Depaepe Telecom HD 2000 series User manual

Version V2.0
HD2000 IP Phone
User Manual
Made in France
SAS HENRI DEPAEPE
http://www.depaepe.com

HD2000 IP User Manual
Copyright © 2015 SAS HENRI DEPAEPE Page 2 of 52
Table of Content
1. WELCOME...................................................................................................................4
2. WHAT IS IN THE PACKAGE.......................................................................................4
3. Key Features...............................................................................................................5
4. Hardware specification..............................................................................................6
5. INSTALLATIONS .........................................................................................................6
5.1. Power and LAN connection...........................................................................6
5.2. Walls mount installation:................................................................................8
6. Get Familiar with the telephone..............................................................................10
7. BASIC OPERATIONS................................................................................................12
7.1. Get Familiar with Voice menu (keypad models only) ..................................12
7.2. Make a Phone call (keypad models only)....................................................14
7.2.1. Completing Calls.................................................................................14
7.2.2. Quick IP Call Mode..............................................................................14
7.3. ANSWERING PHONE CALLS ....................................................................15
7.3.1. Receiving Calls....................................................................................15
7.4. PHONE FUNCTIONS DURINGA PHONE CALL (keypad models only)....15
7.4.1. Call Hold..............................................................................................15
7.4.2. Call Waiting and Call Flashing............................................................15
7.4.3. Call Transfer........................................................................................15
7.4.3.1 Blind Transfer ................................................................................15
7.4.3.2 Attended Transfer...........................................................................15
7.4.4. Conference Call...................................................................................16
7.4.5. Mute incoming calls.............................................................................16
7.4.6. Voice Messages (Message Waiting Indicator)....................................16
7.5. CALL FEATURES (keypad models only).....................................................17
7.5.1. Call Features Tables............................................................................17
8. CONFIGURATION GUIDE.........................................................................................18
8.1. Configuring HD2000IP using Web Browser ................................................18
8.1.1. Get the IP address of the HD200IP: ...................................................18
8.1.2. Accessing the Web Configuration.......................................................18
8.1.3. User Programming and Configuration ................................................19
8.1.4. Login, Passwords................................................................................19
8.1.5. Configuration Options and Explanations.............................................20
8.1.5.1 Device Status .................................................................................20

HD2000 IP User Manual
Copyright © 2015 SAS HENRI DEPAEPE Page 3 of 52
8.1.5.2 Account.........................................................................................22
8.1.5.3 Network........................................................................................33
8.1.5.4 Setting..........................................................................................37
8.1.6. Saving the Configuration Changes.....................................................48
8.1.7. Rebooting the HD2000IP....................................................................48
8.1.8. Configuration through a Central Server..............................................48
9. SOFTWARE UPGRADE............................................................................................50
10. RESTORE TO FACTORY DEFAULT SETTINGS .....................................................51

HD2000 IP User Manual
Copyright © 2015 SAS HENRI DEPAEPE Page 4 of 52
1. WELCOME
The IP PHONE HD2000IP is an internet telephone set that features superb audio quality, rich
functionalities, high level of integration, and compactness. By converting analog voice for
transmission over the internet, the IP Phone HD2000IP allows users with broadband internet
connections to make calls to and from anywhere in the world. The IP PHONE HD2000IP is fully
compatible with SIP industry standard and can interoperate with many other SIP compliant devices
and software on the market.
2. WHAT IS IN THE PACKAGE
The HD2000IP package contains:
One HD2000IP VoIP Phone
One power supply (option)
Quick installation guide and quick user guide
1 thin screw, 2 bigger screws, 1 foam.

HD2000 IP User Manual
Copyright © 2015 SAS HENRI DEPAEPE Page 5 of 52
3. Key Features
Support SIP 2.0 (RFC 3261), TCP/UDP/IP, RTP/RTCP, HTTP, ICMP, ARP/RARP, DNS,
DHCP, NTP, PPPoE, STUN, UPNP,TFTP, etc.
Powerful Digital Signal Processing (DSP) technology to ensure superior audio quality
Support various codecs including G.711 (PCM a-law and u-law), G.723.1 , G.729A/B, G.726-32,
G.722, GSM_FR, iLBC.
Support standard encryption and authentication (DIGEST using MD5, MD5-sess), AES ?
Support for Layer 2 QoS (802.1Q/VLAN Tag, 802.1p) and Layer 3 QoS (ToS, DiffServ, MPLS)
Support Silence Suppression, VAD (Voice Activity Detection), CNG (Comfort
Noise Generation), Acoustic Echo Cancellation (AEC) with Acoustic Gain Control(AGC) for
speakerphone mode.
Support automated provisioning for mass deployment ,RTP and TLS (pending)for security
protection
Support automated NAT traversal without manual manipulation of firewall/NAT
Support Hold, Transfer, Forward, 3-way Conference, in-band and out-of-band DTMF, Call
Waiting, Call Log, Off-hook Auto Dial, Auto Answer, Downloadable Ringtones, SMS,Direct IP
Call, Intercom, Paging, Pick up.
Support syslog, full duplex hands-free speakerphone with advanced acoustic echo cancellation,
redial, volume control, voice mail with indicator, downloadable ring tones.
Provide easy configuration through manual operation (phone keypad), Web
interface or automated centralized configuration file via TFTP, HTTP, FTP, HTTPS.
Support 6 dedicated function keys: Mute, 3 level volume key, Flash (Hold), Message,
Conference, Redial.
Support 3 levels ringer volume ( high/middle/off for HD2000IP with keypad, high/middle/low
for HD2000IP urgence)
HD2000 IP User Manual
Copyright © 2015 SAS HENRI DEPAEPE Page 6 of 52
4. Hardware specification.
Model
HD2000IP
LAN interface
1x RJ45 100Base-T(PoE supported)
PoE Class 4
Power consumption 1,600 mW
Current consumption 34 mA
Power supply (optional)
Input: 100-240VAC 50-60 Hz
Output: +5VDC, 1200mA
CE/FCC/UL certification
Dimension
215 x 165 x 70 mm (L x W x H)
Weight
0.9kg
Temperature
40 –130 F
5 –45 C
Humidity
10 - 90%
5. INSTALLATIONS
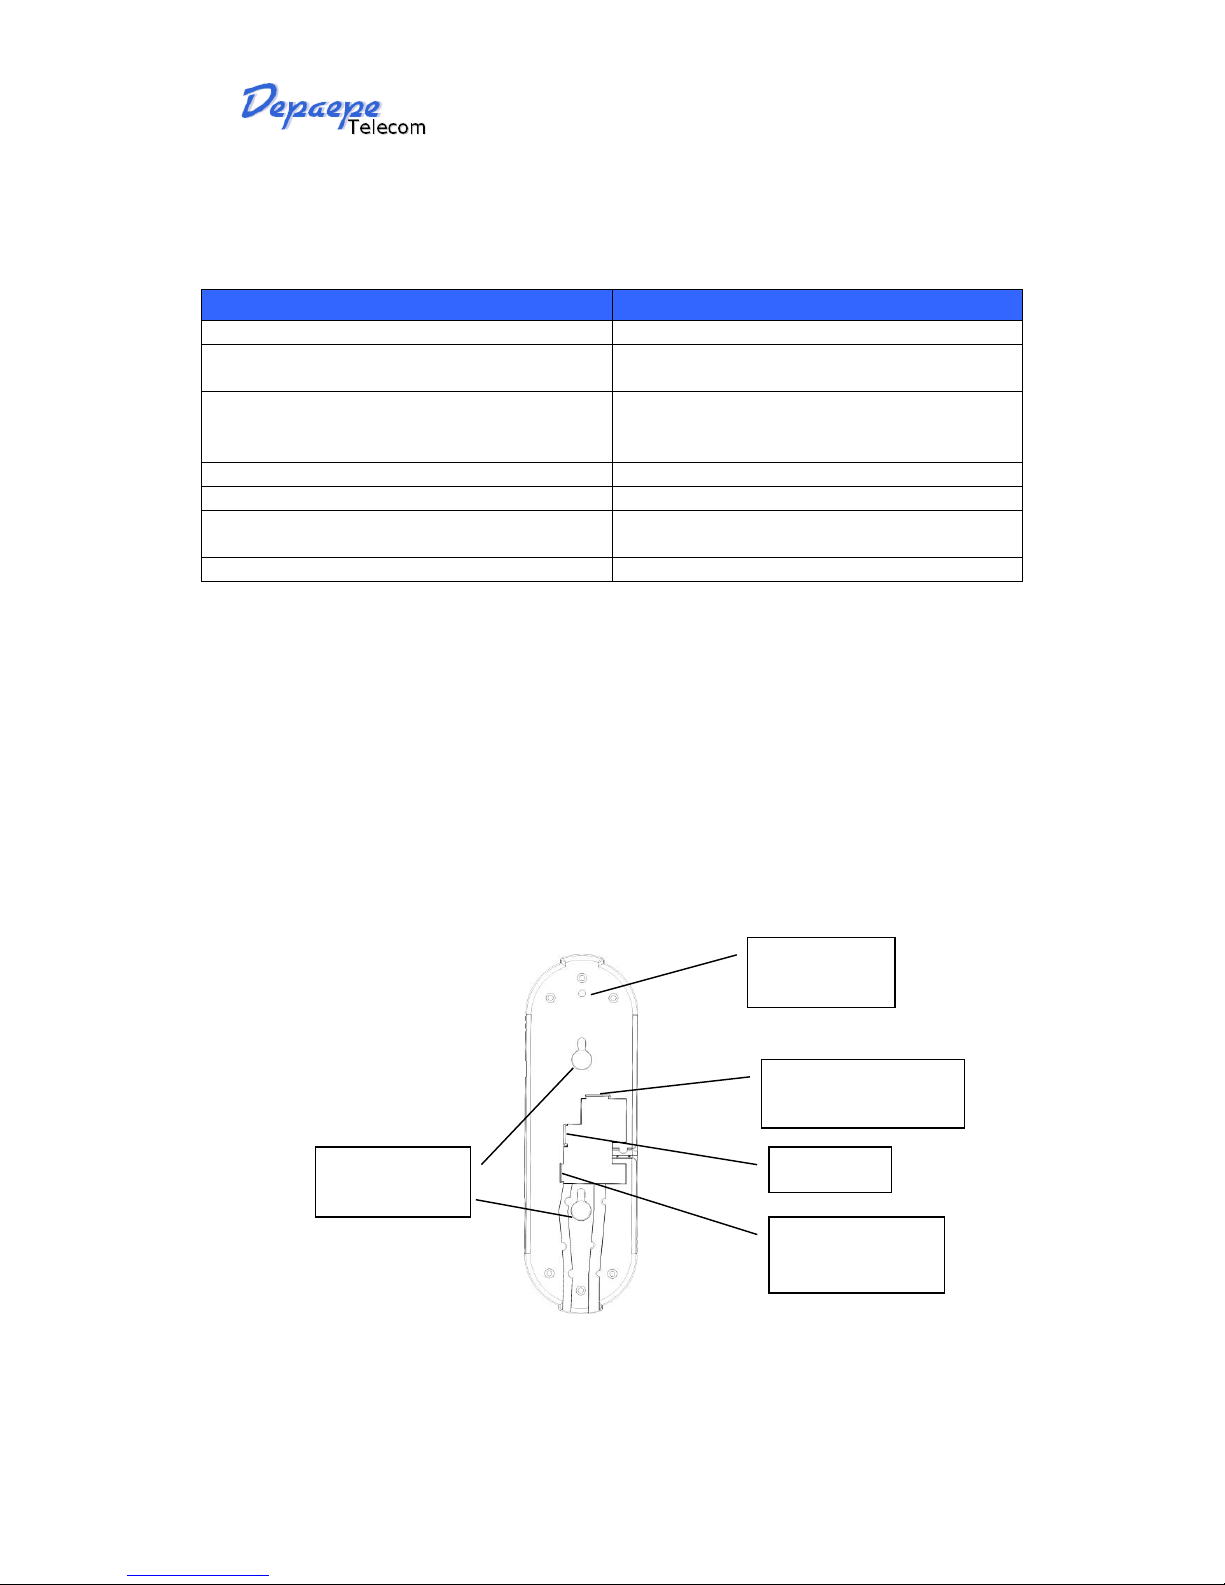
5.1. Power and LAN connection
Following are the steps to install a HD2000IP:
Connect Ethernet cable from back of the phone (LAN Port) to a PoE port of switch or router.
If you don’t have PoE switch or router, please use power adapter (optional) into back of the
phone and connect it to a power outlet.
DC 5V
RJ45 plug network
cord connection
RJ9 plug handset
cord entry
Concealed
screw hole
Wall mount
fixing holes

HD2000 IP User Manual
Copyright © 2015 SAS HENRI DEPAEPE Page 7 of 52
Power Jack
5V DC power port
LAN
10/100Mbps RJ45 port for LAN
Handset Jack
RJ9 port connect to handset
SAFETY COMPLIANCES
The HD2000IP phone complies with FCC/CE and various safety standards. The HD2000IP power
adaptor (optional) is compliant with these standards. Only use the HD2000IP power adaptor
provided by Depaepe. The manufacturer’s warranty does not cover damages to the phone caused
by unsupported power adaptors.
WARRANTY
If you purchased your HD2000IP from a reseller, please contact the company where you
purchased your phone for replacement, repair or refund. If you purchased the product directly
from DEPAEPE technologies, contact your DEPAEPE’s Sales and Service Representative for a
RMA (Return Materials Authorization) number before you return the product. DEPAEPE reserves
the right to remedy warranty policy without prior notification.
HD2000 IP User Manual
Copyright © 2015 SAS HENRI DEPAEPE Page 8 of 52
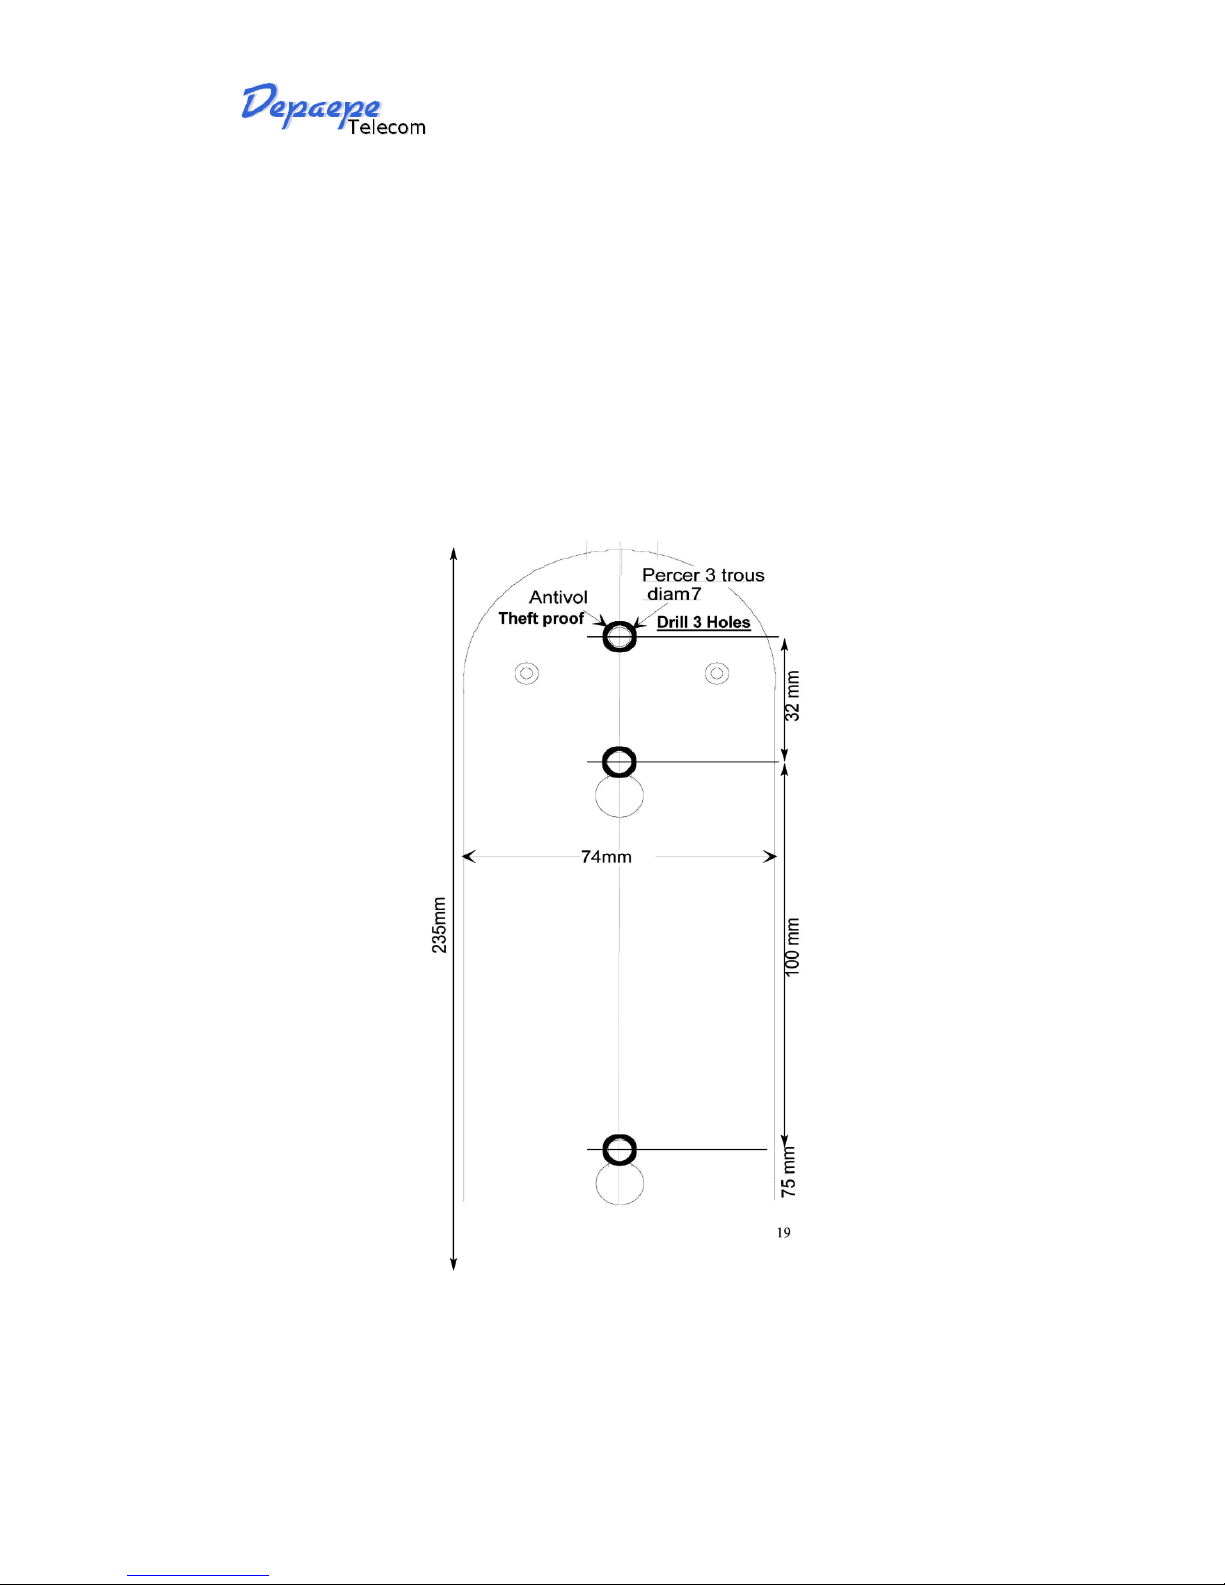
5.2. Walls mount installation:
The HD2000 IP comes with a small plastic bag containing 1 thins screw and a foam plug to be
used for preventing theft or unauthorized removal, 2 bigger screws for wall mount fixing.
1) Drill 2 holes as shown on the wall mounting layout (see the next drawing). Install the 2
bigger screws in those holes on the wall.

HD2000 IP User Manual
Copyright © 2015 SAS HENRI DEPAEPE Page 9 of 52
2) If the telephone must be secured against thefts or unauthorized removal, drill a third hole
as shown on the wall mounting layout.
3) Check the LAN or/and Power connection.
4) Align the 2 slots at the base of the HD2000IP in front of the 2 screws and pull down.
5) If needed, install the third screw though the hole located above the telephone (see the
page 6) and hide it with the foam plug.

HD2000 IP User Manual
Copyright © 2015 SAS HENRI DEPAEPE Page 10 of 52
Message
Mute
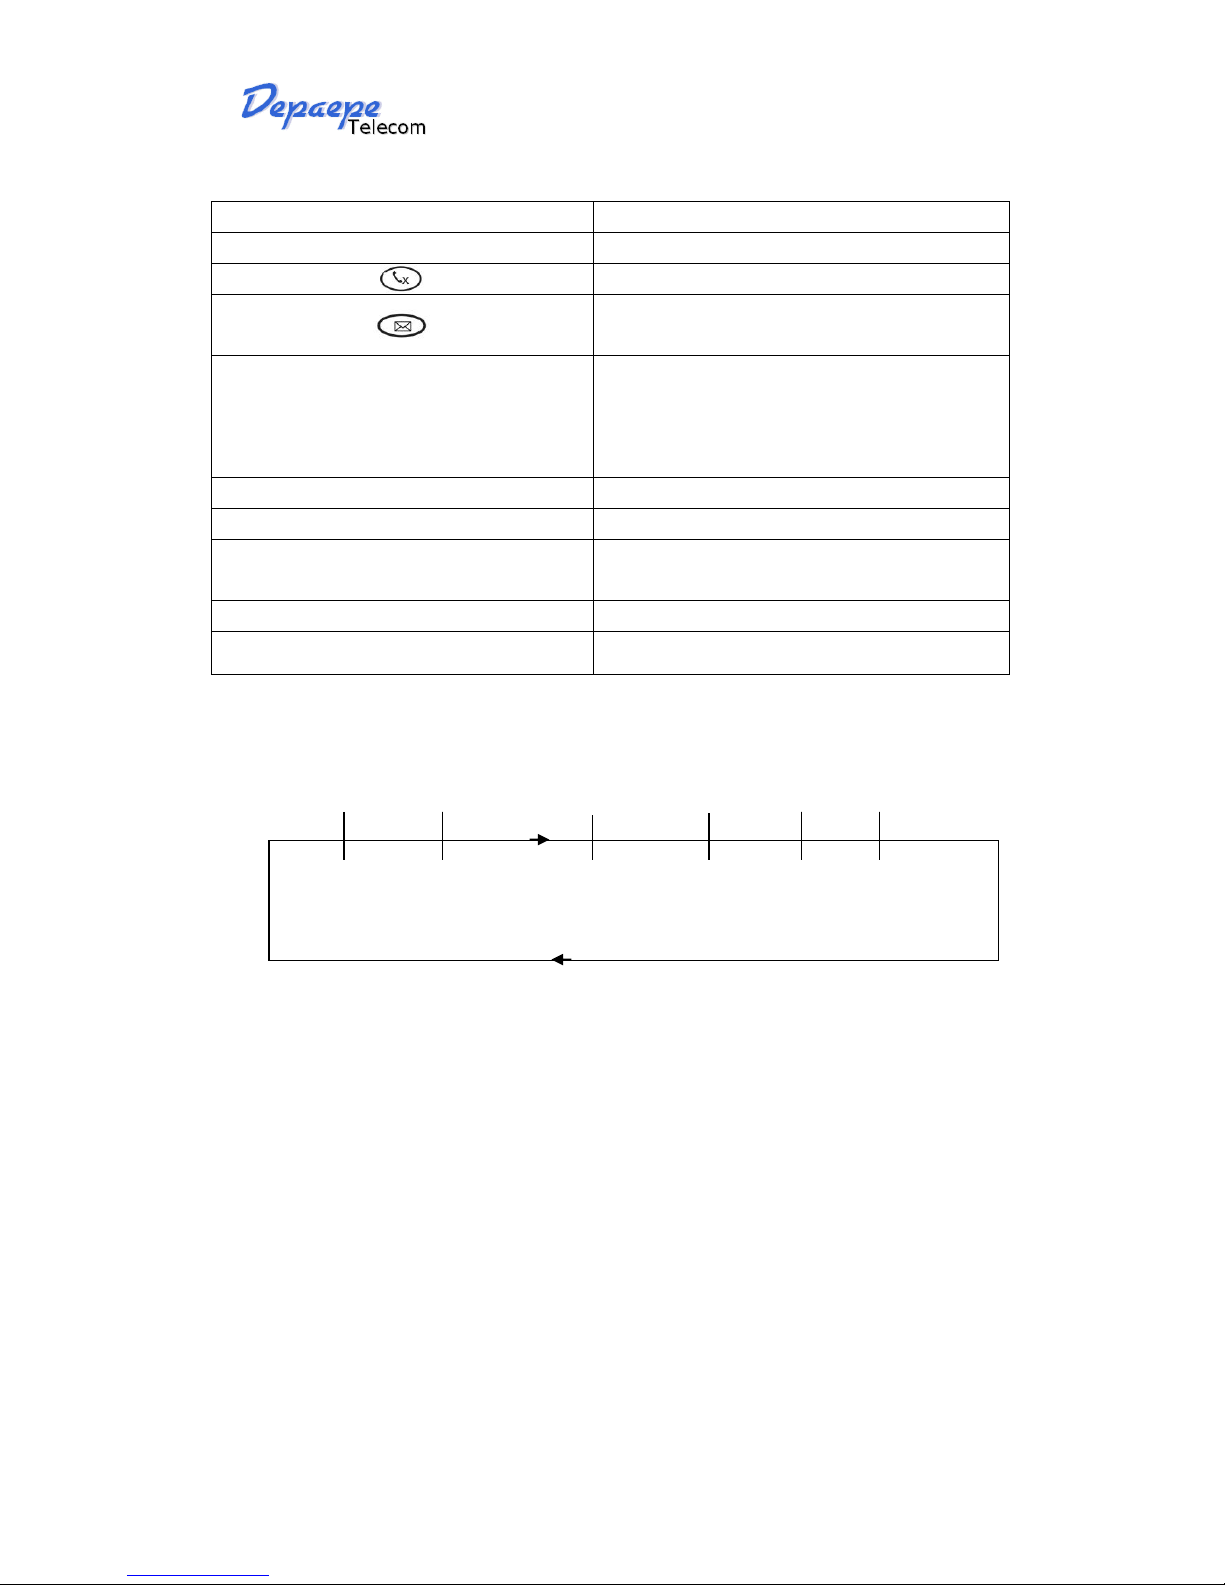
6. Get Familiar with the telephone
*Handset on hold position: This feature can be used to secure the handset while waiting for
someone to ‘come to the phone” without going back to on-hook condition.
LEDs for ringer
and Message
Ringer volume
Speaker
Key pad
Speed dial keys (HD2000
urgence models only)
Conference
Redial
Volume adjustment
R flash
Handset, on hold
position*
HD2000 IP User Manual
Copyright © 2015 SAS HENRI DEPAEPE Page 11 of 52
Keypad Buttons
Keypad Buttons Definitions
0 - 9, *(.), #
To input: numbers, *(.), #
Stop voice to receiver (Mute key).
Enter to retrieve voice mails or other messages
+/-**
control the earpiece (Handset) volume, the last
state is memorized, when you press the key, you
increase the volume up to the maximum step, a
new pressing goes to the first step
R
Switch the call (Transfer key)
ConF
Conference call for three sides
#
Press # button to send a call immediately before
“no key entry timeout” value Expires
Bis
redial the last number dialed
Speed dial keys
Short cut of register call
**Note:
Press +/-
Level
By default
Press +/-
Press +/-
Press +/-
Level + XdB
Level + 2XdB
Level + 3XdB
Level -XdB
Level -2XdB
Press +/-
Press +/-
HD2000 IP User Manual
Copyright © 2015 SAS HENRI DEPAEPE Page 12 of 52
7. BASIC OPERATIONS
7.1. Get Familiar with Voice menu (keypad models
only)
HD2000IP has stored a voice prompt menu for quick access to settings and simple configuration.
You can enter this voice prompt menu one ways
Pick up the receiver of the telephone and press “***”
A voice will say, “Enter the new option.” At this point, you can select from the following menu
voice prompt options to begin using the HD2000IP:
Menu
Voice Will Say the Following:
Main
Menu
“Enter a Menu Option”
Enter “*” for the next menu option
Enter “#” to return to the main menu
Enter 01 –08,12 - 17, 47, 86 or 99 Menu
option
01
“DHCP Mode”, “Static IP Mode”
Enter ‘9’ to toggle the selection
If user selects “Static IP Mode”, user needs
configure all the IP address information
through menu 02 to 05.
If user selects “Dynamic IP Mode”, the
device will retrieve all IP address information
from DHCP server automatically when user
reboots the device.
02
“IP Address “ + IP address
The current WAN IP address is announced. If
in Static IP Mode, enter 12-digit new IP
address like 192168000123.
03
“Subnet “ + IP address
Same as Menu option 02
04
“Gateway “ + IP address
Same as Menu option 02
05
“DNS Server “ + IP address
Same as Menu option 02
06
“MAC Address”
Announces the Mac address of the unit.
07
Preferred Vocoder
Enter “9” to go to the next selection in the
list:
PCM U
PCM A
G-726
G-723
G-729

HD2000 IP User Manual
Copyright © 2015 SAS HENRI DEPAEPE Page 13 of 52
08
Your number is
The current number is announced.
12
WAN Port Web Access
Enter “9” to toggle between enable and
disable
13
Firmware Server IP
Address
Announces current Firmware Server IP
address. Enter 12 digit new IP address.
14
Configuration Server IP
Address
Announces current Config Server Path IP
address. Enter 12 digit new IP address.
15
Upgrade Protocol
Upgrade protocol for firmware and
configuration update.
Enter “9” to toggle between TFTP and HTTP
16
Firmware Version
Firmware version information.
17
Firmware Upgrade
Firmware upgrade mode. Enter “9” to rotate
among the following three options:
1. always check
2. check when pre/suffix changes
3. never upgrade
47
“Direct IP Calling”
Enter the target IP address to make a direct IP
call, after dial tone. (See “Make a Direct IP
Call”.)
99
“RESET”
Enter “9” to reboot the device; or
Enter MAC address to restore factory default
setting (See Restore Factory Default Setting
section)
“Invalid Entry”
Automatically returns to Main Menu
Other Menu Prompt Features:
“*” shifts down to the next menu option
“#” returns to the main menu
“9” functions as the ENTER key in many cases to confirm an option
All entered digit sequences have known lengths - 2 digits for menu option and 12 digits for IP
address. Once all of the digits are collected, the input will be processed.
Incorrect keyed entry cannot be deleted or undone. The HD2000IP will prompt you to start over
by telling you that you made an error.

HD2000 IP User Manual
Copyright © 2015 SAS HENRI DEPAEPE Page 14 of 52
7.2. Make a Phone call (keypad models only)
7.2.1.
Completing Calls
There are two ways to complete a call:
DIAL: To make a phone call.
•Take Handset off-hook
• The phone will have a dial tone.
• Enter the phone number
• Waiting for 4 seconds or press the # key
Note: 1) The value ‘no key entry time out’ by default is 4 seconds, you can change it.
2) You can also modify the dial plan for send a call immediately.
REDIAL: To redial the last dialed phone number.
• Take Handset off-hook
• press Bis button.
7.2.2.
Quick IP Call Mode
Direct IP calling allows two phones to talk to each other in an ad hoc fashion without a SIP proxy.
VoIP calls can be made between two phones if:
• Both phones have public IP addresses, or
• Both phones are on a same LAN/VPN using private or public IP addresses, or
• Both phones can be connected through a router using public or private IP addresses (with
necessary port forwarding or DMZ)
The HD2000IP also supports Quick IP call mode. This enables the phone to make direct IP-calls,
using only the last few digits (last octet) of the target phone’s IP-number.
This is possible only if both phones are in under the same LAN/VPN. This simulates a PBX
function using the CMSA/CD without a SIP server. Controlled static IP usage is recommended.
For example:
192.168.0.2 calling 192.168.0.3 -- dial *473 follow by #
192.168.0.2 calling 192.168.0.23 -- dial *4723 follow by #
192.168.0.2 calling 192.168.0.123 -- dial *47123 follow by #
192.168.0.2: dial *473 and *4703 and *47003 results in the same call -- call 192.168.0.3
NOTE: If you have a SIP Server configured, a Direct IP-IP still works. If you are using STUN,
the Direct IPIP call will also use STUN. Configure the “Use Random Port” to “NO” when
completing Direct IP calls.

HD2000 IP User Manual
Copyright © 2015 SAS HENRI DEPAEPE Page 15 of 52
7.3. ANSWERING PHONE CALLS
7.3.1.
Receiving Calls
1. Incoming single call: Phone rings with selected ring-tone. Answer call by taking Handset.
2. Incoming multiple calls: When another call comes in while having an active call, the phone
will produce a Call Waiting tone (stutter tone). Answer the incoming call by pressing the “R” key.
The current active call will be put on hold.
7.4. PHONE FUNCTIONS DURING A PHONE CALL
(keypad models only)
7.4.1.
Call Hold
While in conversation, pressing the “R” button will put the remote end on hold. Pressing the
“R” button again will release the previously Hold state and resume the bi-directional media.
7.4.2.
Call Waiting and Call Flashing
If call waiting feature is enabled, while the user is in a conversation, he will hear a special
stutter tone if there is another incoming call. User then can press R button to put the current call
party on hold automatically and switch to the other call. Pressing flash button toggles between the
two active calls.
7.4.3.
Call Transfer
HD2000IP supports both blind and attended call transfer. Each is easy to use. Use blind transfer
if you want to transfer a call without speaking with someone first; use attended transfer if you
want to speak with the someone prior to transferring call.
7.4.3.1 Blind Transfer
Transfer an active call to a third party without announcement.
Press the R button and wait for a dial tone. Dial the third party’s phone number followed by the
# button.
Hang up to transfer the call
NOTE: The “Enable Call Feature” must be configured to “Yes” in the web configuration page to
enable this feature.
7.4.3.2 Attended Transfer
Transfer an active call to a third party with attended.
Press R button and make a call and automatically place the ACTIVE call on HOLD. Once the

HD2000 IP User Manual
Copyright © 2015 SAS HENRI DEPAEPE Page 16 of 52
call is established, hang up to transfer the call.
NOTE: To transfer calls across SIP domains, SIP service providers must support transfer across
SIP domains.
7.4.4.
Conference Call
HD2000IP phone supports 3-way conference.
Assuming that call party A and B are in conversation. A wants to bring C in a conference:
A presses the “R” button to get a dial tone and put B on hold
A dials C’s number then “SEND” key to make the call
If C answers the call, then A presses “CONF” button to bring B, C in the conference.
If C does not answer the call, A can press R back to talk to B.
NOTE:
During the conference, if B or C drops the call, the remaining two parties can still talk.
However, if A the conference initiator hangs up, all calls will be terminated.
7.4.5.
Mute incoming calls
Press the Mute button to enable/disable muting the microphone.
7.4.6.
Voice Messages (Message Waiting Indicator)
A blinking red MWI (Message Waiting Indicator) indicates a message is waiting. Press the
MSG button to retrieve the message. An IVR (Interactive Voice Response) will prompt the user
through the process of message retrieval.
NOTE: Account requires a voicemail portal number to be configured in the “voicemail user id”
field.

HD2000 IP User Manual
Copyright © 2015 SAS HENRI DEPAEPE Page 17 of 52
7.5. CALL FEATURES (keypad models only)
7.5.1.
Call Features Tables
Following table shows the call features of HD2000IP :
Key
Call Features
*30
Block Caller ID (for all subsequent calls)
*31
Send Caller ID (for all subsequent calls)
*67
Block Caller ID (per call)
*82
Send Caller ID (per call)
*50
Disable Call Waiting (for all subsequent calls)
*51
Enable Call Waiting (for all subsequent calls)
*70
Disable Call Waiting. (Per Call)
*71
Enable Call Waiting (Per Call)
*72
Unconditional Call Forward.
To use this feature, dial “*72” and get the dial tone. Then dial the forward
number and “#” for a dial tone, then hang up.
*73
Cancel Unconditional Call Forward.
To cancel “Unconditional Call Forward”, dial “*73” and get the dial tone, then
hang up.
*90
Busy Call Forward.
To use this feature, dial “*90” and get the dial tone. Then dial the forward
number and “#” for a dial tone, then hang up.
*91
Cancel Busy Call Forward.
To cancel “Busy Call Forward”, dial “*91” and get the dial tone, then hang up.
*92
Delayed Call Forward.
To use this feature, dial “*92” and get the dial tone. Dial the forward number
and “#” for a dial tone and then hang up.
*93
Cancel Delayed Call Forward.
To cancel this feature, dial “*93”, get the dial tone, and then hang up.
Flash/Hook
Call waiting indication.
When in conversation without an incoming call, this action will switch to a new
channel to make a new call.
HD2000 IP User Manual
Copyright © 2015 SAS HENRI DEPAEPE Page 18 of 52
8. CONFIGURATION GUIDE
8.1. Configuring HD2000IP using Web Browser
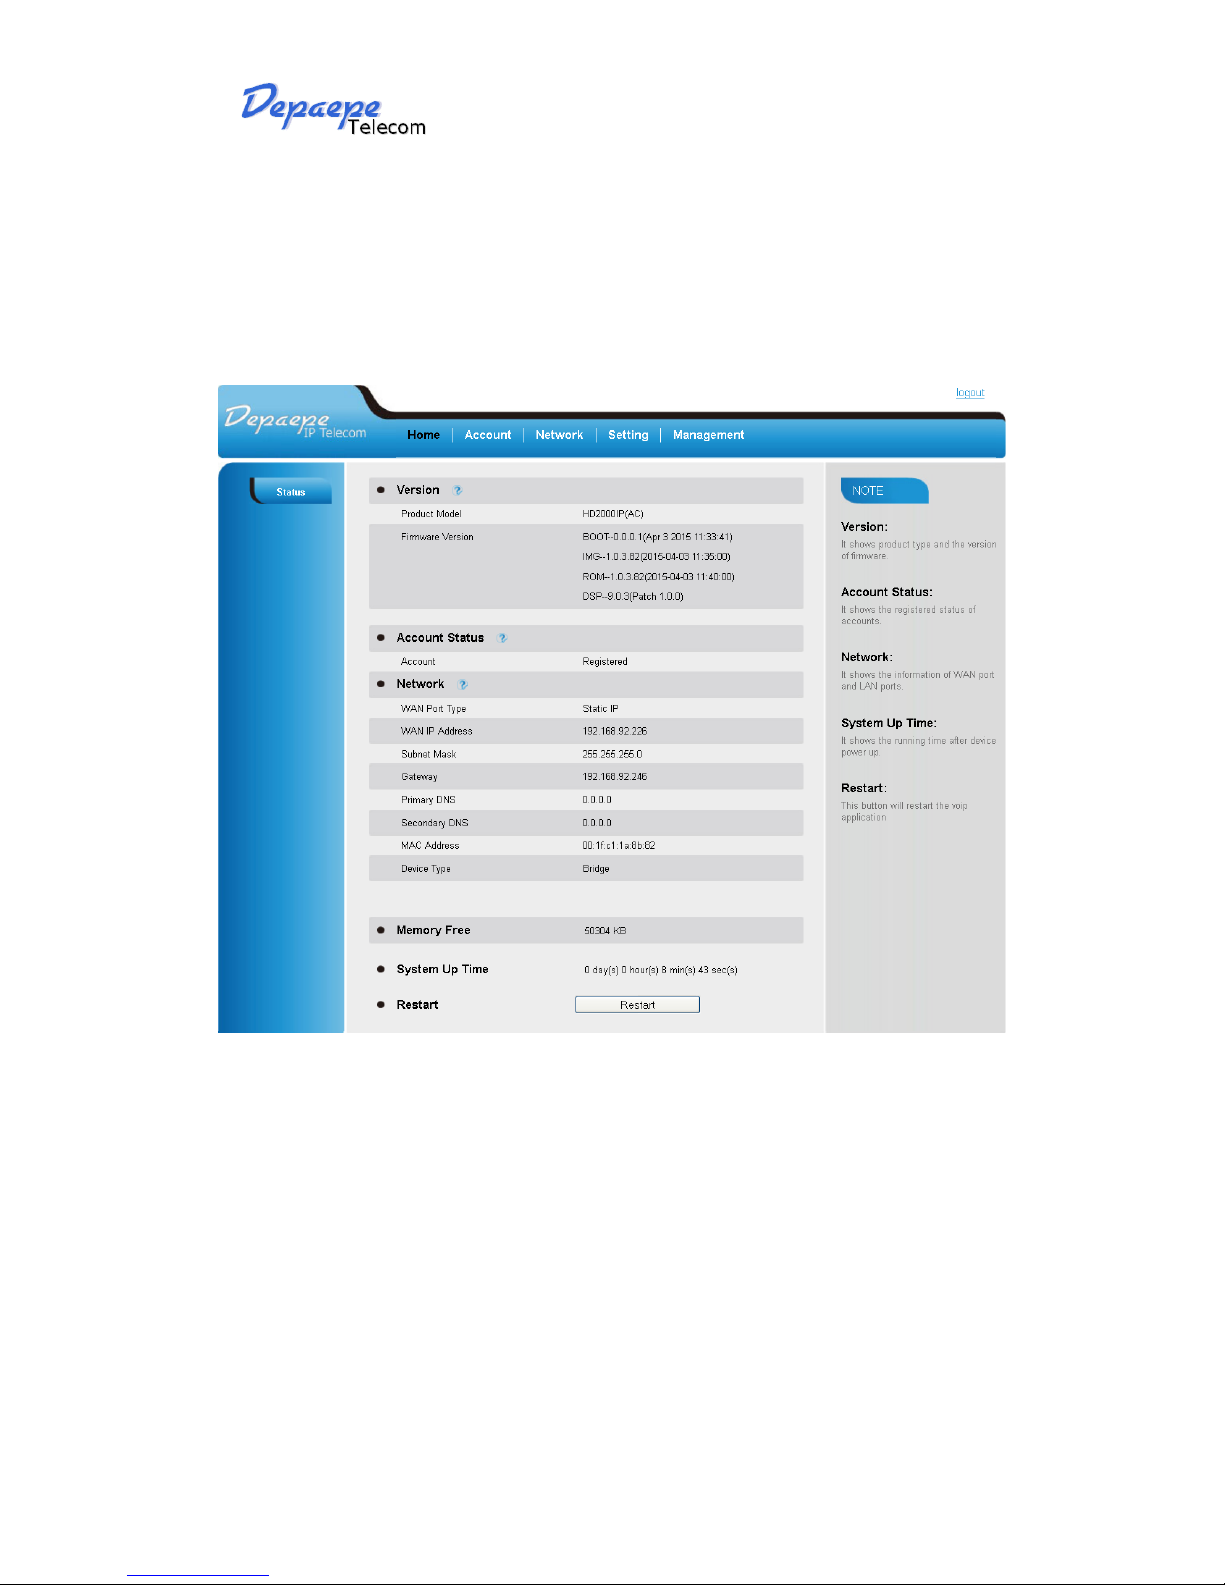
HD2000IP has embedded Web server and HTML pages that allow users to configure the
HD2000IP through an easy-to-use Web browser interface such as Firefox browser. Below is a
screen shot of the HD2000IP configuration page:
8.1.1.
Get the IP address of the HD200IP:
Connect the HD2000 IP to a network via standard Ethernet cable, be default the HD2000IP is in
DHCP mode.
If it is the HD2000IP with keypad, use the voice menu to get the IP address of the HD2000IP (see
the 7.1 get familiar with voice menu)
If you have the HD2000 IP urgency, use a standard network protocol analyzer (for e.g. Wireshark)
to eavesdrop the IP address allocated to the base unit by the DHCP server.
You can also contact with your administrator to get the IP address allocated to HD2000IP by
DHCP server.
8.1.2.
Accessing the Web Configuration
The HD2000IP configuration page can be accessed via your web browser by entering the WAN IP
address: http://yourip’s
Be sure that your PC is connected to the same VLan with the HD2000IP.

HD2000 IP User Manual
Copyright © 2015 SAS HENRI DEPAEPE Page 19 of 52
8.1.3.
User Programming and Configuration
From your web browser, the HD2000IP will show the following login screen:
Enter the password and click on the “Login” button
8.1.4.
Login, Passwords
Password is case sensitive and all Depaepe devices come with factory default password as
indicated below:
Advanced User Password for access to Super User Options: admin
End User Password for access to Basic User Options: 1234
HD2000 IP User Manual
Copyright © 2015 SAS HENRI DEPAEPE Page 20 of 52
8.1.5.
Configuration Options and Explanations
After a correct password is entered in the login screen, the embedded web server inside the
HD2000IP will show the configuration page, which is explained in details below:
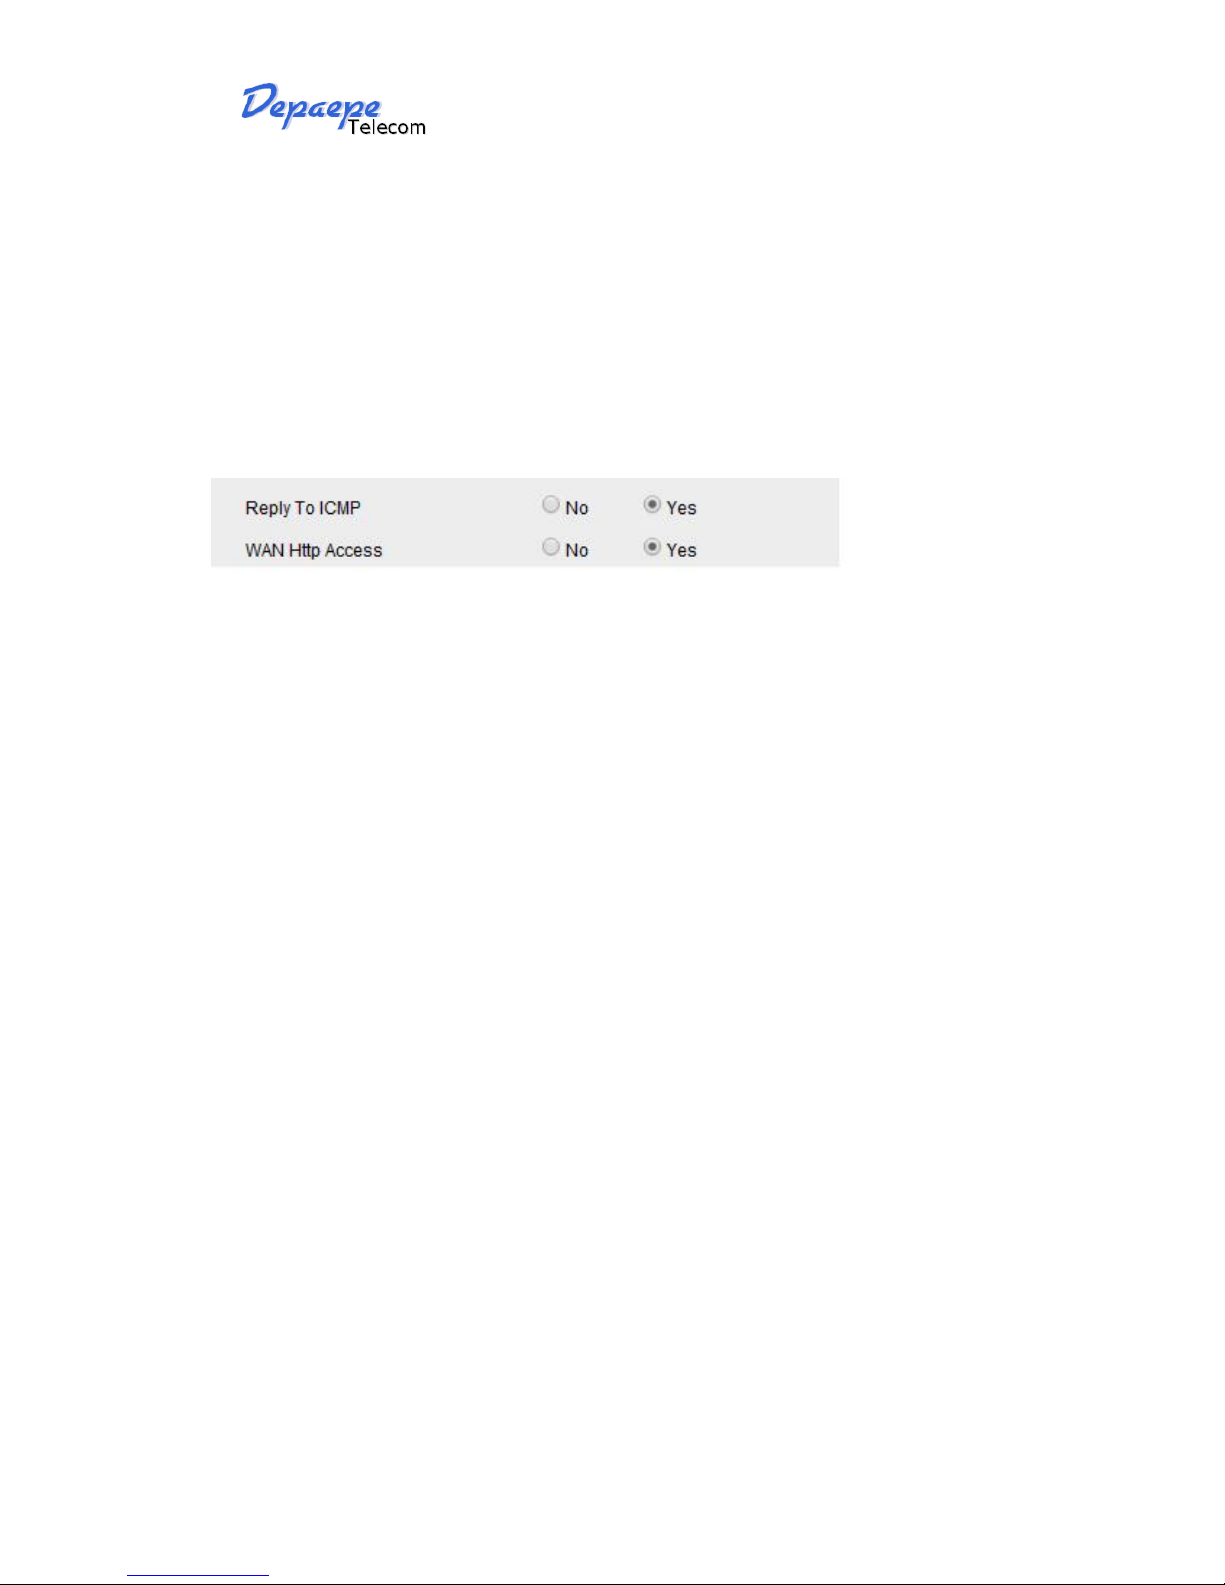
8.1.5.1 Device Status
Other manuals for HD 2000 series
2
Table of contents
Other Depaepe Telecom IP Phone manuals

Depaepe Telecom
Depaepe Telecom UC862 User manual

Depaepe Telecom
Depaepe Telecom HD 2000 series User manual

Depaepe Telecom
Depaepe Telecom Premium 300 User manual

Depaepe Telecom
Depaepe Telecom progress User manual

Depaepe Telecom
Depaepe Telecom UC806 User manual

Depaepe Telecom
Depaepe Telecom Securphone User manual

Depaepe Telecom
Depaepe Telecom UC802P User manual


