manuals.online logo
Brands
  1. Home
  2. •
  3. Brands
  4. •
  5. Desa
  6. •
  7. Heater
  8. •
  9. Desa HD24B User manual

Desa HD24B User manual

Infra-Red
TankTop Heater
Owner’s Manual
Models
HD24B andTT24B
Heater Size: 8,000 – 24,000 Btu/Hr
klsuiejlboeklhikokle,,;log;e;;pdl;lklsuiejlboe
;e;;pdl;lklsuiejlboeklhikokle,,;log;e;;pdl;l
klsuiejlboeklhikokle,,;log;e;;pdl;lklsuiejlboeklhikokle,,;log;e;;pdl
;lklsuiejlboeklhikokle,,;log;e;;pdl;lklsuiejlboeklhikokle,,;log;e;;pdl;l
klsuiejlboeklhikokle,,;log;e;;pdl;lklsuiejlboeklhikokle,,;log;e;;pdl;l
klsuiejlboeklhikokle,,;log;e;;pdl;l
klsuiejlboeklhikokle,,;log;e;;pdl;lklsuiejlboeklhikokle,,;log;e;;pdl;l
WARNING
Safety Information
Make certain you read and understand all warnings. Do not allow anyone who has not
read this manual to operate this heater. Keep this manual for reference. It is your guide
to safe and proper operation of this heater.
1. Read and understand this manual before assembling or using this heater. Improper
use of this heater can cause serious injury.
2. For outdoor use only. Do not use inside house, camper, tent, vehicle, or any type of
unvented or enclosed area.
3. Never operate heater while sleeping or unattended. Keep children and animals
away from heater.
4. WARNING: This product contains and/or generates chemicals known to the
State of California to cause cancer or birth defects, or other reproductive harm.
5. Minimum heater clearances from combustibles:
Top and Front: 5 Ft. Sides and Rear: 3 Ft.
6. Use only in well-vented areas.
7. Use only propane gas set up for vapor withdrawal.
8. Before connecting heater to propane tank, make sure heater regulator knob is in
the “OFF” position. Always connect and light heater in areas free of open flames.
9. Before each use, check heater for leaks. Never use an open flame to check for a
leak. Apply a mixture of liquid soap and water to all joints. Bubbles forming show a
leak. Correct all leaks at once.
10. Locate propane tank on a stable and level surface. The heater burners must be at
least two feet above the floor. Always attach heater to propane tank in an upright
position. Never operate heater on its side or attach to propane tank in a horizontal
position. This could lead to dangerous flare-ups or fire.
11. Do not use heater in basement or below ground level. Propane is heavier than air. If
a leak occurs, propane gas will sink to the lowest possible level. If you smell gas or
suspect a leak, shut off the propane tank valve at once and ventilate the area. Do
not strike match or create any flame or electric spark. Find and correct leak before
attempting to light any appliance. If you cannot correct leak, do not tamper with
heater. Return heater to nearest authorized service center or to address on back
page of this manual, freight prepaid.
12. Do not move or handle a hot or operating heater. Do not attach or remove a
propane tank from a hot or operating heater. Severe burns may result.
13. Always remove heater from propane tank after each use. Always store propane
tank outdoors. Never store propane tank in an enclosed area. Never store propane
tank near high heat, open flame, or where temperatures exceed 1000F.
14. Keep all connections and fittings clean. Make sure propane tank valve outlet is
clean. Check the “O” ring on the heater inlet fuel connector for damage before each
use. Replace if worn or damaged.
15. Do not attempt to light one burner off of the other. Use one match per burner.
16. Do not overlap or point burners at each other.
17. Do not raise burner heads and cover air inlet holes in mixing tube with burner
head bracket.
18. Wing nuts and burner heads become very hot during operation. Do not attempt to
adjust burner position while heater is operating. Allow 15 minutes to cool.
19. Check heater for damage before each use. Do not use a damaged heater. Do not
alter heater. Keep heater in its original state. Do not use heater if altered.
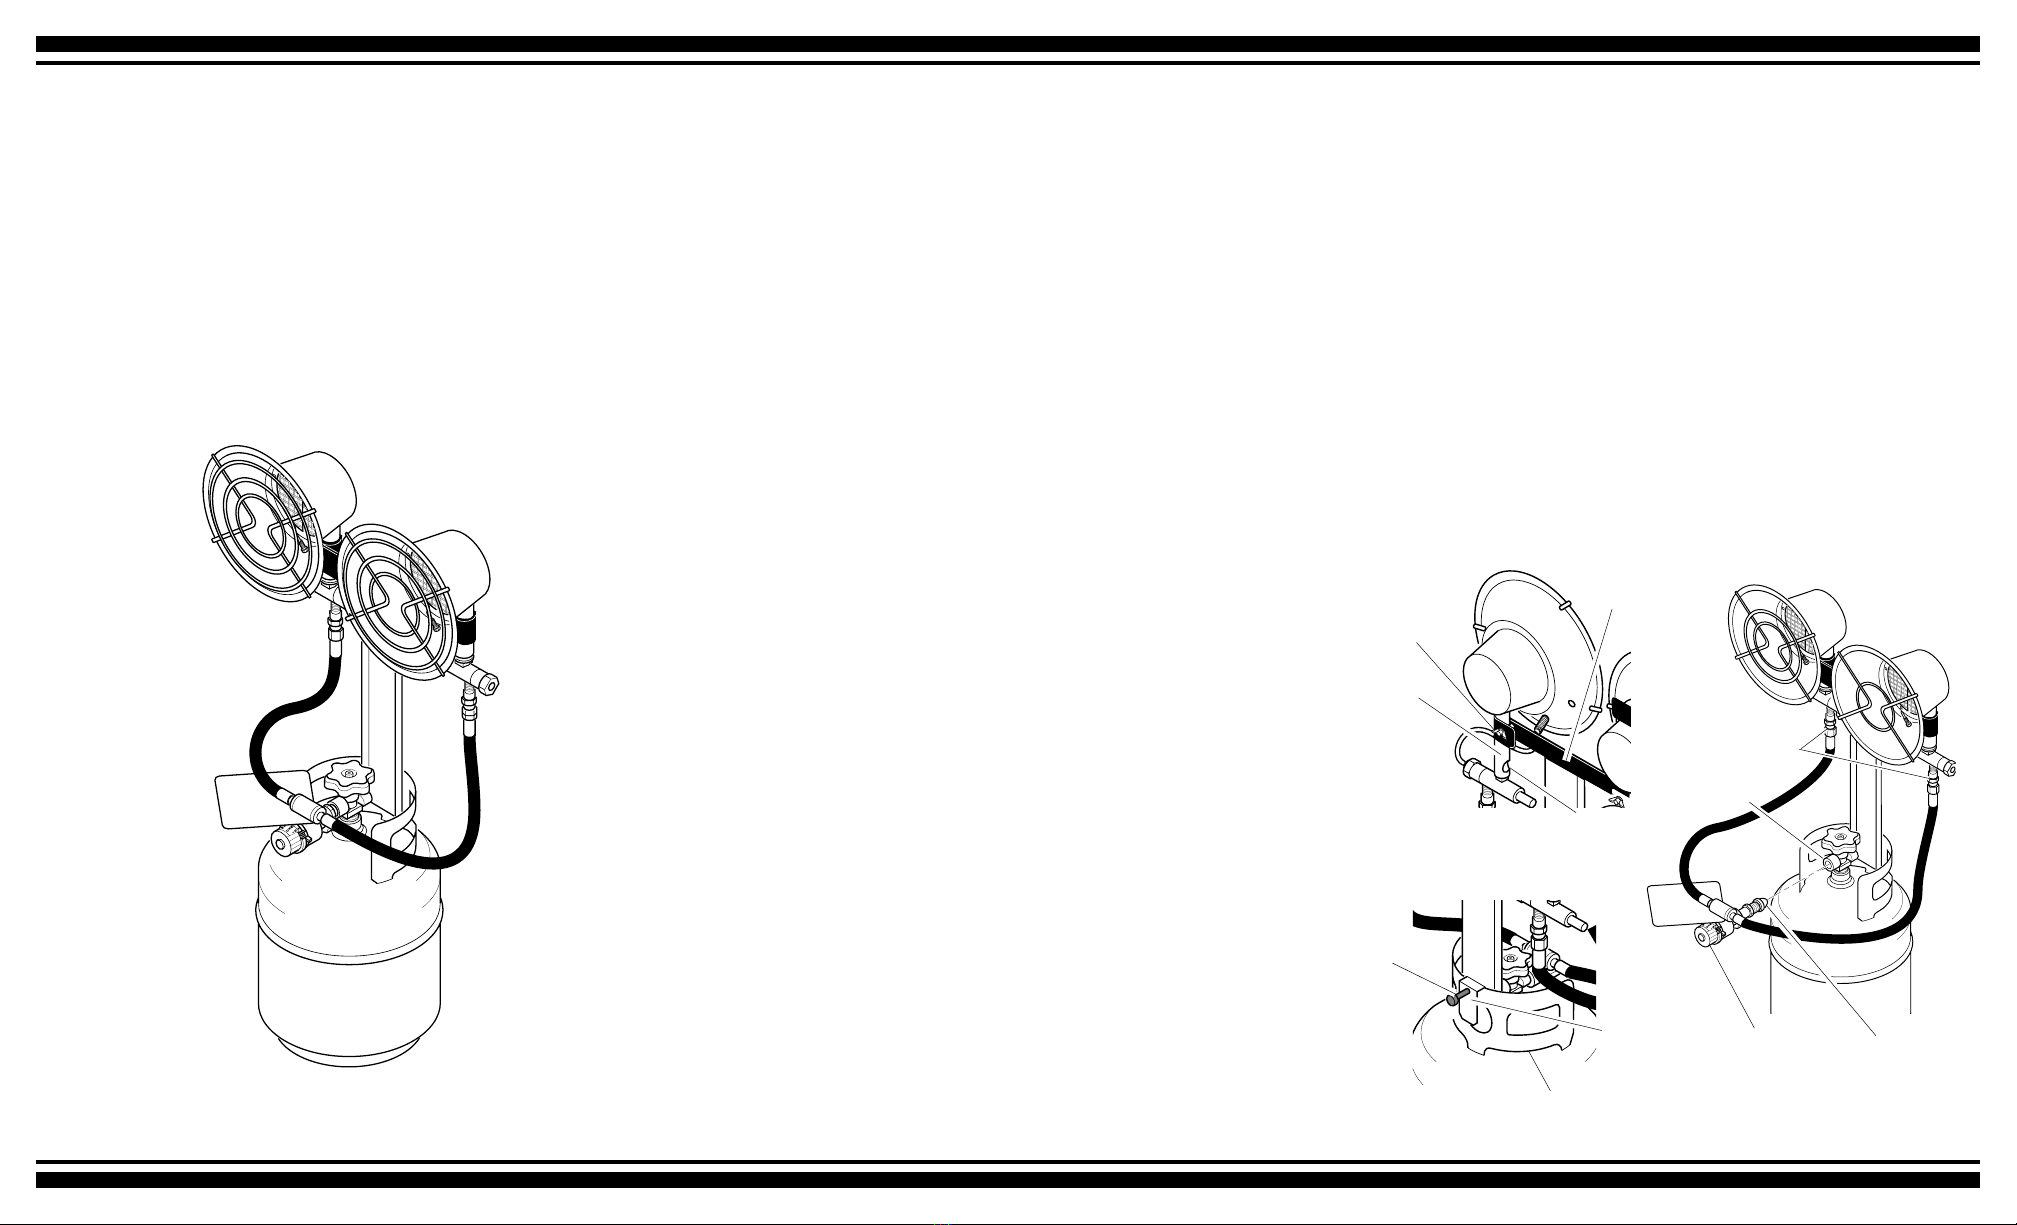
Assembly
1. Place each burner head onto the burner bracket as shown in Figure 1. CAUTION:
The burner heads should be positioned as far down on the burner bracket as
possible. Make sure the air inlet holes in the mixing tube on the burner head
are not covered by the burner bracket
Continued
2. Insert two bolts through square holes and then through round holes in burner bracket.
3. Place two flat washers onto bolts. Thread wing nuts onto bolts.
4. Carefully thread mounting bolt into tank collar bracket on the lower portion of the post.
Connecting HeaterTo PropaneTank
Read and understand all safety information before connecting heater to propane tank.
1. Place heater onto tank with tank collar bracket over tank collar (see Figure 2).
Mounting bolt should be positioned to the outside of tank collar.
2. Firmly secure to tank by hand-tighten mounting bolt. Do not over-tightening
mounting bolt.
3. Make sure heater regulator knob is in the “OFF”position.
4. Wrench tighten the fuel connector nut into the propane tank valve with both gas
hose fittings in a horizontal position (see Figure 3). Turn fuel connector nut
counterclockwise to tighten. Threads are left-handed.
5. Connect both hoses to inlet connectors (see Figure 3). Tighten firmly using wrench.
Make sure both hoses are connected before opening the tank valve.
6. Open propane tank valve slowly.
7. Check all fittings for leaks. Apply a mixture of liquid soap and water to all joints.
Bubbles forming show a leak. Correct all leaks at once. WARNING: Never use an
open flame to check for a leak.
8. Always remove propane tank from heater after each use. Do not store heater while
attached to propane tank.
klsuiejlboeklhi kokle,,;log;e;;pdl;lklsuiejlboe
;e;;pdl;lklsuiejlboeklhi kokle,,;log;e;;pdl;l
klsuiejlboeklhikokle ,,;log;e;;pdl;l klsuiejlb oeklhi kokle ,,;log;e;;pdl
;lklsuiejlb oeklhikokle ,,;log;e ;;pdl;l klsuiejlb oeklhikokle ,,;log;e;;pdl;l
klsuiejlboeklhi kokle ,,;log;e;;pdl;l klsuiejlb oeklhikokle ,,;log;e;;pdl;l
klsuiejlboeklhi kokle,,;log;e ;;pdl;l klsuiejlb oeklhi kokle ,,;log;e ;;pdl;l
klsuiejlboeklhi kokle,,;log;e;;pdl;l klsuiejlb oeklhi kokle,,;log;e;;pdl;l
klsuiejlboeklhi kokle ,,;log;e ;;pdl;l
klsuiejlboeklhikokle ,,;log;e;;pdl;l klsuiejlb oeklhikokle ,,;log;e;;pdl;l
WARNING
Figure 2 - Assembling Heater
Heater
Regulator
Knob
Tank Collar
Bracket
Tank Collar Figure 3 - Connecting
Heater to Propane Tank
Mounting
Bolt
Air Inlet
Hole
Figure 1 - Attaching
Heater to Bracket
Burner
Bracket
Mixing
Tube
Wing Nut
and Washer
Propane
Tank Valve
Fuel
Connector
Nut
Inlet Connectors
Heater Information
Btu Input One Burner Two Burners
HI 12,000 Btu/Hr 24,000 Btu/Hr
MED 10,000 Btu/Hr 20,000 Btu/Hr
LOW 8,000 Btu/Hr 16,000 Btu/Hr
Length of Operation
20 lb. Propane Tank 36 hours 18 hours
100926-01
Rev. J
05/03
2701 Industrial Drive
P.O. Box 90004
Bowling Green, KY 42102-9004
www.desatech.com
Warranty Information
Propane Infra-Red Tank Top Heater
Limited Warranty
DESA Heating Products warrants this product and any parts thereof, to be free from defects
in material and workmanship for one year from the date of first purchase, provided that the
product has been properly installed, operated, and maintained in accordance with all appli-
cable instructions. To make a claim under this warranty, the bill of sale or proof of purchase
must be presented.
This warranty is extended only to the original retail purchaser. This warranty covers only the
cost of parts required to restore this heater to proper operating condition. Warranty parts
must be obtained through authorized dealers of this product and/or DESA Heating Products
who will provide original factory replacement parts. Failure to use original factory replace-
ment parts voids this warranty. The heater must be used in accordance with all local codes
and instructions furnished with the unit.
This warranty does not apply to parts that are not in original condition because of normal
wear and tear, or parts that fail or become damaged as a result of misuse, accidents, lack of
proper maintenance, alteration, tampering, contaminated fuels, or defects caused by im-
proper installation. Travel, transportation and incidental costs associated with warranty re-
pair are not reimbursable under this warranty and are the responsibility of the owner.
TO THE FULL EXTENT ALLOWED BY THE LAW OF THE JURISDICTION THAT GOV-
ERNS THE SALE OFTHE PRODUCT: THIS EXPRESS WARRANTYEXCLUDESANYAND
ALL OTHER EXPRESSED WARRANTIES OF MERCHANTABILITY AND FITNESS FOR A
PARTICULAR PURPOSE TO ONE YEAR FROM THE DATE OF FIRST PURCHASE: AND
DESAHEATING PRODUCTS’LIABILITY IS HEREBY LIMITED TO THE PURCHASE PRICE
OF THE PRODUCTAND DESA HEATING PRODUCTS SHALL NOT BE LIABLE FORANY
OTHER DAMAGES WHATSOEVER INCLUDING INDIRECT, INCIDENTAL OR CONSE-
QUENTIAL DAMAGES.
Some states do not allow a limitation on how long an implied warranty lasts or an exclusion or
limitation of incidental or consequential damages, so the above limitation on implied warran-
ties, or exclusion or limitation on damages may not apply to you.
This warranty provides the original retail p urchaser with specific legal rights. For specific
information regarding those rights, please consult the applicable state laws.
To Light Heater
Read and understand all safety information before operating heater.
1. Adjust burners to desired position by loosening wing nuts on back of burner head
bracket. WARNING: Wing nuts and burner heads become very hot during
operation. Do not attempt to adjust burner position while heater is operating.
Allow 15 minutes to cool. WARNING: Do not raise burner heads and cover air
inlet holes in mixing tube with burner bracket. Firmly tighten wing nuts to
secure burners. Do not overlap or direct burners at each other.
2. WARNING: Make sure there is no open flame in the area. Fully open the
propane tank valve.
3. Turn heater regulator knob counterclockwise to the “HI”position (see Figure 4).
4. WARNING: Stand to the side of unit while lighting. Do not stand or have any
part of your body over or in front of heater while lighting. Do not attempt to
light one burner off of the other. Use one match per burner. Locate ignition hole
in underside of burner (see Figure 5). Hold a lit match under ignition hole. CAU-
TION: Do not insert match into air inlet holes in mixing tube. Push in the safety
shutoff valve plunger (see Figure 5). WARNING: Do not push in safety shutoff
valve plunger before inserting lit match. Burner should light. Mesh screen on
burner glows red when lit. After burner is lit, continue holding in safety shutoff valve
plunger (about 10 to 30 seconds) until heater stays lit.
5. If the burner does not light within 30 seconds, turn regulator knob to the “OFF”
position. Wait at least two minutes for the gas to dissipate before relighting.
6. If heater will not light after repeated tries, do not attempt to repair heater. Return
heater to nearest authorized service center or to address on back panel of this
manual, freight prepaid.
7. After burner lights, turn the heater regulator knob to the desired heat setting (LOW,
MED, or HI).
8. Light both burners when maximum heat is needed. Use one burner to conserve
fuel. Repeat above steps to light second burner.
Thermocouple
Burner Front
Figure 4 Figure 5 Back View
Burner Guard
Technical Service and Replacement Parts
For assistance in servicing your heater and parts under warranty, contact DESA Heating
Products’Technical Service Department at 1-866-672-6040 or visit our web site at
www.desatech.com.
Parts Under Warranty: Contact authorized dealers of this product. If they can’t supply
original replacement parts, either contact your nearest authorized service center or call
DESA Heating Products’Technical Service Department at 1-866-672-6040.
Parts Not Under Warranty: Contact authorized dealers of this product. If they can not
supply these accessories or parts, either contact your nearest Parts Central or DESA
Heating Products for referral information. Parts Centrals are listed in the Authorized Ser-
vice Center booklet supplied with heater. Call DESA Heating Products at 1-866-672-6040
for referral information.
Replacement Parts
Item Description Part Number Model
1 Burner Guard 100911-01 All
2 Thermocouple 100886-01 All
3 Regulator with Fuel Gas Connector LPA2025 All
4 Hose Assembly (not shown) 101807-01 All
5 Owner’s Manual (not shown) 111680-01 All
6 Operation Tag (not shown) 101860-04 HD24B
101860-06 TT24B
7 Burner Replacement Kit* (not shown) LPA5050 All
Air Inlet
Hole
Safety Shutoff
Valve Plunger
Heater
Regulator
Knob
Ignition Holes
To Turn Off Heater
1. Tightly close propane tank valve by turning clockwise.
2. Turn the heater regulator knob to the “OFF”position. Wait at least 15 minutes for
the heater to cool before handling heater.
3. Always remove the heater from the propane tank after each use. Do not store
heater while attached to propane tank. Always store propane tank outdoors. Never
store propane tank in an enclosed area.
Regulator
100926 01
NOT A UPC
* Replaces burner screens that are worn, split or broken.

This manual suits for next models

1

Other Desa Heater manuals

Desa 50 User manual

Desa

Desa 50 User manual

Desa HD15 User manual

Desa

Desa HD15 User manual

Desa 30-80 User manual

Desa

Desa 30-80 User manual

Desa Master WA 33 B User manual

Desa

Desa Master WA 33 B User manual

Desa BLP30 User manual

Desa

Desa BLP30 User manual

Desa B350D User manual

Desa

Desa B350D User manual

Desa RCLP35B User manual

Desa

Desa RCLP35B User manual

Desa SPC170-F User manual

Desa

Desa SPC170-F User manual

Desa RCLP50B User manual

Desa

Desa RCLP50B User manual

Desa Comfort Glow RFN30TA Specification sheet

Desa

Desa Comfort Glow RFN30TA Specification sheet

Desa Reddy RK150 User manual

Desa

Desa Reddy RK150 User manual

Desa 125 User manual

Desa

Desa 125 User manual

Desa and 55 User manual

Desa

Desa and 55 User manual

Desa RCCP200V User manual

Desa

Desa RCCP200V User manual

Desa 80-CC User manual

Desa

Desa 80-CC User manual

Desa RC40 User manual

Desa

Desa RC40 User manual

Desa Master BV 70 E User manual

Desa

Desa Master BV 70 E User manual

Desa Air Conditioner User manual

Desa

Desa Air Conditioner User manual

Desa BG SERIES User manual

Desa

Desa BG SERIES User manual

Desa CHD24B User manual

Desa

Desa CHD24B User manual

Desa 40 User manual

Desa

Desa 40 User manual

Desa SB70DT User manual

Desa

Desa SB70DT User manual

Desa Master B350CEA User manual

Desa

Desa Master B350CEA User manual

Desa D20H User manual

Desa

Desa D20H User manual

Popular Heater manuals by other brands

Nouveau NHMH205 operating instructions

Nouveau

Nouveau NHMH205 operating instructions

Rointe KYROS KRI0330RAD3 instruction manual

Rointe

Rointe KYROS KRI0330RAD3 instruction manual

HEATSTRIP THH1500 Installation, operation & maintenance manual

HEATSTRIP

HEATSTRIP THH1500 Installation, operation & maintenance manual

Arrow DVi25S owner's manual

Arrow

Arrow DVi25S owner's manual

Gude GD 10 E owner's manual

Gude

Gude GD 10 E owner's manual

Sonnenkonig CERAMICO HELSINKI user manual

Sonnenkonig

Sonnenkonig CERAMICO HELSINKI user manual

DEFA 411420 Fitting instructions

DEFA

DEFA 411420 Fitting instructions

Akai FH11AL instruction manual

Akai

Akai FH11AL instruction manual

Philco PFH/S-1115 manual

Philco

Philco PFH/S-1115 manual

Qlima R7224S C-2 operating manual

Qlima

Qlima R7224S C-2 operating manual

EOS Structure Installation and operating instructions

EOS

EOS Structure Installation and operating instructions

Winterwarm WWH-EC instruction manual

Winterwarm

Winterwarm WWH-EC instruction manual

Opranic Thor user manual

Opranic

Opranic Thor user manual

Webasto DBW 2020 Service and repair manual

Webasto

Webasto DBW 2020 Service and repair manual

EOS Finnrock 94.5664 Installation and operation manual

EOS

EOS Finnrock 94.5664 Installation and operation manual

Dru Metro 80E Installation and service manual

Dru

Dru Metro 80E Installation and service manual

Ridea Living Othello Mono Slim Instruction and installation booklet

Ridea

Ridea Living Othello Mono Slim Instruction and installation booklet

Hortus Golden Tube 211-390 instructions

Hortus

Hortus Golden Tube 211-390 instructions

manuals.online logo
manuals.online logoBrands
  • About & Mission
  • Contact us
  • Privacy Policy
  • Terms and Conditions

Copyright 2025 Manuals.Online. All Rights Reserved.