Desa ALL-PRO SPC-21PHTSA User manual

Propane/LP Table Top Patio Heater
Owner’s Manual
MODEL SPC-21PHTSA
Save this manual for future reference.
For more information, visit www.desatech.com
IMPORTANT: Read and understand this manual before
assembling, starting or servicing heater. Improper use
of heater can cause serious injury. Keep this manual for
future reference.
WARNING: For outdoor use only.
86NH
WARNING CARBON MONOXIDE HAZARD
This appliance can produce carbon mon-
oxide which has no odor.
Using it in an enclosed space can kill you.
Never use this appliance in an enclosed
space such as a camper, tent, car, or home.

www.desatech.com 114082-01A
2
SAFETY INFORMATION
WARNING: This product con-
tains and/or generates chemicals
known to the State of California
to cause cancer or birth defects,
or other reproductive harm.
WARNING: Not for home or
recreational vehicle use.
SPECIFICATIONS
Rating 10,000-15,000 Btu/hr (2.93-4.40 kW)
Type of Gas Propane/LP Only
Gas Supply Pressure to regulator Maximum - 150 psi (1034.2 kPa) Minimum - 5 psi (34.5 kPa)
Gas Supply Pressure Regulator out 11" W.C. (2.74 kPa)
Ignition Piezo Ignition
Fuel Consumption 10,000 Btu/hr: 2 hr, .016 lb/hr (0.21 kg/hr)
(per 16 oz propane/LP cylinder) 15,000 Btu/hr: 1.25 hr, .070 lb/hr (0.32 kg/hr)
Flame Safety
Thermocouple Operated Gas Valve with Oxygen Depletion System
WARNING: Fire, burn, inhala-
tion, and explosion hazard. Keep
solid combustibles, such as build-
ing materials, paper or cardboard,
a safe distance away from the
heater as recommended by the
instructions. Never use the heater
in spaces which do or may contain
volatile or airborne combustibles,
or products such as gasoline, sol-
vents, paint thinner, dust particles
or unknown chemicals.
GENERAL HAZARD WARNING:
Failure to comply with the precautions and instructions
provided with this heater, can result in death, serious
bodily injury and property loss or damage from hazards
of fire, explosion, burn, asphyxiation, carbon monoxide
poisoning and/or electrical shock.
Only persons who can understand and follow the in-
structions should use or service this heater.
If you need assistance or heater information such as an in-
structions manual, labels, etc. contact the manufacturer.
TABLE OF CONTENTS
Specifications ...................................................... 2
Safety Information ............................................... 2
Propane/LP Safety .............................................. 4
Product Identification ........................................... 5
Product Features ................................................. 5
Unpacking ........................................................... 5
Assembly Instructions ......................................... 5
Propane/LP Supply .............................................. 6
Operating Instructions ......................................... 6
Cleaning and Maintenance .................................. 7
Storage ................................................................ 8
Servicing .............................................................. 8
Troubleshooting ................................................... 9
Technical Service ...............................................11
Accessories ........................................................11
Replacement Parts .............................................11
Illustrated Parts Breakdown and Parts List ....... 12
Warranty and Repair Service ..............Back Cover

www.desatech.com
114082-01A 3
We cannot foresee every use which may be made
of our heaters. Check with your local fire safety
authority if you have questions about heater use.
Other standards govern the use of fuel gases and
heat producing products for specific uses. Your
local authorities can advise you about these.
Carbon Monoxide Poisoning: Direct-Fired means
that all of the combustion products enter the heated
space. Even though this heater operates very close
to 100 percent combustion efficiency, it still pro-
duces small amounts of carbon monoxide. Some
people are more affected by carbon monoxide than
others. Early signs of carbon monoxide poisoning
resemble the flu, with headaches, dizziness, and/or
nausea. If you have these signs, the heater may not
be working properly. Get fresh air at once! Check
for proper ventilation and have heater serviced.
Propane Gas: Propane gas is odorless. An odor-
making agent is added to propane gas. The odor
helps you detect a propane gas leak. However, the
odor added to propane gas can fade. Propane gas
may be present even though no odor exists.
This is a propane, direct-fired heater. Propane is
heavier than air. If propane leaks from a connection
or fitting, it sinks to the floor, collecting there with
the surrounding air, forming a potentially explosive
mixture. Obviously, propane leaks should be avoided,
so set up the propane supply with utmost care. Read
Propane/LP Safety, page 4 for additional informa-
tion about detecting propane leaks. Leak check new
connections or reconnections with a soap and water
solution and follow all connection instructions herein.
Also, ask your propane dealer for advice on the
propane application and supply installation and ask
them to check it if there are any questions.
When the heater is to be operated in the presence of
other people the user is responsible for properly ac-
quainting those present with the safety precautions
and instructions, and of the hazards involved.
Make certain you read and understand all warn-
ings. Keep this manual for reference. It is your
guide to safe and proper operation of this heater.
1. Check the heater thoroughly for damage. DO
NOT operate a damaged heater.
2. DO NOT modify the heater or operate a heater
which has been modified from its original
condition.
3. Use only propane/LP gas.
SAFETY INFORMATION
Continued
4. Use only VAPOR WITHDRAWAL propane
supply. The propane cylinder must be arranged
for vapor-withdrawal, in accordance with the
Compress Gas Associations, Small Propane
Bottle Assembly. If there is any question about
vapor withdrawal, ask your propane dealer.
5. Never use the heater if the ballast weight is
not assembled onto the base. The base must
be weighted to avoid tipping.
6. Use only the factory preset regulator provided
with the heater. Use only replacement pressure
regulators specified in this manual.
7. If used, inspect the hose before each use of
the heater. If it is evident there is excessive
abrasion or wear, or the hose is cut, it must
be replaced prior to the heater being put into
operation. Use replacement hose assembly kit
100427-01 (see Accessories, page 11).
8. This heater is for OUTDOOR USE ONLY,
even so, make sure that there is ample fresh air
ventilation. Do not use in buildings, garages
or other enclosed spaces.
9. If at any time gas odor is detected, IMMEDI-
ATELY DISCONTINUE operation until the
source of gas has been located and corrected.
Read Propane Safety, page 4 for additional
information about detecting propane leaks.
10. Install the heater such that it is not directly
exposed to water spray, rain and/or dripping
water.
11. Maintain minimum clearance to people or
normal combustible material (like paper) of
3.6 ft. (1100 mm) from top and 2 ft. (609 mm)
from the reflector.
12. Operate only on a stable, level surface.
13. Do not spray aerosols near the heater during
use or shortly thereafter.
14. Do not clean heater with combustible or cor-
rosive cleaners. Use warm, soapy water.
15. Check control compartment burners and cir-
culation air passageways for free air passage,
make sure that there are no obstructions. These
areas are a common location for spider webs,
which can present a dangerous condition,
damage the heater and render it unsafe for
use. The heater must be checked if any of the
following conditions exist:
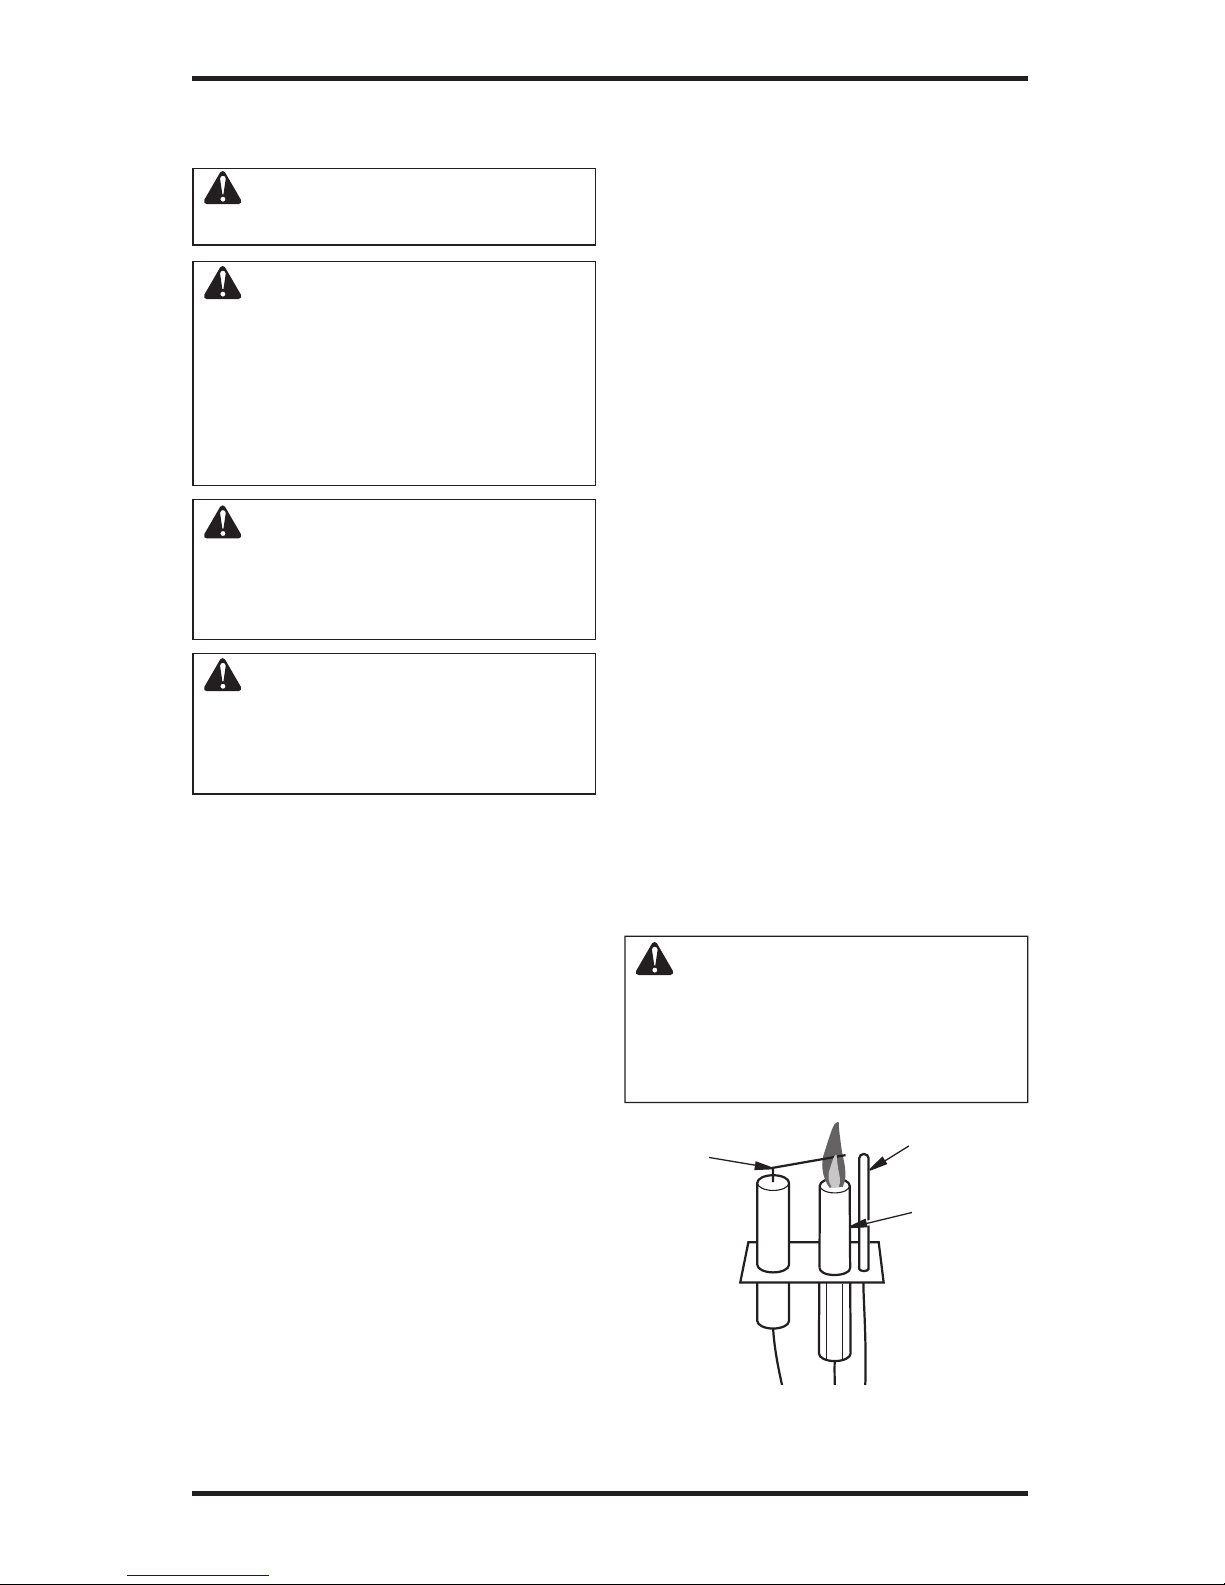
a) Gas smell along with predominate yellow
tipping of the burner.
b) Heater does not reach temperature.
c) Uneven burner glow.
d) Burner makes popping noises during nor-
mal use, other than during shutdown.

www.desatech.com 114082-01A
4
16. Use only soapy water (1 part liquid dishwash-
ing detergent to 3 parts water) to conduct
leak tests whenever a propane cylinder is
connected. Bubbles indicate a leak.
17. Do not adjust gas regulator. If you are unsure
of your appliances gas type or pressure, call
a qualified service person.
18. Place the control knob on "OFF" position
when heater is not in use.
19. Always disconnect the gas supply after the
heater is turned "OFF".
20. Do not move, handle or service while hot or
burning.
21. Allow 45 minutes to cool down after use
before attempting to move heater.
22. Do not operate this appliance in windy condi-
tions. Maximum allowable wind speed is 10 mph
(16 Km/h).
23. Do not operate this appliance in temperature
conditions below 40° F (5° C).
24. Keep heater away from areas where flammable
liquids, vapors or solids are stored or used.
25. If operated in salt air environments, the
unit will require more frequent cleaning;
otherwise, the longevity of the unit will
deteriorate rapidly. Use warm soapy water to
clean the unit.
26. Items or material, when stored under the
heater, will be subjected to radiant heat and
could be seriously damaged.
27. Use only in accordance with local codes, or in
the absence of local codes, with the National
Fuel Gas Code ANSI Z223.1.
Any guard or other protective device
removed for servicing must be re-
placed prior to operating the heater.
Surface temperatures become very
hot when operating heater. Children
and adults should stay away to avoid
burns or clothing ignition.
Young children should be carefully
supervised when they are in the area
of the heater.
Clothing or other flammable mate-
rials should not be hung from the
heater, or placed on or near heater.
Installation and repair should be
done by a qualified service person.
The heater should be inspected
before use and at least annually by
a qualified service person. More
frequent cleanings may be required
as necessary. It is imperative that
control compartments, burners and
circulating air passageways of the
heater be kept clean.
CAUTION: The gas pressure
regulator provided with this ap-
pliance must be used. This regu-
lator is set for an output pressure
of 11" W.C. (2.74 kPa).
PROPANE/LP SAFETY
WARNING: For outdoor
use only.
ASPHYXIATION HAZARD
• Do not use this heater for heating human
living quarters.
• Do not use in unventilated areas.
• The flow of combustion and ventilation
air must not be obstructed.
• Proper ventilation air must be provided
to support the combustion air require-
ments of the heater being used.
• Refer to the Specifications, page 2, heater
data plate or contact DESA Heating Prod-
ucts to determine combustion air ventila-
tion requirements of the heater.
• Lack of proper ventilation air will lead
to improper combustion.
• Improper combustion can lead to carbon
monoxide poisoning leading to serious
injury or death. Symptom of carbon mon-
oxide poisoning can include headaches
dizziness and difficulty in breathing.
SAFETY INFORMATION
Continued

www.desatech.com
114082-01A 5
PRODUCT
IDENTIFICATION
Figure 1 - Propane/LP Table Top Patio
Heater
Dome
Reflector
PRODUCT FEATURES
SAFETY PILOT
This heater has a pilot with an Oxygen Deple-
tion Sensing (ODS) safety shutoff system. The
ODS/pilot is a required feature for table top patio
heaters. The ODS/pilot shuts off the heater if there
is not enough fresh air.
PIEZO IGNITION SYSTEM
This heater has a piezo ignitor. This system re-
quires no matches, batteries, or other sources to
light heater.
UNPACKING
1. Remove heater from carton.
2. Remove all protective packaging applied to
heater for shipment.
3. Check heater for any shipping damage. If
heater is damaged, promptly return to dealer
where you bought heater.
ASSEMBLY
INSTRUCTIONS
Tools Required:
• Phillips Head Screwdriver
• Standard Pliers
Inspect heater components for possible shipping
damage. If any is found, immediately notify the
dealer. Check to make sure that all components are
included with your heater (see pages 12 and 13).
1. Attach burner and controls assembly to base
assembly with 4 screws (see Figure 3). Tighten
screws. Place operating instruction label under
control knob for easy review.
2. Align 3 dome holes with the 3 studs protruding
from burner top (see Figure 3). Place dome
onto the studs. Install 3 cap nuts onto studs.
Tighten with pliers.
The installation must conform with local codes or
in the absence of local codes, The National Fuel
Gas Code, ANSI Z223.1.
Figure 3 - Heater Assembly
Figure 2 - Clearances from Combustibles
16"
(40.64 cm)
Wire
Guard
Propane/LP
Cylinder
Housing
Base
Control
Knob
16"
(40.64 cm)
16"
(40.64 cm)
30" (76.20 cm)
Below Burner
Dome
Reflector
Cap Nuts
Burner and
Controls
Assembly
Base
Assembly
Screws

www.desatech.com 114082-01A
6
OPERATING
INSTRUCTIONS
PREPARING FOR OPERATION
1. Check heater for possible shipping damage. If
any is found, immediately notify the factory.
2. Follow all safety information.
3. Make sure control knob is in the OFF position.
4. Open door to propane/LP cylinder housing by
turning latching knob counterclockwise.
5. Check regulator inlet and propane/LP cylinder
for contamination such as dirt, webs, etc.
Clean if needed.
6. Screw threaded end of propane/LP canister
clockwise into threaded regulator inlet until
hand tight.
IMPORTANT: Use only standard 16.4 oz propane/LP
cylinder constructed and marked in accordance
with the U.S. Dept. of Transportation (D.O.T.)
No. 600 connection type. Disconnect the cylinder
when the appliance is not in use.
7. Apply a soap and water solution to connection
at regulator and cylinder. Bubbles forming
show a leak.
8. In case of any leaks, remove propane/LP cyl-
inder. Check and clean connection. Reconnect
regulator and propane/LP cylinder and leak
test again. If leak persists, call DESA Heating
Products at 1-866-672-6040.
9. Close and latch door
TO START HEATER
1. Turn gas control knob clockwise to OFF posi-
tion.
2. Push in and turn gas control knob counter-
clockwise to ON/HIGH. This will light the
burner. If necessary, keep pressing and turning
knob clockwise then counterclockwise until
burner lights.
3. Keep control knob pressed in for at least 30
seconds after lighting burner. After 30 seconds
release control knob.
4. If the burner does not stay lit, turn control
knob clockwise to OFF immediately, wait 5
minutes then repeat steps 2 and 3.
5. When burner is lit, turn gas control knob to
desired setting.
TO STOP HEATER
1. Turn control knob clockwise to OFF position.
2. If heater is not to be relit, remove propane/LP
cylinder by rotating counterclockwise. Re-
move cylindr when heater is not in use.
3. Do not relight heater for 5 minutes after pro-
pane/LP cylinder has been removed.
TO RESTART HEATER
1. Turn control knob clockwise to OFF position.
2. Wait 5 minutes.
3. Restart following To Start Heater.
WARNING: FOR YOUR SAFETY
If you smell gas:
• Shut off gas to the appli-
ance.
• Extinguish any open flames.
• If odor continues, immediately
call your gas supplier.
See Safety Information, page 2
for more information.
PROPANE/LP SUPPLY
Propane/LP gas and propane/LP tank(s) are to be
furnished by the user. The propane/LP cylinder
to be used must be constructed and marked in
accordance with the specifications for the pro-
pane/LP gas cylinders of the U.S. Department of
Transportation (DOT).
Use this heater only with a propane/LP vapor
withdrawal supply system. See Chapter 5 of the
Standard for Storage and Handling of Liquefied
Petroleum Gas, ANSI/NFPA 58 and/or CAN/CGA
B149.2. Your local library or fire department will
have this booklet.
The amount of propane/LP gas ready for use from
propane/LP tanks varies. Two factors decide this
amount:
1. The amount of propane/LP gas in tank(s)
2. The temperature of tank(s)

www.desatech.com
114082-01A 7
CLEANING AND
MAINTENANCE
WARNING: Turn off heater
and let cool before cleaning.
CAUTION: You must keep
control areas, burner, and circu-
lating air passageways of heater
clean. Inspect these areas of
heater before each use. Have
heater inspected yearly by a
qualified service person.
CAUTION: You must check
and keep burner/venturi tubes
clean of insect and insect nest. A
clogged tube can lead to a fire.
WARNING: Failure to keep
the primary air opening(s) of
the burner(s) clean may result in
sooting and property damage.
ODS/PILOT AND BURNER
Use a vacuum cleaner, pressurized air, or small,
soft bristled brush to clean.
BURNER PILOT AIR INLET
The primary air inlet holes allow the proper
amount of air to mix with the gas. This provides a
clean burning flame. Keep these holes clear of dust,
dirt, and lint. Clean these air inlet holes prior to
each heating season. Blocked air holes will create
soot. We recommend that you clean the unit every
three months during operation and have heater
inspected yearly by a qualified service person.
We also recommend that you keep the burner
tube and pilot assembly clean and free of dust and
dirt. To clean these parts we recommend using
compressed air no greater than 30 PSI. Your local
computer store, hardware store, or home center
may carry compressed air in a can. You can use a
vacuum cleaner in the blow position. If using com-
pressed air in a can, please follow the directions on
the can. If you don't follow directions on the can,
you could damage the pilot assembly.
Always keep the heater area clear and free from
combustible materials, gasoline and other flam-
mable vapors and liquids.
Keep the vent areas (slots in the bottom and the top
at the front of heater) clear at all times.
Visually inspect the pilot flame and burner peri-
odically during use. The burner should be bright
orange without a noticeable flame. If the burner
has a noticeable flame, cleaning may be required.
Use the following procedure to inspect burner
assembly.
It is necessary to periodically check the burner
orifice and burner venturi tube to make sure they
are clear of insects, nests or spider webs that may
accumulate over time. A clogged tube can lead
to a fire.
1. Allow heater to thoroughly cool before per-
forming any maintenance.
2. Turn control knob to the OFF position and re-
move disposable 1 lb. cylinder from heater.
3. Remove four screws securing burner assembly
to base assembly (see Figure 3, page 5).
4. Remove burner assembly from base assembly.
5. Inspect interior of burner assembly for ac-
cumulation of dust, lint or spider webs. If
necessary, clean interior with a vacuum
cleaner or apply air pressure. Do not damage
any components within burner assembly when
you are cleaning.
6. Inspect and clean main burner orifice by us-
ing a vacuum or apply air pressure at orifice
opening.
7. Inspect and clean pilot (mounted to bracket) by
using a vacuum or apply air pressure through
the air holes in the pilot (see Figure 4).
WARNING: Never use nee-
dles, wires, or similar cylindrical
objects to clean the pilot to avoid
damaging the calibrated ruby
that controls the gas flow.
Figure 4 - Pilot
Thermocouple
Burner
Ignitor
Electrode

www.desatech.com 114082-01A
8
8. Apply air pressure into the venturi tube (with cone
on end) to remove dust, lint or spider webs.
9. Reinstall burner assembly to base assembly.
CABINET
Air Passageways
Use a vacuum cleaner or pressurized air to clean.
Exterior
Use a soft cloth dampened with a mild soap and
water mixture. Wipe the cabinet to remove dust.
STORAGE
1. Allow at least 45 minutes for heater to cool
down after using.
2. Store heater upright in a sheltered area away
from inclement weather and dust.
3. If desired, cover heater after heater has
cooled.
4. If heater is not to be used for an extended period
of time, disconnect and remove propane/LP
gas cylinder and store in accordance with the
Standard for Storage and Handling of Liquefied
Petroleum Gases, ANSI/INFPA 58.
CLEANING AND
MAINTENANCE
Continued
SERVICING
To assure safety, proper function and longevity
of the heater, regular maintenance is required.
The frequency of maintenance will depend on the
usage of the unit. Review the following concern-
ing the criteria for a properly functioning heater.
Failing to follow proper, regular maintenance will
void warranty.
A hazardous condition may result if a heater is
used that has been modified or is not functioning
properly. When the heater is working properly:
• The flame is contained within the heater.
• The flame is essentially blue with perhaps some
yellow tipping.
• There is no strong disagreeable odor, eye burn-
ing or other physical discomfort.
• There is no smoke or soot internal or external
to the heater.
• There are no unplanned or unexplained shut
downs of the heater.
The parts lists and wiring diagram show the heater
as it was constructed. Do not use a heater which is
different from that shown. In this regard, use only
the hose, regulator and cylinder connection fitting
(called a POL fitting) supplied with the heater.
IMPORTANT: Do not use alternates. For this
heater, the regulator must be set as shown in Speci-
fications, page 2. If there is any uncertainty about
the regulator setting, have it checked.

www.desatech.com
114082-01A 9
TROUBLESHOOTING
WARNING: Turn off heater and let cool before servicing. Only a
qualified service person should service and repair heater.
CAUTION: Never use a wire, needle, or similar object to clean
ODS/pilot. This can damage ODS/pilot unit.
Note: All troubleshooting items are listed in order of operation.
POSSIBLE CAUSE
1. Ignitor electrode positioned
wrong
2. Ignitor electrode broken
3. Ignitor electrode not con-
nected to ignitor cable
4. Ignitor cable pinched or wet
5. Broken ignitor cable
6. Bad piezo ignitor
1.
Control knob not fully pressed in
2. Control knob not pressed in
long enough
3. Safety interlock system has
been triggered
4. Thermocouple connection
loose at control valve
5. Pilot flame not touching
thermocouple, which allows
thermocouple to cool, caus-
ing pilot flame to go out. This
problem could be caused by
one or both of the following:
A) Low gas pressure
B) Dirty or partially clogged
ODS/pilot
6. Thermocouple damaged
7. Control valve damaged
1. Burner orifice is clogged
2. Inlet gas pressure is too low
1. Manifold pressure is too low
2. Burner orifice is clogged
REMEDY
1. Replace pilot assembly
2. Replace pilot assembly
3. Reconnect ignitor cable
4. Free ignitor cable if pinched
by any metal or tubing. Keep
ignitor cable dry
5. Replace ignitor cable
6. Replace piezo ignitor valve
assembly
1. Press in control knob fully
2. After ODS/pilot lights, keep
control knob pressed in 30
seconds
3. Wait one minute for safety
interlock system to reset.
Repeat ignition operation.
4. Hand tighten until snug, then
tighten 1/4 turn more
5. A) Replace propane/LP gas
cylinder
B) Clean ODS/pilot (see
Cleaning and Maintenance,
page 7) or replace ODS/pilot
assembly
6. Replace pilot assembly
7. Replace control valve
1. Clean burner orifice (see Clean-
ing and Maintenance, page 7)
or replace burner orifice
2. Replace propane/LP gas
cylinder
1. Replace propane/LP gas
cylinder
2. Clean burner orifice (see Clean-
ing and Maintenance, page 7)
or replace burner orifice
OBSERVED PROBLEM
When ignitor button is actuated,
there is no spark at ODS/pilot
ODS/pilot lights but flame
goes out when control knob is
released
Burner does not light after ODS/
pilot is lit
Delayed ignition of burner

www.desatech.com 114082-01A
10
TROUBLESHOOTING
Continued
WARNING: If you smell gas
• Shut off gas supply.
• Do not try to light any appliance.
• Do not touch any electrical switch; do not use any phone in your
building.
• Immediately call your gas supplier from a neighbor’s phone. Fol-
low the gas supplier’s instructions.
• If you cannot reach your gas supplier, call the fire department.
IMPORTANT: Operating heater where impurities in air exist may create odors. Cleaning supplies,
paint, paint remover, cigarette smoke, cements and glues, new carpet or textiles, etc., create fumes.
These fumes may mix with combustion air and create odors.
POSSIBLE CAUSE
1. Burner orifice is clogged or
damaged
2. Inlet gas pressure is too low
3. Burner damaged
4. Gas regulator defective
1. Residues from manufacturing
processes
1. Heater burning vapors from
paint, hair spray, glues, etc.
See IMPORTANT statement
above
2. Low fuel supply
3. Gas leak. See Warning
statement at top of page
1. Not enough fresh air is avail-
able
2. Low line pressure
3. ODS/pilot is partially
clogged
4. Tip over switch activated
from bumping heater
1. Gas leak. See Warning
statement at top of page
2. Control valve defective
REMEDY
1. Clean burner orifice (see Clean-
ing and Maintenance, page 7)
or replace burner orifice
2. Replace propane/LP gas
cylinder
3. Replace burner
4. Replace gas regulator
1. Problem will stop after a few
hours of operation
1. For outdoor use only. Stop
using odor-causing products
while heater is running
2. Replace propane/LP gas
cylinder
3. Locate and correct all leaks
1. For outdoor use only.
Provide
adequate ventilation
2. Replace propane/LP gas
cylinder
3. Clean ODS/pilot (see Cleaning
and Maintenance, page 7)
4. Relight heater
1. Locate and correct all leaks
2. Replace control valve
OBSERVED PROBLEM
Burner backfiring during com-
bustion
Slight smoke or odor during
initial operation
Heater produces unwanted
odors
Heater shuts off in use
Gas odor even when control knob
is in OFF position

www.desatech.com
114082-01A 11
TECHNICAL SERVICE
A heater which is not working right must be re-
paired, but only by a trained, experienced service
person. To find the service center closest to you,
or if you have further questions about this heater,
contact DESA Heating Productsʼ Technical Service
Department at 1-866-672-6040. When calling,
please have your model and serial numbers of
your heater ready.
You can also visit DESA Heating Productsʼ Techni-
cal Service web site at www.desatech.com.
You may also obtain in-warranty or out-of-war-
ranty service by taking the product to your local
service center.
ACCESSORIES
Purchase this heater accessory from your local
dealer. If they cannot supply this accessory, call
DESA Heating Products at 1-866-672-6040 for
referral information. You can also write to the ad-
dress listed on the back page of this manual.
5 FT. PROPANE/LP HOSE
ASSEMBLY - P4122
Includes 1"-20 male throwaway cylinder thread x
POL with handwheel.
REPLACEMENT PARTS
WARNING: Use only original
replacement parts. This heater
must use design-specific parts.
Do not substitute or use generic
parts. Improper replacement
parts could cause serious or fa-
tal injuries. This will also protect
your warranty coverage for parts
replaced under warranty.
PARTS UNDER WARRANTY
Contact authorized dealers of this product. If they
canʼt supply original replacement part(s), either
contact your nearest Parts Central or call DESA
Heating Productsʼ Technical Service Department
at 1-866-672-6040.
When calling DESA Heating Products, have ready
• your name
• your address
• model number of your heater
• how heater was malfunctioning
• purchase date
PARTS NOT UNDER WARRANTY
Contact authorized dealers of this product. If
they canʼt supply original replacement part(s),
either contact your nearest Parts Central (listed in
Authorized Service Center booklet) or call DESA
Heating Products at 1-866-672-6040 for referral
information.
When calling DESA Heating Products, have ready
• model number of your heater
• the replacement part number

www.desatech.com 114082-01A
12
ILLUSTRATED PARTS BREAKDOWN
MODEL SPC-21PHTSA
1
2
3
30
26
27
25
11
24
23
21
20
19
18
17
16
22
12
13
14
10
15
8
9
7
28
32
31
4
5
29
6

www.desatech.com
114082-01A 13
PARTS LIST
This list contains replaceable parts used in your heater. When ordering parts, follow the instructions
listed under Replacement Parts on page 11 of this manual.
KEY PART
NO. NUMBER DESCRIPTION QTY.
1 114051-01 Base 1
2 114052-01 Ballast Plate 1
3 114053-01 Cylinder Housing 1
4 114054-01 Door 1
5 114055-01 Regulator 1
6 114056-01 Regulator Mounting Bracket 1
7 114057-01 Tilt Switch 1
8 114058-01 Regulator Connector 1
9 114059-01 Valve Mounting Bracket 1
10 114060-01 Valve 1
11 114061-01 Knob 1
12 114185-01 ODS Pilot 1
13 114186-01 Pilot Cover 1
14 114237-01 Burner Bracket 1
15 114065-01 Thermocouple Bracket 1
16 114066-01 Burner Assembly 1
17 114067-01 Wire Guard 1
18 114068-01 Emitter Screen Assembly 1
19 114069-01 Reflector 1
20 114070-01 Bottom Emitter 1
21 114071-01 Nozzle 1
22 114072-01 Heat Shield 1
23 114073-01 Post 1
24 114074-01 Ring Housing 1
25 114075-01 Valve Housing 1
26 114076-01 Gas Pipe Assembly 1
27 114077-01 Compression Ferrule 2
28 114078-01 Compression Nut 2
29 114079-01 Compression Fitting 1
30 114080-01 Door Knob 1
31 114081-01 Door Latch 1
32 114239-01 Regulator Mounting Bracket 1
PARTS AVAILABLE - NOT SHOWN
114085-01 Model Data Decal 1
114084-01 Operating Instruction Decal (English) 1
114086-01 Warning Decal (English) 1
114086-02 Warning Decal (Spanish) 1
114086-03 Warning Decal (French) 1
114086-04 Operating Instruction Decal (Spanish) 1
114086-05 Operating Instruction Decal (French) 1
114238-01 Hardware Package 1
114083-01 O-Ring 1

WARRANTY AND REPAIR SERVICE
KEEP THIS WARRANTY
Model
Serial No.
Date of Purchase
2701 Industrial Drive
P.O. Box 90004
Bowling Green, KY 42102-9004
ATTN: Customer Service Department
This warranty does not cover discoloration due to operation of heater. We reserve the right to amend these specifica-
tions at any time without notice. The only warranty applicable is our standard written warranty. We make no other
warranty, expressed or implied.
WARRANTY SERVICE
Should your heater require service, return it to your nearest authorized service center. Proof of purchase must be
presented with the heater. The heater will be inspected. A defect may be caused by faulty materials or workmanship.
If so, DESA Heating Products will repair or replace the heater without charge.
REPAIR SERVICE
Return the heater to your nearest authorized service center. Each Service Center is independently owned and operated.
Repairs not covered by the warranty will be billed at standard prices. We reserve the right to amend these specifications
at any time without notice.
For information about this warranty write:
LIMITED WARRANTY
DESA Heating Products warrants this product and any parts thereof, to be free from defects in materials and
workmanship for one (1) year from the date of first purchase when operated and maintained in accordance with in-
structions. This warranty is extended only to the original retail purchaser, when proof of purchase is provided.
This warranty covers only the cost of parts and labor required to restore the product to proper operating condition.
Transportation and incidental costs associated with warranty repairs are not reimbursable under this warranty.
Warranty service is available only through authorized dealers and service centers.
This warranty does not cover defects resulting from misuse, abuse, negligence, accidents, lack of proper main-
tenance, normal wear, alteration, modification, tampering, contaminated fuels, repair using improper parts, or
repair by anyone other than an authorized dealer or service center. Routine maintenance is the responsibility of
the owner.
THIS EXPRESS WARRANTY IS GIVEN IN LIEU OF ANY OTHER WARRANTY EITHER EXPRESSED OR
IMPLIED, INCLUDING WARRANTIES OF MERCHANTABILITY AND FITNESS FOR A PARTICULAR
PURPOSE.
DESA Heating Products assumes no responsibility for indirect, incidental or consequential damages. Some states
do not allow the exclusion or limitation of incidental or consequential damages or limitations or exclusions may
not apply to you. This Limited Warranty gives you specific legal rights and you may also have other rights which
vary from state to state.

CALENTADOR DE PATIO PARA MESA DE PROPANO O GAS LP
Manual del propietario
MODELO SPC-21PHTSA
IMPORTANTE: Lea y comprenda este manual antes de
ensamblar, encender o dar servicio al calentador. El uso
inadecuado del calentador puede causar lesiones gra-
ves. Conserve este manual para referencias futuras.
ADVERTENCIA: para uso en exteriores solamente.
86NH
ADVERTENCIA
PELIGRO POR MONÓXIDO DE CARBONO
Este aparato puede producir monóxido de
carbono que no tiene olor.
Su uso en un espacio cerrado puede matarlo.
Nunca utilice este aparato en un espacio ce-
rrado tal como una casa rodante, una tienda
de campaña, un automóvil o una casa.
Guarde este manual para futuras referencias.
Para obtener mayor información, visite el sitio www.desatech.com

www.desatech.com 114082-01A
2
INFORMACIÓN DE
SEGURIDAD
ADVERTENCIA: este producto
contiene y/o genera químicos que
el Estado de California reconoce
que causan cáncer, defectos de
nacimiento u otros daños relacio-
nados con la reproducción.
ADVERTENCIA: no usar
en residencias ni en vehículos
recreativos.
ESPECIFICACIONES
Clasificación 2,93 - 4,40 kW (10.000 - 15.000 BTU/h)
Tipo de gas únicamente gas propano o LP
Presión del suministro de gas al regulador máxima: 150 PSI (1034,2 kPa) mínima: 5 PSI (34,5 kPa)
Presión del suministro de gas
salida del regulador, 11 pulgadas de col. de agua (2,74 kPa)
Encendido encendido piezoeléctrico
Consumo de combustible (por cilindro de 10.000 BTU/h: 2hrs; (0,21 kg/hr [0,46 lb/hr])
16 onzas de Propano o gas LP) 15.000 BTU/h: 1,25 hrs; (0,32 kg/hr [0,070 lb/hr])
Seguridad de la llama Válvula de gas operada por termopar con sistema de
agotamiento de oxígeno
ADVERTENCIA: peligro de
incendio, quemaduras, inhalación
y explosión. Mantenga los combus-
tibles sólidos, como materiales de
construcción, papel o cartón a una
distancia segura del calentador según
se recomienda en las instrucciones.
Nunca use el calentador en espacios
que contengan o puedan contener
combustibles volátiles o gaseosos o
productos como gasolina, solventes,
diluyente de pintura, partículas de
polvo o químicos desconocidos.
ADVERTENCIA GENERAL DE PELIGRO:
No cumplir con las precauciones e instrucciones proporcio-
nadas con este calentador puede causar la muerte, lesiones
físicas graves y pérdidas o daños a la propiedad debido al
peligro de incendio, explosión, quemaduras, asfixia, intoxi-
cación con monóxido de carbono y/o electrocución.
Únicamente las personas que puedan entender y seguir las
instrucciones deberán usar o dar servicio a este calentador.
Si necesita ayuda o información sobre el calentador, como manuales
de instrucciones, etiquetas, etc., comuníquese con el fabricante.
TABLA DE CONTENIDO
Especificaciones .................................................. 2
Información de seguridad .................................... 2
Seguridad con propano o gas lp ......................... 5
Identificación del producto ................................... 5
Características del producto ................................ 5
Desempaque ....................................................... 5
Instrucciones de ensamblaje ............................... 5
Suministro con propano o gas LP ....................... 6
Instrucciones de funcionamiento ......................... 6
Limpieza y mantenimiento ................................... 7
Almacenamiento .................................................. 8
Reparaciones ...................................................... 8
Solución de problemas ........................................ 9
Servicio técnico ..................................................11
Accesorios ..........................................................11
Piezas de repuesto .............................................11
Clasificación ilustrada de piezas y lista de piezas
... 12
Garantía y servicio de reparación ..................... 14

www.desatech.com
114082-01A 3
No podemos prever todos los usos que se le pueden
dar a nuestros calentadores. Verifique con la autoridad
local de seguridad contra incendios si tiene preguntas
acerca del uso de calentadores.
Otras normas rigen el uso de gases combustibles y
productos que producen calor para usos específicos. Las
autoridades locales pueden informarle acerca de éstas.
Intoxicación con monóxido de carbono: de “caldeo
directo” significa que todos los productos de com-
bustión entran al espacio que se está calentando. Aun
cuando este calentador opera con una eficiencia de
combustión muy cercana al 100%, produce cantida-
des pequeñas de monóxido de carbono. El monóxido
de carbono afecta más a algunas personas que a otras.
Los primeros signos de intoxicación con monóxido
de carbono se asemejan a los de la gripe, con dolor
de cabeza, mareo y/o náusea. Si usted presenta
estos síntomas, es posible que el calentador no esté
funcionando correctamente. ¡Respire aire fresco
inmediatamente! Compruebe que haya ventilación
adecuada y haga que reparen el calentador.
Gas propano: El gas propano es inodoro. Al gas
propano se le agrega un agente oloroso. El olor
le ayuda a detectar las fugas de gas propano. Sin
embargo, el olor que se añade al gas propano puede
desvanecerse. Es posible que haya gas propano
presente aunque no haya ningún olor.
Este es un calentador de propano de caldeo directo.
El propano es más pesado que el aire. Si hay una
fuga de propano en una de las conexiones o niples,
éste fluirá hacia el piso y se acumulará ahí con el
aire circundante, lo que formará una mezcla que es
potencialmente explosiva. Obviamente, las fugas de
propano se deben evitar, por lo que debe instalar el
suministro de propano con el mayor cuidado posible.
Lea Seguridad con propano o gas LP en la página 5
para obtener información adicional sobre cómo detec-
tar fugas de propano. Revise las nuevas conexiones
en busca de fugas utilizando una solución de agua
y jabón y siga todas las instrucciones de conexión
contenidas en este manual. Además, pida consejo a
su distribuidor de gas propano sobre la instalación del
suministro y aplicación de propano y pida también
que la revise en caso que haya alguna duda.
Si el calentador se va a hacer funcionar en presencia
de otras personas, es responsabilidad del usuario
hacer que dichas personas se familiaricen con las
precauciones e instrucciones de seguridad, así como
con los peligros asociados.
Asegúrese de leer y comprender todas las advertencias.
Conserve este manual para consulta. Es su guía para la
operación segura y correcta de este calentador.
INFORMACIÓN DE
SEGURIDAD Continuación
1. Revise el calentador completamente para ver si
presenta daños. NO haga funcionar un calenta-
dor dañado.
2. NO modifique el calentador ni haga funcionar
un calentador que ha sido sometido a modifica-
ciones de su condición original.
3. Utilice únicamente gas propano o LP.
4.
Utilice únicamente suministros de propano con EX-
TRACCIÓN DE VAPORES. El cilindro de propano
se debe de configurar para la extracción de vapores,
de acuerdo a Ensamblaje de botellas pequeñas de
propano de la Asociación de gas comprimido. Si
tiene alguna pregunta acerca de la extracción de
vapores, pregunte al distribuidor de propano.
5. Nunca utilice el calentador si el contrapeso no
está ensamblado en la base. La base debe contar
con peso para evitar que se vuelque.
6. Use sólo el regulador preinstalado en la fábrica
que se incluye con el calentador. Utilice única-
mente reguladores de presión especificados en
este manual para su reemplazo.
7. Si se usa, inspeccione la manguera antes de cada
uso del calentador. Si es evidente una abrasión
excesiva o desgaste, o si la manguera está rota,
debe ser reemplazada antes de poner en fun-
cionamiento el calentador. Utilice el juego de
ensamblaje de manguera 100427-01 (consulte
Accesorios en la página 11).
8. Este calentador es PARA USO EN EXTERIO-
RES SOLAMENTE; aun así, asegúrese de que
haya suficiente aire fresco para la ventilación.
No lo utilice dentro de edificios, cocheras u otros
espacios cerrados.
9. Si en cualquier momento percibe olor a gas,
DETENGA INMEDIATAMENTE el funciona-
miento del aparato hasta que la fuente de donde
proviene el gas haya sido localizada y reparada.
Lea Seguridad con propano en la página 5 para
obtener información adicional sobre cómo
detectar fugas de propano.
10. Instale el calentador de manera que no esté
expuesto a rocío de agua, lluvia o goteras.
11. Mantenga las distancias mínimas con respecto
a las personas o a los materiales comunes com-
bustibles (como el papel) de 1,10 m (3,6 pies)
con respecto a la parte superior y de 61 cm (2
pies) con respecto al reflector.
12. Hágalo funcionar únicamente sobre una super-
ficie estable y nivelada.
13. No rocíe aerosoles cerca del calentador mientras
éste esté funcionando, ni poco después de que
deje de funcionar.
14. No limpie el calentador con limpiadores combus-
tibles o corrosivos. Use agua tibia jabonosa.

www.desatech.com 114082-01A
4
15. Revise que en los quemadores y ductos de aire
de ventilación pueda fluir libremente el aire y
que estén libres de obstrucciones. En estas áreas
comúnmente se acumulan telarañas que pueden
producir condiciones de peligro, dañar el calen-
tador y causar que sea inseguro operarlo. Debe
de revisar el calentador si se presenta cualquiera
de las siguientes condiciones:
a) Olor a gas, aunado a un coloramiento predo-
minantemente amarillo en las puntas de las
llamas del quemador.
b) El calentador no alcanza la temperatura.
c) El brillo en el quemador no es uniforme.
d) Se escuchan chasquidos del quemador durante
uso normal, aparte de cuando se apaga.
16. Use solamente agua jabonosa (1 parte de de-
tergente líquido para platos y 3 partes de agua)
para revisar que no haya fugas cada vez que se
conecta un cilindro de propano. Las burbujas
indican una fuga.
17. No ajuste el regulador de gas. Si no está seguro
del tipo de gas o de la presión de su aparato,
llame a una persona de servicio calificada.
18.
Ponga la perilla de control en la posición de “APA-
GADO” cuando no esté usando el calentador.
19. Siempre desconecte el suministro de gas cuando
el calentador esté “APAGADO”.
20. No lo mueva, manipule ni repare mientras está
caliente o encendido.
21. Permita que pasen 45 minutos después de usarse
para que se enfríe el calentador antes de intentar
moverlo.
22. No haga funcionar este aparato bajo condiciones
de mucho viento. La velocidad máxima permi-
sible es de 16 km/h (10 mph).
23. No opere este aparato en condiciones de tempe-
ratura por debajo de los 5° C (40° F).
24. Mantenga el calentador alejado de áreas donde se
almacenen o se usen líquidos, vapores o sólidos
inflamables.
25. Si el calentador se opera en áreas con aire salado,
será necesario limpiarlo con más frecuencia;
de lo contrario, la longevidad de la unidad se
deteriorará rápidamente. Use agua jabonosa para
limpiar la unidad.
26. Los materiales o artículos que se almacenen
debajo del calentador estarán sometidos a un
calor radiante y pueden sufrir daños graves.
27. Úsese sólo de acuerdo a los códigos locales o,
a falta de dichos códigos, de acuerdo al Código
Nacional de Gas Combustible, ANSI Z223.1.
Cualquier resguardo u otro dispo-
sitivo de protección que haya sido
retirado para fines de servicio debe
volver a colocarse antes de hacer
funcionar el calentador.
Las temperaturas de las superficies
se calientan mucho cuando el calen-
tador está en funcionamiento. Los
niños y los adultos deben permane-
cer alejados para evitar quemaduras
o igniciones de la ropa.
Los niños menores deben ser su-
pervisados muy cuidadosamente
cuando se encuentren en el área
del calentador.
La ropa u otros materiales infla-
mables no se deben colgar en el
calentador, ni colocarse sobre éste
o cerca de él.
Una persona de servicio capacitada
debe realizar la instalación y las
reparaciones. El calentador debe ser
inspeccionado antes de su uso y al
menos una vez al año por una persona
de servicio capacitada. Es posible
que sea necesario realizar limpiezas
más frecuentes. Es imperativo que los
compartimientos de control, quema-
dores y pasajes de aire circulante del
calentador se mantengan limpios.
PRECAUCIÓN: se debe utilizar
el regulador de presión de gas que
se incluye con este aparato. Este
regulador está calibrado para una
presión de salida de 2,74 kPa (11
pulgadas de columna de agua).
INFORMACIÓN DE
SEGURIDAD Continuación

www.desatech.com
114082-01A 5
SEGURIDAD CON
PROPANO O GAS LP
ADVERTENCIA: para uso en
exteriores solamente.
PELIGRO DE ASFIXIA
• No utilice este calentador para la calefac-
ción de lugares de alojamiento humano.
• No lo utilice en áreas sin ventilación.
• No se debe obstruir el flujo de aire para
combustión y ventilación.
• Se debe procurar el aire necesario para
ventilación a fin de que se cumplan los
requisitos de aire para combustión del
calentador que se está usando.
• Consulte Especificaciones, en la página
2, la placa del calentador, o bien, llame a
DESA Heating Products para determinar
los requerimientos de aire para la com-
bustión y ventilación del calentador.
• La falta de aire para una ventilación adecua-
da producirá una combustión incorrecta.
• La combustión incorrecta puede generar
intoxicaciones por monóxido de carbono
que pueden resultar en lesiones graves
o en la muerte. Los síntomas de la intoxi-
cación con monóxido de carbono pueden
incluir dolores de cabeza, mareos y difi-
cultad para respirar.
IDENTIFICACIÓN DEL
PRODUCTO
Figura 1. Calentador de patio para mesa
de propano o gas LP
Reflector
del domo
CARACTERÍSTICAS DEL
PRODUCTO
PILOTO DE SEGURIDAD
Este calentador tiene un piloto con un sistema de
apagado de seguridad con Sensor de agotamiento de
oxígeno (ODS, por sus siglas en inglés). El piloto con
ODS es una característica necesaria de los calentado-
res de patio para mesa. El piloto con ODS apaga el
calentador cuando no hay suficiente aire fresco.
SISTEMA DE ENCENDIDO
PIEZOELÉCTRICO
Este calentador tiene un encendedor piezoeléctri-
co. Este sistema no necesita de fósforos, baterías ni
de otras fuentes para encender el calentador.
DESEMPAQUE
1. Saque el calentador de la caja.
2. Retire todo el empaque de protección que se
agregó al calentador para su envío.
3.
Revise el calentador para ver si hay algún daño debido
al transporte. Si el calentador está dañado, devuélvalo
de inmediato al distribuidor a quien lo compró.
INSTRUCCIONES DE
ENSAMBLAJE
Herramientas necesarias:
• Destornillador phillips
• Pinzas estándar
Inspeccione los componentes del calentador en busca
de posibles daños sufridos durante el transporte. Si
se encuentra algún daño, informe inmediatamente
al distribuidor. Revíselo para asegurarse que todos
los componentes estén incluidos con el calentador
(consulte las páginas 12 y 13).
1.
Fije el ensamblaje de los controles y del quemador
al ensamblaje de la base con 4 tornillos (consulte la
figura 3, página 6). Apriete los tornillos. Coloque la
etiqueta de instrucciones de operación debajo de la
perilla de control para que sea fácil su revisión.
Figura 2. Distancias mínimas en relación
a los combustibles
Protector
de cable
Carcasa del
cilindro de
propano o
gas LP
Base
Perilla de
control
40,64 cm
(16 pulgadas)
76,20 cm
(30 pulgadas)
debajo del
quemador
40,64 cm
(16 pulgadas)
40,64 cm
(16 pulgadas)

www.desatech.com 114082-01A
6
INSTRUCCIONES DE
FUNCIONAMIENTO
PREPARACIÓN PARA EL FUNCIONAMIENTO
1. Revise el calentador para ver si sufrió algún daño
durante el transporte. Si se encuentra algún daño,
informe inmediatamente a la fábrica.
2. Siga toda la información de seguridad.
3. Asegúrese de que la perilla de control esté en la
posición de APAGADO.
4. Abra la puerta de la carcasa del cilindro de pro-
pano o gas LP girando la perilla del cerrojo en el
sentido contrario al de las manecillas del reloj.
5. Verifique que la entrada del regulador y del cilindro
de propano o gas LP no estén contaminados por
tierra, telarañas, etc. Límpielo si es necesario.
6. Atornille el extremo enroscado del cilindro de
propano o gas LP en el sentido de las manecillas
del reloj a la entrada enroscada del regulador,
apretándolo con la mano.
IMPORTANTE: utilice únicamente cilindros
estándar de 16,4 onzas construidos y marcados de
acuerdo con el Departamento de Transportación de
los E.E.U.U. (D.O.T., por sus siglas en inglés) Tipo
de conexión 600. Desconecte el cilindro cuando el
aparato no esté en uso.
7. Aplique una solución de agua y jabón a la
conexión entre el regulador y el cilindro. La
formación de burbujas indicará una fuga.
8. En caso de presentarse alguna fuga, retire el
cilindro de propano o gas LP. Revise y limpie
la conexión. Vuelva a conectar el regulador y el
cilindro de propano o gas LP y vuelva a revisar
si hay alguna fuga. Si la fuga persiste, llame a
DESA Heating Products al 1-866-672-6040.
9. Cierre la puerta con el cerrojo
PARA ENCENDER EL CALENTADOR
1. Gire la perilla de control del gas en el sentido de las
manecillas del reloj hacia la posición de apagado.
2. Presione y gire la perilla de control del gas en
sentido contrario al de las manecillas del reloj
hasta la posición de ENCENDIDO/ALTO. Esto
encenderá el quemador. Si es necesario, manten-
ga presionada la perilla girándola en el sentido de
las manecillas del reloj y después en el sentido
contrario al de las manecillas del reloj hasta que
el quemador se encienda.
3.
Mantenga la perilla de control presionada durante 30
segundos después de encender el quemador. Después
de los 30 segundos, suelte la perilla de control.
4.
Si el quemador no permanece encendido, gire la
perilla de control en el sentido de las manecillas del
reloj a la posición de APAGADO inmediatamente,
espere 5 minutos y vuelva a repetir los pasos 2 y 3.
5. Cuando el quemador se encienda, gire la perilla
de control del gas a la posición deseada.
PARA APAGAR EL CALENTADOR
1. Gire la perilla de control en el sentido de las ma-
necillas del reloj hacia la posición de apagado.
2. Alinee los 3 orificios del domo con los 3 pernos
que sobresalen de la parte superior del quemador
(consulte la figura 3). Coloque el domo sobre
los pernos. Instale las 3 tuercas ciegas sobre los
pernos. Apriete con pinzas.
La instalación debe apegarse a los códigos locales
o, a falta de dichos códigos, de acuerdo al Código
Nacional de Gas Combustible, ANSI Z223.1.
Figura 3. Ensamblaje del calentador
Reflector
del domo
Tuercas ciegas
Ensamblaje de
los controles y
del quemador
Ensamblaje
de la base
Tornillos
INSTRUCCIONES DE
ENSAMBLAJE Continuación
SUMINISTRO CON
PROPANO O GAS LP
El propano o gas LP y el (los) tanque(s) de pro-
pano o gas LP los debe aprovisionar el usuario.
El cilindro de propano o gas LP que va a utilizar
debe estar construido y marcado de acuerdo con
las especificaciones para los cilindros de propano o
gas LP del Departamento de Transportación de los
E.E.U.U. (D.O.T., por sus siglas en inglés).
Use el calentador solamente con un sistema de
suministro con extracción de vapores de propano
o gas LP. Consulte el capítulo 5 de la Norma de al-
macenamiento y manejo de gas licuado de petróleo,
ANSI/NFPA 58 y/o la norma CAN/CGA B149.2.
La biblioteca local o el departamento de bomberos
debe tener este folleto.
La cantidad de propano o gas LP lista para usarse de
los tanques de propano o gas LP varía. Dos factores
determinan esta cantidad:
1. La cantidad de propano o gas LP en el (los)
tanque(s) .
2. La temperatura del(de los) tanque(s).
Table of contents
Languages:
Other Desa Patio Heater manuals
Popular Patio Heater manuals by other brands

Bigassfans
Bigassfans Obsidian BAFCF30240B Installation, operation and maintenance manual

Firesense
Firesense KLD7001S instruction manual

Sun Heat
Sun Heat WL15BTS-B Safety instructions and operation manual

HAMPTON BAY
HAMPTON BAY HDMIRAGECO PC user manual

Mi-T-M
Mi-T-M MH-0042-PM11 Operator's manual

Master
Master SSR-834H-IHR User's manual & operating instructions