Designs for Vision LED DayLite WireLess DVI-WRLS User manual

LED DayLite®
WireLess
™
U
SER
GUIDE
Model: DVI-
WRLS
Ver. 4.21
(En)
®

2
LED DayLite®WireLess
TM
User Guide
CONTENTS
Indications for Use ..............................................................3
Device Description ..............................................................3
Contraindications ................................................................ 3
Warnings ..............................................................................4
Specifications.......................................................................7
Device Diagrams..................................................................9
Directions for Use..............................................................11
Charging the Battery Pods....................................................11
Using the Headlight..................................................................13
Wireless IR HDi Headlight Operation...............................15
Understanding the Charging Cradle.................................17
Inspection and Preventative Maintenance...................... 18
Plug and Cord Sets.............................................................19
Description of Various Symbols ....................................... 20
Warranty ............................................................................22

LED DayLite®WireLess
TM
User Guide
3
INDICATIONS FOR USE
The Designs for Vision®LED DayLite®WireLessTM is a lightweight, frame
mounted headlight that is designed for general illumination in
laboratory settings.
DEVICE DESCRIPTION
The Designs for Vision® LED DayLite® WireLessTM provides bright,
portable light to the laboratory environment. The headlight is designed
to clip onto a wide variety of frames. It is powered by a lithium ion
battery and generates a 3” spot of light at a 12-inch working distance.
The light has a correlated color temperature of 5800˚K and a maximum
intensity up to 3,000 lux. The unit can run on battery power for approx.
100 minutes before needing to be recharged.
CONTRAINDICATIONS
None known

4
LED DayLite®WireLess
TM
User Guide
WARNINGS
Save these instructions. This manual contains
important safety and operating instructions
Always examine the unit and accessories for damage
before commencing use. Damaged accessories must
not be used and must be replaced. Use original
Designs for Vision, Inc. parts and accessories only. The
use of unapproved parts may void the warranty.
To reduce the risk of battery explosion, follow these
instructions and those marked on the battery
Do not Autoclave
For indoor use only
If the equipment is used in a manner not specified by
Designs for Vision, Inc., the protection provided by the
equipment may be impaired
A spent battery pod should not be used. Contact
Designs for Vision Inc. for ordering a replacement
Replace with Designs for Vision, Inc. battery only.
Using unapproved batteries may not work and will
void the warranty

LED DayLite®WireLess
TM
User Guide
5
This equipment and accessories do not contain
serviceable parts. All repairs need to be conducted by
Designs for Vision, Inc. service personnel
Do not let liquids enter openings or ports. Do not
immerse parts in solutions. Allowing liquids to enter
openings or ports may void warranty.
Equipment not suitable for use in the presence of a
flammable anesthetic mixture with air or in an oxygen
rich environment
Care must be taken when operating this equipment
around other equipment to avoid reciprocal
interference. Potential electromagnetic or other
interference could occur to this or to the other
equipment. Try to minimize this interference by not
using other equipment in conjunction with this device
No modification of this equipment is allowed.
Performing unauthorized modification on the
equipment, accessories or the product labelling may
void the warranty
Remove battery pod from headlight if this device is not
in use and will be stored for some time. Maintain
storage at environmental conditions listed below

6
LED DayLite®WireLess
TM
User Guide
Improper use of battery pod may cause them to get
hot, ignite or explode. Always follow all safety
precautions listed in this manual
Never make changes or modifications to the battery
pod
Do not short circuit
Do not expose to fire
Protect battery pod from fluids and damp
environments
Charge battery pods with supplied charger only
Waste of electrical and electronic equipment must not
be disposed as unsorted municipal waste. It must be
collected separately, and must be disposed as per local
regulations

LED DayLite®WireLess
TM
User Guide
7
SPECIFICATIONS
POWER REQUIREMENTS
Designs for Vision, Inc.®
LED DayLite®WireLess™
Model Number: DVI-WRLS
Charger Model Number: SMT-CH
Battery Power :
3.7VDC, 700mAh
1 Cell 16340 Li-Ion Battery
For Charging :
Input : 100-240VAC, 50/60 Hz, 0.5A rms
Output : 4.2VDC, 1.0A max per port
ILLUMINATION
At 12” measured with a cosine
corrected light meter
35,000 lux ±5%
45,000 lux ±5% (HDi version)
OVERCURRENT PROTECTION
Resettable Polyfuse/One-Time AC Fuse
ENVIRONMENTAL OPERATING
CONDITIONS:
TEMPERATURE:
RELATIVE HUMIDITY:
ATMOSPHERIC PRESSURE:
10OC to 40OC
30% to 75%
700 to 1060 hPa
STORAGE & SHIPPING
TEMPERATURE:
RELATIVE HUMIDITY:
-20OC to 40OC
10% to 90%
DIMENSIONS:
WIRELESS™W/BATT POD:
WIRELESS™IR HDI™ W/BATT POD:
WEIGHT:
CHARGING CRADLE:
WEIGHT:
1.80” x 0.90” x 2.75”
1.79” x 0.88” x 2.81”
1.45 oz/ HDi 1.80 oz
3.63” x 3.75” x 1.50”
8.35 oz.
APPROVALS: UL 61010-1: 2012
CAN/CSA C22.2#61010-1: 2012

8
LED DayLite®WireLess
TM
User Guide
IEC 61010-1:2010
UL 1310:2011
CAN/CSA C22.2#107.1:2001
EN 60335-1:2012
EN 60335-2-29:2004
PATENTS:
HDi™ Technology Patent Pending
US PAT. 8,851,709
US PAT. 8,215,791
US PAT. 7,690,806 B2
US PAT. 8,215,791
US PAT. D600,728
US PAT. D589,545
US PAT. 8,851,709
US PAT. 7,690,806

LED DayLite®WireLess
TM
User Guide
9
The LED DayLite® WireLessTM includes these main components:
WirelessTM Headlight
or
WirelessTM IR HDiTM Headlight
Three Battery Pods
Smart Charging Cradle
AC Power Cord
Accessories include:
Hex Drivers (if equipped)
UV/Blue Light Filter
T-Mount Bracket (sold separately)
Color Coded Bands
Operation Manual
Warranty Card
DEVICE DIAGRAMS
Your LED DayLite® WireLessTM is designed to be simple and lightweight.
It consists of an LED Headlight, Battery Pods and a Charging Cradle.
NOTE: The UV/blue light filter (not shown) comes attached to the LED
Headlight, but is removable.The following diagrams identify each part
for your reference in this manual:

10
LED DayLite®WireLess
TM
User Guide
F
IG
.
1
F
IG.2
CHARGING BAY
S
MART
C
HARGING
C
RADLE
B
ATTERY
P
OD
LED HEADLIGHT
T-MOUNT CONNECTION
B
ATTERY
F
UEL
G
AUGE
B
ATTERY
I
NDICATOR
A
DJUSTABLE
HEADLIGHT
C
APACITIVE
TOUCH
SWITCH

LED DayLite®WireLess
TM
User Guide
11
DIRECTIONS FOR USE
CHARGING THE BATTERY PODS
Remove the components from the shipping container, checking that all
parts on the packing list have been received.
Carefully remove the headlight, battery pods,
charging cradle and AC power cord from the
packaging carton.
The charging cradle is designed to meet multi-
national regulatory requirements and has multi-input voltage capability
to accommodate various line voltages from 100-240 VAC. The battery
pods are to be charged with the supplied charger only.
Plug the AC power cord into the charging cradle and connect to an AC
outlet. Note: International plugs are available through Designs for
NOTE: The
battery pods
need to receive
a full charge
before initial
operation
F
IG
.
3

12
LED DayLite®WireLess
TM
User Guide
Vision; refer to the list of part numbers on page 19. You can now flip the
power switch on the back of the charging cradle to turn on the power.
You should notice two pulsing BLUE lights on the battery indicators,
which show that the charging bays are ready to charge (Fig.3). Screw
two battery pods firmly into the two charging bays all the way down
(Fig. 4). The BLUE lights should now turn off and YELLOW indicator lights
should start flashing. Once the charge cycle has begun, the lights will
illuminate RED and
display the current
state of charge.
When the batteries
are finished charging,
(approx. 60 mins),
the LEDs should all
light up GREEN. You
can now remove the
battery pods from
the charging cradle.
F
IG.4
F
IG.4
LED DayLite®WireLess
TM
User Guide
13
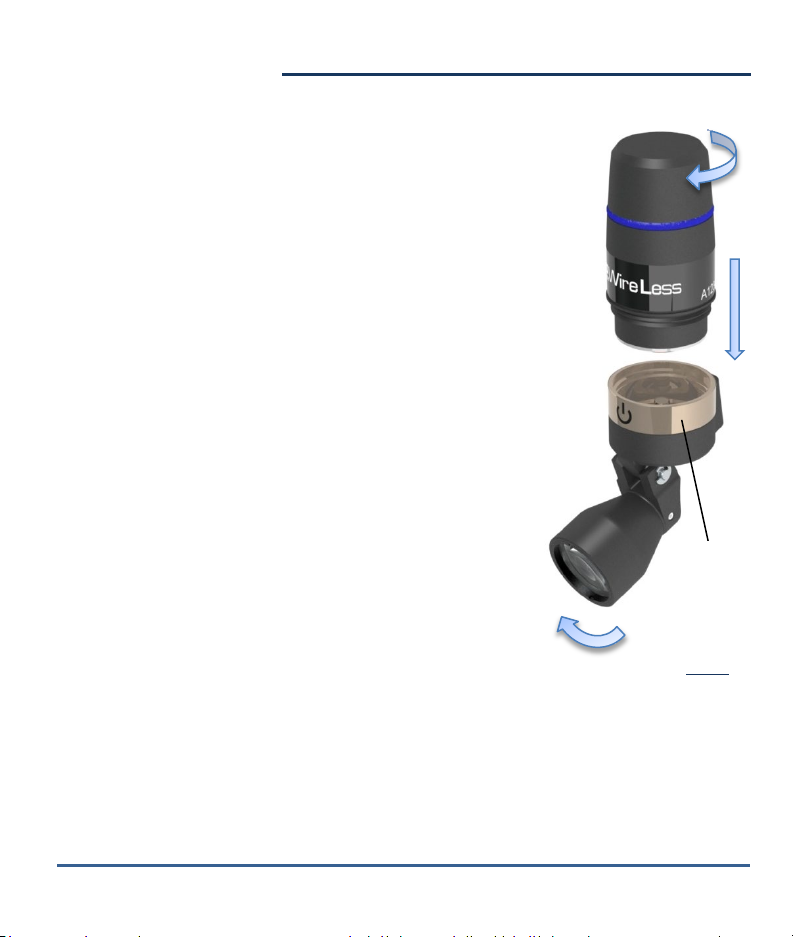
USING THE HEADLIGHT
Place the LED headlight onto the t-mount
bracket for your frame. Take a charged battery
pod and screw it firmly down onto the LED
headlight. NOTE: Make sure to remove dust plug
before installing battery pod. Do not apply
excessive force when installing battery pod.
Your LED DayLite® WireLessTM uses a capacitive
touch switch to control the light. The indicated
area shows where you can touch (Fig. 5). Touch
the silver band once to activate the light. The
light will turn on at its highest intensity. If you
touch the band a second time, the light will
reduce to medium intensity. The light will
deactivate the third time you touch the silver
band. Note: Make sure the capacitive touch sensor is not making
contact with other items when in use.
CAPACITIVE
T
OUCH
S
WITCH
F
IG.5

14
LED DayLite®WireLess
TM
User Guide
The LED DayLite® WirelessTM also includes a Low Battery Warning. At
approximately five (5) minutes remaining, the headlight will flash three
times. This will continue once each minute until the headlight shuts off.
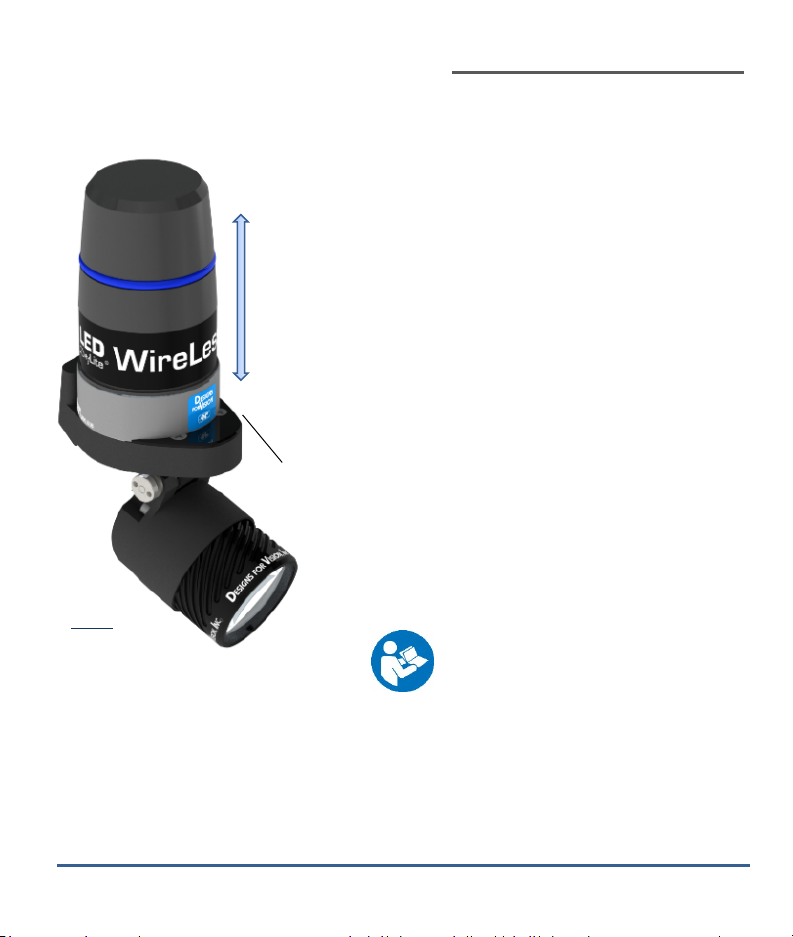
The headlight can be adjusted up and down to align with your point of
view. NOTE: Move only the headlight to make adjustments. Do not grab
battery pod to make adjustments to headlight position.
A UV/blue light filter is provided to prevent premature curing of dental
composites. To use,
slide the filter over
the front of the
headlight until
completely seated.
Tighten the set
screw on the
bottom of the filter
to properly secure to the headlight. You can now flip the UV/blue light
filter in and out of the path of light as required.
F
IG
.
6
LED DayLite®WireLess
TM
User Guide
15
WIRELESS IR HDI HEADLIGHT OPERATION
Your LED DayLite® WireLess™IR HDi™uses an infrared (IR) switch to
control the light. The indicated area
shows where the sensor is located (Fig.
7). Pass your hand within six inches of
the top of the sensor. The headlight will
be looking for an intentional swipe. The
first swipe will activate the light. The
light will turn on at its highest intensity.
If you swipe your hand pass the sensor
a second time, the light will reduce to
medium intensity. The light will
deactivate on the third pass.
Please see the guide sheet
included with your light.
The LED DayLite® WireLess™IR HDi™incorporates an accelerometer
which monitors the headlight’s absolute position. When the headlight
is mounted onto a frame and the frame is on your face, the IR sensor is
F
IG.7
INFRARED
SWITCH
6INCH
R
ANGE
16
LED DayLite®WireLess
TM
User Guide
active. However, when the frame is hanging from a pair of chum straps
the IR sensor is deactivated. This is done to minimize unintentional
activation while the headlight is not in use.
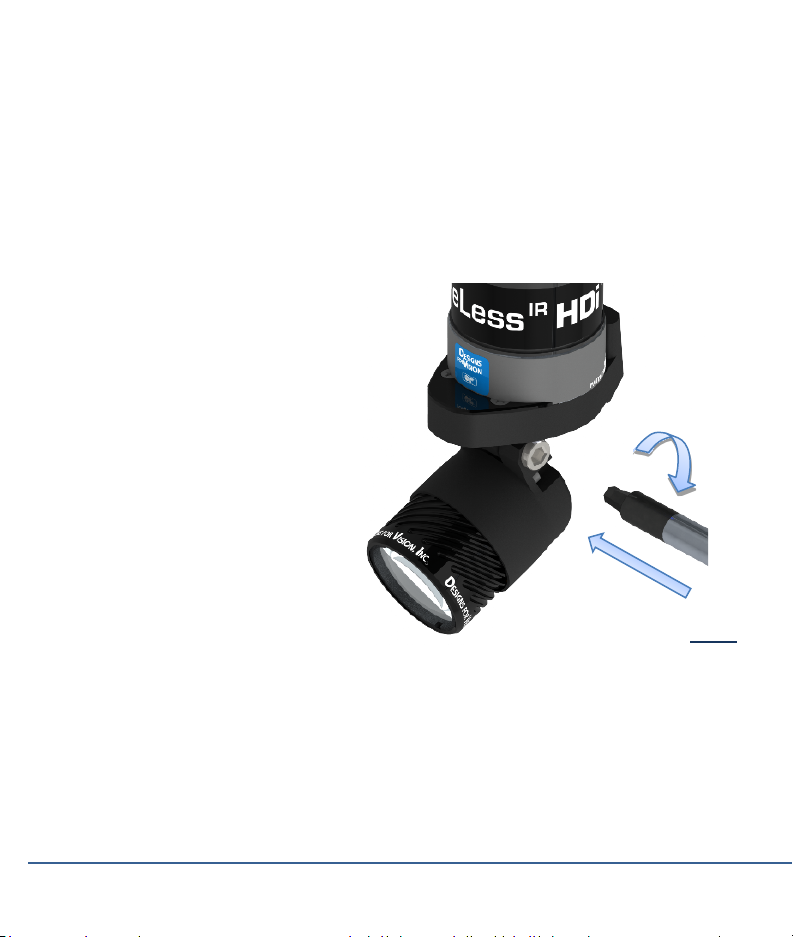
The headlight can also be adjusted up and down to align with your point
of view. NOTE: Move only the headlight to make adjustments. Do not
grab battery pod to make
adjustments to headlight
position. The headlight can
then be locked into that
position using the provided
driver.
Locate the hex in the locking
shaft of the headlight (Fig. 8).
Place the driver into this
opening and turn clockwise to tighten the shaft. To unlock the position,
loosen the shaft by turning counter-clockwise. NOTE: The shaft will only
turn a limited distance. Do not force in either direction.
FIG.
8

LED DayLite®WireLess
TM
User Guide
17
UNDERSTANDING THE CHARGING CRADLE
Your LED DayLite® WireLessTM comes with a rapid-charge smart battery
monitoring system. This feature will check the health of your battery as
well as indicate when it needs to be replaced. The Battery Status
indicators can display messages according to the following chart:
Battery Status
Message
POWER ON
WAITING TO CHARGE
REPLACE BATTERY
BATTERY OVERHEAT
-POWER ON:Indicates that power is on to the charging bay
-WAITING TO CHARGE:Indicates that the charge cycle is preparing
to start (NOTE: Typical charge prep is 5 seconds)
-REPLACE BATTERY:Indicates an error with the battery pod.
Remove from charging bay and reinstall. If the error continues,
discard the battery pod

18
LED DayLite®WireLess
TM
User Guide
-BATTERY OVERHEAT:Indicates an overheat condition on the
battery. Make sure the charger is in a cool location. If the error
continues, discard the battery pod
NOTE: Never use a battery pod that continuously gives Replace Battery
and/or Battery Overheat indications. Discard in accordance with all
regulations and contact Designs for Vision, Inc. for a replacement.
INSPECTION AND PREVENTATIVE MAINTENANCE
•Clean lenses with a standard glass cleaner and a soft, lint-free
cloth, making sure not to scratch the surface. It is recommended
for disinfection that all the exposed plastic sections of the
headlight be wiped with Lysol IC surface disinfectant/cleaner or an
equivalent plastic-safe cleaner. Note: Do not use alcohol, phenol,
ammonia or iodine complex solutions
•Wipe the sections rather than spraying onto plastic parts. Note:
Do not let liquids enter openings or ports. Do not immerse parts in
solutions. Using solutions other than recommended may void
warranty. Allowing liquids to enter openings or ports may void

LED DayLite®WireLess
TM
User Guide
19
warranty.
•Battery Pods should be replaced every 12 months to ensure
proper operation
NOTE: Do not Autoclave
NOTE: For indoor use only
NOTE: Disposal of the equipment and the accessories at the end of
their useful lives should be in accordance with all national and local
regulations
NOTE: If the equipment is used in a manner not specified by Designs
for Vision, Inc., the protection provided by the equipment may be
impaired
PLUG AND CORD SETS
United States Plug & Cord Set
European Plug & Cord Set
Australian Plug & Cord Set
South African Plug & Cord Set
4706-0000-0038
4706-0000-0030
4706-0000-0032
4706-0000-0039

20
LED DayLite®WireLess
TM
User Guide
Indian Plug & Cord Set
English Fused Plug & Cord Set
Japanese Plug & Cord Set
4706-0000-0033
4706-0000-0034
4706-0000-0037
DESCRIPTION OF VARIOUS SYMBOLS
ATTENTION: CONSULT ACCOMPANYING
DOCUMENTS
INDICATES CONFORMITY OF THE PRODUCT
WITH MDD 93/42/EEC ANNEX VII
INDICATES WHERE THE UNIT CAN BE
TURNED ON AND OFF
WASTE ELECTRICAL AND ELECTRONIC
EQUIPMENT (WEEE) DIRECTIVE SYMBOL
CAUTION: HOT SURFACE
Table of contents
Other Designs for Vision Dental Equipment manuals


Popular Dental Equipment manuals by other brands


DENTAURUM
DENTAURUM desktop Compact Instructions for use

hatch
hatch comfort TAURAUS C1 User's operating manual

KaVo
KaVo MASTER lase Short instructions for use

mectron
mectron Silverlight Manual of use and maintenance

SCHEU
SCHEU IMPRIMO Clean Operation manual

Renfert
Renfert SYMPRO Translation of the original instructions for use