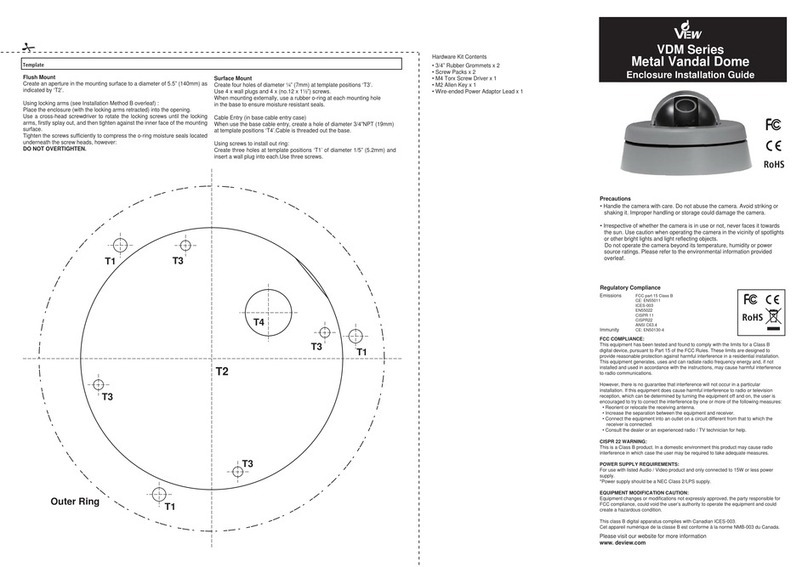
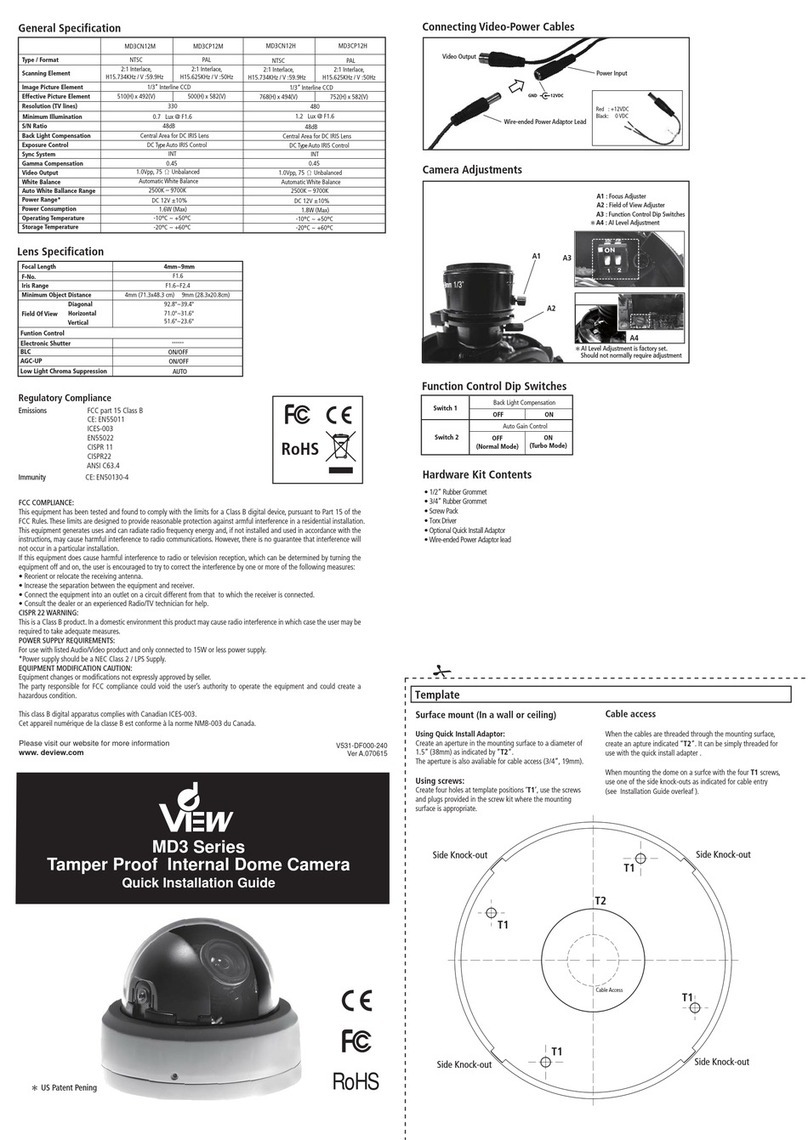
DeView CQ Series User manual

Instruction Manual
Parts Descriptions Specifications
NTSC PAL
1/3 Format Interline CCD Sensor
976(H) x 494(V) 976(H) x 582(V)
NTSC 2:1 Interlace PAL 2:1 Interlace
H:15750Hz V:59.94Hz H:15625Hz V:50.0Hz
1.0 Vpp BNC 75Ωunbalanced
650 TVL TYPE
Image Size
Pixel Element
Scanning Frequency
Video Output
* Night Mode: 700 TV Lines
Resolution
Minimum illumination Day Mode: 0.3 Lux @ F1.2 (DSS OFF)
Day Mode: 650 TV Lines
* Night Mode: 0.01 Lux @ F1.2 (DSS OFF)
12VDC or 24VAC
5.7W Max
3Ø Green LED on Rear Panel
3pin Push Lock Terminal Block on Rear
4pin Connector on Rear
CS Mount, Change C Mount by Adaptor
Adjust by screw
1/4” Top and Bottom
73.5 mm(W) x 58 mm(H) x 126 mm (L)
IRIS Connector
Power Source
General
Power Consumption
Power Indicator
Video Drive
DC Drive
Lens Mount
Back Focus Adjust
Mounting Hole
External Dimensions
-10°C~50°C / -20°C~60°C
Operation/Storage Temperature
100~240 VAC
Mains Power
Low Voltage
* Night Mode is available Only for TDN Models
CQ Series
Motion Detection & Face Detection
High Resolution Box Camera
Never attempt to disassemble or modify the
camera. Any modification could lead to
damages that are not covered by the guarantee.
Make sure the power source is switched off and
the camera disconnected before installation.
Refer servicing to qualified personnel only.
To prevent fire or electrical shock, use only a
regulated power supply and the wiring used
should be appropriate for the input terminals.
Camera Installation
The camera can be mounted by using either the bracket
mount on the top or bottom (see part descripton 2).
The bracket mounts accept standard photographic mounting
bolts (1/4" BSW or 20 UNC).
For AC/DC Dual Power Model: The camera operates at either 24 VAC or 12 VDC.
For AC Mains Power Model: The camera operates at 100 ~240 VAC.
Connections are indicated in the rear panel of the camera.
The power supply must be a stable power source and should only be installed by qualified personnel.
The power LED on the rear panel is illuminated when the camera is connected to a power source.
Connect the 75 Ohm coaxial cable to video output (see part description 6).
Precautions
Connecting to the Power Source and Video Output
Do not expose or operate the camera in wet areas.
Moisture may damage the camera and also increase
the danger of electrical shock
Do not attempt to aim the camera at the sun or other
extremely bright objects, even when switched off.
This may cause damage to the CCD and invalidate
the warranty.
Do not touch the lens elements or the CCD with
your fingers while insalling or adjusting the camera.
This will reduce image quality or cause damage to
the camera.
This product must be installed and maintained in accordance with good
installation practices, by qualified personnel only.
To prevent damage to your camera or injury to yourself or to others, read and
comply with the safety precautions as follows:
Ver.03/2011
Please visit our website for more information:
www.deview.com
Product specifications subject to change without notice.
Certain product names mentioned herein may by trade names
and/or registered trademarks of other companies.
Ensure the bracket, screws (inc. wall plugs,
if used) and mounting surface can support
the load of the camera, lens and bracket.
Bracket Mount
Protective
Cover
3
CQ3/V531-CQ000-203
S/N Ratio 50 dB
Functional Specification
Exposure Control
AES
MES
Reverse Control
Auto White Balance (AWB)
Auto White Balance Range
Chroma
WDR Range
Day & Night
SYNC System
Auto IRIS Lens / Auto Electronic Shutter /
Manual Electronic Shutter
Auto Luminance Control
1/60 ( 1/50 ) ~ 1/100000 sec Max.
8 Step 1/60(NTSC)1/50 (PAL),
1/100(NTSC) 1/120(PAL), 1/250, 1/500,
1/1000, 1/2000, 1/5000, 1/10000
H-Reverse / V-Reverse / HV-Reverse
AWB / AWB-EX / Push White Balance /
Manual White Balance / AWB Speed
Standard Range: 2500K ~ 9500K
Extended Range: 1800K ~ 18000K
Level 0-15 Adjustable
53 dB Max
Auto / Day / Night
INT / Line Lock
Day/Night Switching Input Dry (voltage-free) contact, from external device
Manual White Balance Range 1x Preset, R Gain and B Gain Adjustable
Remote Control RS-485
Motion Detection ON / OFF
Digital Zoom 8x Max.
Face Detection Yes, ON / OFF
3D DNR, OFF / Low / Middle / High / Auto / DVRDigital Noise Reduction (DNR)
AGC Max Gain 36 dB
Top View Side View
Rear View
Front View
12
SET
Control Key
SET
Control Key
45
AC/DC Dual Power AC Mains Power
1. Back Focus Adjustment
2. Bracket Mount
3. Camera Sensor
4. OSD Navigation Pad
5. OSD Enter Button
6. BNC Composite Video Output
7. Second Video Output
8. DC Lens Connector
9. Video Lens Connetor
10. Motion/Face Detect Alarm Output
11. Day/Night Switching Input
12. RS-485 Connection Terminal
13. Power Input Terminel
14. AC Mains Power Input Connector
15. Power Lamp Indicator
D/N SW
6 7 8
91312
Rt ON
D/N SW
6 7 8
914
15
12
Rt ON
D/N SW
11
10
Video Output
D/N SW
Rt ON
Mains Power
Connector
Power Input
Terminal
Video Output
D/N SW
Rt ON
Digital Slow Shutter (DSS) 2x, 4x, 8x, 16x, 32x, 64x,128x, 256x
Resolution Enhancement Standard / Enhancement / Enhancement-EX

Connection and Adjustment
Lens Installation
Manual / Fixed Lens Mounting
1. If using a C-mount lens, attach the C-CS mount adaptor before installaing the lens.
2. Move the back focus adjustment lever fully to the left, with the lens facing towards you
(see Back Focus Adjustment).
3. Install the lens on to the camera.
4. Adjust the Back Focus to the correct positon then secure the screw.
5. Adjust the Zoom and Focus levers of the lens to acquire a clear image and the
required field of view.
Auto IRIS Lens Mounting
1. If using a C-mount lens, attach the C-CS mount adaptor before installaing the lens.
2. Move the back focus adjustment lever fully to the left, with the lens facing towards you
(see Back Focus Adjustment).
3. Install the lens on to the camera.
4. For Direct Drive Lens application, connect the DC Lens Connector to the rear panel of the camera.
Fit the lens to the camera according to the following connection assignments.
5. For Video Drive Lens application, connect the wires to the rear panel of the camera. Fit the lens to the
camera according to the following connection assignments.
Strip 6mm of insulation from lens wires. Depress button to open cable clamp aperture and insert bare end
into clamp. Release button to secure wire.
6. Adjust the Back Focus to the correct positon then secure the screw.
7. Adjust the Zoom and Focus levers of the lens to acquire a clear image and the required field of view
8. Adjust the Zoom and Focus levers of the lens to acquire the clear image.
Protective
Cover
Back Focus
Adjustment Lever
Lens
(Not Supplied)
C-CS Mount
(for C-type Lens)
Zoom and Focus
Adjustment Levers
Back Focus
Adjustment Lever
Lens (Optional)
Zoom and Focus
Adjustment Levers
DC Lens
Pin Assignments
Back Focus
Adjustment Lever
Lens (Not Supplied)
Zoom and Focus
Adjustment Levers
Pin Number DC Drive
Pin 1 Damp -
Pin 2 Damp +
Pin 3 Drive+
Pin 4 Drive -
2
1
4
3
Installing the Lens
Before installing a lens, you must first
remove the protective cover from the
camera. If mounting a C-Mount lens,
attach the C-CS mount adaptor to
the camera.
Adjust the Back Focus to acquire a
sharp image (see Back Focus
Adjustment).
Back Focus Adjustment
There is a mechanism for back focus adjustment.
Loosen the back focus locking screw.
Move the adjustment lever to obtain optimum focus of
the image.
Tighten the screw to lock the back focus
adjustment lever in place. Back Focus Adjustment Lever
Rt NO
Camera Configuration
DC Lens
Connector
Rt NO
Video Lens
Pin Assignments
Button
Press to Open
the Clamp
Cable Clamp
SET
Control Key
ENTER ButtonNavigation Pad
Camera OSD Menu
The control buttons are on the left hand side of the camera.
Push the side cover to access the buttons.
Press the ENTER button and the OSD Menu will be displayed.
Use the Navigation Pad to select the desired menu option.
Pressing the ENTER button will open the sub-menu or confirm the configuration.
Use the Navigation Pad to move the cursor to SAVE, then press ENTER button to write the new settings to
memory and complete the configuration.
To quit or give up the configuration, select CANCEL and press ENTER to close the OSD Menu.
To reset the camera to the factory setting, press the Navigation Pad and move the cursor to DEFAULT to
restore the factory setting.
DAY/NIGHT
DAY MODE
NIGHT MODE
LENS
LANGUAGE
WHITE BALANCE
3D DNR
SLOW SHUTTER
PAGE 2
AUTO
SETTING
SETTING
LEVEL
ENGLISH
AWB
AUTO
OFF
SAVE CANCEL DEFAULT
SET UP MENU 1
DAY/NIGHT
DAY MODE
NIGHT MODE
LENS
LANGUAGE
WHITE BALANCE
3D DNR
SLOW SHUTTER
SYNC
BLC
TITLE
PRIVACY ZONE
RS485
DIGITAL ZOOM
DETECTION
REVERSE
SAVE
AUTO
NIGHT
DAY
SETTING
BF
LEVEL
ENGLISH
FRANÇAIS
ESPAÑOL
中文
AWB
AWB-EX
MWB
PUSH MWB
AWB-SPEED
AUTO
OFF
LOW
HIGH
DVR
OFF
X02/X04/X08/X16
X32/X64/X128/X256
INT
LINE LOCK
OFF
ZONE 1
ZONE 2
ZONE 3
ZONE 4
ZONE 5
ZONE 6
OFF
ON
SETTING
SETTING
x1 / x1.5
x2 / x4 / x8
SETTING
OFF
H REVERSE
V REVERSE
HV REVERSE
CANCEL
D/N LEVEL
N/D LEVEL
BURST
D/N TIME
SHUTTER
BRIGHT
AGC
APERTURE
CHROMA
GAMMA CORR.
RES. ENCHANCE
LEVEL 1-19
R GAIN LEVEL
G GAIN LEVEL
SET
LEVEL
V-PHASE
LEVEL 1-15
TEXT
POSITION
FLASH
MASK MODE
LEVEL
POSITION
ALL CLEAR
ADDRESS
BAUD RATE
DETECT MODE
ZONE DISPLAY
ALARM TRIGGER
ZONE
DEFAULT
HIGH
STANDARD
LOW
AUTO / ON
5 Sec
10 Sec
20 Sec
30 Sec
60 Sec
1/50 (1/60)
1/120 (1/100)FLK
1/250
1/500
1/1K
1/2K
1/4K
1/10K
AES
WDR
LEVEL 1-15
LEVEL 1-8
STANDARD
ENHANCE
ENHANCE-EX
0 ~ 255
LOCK
PUSH ON
LOW
HIGH
STANDARD
(16 Characters)
OFF / ON
MASK / MOSAIC
LEVEL 1-15
ZONE 1
ZONE 2
ZONE 3
ZONE 4
0~999
4800 BPS
9600 BPS
19200 BPS
OFF
MOTION
FACE ZONE
FACE
REMAIN
AUTO
HIGH
LOW
SHADOW
HIGHLIGHT
LEVEL 1-15
LEVEL 1-15
Table of contents
Other DeView Security Camera manuals
DeView
DeView BTP12H37V12L User manual
DeView
DeView CR Series User manual

DeView
DeView CR Series User manual
DeView
DeView Tamper Proof User manual
DeView
DeView 690HTVL-E User manual
DeView
DeView CCD User manual
DeView
DeView MD4SP70 User manual

DeView
DeView CR Series User manual
DeView
DeView D410-THRE3V12L User manual
DeView
DeView ATMP7W User manual
Popular Security Camera manuals by other brands
American Dynamics
American Dynamics SpeedDome Ultra Drone II Specifications
wavestore
wavestore Vision WV-8S-180-AI installation guide
Vivotek
Vivotek MD8562 Quick installation guide
LTS
LTS VSIP8182W-28 quick start guide

Hitron
Hitron HCG-P7xDxA32 instruction manual
Logitech
Logitech CIRCLE 2 quick start guide
