Dewenwils TLA-120-12W-1 User manual
SKU: HOSL03B2
Please pay attention to the warning signs
Read the instructions with caution before operating
and keep it properly
V20726
Wi-Fi Low Voltage Transformer

If you have multiple routers in your home, especially under the same modem
and using dynamic IP address mode, please notice the routers with same
LAN IP address may cause IP address conflict and makethe routers involved
cannot access internet. which makes Wi-Fi Low Voltage Transformer cannot
be discovered and controlled via internet (like user's cellular data service).
READ ALL INSTRUCTIONS before using the Wi-Fi Low Voltage
Transformer.
IMPORTANT:Please refer to INSTALLATION INSTRUCTION
before proceeding with Wi-Fi router connection. Wi-Fi Low Voltage
Transformer must be installed before connecting to Wi-Fi router.
Compatible with 2.4 GHz Wi-Fi networks.
Download the “dewenwils" App: Scan QR Code or search "dewenwils" in
Google Play or the App Store to download and install the app.
Note: All pictures shown are for illustration purpose only, the APP will be
updated continuously, please refer to the latest APP interface to operate.
STEP 1: Software Installation

Note: Each device can only be connected to one account. If anyone else
needs to control it, please share your device via the app.
Note: The Wi-Fi Low Voltage transformer only support 2.4GHz network.
Free APP for android and IOS
STEP 2: Log in or Sign up
STEP 3: Add the Wi-Fi Low Voltage transformer

Note:
• If the Wi-Fi Low Voltage transformer can't be connected to WiFi,Please
press and hold the power button while pressing RESET button until the
WiFi signal indicator flashes, then release the two buttons, the data has
been cleared. Then remove the sub-device on the app, and re-add the
device; or long press the RESET button again to enter the hotspot network
and remove the device on the app, then add the device again.
• The Wi-Fi Low Voltage transformer only work with 2.4GHz network. If your
router broadcasts both 2.4GHz and 5GHz, please select the 2.4GHz
network with the app. If connection still fails), we recommend you call
your ISP and had them completely shut off the 5GHz network on the
router. You are free to change the network to 5GHz again after
connecting.
• Please try to make the Wi-Fi Low Voltage transformer and router as close
as possible.
LED Status
Red LED is on
Red LED is off
Green LED is blinks rapidly
Green LED is blinks slowly
Green LED is on
Power is on
Power is off
Bluetooth provisioning network
Hotspot provisioning network
Connect to the Internet successfully
Function
1) Auto Add Mode (Bluetooth Mode)
• Turn on Bluetooth on the smartphone.
• Open the “dewenwils” APP(Figure 1)and click the “+” at the top right
list, it will find the Wi-Fi Low Voltage transformer automatically.(Figure 2)
Tap “Go to add”, the interface in Figure 3 will appear, click the button to
switch to the appropriate WiFi signal source, then type in WiFi password
and click “next” to enter the interface in Figure 4. At this time the device is
connecting to your home WiFi automatically.
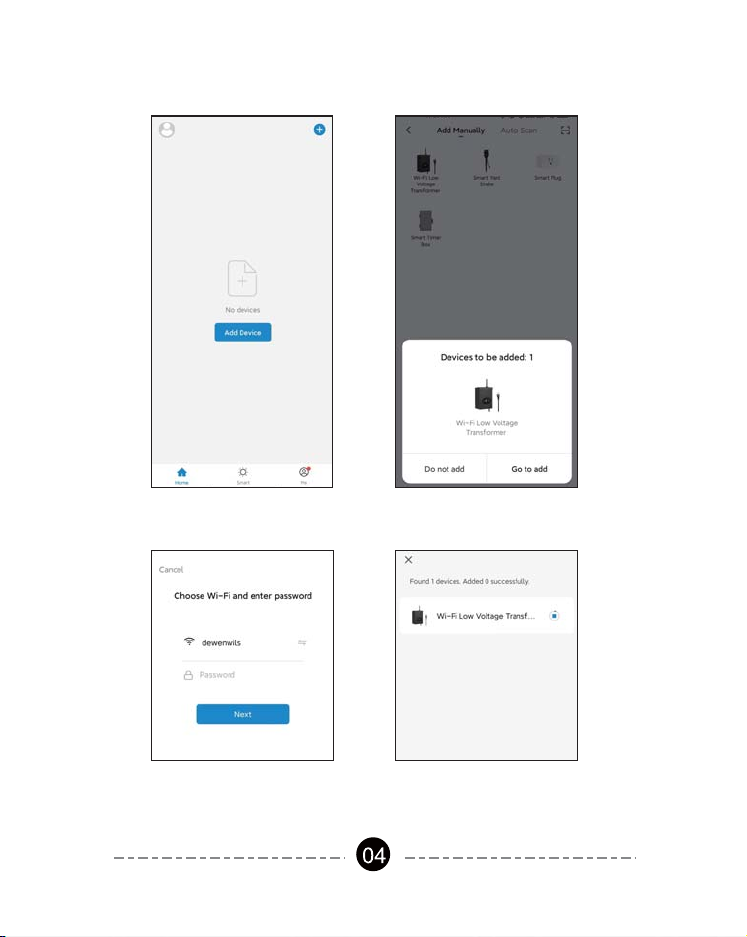
Figure 1 Figure 2
Figure 3 Figure 4

The prompt in Figure 5 will appear after connecting successfully.
• If the Wi-Fi Low Voltage transformer is not automatically discovered, select
“Auto Scan” to automatically search for the Wi-Fi Low Voltage transformer.
(Figure 6)After clicking “next”, Figure 3 will appear, then type in correct
password and click “next”, Figure 7 and Figure 8 will appear in sequence to
remind you that the connection is successful.
Figure 6
Figure 5
Figure 7 Figure 8
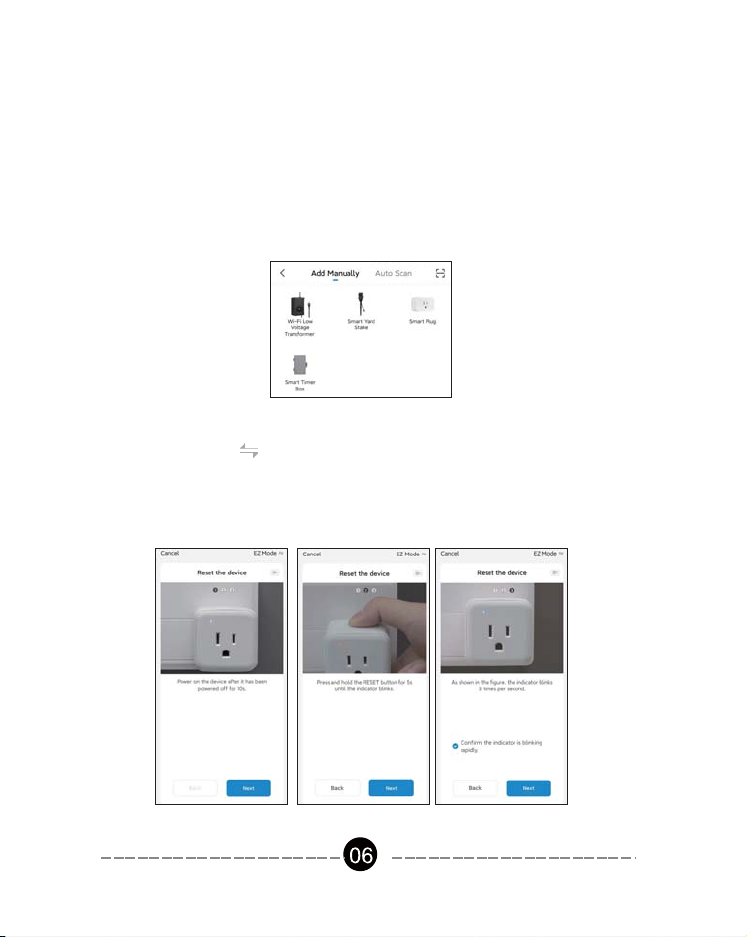
2) Add Manually Mode
• Click the "+" icon at the right corner and then choose the " Wi-Fi Low
Voltage transformer". (Figure 9)
Figure 9
Follow ①②③ on the app to confirm in turn (in step①),please check the mode
on the left side of at the top right corner, if it is not “EZ Mode”, please
switch to “EZ Mode”. In step ②, please press and hold the RESET button on
the transformer for more than 5 seconds, and release the button when the
indicator flashes. In step③, click "Confirm the indicator is blinking rapidly",
and click "Next"). As shown in Figure 10 to 12.
•
Note: Automatic connection time of devices varies depending on the strength
of WiFi signal, so please do not operate the phone. If the connection fails,
please reconnect, or switch to other stronger WiFi signal sources, or keep
your phone closer to the device, or connect it by following the Manually Mode
below.
Figure 10 Figure 11 Figure 12
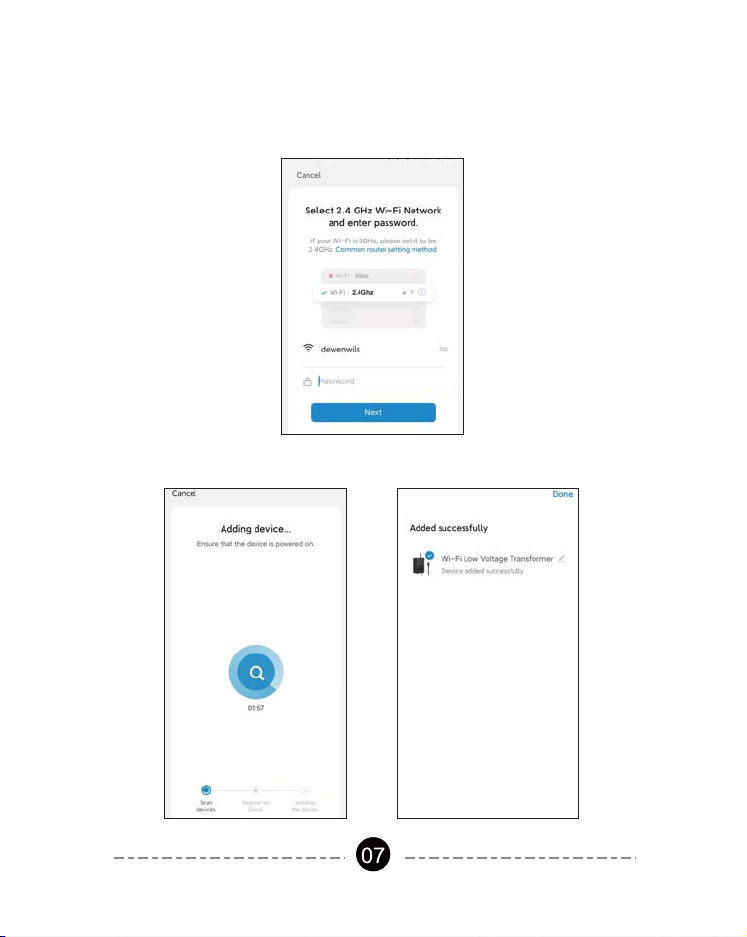
• Select 2.4GHz Wi-Fi Network and enter password, then click ”NEXT”.
Wait for the connection to complete. (Figure 13)
• Wi-Fi Low Voltage transformer has been added successfully. (Figure 14)
Figure 13
Figure 14 Figure 15

STEP 4: Set the Function You Need
1. Interface Introduction
2. Timer Function Introduction
Tap “Timer”, the interface of Timer Schedule will appear.(Figure 16)
Tap the plus icon to add tasks, including schedule, circulate, and random
modes.(Figure 17)
Figure 15
Change Device Name
Power Consumption Display
Countdown
Change Transformer Name
ON/OFF button
Timer Setting Button

Figure 16 Figure 17
3.Schedule
Tap "Schedule" to enter the interface as shown in Figure 18. You can set
the Start/End time in a 7-day period with a 1 minute interval according to
needs. Every program set before repeats weekly.(Figure 18, 19)Tap “Save”
to return and review the overall schedule, (Figure 21).
Note: The device can only be turned on and off properly when selecting
PerformSwitch as switch.(Figure 20)
Note: Please select Perform Action to open or close as needed.
(Figure 18, 19)

Figure 18 Figure 19
Figure 20 Figure 21

4.Circulate
You can set the duration of each ON and OFF, Start and End time according
to your needs. The ON/OFF schedule will repeat between the Start and End
time. For example: Set a period from 9:00 AM to 3:00 PM on Monday
through Friday, turn on your light for 1 hour , and off for 30 minutes. The
outlet will repeat ON/OFF from9:00 AM to 3:00 PM.(Figure 22, 23)
5.Random
Either +/-30 minutes than setting ON/OFF time, randomly control device
when you are away from home.
Figure 22 Figure 23
Note:The device can only be turned on and off properly when selecting
PerformSwitch as switch. (Figure 20)
11
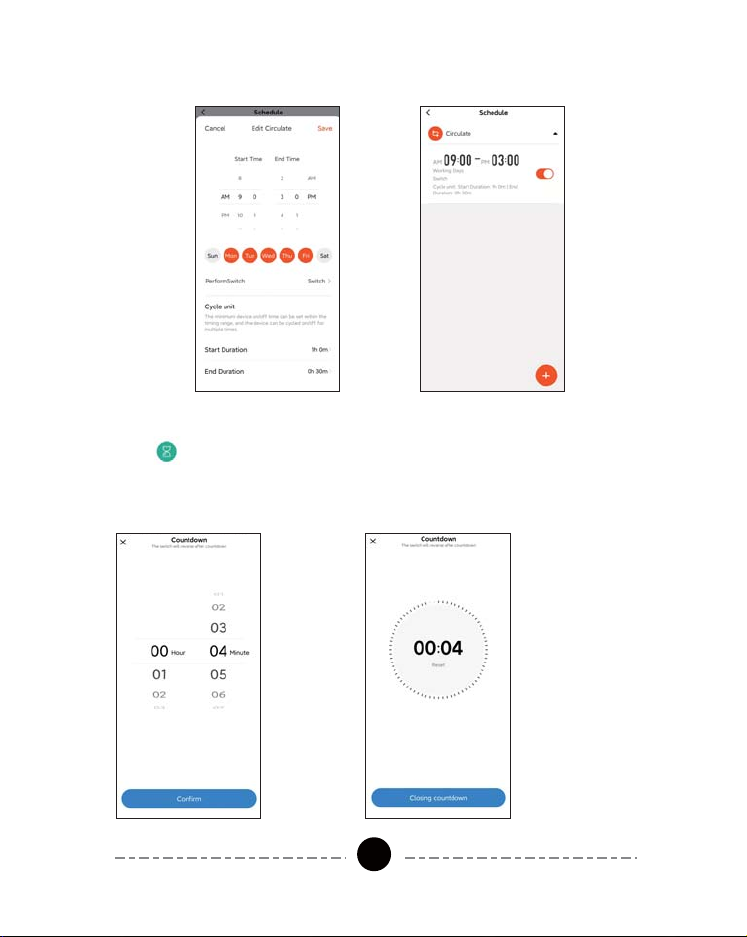
6.Countdown
Tap " " to set the hours and minutes, and then tap the “Confirm” button.
The Wi-Fi Low Voltage transformer will maintain the current state (on or off)
until the end of the countdown. It will exit countdown mode automatically if
you turn on/off manually. (Figure 26, 27)
Figure 24 Figure 25
Figure 26 Figure 27
12

Easy and Fast Blinding of Skills
Option 1: APP to APP (OEM App Redirects to Aleax to Bind)
Discover the corresponding OEM Aleax skills directly in your OEM APP, and
easily complete the skill setting and account connection without opening
multiple Apps, greatly shortening the user operation path
1. Find "Me" on the home page, tap More Services
2.Tap Aleax
3.Tap Login
4.Tap Link to complete skill binding
Option 2: APP to APP (Aleax Redirects to OEM App to Bind)
Search for the corresponding OEM Aleax skill in Aleax APP and directly
redirect to bind your OEM APP, avoiding the failure of skill binding due to
incorrect account password input, greatly improving the success rate of
configuration.
1. Find corresponding skill in Aleax APP
2. Tap "Agree and link"
3. Complete the skill binding
Note: It is recommended to purchase all the functions together for the best
experience (the above illustration are all based on Tuya Smart App)
Work with Amazon Alexa
Preparation
1. Make sure the smart device has been added to the dewenwils App and
the device is online.
2.Make sure the Google Home App is installed.
Start
1. Click Me in the bottom right corner, click Google Assistant, click Link with
Google Assistant.
2. The App will pull up the Google Home App, click Link.
3. Click agree Link.
4. Wait for it to finish loading, your smart devices will be synced to Google
Assistant or Google Home App that can control them. Next, you can
assign rooms to your devices in the Google Home App.
Work with Google Home
13

INSTALLATION INSTRUCTIONS
Other Functions
Figure 28
Change the device name
Share the device with your family
Enter family member’s “Smart Life”account to
control the device.
Devices under the same group can be controlled
simultaneously
Create Group
14
Important safety information to reduce risk of fire injury.
1. Do not install within 10 feet (3 m) of a pool, spa or fountain.
2. No serviceable parts inside the power supply unit. DO NOT
DISASSEMBLE.
3. Do not repair or tamper with cord or plug.
4. Do not submerge transformer in water.
5. Do not mount the transformer onto combustible material.
6. Do not connect two or more transformers in parallel.
7. Do not use the transformer with a dimmer switch.
8. Plug the power supply unit directly into a GFCI outlet in wet location.
9. For low voltage outdoor landscape lighting system use only.
10. The maximum output of this transformer is 120 watts. Do not overload
the transformer. Be sure that the total cumulative wattage of all 12 volt
fixtures connected to the transformer be equal to or less than 120 watts.

The 120 Watt transformer has 120 watt circuits which will power up to 120
watts of light. To make sure the maximum number of fixtures can be safely
connected to this transformer, add up the individual wattage of all the
fixtures. The total wattage of your fixtures must not exceed output capacity
of the 120 Watt transformer.
CALCULATE LIGHTING CAPACITY
Be careful when splitting the
landscape cable. Do NOT
expose the copper cable.
Remove 1/2 inch of insulation
from both cables and twist the
ends.
INSTALLATION
1. Prepare the Cable
Lay the transformer on a flat, stable surface and use screwdriver to connect
the stripped ends of the cable under the terminal clamping plate.
2.Connect the cable to the Transformer
Note: Gently pull on the landscape
cable to verify if the connection is strong.
CAUTION: This landscape light system must be installed in accordance
with all local codes and ordinances. If you encounter problems, contact
a qualified electrician.
15

Lay your fixtures (not included) to your desired location. Be sure they do
not exceed the 120-watt rating of the transformer. Coil the rest of the cable
after +connecting the last fixture.
3. Place Your Fixtures and Route the cable
Turn the transformer on. Use the cable connectors to attach your fixtures
with the cable. Then it will light up.
4.Attach Your Fixtures
Use the screw to mount the transformer directly on a wall. 12 inch to 48
inch (0.3 m to 1.2 m) high from the ground would be suggested.
5.Mount the Transformer
16

17

- 1 x Low-Voltage Transformer
- 2 x Screws
- 2 x Wall Anchors
- 1 x Instruction Manual
Package List
Model: TLA-120-12W-1 WI-FI 2nd Gen
Input Voltage: 120VAC, 60Hz
Output: 12VAC
Max Power Rating: 120W
Specifications
This device complies with Part 15 of the FCC rules. Operation is subject to
the following two conditions:
1) this device may not cause harmful interference, and 2) this device must
accept any interference received, including interference that may cause
undesired operation.
Changes or modifications not expressly approved by the party responsible for
compliance could void your authority to operate the equipment.
NOTE: This equipment has been tested and found to comply with the limits for
a Class B digital device, pursuant to Part 15 of the FCC Rules. These limits are
designed to provide reasonable protection against harmful interference in a
residential installation.
This equipment generates uses and can radiate radio frequency energy , if
not installed and used in accordance with the instructions, may cause harmful
interference to radio communications. However, there is no guarantee that
interference will not occur in a particular installation. If this equipment does
cause harmful interference to radio or television reception, which can be
determined by turning the equipment off and on, the user is encouraged to try
to correct the interference by one or more of the following measures:
FCC STATEMENT
18

the receiver is connected.
!
19
One Year Limited Warranty
Supported by our professional R&D team and QC team, we provide One
Year Warranty for materials and workmanship from the purchase date.
Please note that the warranty does not cover damage caused by personal
misuse or improper installation.
Please attatch your Order ID and Name so that our dedicated customer
service team can help you better.
The use distance should be greater than 20cm.
This manual suits for next models
1
Table of contents
Other Dewenwils Transformer manuals


