DH Wireless Solutions PDN LITE S2 User manual

1877.524.0430
PDN LITES2 Field Manual FIELD MANUAL

PDN LITES2 Field Manual
www.portablessupport.com 2
Table of Contents PAGE
Welcome......................................3
What’s Inside..................................3
What’s Included ...............................3
Getting to Know Your PDN....................4–5
General Use...................................6
Quick Start Guide .............................7
Storage......................................7
Transport ....................................7
Cleaning..................................... 7
SmartSource (S2) Overview .....................8
Monthly Maintenance Checks...................8
Troubleshooting ...............................9
Detailed Troubleshooting Guide ............10–13
Warranty..................................... 14
Service ...................................... 14
Important Safety Measures & Warnings ......... 15
12-Month Maintenance Log .................16–19
Read entire Field Manual before using your PDN.
3877.524.0430
PDN LITES2 Field Manual
Your PDN LITE
S2
will assist in facilitating your on-the-go communications.
Our closed-case rugged solution will become your portable network-in-a-box
and WiFi hotspot. It is easy to use; just push the Standby Button to activate
the gateway, and within minutes you will have a secure wireless connection.
We are committed to supporting your PDN communication needs.
Sincerely,
DH Wireless Solutions
Welcome
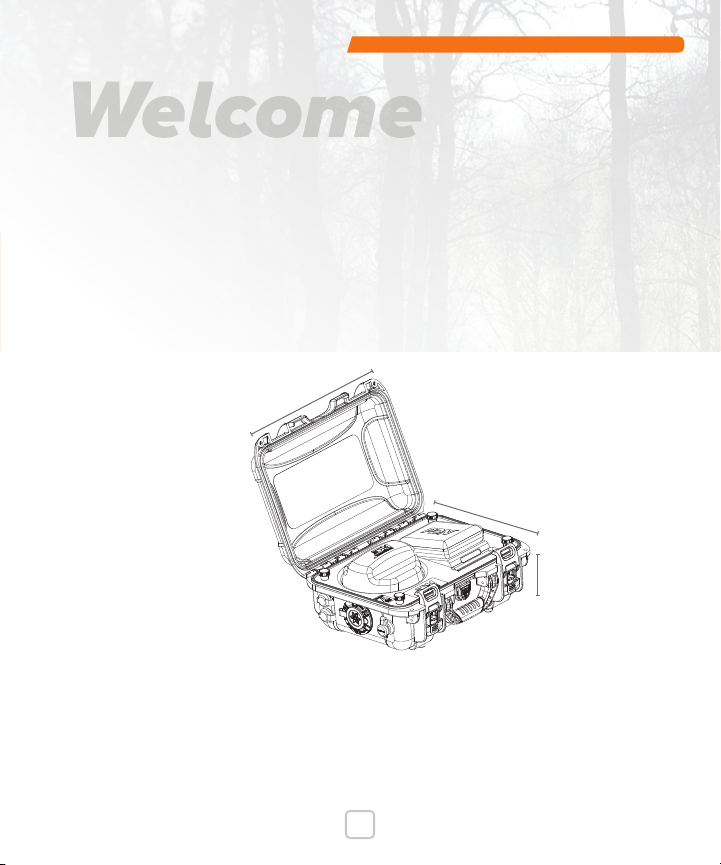
WHAT’S INSIDE
PAGE
Quick Start/
Troubleshooting Guide
Main Power Switch
(travel mode)
Antenna
110-120V AC Input
12V DC Input
Data Ports (Ethernet)
Anti-skid Rubber Feet
AGM Batteries
Cable Pouch
Field Manual
Cellular Gateway
Standby Button
Battery Level Indicator
WHAT’S INCLUDED
✓
Wireless gateway with
wide-ranging WiFi and GPS
✓
Critical communications antenna
✓
Portable, rugged, and
outdoor-ready case
✓
AGM Batteries for up to
4 hours of operational life*
✓
AC/ DC flexible charging/ power
✓
WAN & LAN Ethernet ports
✓
Comprehensive service plan
*Actual battery life may vary depending
on gateway model, usage pattern, other
surrounding and environmental factors.
12.5”
15.8”
7.1 ”

PDN LITES2 Field Manual
www.portablessupport.com 4
27 pt
ON
OFF
GETTING TO KNOW YOUR PDN
7
7
8
3
210, 11
9
1
2
33
44
58
9
1010
1111
6a
6
5a
4a 5b

5877.524.0430
PDN LITES2 Field Manual
1 Quick Start Guide/Troubleshooting: Get connected and start working
immediately with this accessible reference guide.
2 Main Power Switch: Connects or disconnects power supply. Should
always be “ON,” except during travel mode.
3 Antenna: Low profile, enables critical communications.
4 AC Charging Port: 110-120V AC input, 50-60Hz.
4a AC Power/ Charging Cord: Enables charging and use of the PDN.
5 Auxiliary Port: 12V DC input.
5a DC Power Cable w/12v Auto Connector: Power port adapter enables use,
not charging of the PDN.
5b DC Power Cable w/2.5mm Barrel Connector: Power port adapter enables
use, not charging of the PDN.
6 Data Ports: Two RJ45 ports — WAN (IN) / LAN (OUT), programmable.
6a Data Cables: Two Ethernet cables to connect other devices to the PDN.
7 Battery Gauge: At-a-glance battery status and charge indicator.
8 Standby Button: Enables or disables gateway with case closed.
9 Cellular Gateway: Wireless connectivity, see your gateway
specifications for more details.
10 Cable Pouch: Stores cables.
11
Field Manual:
Detailed PDN LITES use instructions, stored under
Cable Pouch.
Internal Components (not pictured):
• AGM Batteries: Provides up to 4 hours of operational life.
• SmartSource (S2) Processor: For power management.
• On-Board Charger: Safely charges AGM batteries.
PART
PDN LITES2 Field Manual
www.portablessupport.com 6
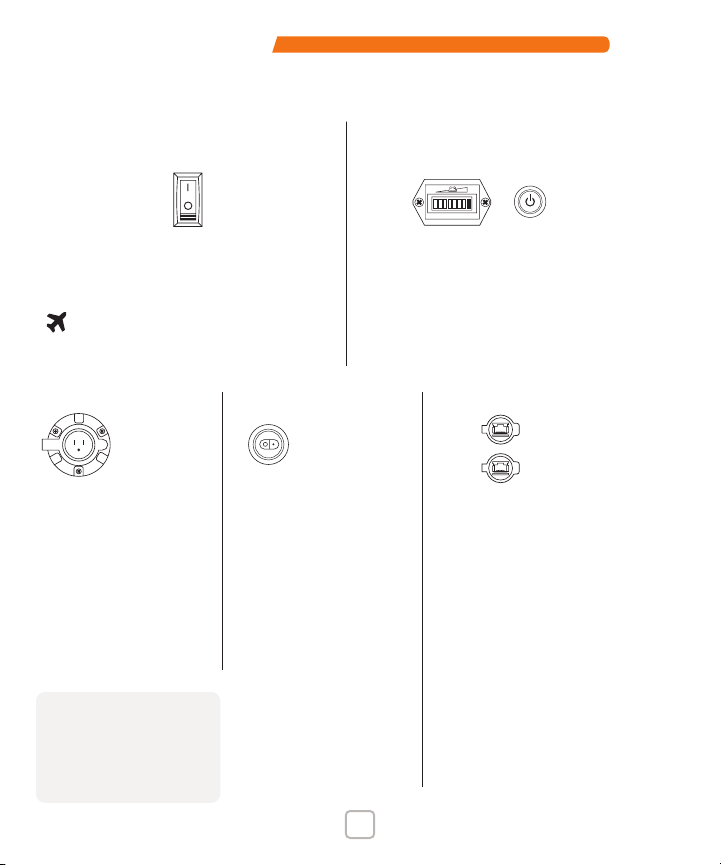
GENERAL USE
ON
OFF
Main Power Switch must be in
the “ON” position for the PDN
to function and charge.
When traveling by airplane,
the switch must be turned o,
cutting power to the PDN.
Standby Button enables and
disables the gateway. While in
standby mode, Battery Gauge will
still indicate charge. When charging,
lights will continuously scale from
left to right.
Main Power Switch
Battery Gauge &
Standby Button
To charge unit, plug
into AC Charging Port
via AC Power Cord with
Main Power Switch
“ON.” Battery Gauge
will scale to indicate
charge. Unit can run at
the same time that it is
being charged.
Charging Auxiliary
If battery charge is low
and an AC power
source is unavailable,
use the DC Power Port
to power the device.
DC Power Port is
operable with any
9-18V DC external
power source that
can be used with the
provided SAE terminated
cables. Unit will run
but not charge when
connected via Auxiliary
DC Power Port.
Data
Use WAN (IN) RJ45 Port to
connect alternate Internet
source (e.g., modem, gateway,
or satellite) to the PDN. Use
the LAN (OUT) RJ45 Port to
provide a wired Internet
connection to switches,
routers, network extenders
and other devices as well as
a wired connection to the
PDN’s embedded cellular
gateway GUI for configuration
changes and gateway status.
Both WAN and LAN ports
are programmable to be
LAN or WAN.
Note: Your PDN comes
preconfigured and assembled.
The unit is ready to use out of
the box. Please contact DHWS
if you require additional details
regarding internal components.
AC POWER PORT
(110-120V AC 50-60Hz)
WAN (IN)
LAN (OUT)
RJ45 PORTS:
DC POWER PORT
(12V DC)

7877.524.0430
PDN LITES2 Field Manual
Quick Start Guide
1. Verify Main Power Switch is in “ON” position.
2. Activate gateway by pressing Standby Button near handle; button will
illuminate indicating the unit is active. Within minutes the gateway will connect
to the cellular network and provide available connectivity for passing data.
3. Locate available PDN WiFi network on your device.
4. Log your device into available PDN WiFi network with your credentials.
Storage
For field readiness, unit should be plugged in via AC power cord with Main Power
Switch “ON” while in storage. Confirm your PDN is charging by observing the light
activity in the Battery Gauge indicator.
Transport
Your PDN is TSA friendly and suitable for carry-on. When traveling by airplane,
the Main Power Switch must be turned “OFF,” cutting power to the PDN.
WARNING To reduce risk of injury or electric shock, turn Main Power
Switch to “OFF” and unplug unit before cleaning.
Cleaning
While the PDN is rugged and made for outdoor use, it may require an occasional
cleaning. Using a soft, lint-free cloth, please observe the following recommendations:
- Use only mild, non-abrasive cleaners sparingly.
- Gently wipe all surfaces and avoid excessive moisture.
- Allow all surfaces to dry prior to storage.

PDN LITES2 Field Manual
www.portablessupport.com 8
SMARTSOURCE S2 OVERVIEW
SmartSource (S2) is an on-board power management system built to facilitate
three basic functions. The S2processor:
1. Monitors and manages PDN power source options.
2. Ensures on-board batteries are at optimal state of charge.
3. Serves as a troubleshooting tool to assist in indicating a resolution
path for power-related issues.
MONTHLY MAINTENANCE CHECKS
We recommend monthly maintenance checks of the unit for optimal
functionality. (See pages 16–19 for a convenient Maintenance Log.)
The steps below should be followed every month to ensure unit is
ready when needed:
1. Determine you are within good cellular range, with Main Power Switch “ON.”
2. Push the Standby Button (see 8 on page 4). An LED light will indicate the
gateway is powered on.
3. Observe the Battery Gauge on the front of the device (see 7 on page 4).
A fully charged PDN will show one bar on the right of the Battery Gauge.
4. Open case to ensure cellular gateway adequately boots by checking
status lights via gateway viewing window (see 9 on page 4).
Note: Status light availability is based upon your selected gateway model.
5. After the gateway has connected to the cellular network, log your device(s)
into the available PDN WiFi network using your unique credentials.
6. Once logged in, access the Internet, making sure you can view multiple
pages and not simply information that has been cached.

9877.524.0430
PDN LITES2 Field Manual
7. Once you have established eective Internet access, log o the network and push
the unit’s Standby Button, the LED light will turn o, indicating gateway services
have been turned o. Avoid leaving the gateway on when not in use, as it will
continue to draw power from the batteries if left on.
8. Locate AC charging cord, lift the weather cover on the recessed AC receptacle,
and plug in the unit. At this time observe the current charge level shown on the
Battery Gauge LEDs. If 30 days have passed since the last charge, it will likely
show low charge. Allow the battery to charge until Battery Gauge indicates
full-charge status.
9. Return to storage, leaving Main Power Switch in the “ON” position while
plugged into available live AC power source.
Record your maintenance data in the Maintenance Log on pages 16-19.
Note: All pass-through ports, caps, seals and gaskets should be inspected periodically to
ensure a tight fit. Contact DHWS for information regarding PDN remote updates or other
maintenance needs. If you are experiencing ongoing issues with your PDN or would like to
order parts, contact DHWS at 877.524.0430, option 3. For online support ticketing or incident
reporting, visit www.portablessupport.com.
TROUBLESHOOTING
1. If unit fails to power up, check to ensure Main Power Switch is in the on position.
Then check the Battery Gauge to ensure batteries are suciently charged. Unit
can run at the same time it is being charged by AC power source.
2. If batteries need to be charged, connect supplied AC Power Cord to unit’s AC
Charging Port and then plug into a live 110-120V AC power source. Main Power
Switch must be “ON” and Battery Gauge will scale to indicate PDN is charging.
3. If WiFi does not appear on your device, ensure cellular gateway is active by
checking status lights.
4. Should a power related issue persist, or to learn more about your on-board
SmartSource (S2), visit www.portablessupport.com.

PDN LITES2 Field Manual
www.portablessupport.com 10
CONNECTIVITY
Problem/
Symptom
Possible
Cause Verification Possible
Corrections
Device is not connecting to gateway
Line of
Service is
not active
Confirm with chosen cellular
provider that line of service
is active on an eligible rate
plan.
Activate line of service on
an eligible rate plan.
Hidden
network
SSID
Contact Administrator
of device to verify
configuration.
If configured in this manner,
Administrator will need to
provide SSID and logon info.
WiFi slow
or not
connected
WiFi is disconnected for
security reasons. Wireless is
slow due to low bandwidth
or transmission of large
data files.
Connect device to LAN
port with Ethernet cable
provided in accessory bag.
Gateway is
not getting
power
Observe status lights
on gateway. If power light
is not on, gateway is not
getting power.
If power light is not
on, see power system
troubleshooting section.
Poor signal or
slow connection
Low
antenna
signal
strength
Open case and check
signal strength LED through
gateway inspection window.
See gateway service
manual for LED signal
strength definitions.
If possible, move the PDN
to a location with better
signal. If hardline/ ISP
Internet is available connect
the Ethernet cable from
hardline/ ISP to WAN port.
Gateway is not
getting power
Main power
switch is
in “OFF”
position
Battery gauge displays
a red LED signal only
when batteries are
connected with main
power switch “ON.”
Open case and ensure
Main Power Switch in the
upper left corner of
the service cover is in the
“ON” position.
POWER SYSTEM
Detailed Troubleshooting Guide

11 877.524.0430
PDN LITES2 Field Manual
Problem/
Symptom
Possible
Cause Verification Possible
Corrections
Gateway is not getting power
Battery
is not
charged
Ensure Main power switch is
“ON”. Check battery gauge
on front of PDN ensuring
LEDs are displayed. Full
battery charge is indicated
by the far right LED on
battery gauge. If LEDs are
not lit, charge on batteries
may have fallen too low.
Use AC power to charge
battery and power gateway
while battery is charging.
If AC power is not available,
then use DC power input
with DC cable in accessories
pouch. NOTE: When using DC
power only, batteries will not
charge.
Gateway
power
is not
connected
Check LED in service
cover window. The power
LED should be on when
power is above 9 volts. If
LEDs are o, gateway is not
getting power.
Remove service cover to
ensure gateway power
cable is connected firmly
into back of gateway and
into the wire harness
connector.
Fuse is
blown
Remove service cover. Open
black rubber cover on fuse
holder connected to battery
charger. Remove fuse and
verify center strip is intact.
Replace the fuse with
a mini blade fuse of
same amperage
rating printed
on top of fuse.
Gateway has no power when
connected to DC input
Main Power
Switch is
in “OFF”
position
DC power is disconnected
when the Main Power Switch
is o. Battery gauge LEDs
will not display.
Open case and ensure
Main Power Switch in
upper left corner of service
cover is in “ON” position.
The DC
source
voltage may
be too low
Use a voltmeter to check
source voltage. Ensure
voltage source has a
minimum of 9 volts DC
and 1.5 AMPs.
Change the external DC
source or switch to a power
source with adequate
charge and voltage.
Fuse is
blown
Remove service cover.
Open black rubber cover on
fuse holder of wire harness.
Remove fuse and check if
center strip is intact.
Replace fuse with mini
blade fuse of same
amperage rating printed
on top of fuse.
POWER SYSTEM

PDN LITES2 Field Manual
www.portablessupport.com 12
Problem/
Symptom
Possible
Cause Verification Possible
Corrections
Battery is not charging
Main power
switch is
in “OFF”
position
Battery gauge displays a red
LED signal when batteries are
connected. Batteries are
disconnected when the main
power switch is o and
therefore will not charge.
Open case and ensure
Main Power Switch
in upper left corner
of service cover is in
the “ON” position.
AC cable
is not
connected
firmly
Inspect both ends of
AC power cable to ensure
they are both seated fully in
receptacles.
AC cable must be pressed
firmly and completely into
a live receptacle.
Fuse is
blown
Remove service cover.
Open black rubber cover
on fuse holder connected
to battery charger. Remove
fuse and check if center
strip is intact.
Replace the fuse with a
mini blade fuse of the
same amperage rating
printed on the top of
the fuse.
Reverse
polarity
of battery
connections
Remove service cover.
Check LED lights on battery
charger. If orange solid LED
appears, battery polarity is
reversed.
Reverse battery connections
ensuring positive red wire
is connected to positive
red battery terminal and
negative black wire is
connected to the negative
black battery terminal.
Battery or
charger
is not
connected
Remove service cover.
Check LED lights on battery
charger. If LED lights alternate
red and green, battery is
not connected. Solid red
indicates charging. Solid
green indicates full charge.
Verify electrical terminals
on the wire harness are not
contaminated and are
firmly connected to the
battery and the battery
charger.
POWER SYSTEM

13 877.524.0430
PDN LITES2 Field Manual
Problem/
Symptom
Possible
Cause Verification Possible
Corrections
Battery is not charging
Batteries
must be
replaced
Determine if battery is
accepting charge. Measure
voltage with a voltmeter. Plug
into charger and measure
again. Determine if voltage
increases within one minute.
If voltage has not
increased, then battery
should be tested and
replaced if necessary.
Battery
voltage
is below
6 volts
Remove service cover.
Check LED lights on battery
charger. If LED lights
alternate red and green,
battery is not connected.
Solid red indicates charging.
Solid green indicates full
charge.
Power device with AC or
DC power cables while
battery is charging. For deep
discharge, a master jump
start may be necessary
to allow charger to begin
charging. Contact DHWS
Support for assistance.
Charge time
is slow
Battery has
been deeply
discharged
Charging time is based on
average depth of discharge.
Deeply discharged batteries
can take up to 24 hours
to recharge.
Power device with AC or
DC power cables while
battery is charging.
POWER SYSTEM

PDN LITES2 Field Manual
www.portablessupport.com 14
Warranty
Your PDN includes a comprehensive support services and limited
warranty plan. See your service plan for details or contact DHWS at
www.portablessupport.com or 877.524.0430, option 3.
WARNING To reduce risk of injury or electric shock, turn Main Power
Switch to “OFF” and unplug unit before servicing.
Service
The following steps are only to be attempted by a trained professional. The PDN
is built to withstand significant drop impacts. However, if you suspect the unit
has sustained a notable impact event, the following inspection is advised
before powering on.
1. Open the unit to ensure the service cover is intact.
2. Loosen service cover captive screws to lift service cover. Note that the
antenna will be attached to the gateway with up to nine cables. There
will be enough slack to carefully access the internal components.
3. Inspect internal components for damage, especially to the battery
casing, ensuring that no wires are damaged or separated from the
conductor blocks, leaving them exposed.
4. Verify all components are secure, including the gateway.
5. Replace service cover, taking care to route the antenna cable loop in a
manner that avoids crimping.
6. If everything appears intact, push Main Power Button to “ON” position,
observing LED functionality and the Battery Gauge. Ensure cellular
gateway properly boots by checking status lights.
Note: If service is required on any internal components, contact DHWS for details. If you
are experiencing regular issues with your PDN or would like to order parts, contact us
at 877.524.0430, option 3. For online support ticketing or incident reporting, visit
www.portablessupport.com. Refer to your “My PDN” sheet for more information.

15 877.524.0430
PDN LITES2 Field Manual
Read entire Field Manual before using your PDN.
IMPORTANT SAFETY MEASURES & WARNINGS
The following list alerts users of proper usage to avoid potentially hazardous
situations that could result in minor or moderate injury or damage to the
product or property:
- Do not use PDN for any purpose other than described in this manual.
- Only use manufacturer recommended accessories.
- Protect case from impact or rough handling, which could adversely aect
internal components.
- During outdoor use, be sure to keep the lid closed to avoid unnecessary
moisture and dust intrusion.
- Do not store additional items in the box, as it may cause signal interference.
- Manufacturer’s safe operating temperature range is 32° – 104°F (0° – 40°C);
Storage 0° – 130°F (-17° – 60°C).
- Do not use in direct sunlight or extreme temperatures for extended periods
of time, as this may negatively aect internal components.
- To reduce risk of injury or electric shock, turn Main Power to “OFF” and unplug
unit before cleaning or servicing.
- Do not submerge.
- Do not use with damaged charging or auxiliary cords. Inspect all external
cords prior to use for damage to prevent shock hazards.
-
Use caution when service cover is open. Batteries have the potential for shock.
- Do not connect to an external AC power source unless it is 110-120V AC,
50-60Hz.
- Only connect auxiliary port to 9-18V DC power sources.
Save Field Manual for future use.

PDN LITES2 Field Manual
www.portablessupport.com 16
12MONTH MAINTENANCE LOG
DATE INITIALS INSPECTION NOTES/ COMMENTS

17 877.524.0430
PDN LITES2 Field Manual
12MONTH MAINTENANCE LOG
DATE INITIALS INSPECTION NOTES/ COMMENTS

PDN LITES2 Field Manual
www.portablessupport.com 18
12MONTH MAINTENANCE LOG
DATE INITIALS INSPECTION NOTES/ COMMENTS

19 877.524.0430
PDN LITES2 Field Manual
12MONTH MAINTENANCE LOG
DATE INITIALS INSPECTION NOTES/ COMMENTS

Table of contents
Other DH Wireless Solutions Emergency Phone manuals


Popular Emergency Phone manuals by other brands

Linear Security
Linear Security PERS2400A Assembly, installation and operation instructions

AVIRE
AVIRE Memcom+ installation guide

Linear
Linear PERS-3600 Installation & operation instructions

Code Blue
Code Blue CB 1 Series Administrator's guide

CruxCare
CruxCare C1 user manual

Rath
Rath 2100-ELL2 Installation & operation manual

Rath
Rath SmartRescue 5 Installation & operation manual

Dahua
Dahua VTA2302A quick start guide

Soundoff Signal
Soundoff Signal Armada A300 quick start guide
 Setup guide")
NSC Sicherheitstechnik
NSC Sicherheitstechnik Evalarm EV-NT (M) Setup guide

Tunstall
Tunstall ConnectMe Vi+ Installation and programming guide

Nortek
Nortek Linear PERS-4200 installation instructions


