manuals.online logo
Brands
  1. Home
  2. •
  3. Brands
  4. •
  5. Dialogic
  6. •
  7. Computer Hardware
  8. •
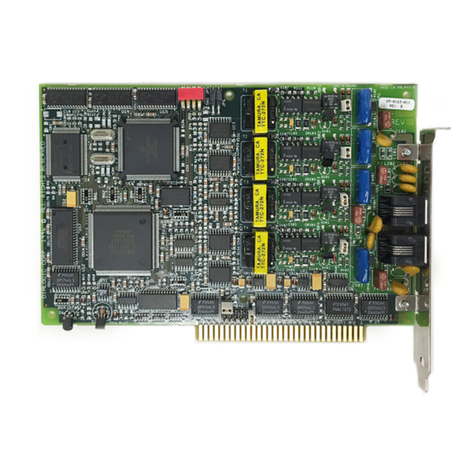
  9. Dialogic D4PCIU Instructions for use

Dialogic D4PCIU Instructions for use

Intel®Dialogic®
D/4PCIU, D/4PCIUF
Quick Install Card for PCI Universal
Part Number C60983-001
Copyright © 2003
Intel Corporation.
All Rights Reserved.
Before You Begin
Electrostatic Discharge
CAUTION
All computer boards are electrostatic sensitive. Handle
all static sensitive components, boards and computers at
a static-safeguarded work area.
A static-safe work area consists of:
• A grounded, static-dissipating wrist strap that drains
static charge from the person wearing the strap.
• A work surface covered with or composed of a
grounded, static-dissipating material that drains electrical
charges from conductive materials placed on the surface.
Both items ensure that static charges are drained to a safe rate
and current level.
Always observe these practices to maintain a static-safe
environment during the entire installation:
• Use the wrist strap to ground yourself to the static-safe work
area.
• Remove the board from the shipping carton and static
shielding at the static-safe work area.
• Lay the board on the static-dissipating work surface.
A Static Safe Work Area
Static-Dissipative
Mat
Static-Dissipative
Wrist Strap
Common
Ground
Point
Configuring the Hardware
Initial Hook State
The position of slide switch SW4 determines how the board
responds to an incoming call when the chassis power is on but
the board is not initialized. Refer to the Physical Description
section. Set the SW4 slide switch as follows:
• SW4 = On-hook (default): Callers hear ringing.
• SW4 = Off-hook: Callers hear a busy signal.
NOTE: If the chassis power is off, callers hear ringing
(on-hook).
Board Identification
The D/4PCIU board uses Plug and Play technology, including
hardware auto-configuration for IRQ and memory address.
This technology enables quick installation and operation
using the factory default hardware settings.
The system software assigns board instance numbers in
ascending order (beginning with 0) as it detects each board in
your system. A board instance number is the identification
(ID) number used by the system software to recognize the
board. Each Board ID is based on the SW30 rotary switch
setting. See the Physical Description section.
NOTE: The ascending Board IDs automatically assigned by
the system may not correspond to a physical order in the
chassis.
Geographical Sequence
Leave SW30 set to Board ID 0 (default) to let the system
automatically assign board instance numbers by PCI bus
logical slot number. This method is not available for ISA bus
boards.
NOTE: If you add or remove a board, the system may
change the existing board instance (ID) numbers.
Programmable Sequence
You must set SW30 to a unique number for each installed
board. Use a non-metallic screwdriver to turn SW30 to 1 of
16 board settings, 0–9 or A–F. You should assign sequential
numbers to each Intel
®
Dialogic
®
board, starting at 1. This
method is also used for all ISA bus boards.
Precedence in Mixed Systems
In systems where both ISA and PCI boards exist, PCI boards
take precedence and are numbered before ISA boards. Also,
when using both geographical and programmable assignment
methods, PCI boards that use SW30 setting 0 are numbered
before PCI boards that use SW30 settings 1–9 or A–F.
NOTES: After the hardware and the system software are
installed in a Windows system, refer to the Intel® Dialogic®
Configuration Manager (DCM) utility to retrieve the assigned
board instance (ID) number(s). After the hardware and the
system software are installed in a Linux system, refer to the
proper configuration files to retrieve the assigned board
instance (ID) number(s).
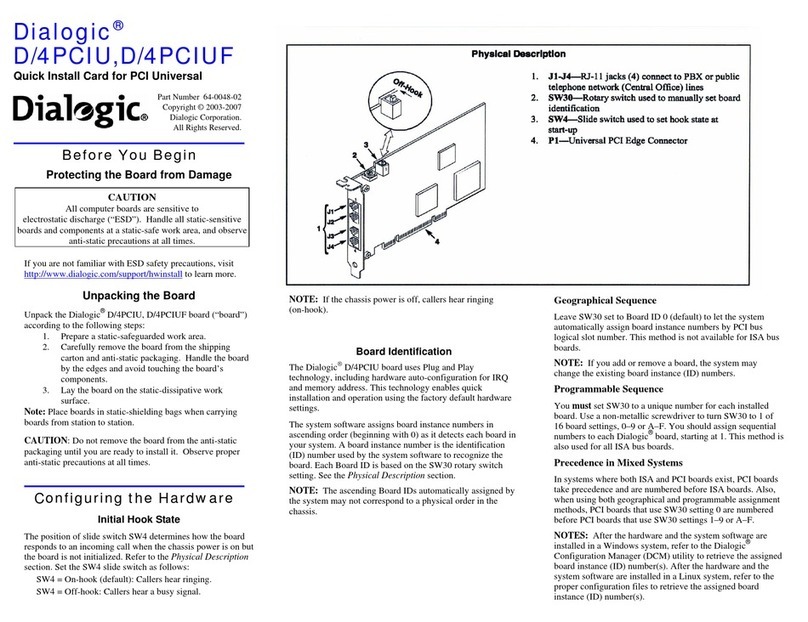
Physical Description
{
2
"

3
4
J1
J2
J3
J4
1
Off-Hook

1. J1-J4—RJ-11 jacks (4) connect to PBX or public
telephone network (Central Office) lines
2. SW30—Rotary switch used to manually set board
identification
3. SW4—Slide switch used to set hook state at
start-up
4. P1—Universal PCI Edge Connector
Installing the Hardware
NOTE: If you are adding Intel
®
hardware to an existing
system, you do not need to uninstall existing system software.
1. Working with your computer at a static-safe work area,
switch off the power and disconnect all power cords
from the electrical outlets.
2. Remove the computer cover.
3. Select an empty PCI expansion bus slot and remove the
slot’s retaining screw and access cover plate.
4. Insert the edge connector of the board into the bus slot.
Press firmly until the board is securely seated.
Installing the Universal PCI Board
ISA Slot
PCI Slot
PCI
Board
Computer
Chassis
Remove
Cover
Plate
5. Replace and tighten the retaining screw to secure the
board firmly in the chassis slot.
6. Replace the computer cover when finished and
reconnect the power cords.
7. Turn the power to the chassis ON.
CAUTION: If your BIOS is set to use Plug and Play
technology and there are ISA boards in your system, an
IRQ conflict can be created if a PCI board is assigned the
same IRQ as an ISA board. This could cause the machine
to stop responding. You can prevent this by entering the
BIOS and reserving the appropriate IRQs (those used by
your ISA boards) for ISA use only.
Connecting External Cables
Each RJ-11 jack on the rear bracket of this board supports a
single channel. Use RJ-11 connectors and telephone cable to
connect each channel jack to a PBX station port or to the
Public Telephone Network Central Office (CO).
NOTE: A standard telephone will not function when directly
connected to the board.
Connecting Cables to J1-J4
PBX or Public Telephone
Network Cable Connector
UNUSED
UNUSED
Ring
Tip
UNUSED
UNUSED
1
2
3
4
5
6
1
2
3
4
5
6
Pinouts for J1–J4
on Bracket
Pin 1
NOTE:
J1 is Channel 1
J2 is Channel 2
J3 is Channel 3
J4 is Channel 4
After Installing the Hardware
After installing the hardware, proceed with the system
software installation as described in the system software
documentation (if applicable).
When configuring your system using the DCM configuration
tool, the correct menu selection to choose is “D4PCIU”
regardless of whether you are using a D/4PCIU or D/4PCIUF
board. Both boards share the same product family name in the
DCM tool.
For technical specifications and product information, see the
Intel
®
website at
http://www.intel.com/design/network/products/telecom.
Direct Return
Authorization (DRA) Process
If you are a reseller and are located in the Americas, you may
return a board for warranty repair by using the online form at
http://www.intel.com/support/motherboards/draform.htm. For
all other returns, contact your vendor or Intel Customer
Support (see http://www.intel.com/support/9089.htm).

Other manuals for D4PCIU

1

This manual suits for next models

1

Other Dialogic Computer Hardware manuals

Dialogic Eiconcard Family User manual

Dialogic

Dialogic Eiconcard Family User manual

Dialogic DSI M3UA Operating and maintenance manual

Dialogic

Dialogic DSI M3UA Operating and maintenance manual

Dialogic Dialogic 64-0074-02 Instructions for use

Dialogic

Dialogic Dialogic 64-0074-02 Instructions for use

Dialogic DIALOG/4 User manual

Dialogic

Dialogic DIALOG/4 User manual

Dialogic D/21H User manual

Dialogic

Dialogic D/21H User manual

Dialogic Dialogic Media Board DMV600BTEC Instructions for use

Dialogic

Dialogic Dialogic Media Board DMV600BTEC Instructions for use

Dialogic DM/V480A-2T1-PCI Instructions for use

Dialogic

Dialogic DM/V480A-2T1-PCI Instructions for use

Dialogic EDP-10 User manual

Dialogic

Dialogic EDP-10 User manual

Dialogic 64-0014-02 Instructions for use

Dialogic

Dialogic 64-0014-02 Instructions for use

Dialogic Station Interface Box SI/240 User manual

Dialogic

Dialogic Station Interface Box SI/240 User manual

Dialogic D4PCIU Instructions for use

Dialogic

Dialogic D4PCIU Instructions for use

Dialogic Brooktrout TR1034 Instructions for use

Dialogic

Dialogic Brooktrout TR1034 Instructions for use

Dialogic M7324 User manual

Dialogic

Dialogic M7324 User manual

Dialogic Dialogic D/480JCT-2T1-EW User manual

Dialogic

Dialogic Dialogic D/480JCT-2T1-EW User manual

Dialogic DISI16-EW User manual

Dialogic

Dialogic DISI16-EW User manual

Dialogic D600JCT-1E1-120-EW User manual

Dialogic

Dialogic D600JCT-1E1-120-EW User manual

Popular Computer Hardware manuals by other brands

ST X-NUCLEO-IDB04A1 user manual

ST

ST X-NUCLEO-IDB04A1 user manual

NETGEAR WG511v2 installation guide

NETGEAR

NETGEAR WG511v2 installation guide

Cypress Semiconductor CY7C68033 Specification sheet

Cypress Semiconductor

Cypress Semiconductor CY7C68033 Specification sheet

Panasonic DLS6 Service manual

Panasonic

Panasonic DLS6 Service manual

Cambricon MLU270-X Series user manual

Cambricon

Cambricon MLU270-X Series user manual

Thermalright TRUE Spirit 140 BW Rev.A manual

Thermalright

Thermalright TRUE Spirit 140 BW Rev.A manual

RF-Star RF-BM-ND08 instruction manual

RF-Star

RF-Star RF-BM-ND08 instruction manual

Air Monitor VELTRON DPT-plus Installation, operation and maintenance manual

Air Monitor

Air Monitor VELTRON DPT-plus Installation, operation and maintenance manual

Rohm BD7682FJ-EVK-301 quick start guide

Rohm

Rohm BD7682FJ-EVK-301 quick start guide

ARM Cortex-M0 Technical reference manual

ARM

ARM Cortex-M0 Technical reference manual

Point of View TV-HDMI-200BT user guide

Point of View

Point of View TV-HDMI-200BT user guide

Pico Communications E-15 Technical reference

Pico Communications

Pico Communications E-15 Technical reference

Pioneer BDR-XD08EMB-S owner's manual

Pioneer

Pioneer BDR-XD08EMB-S owner's manual

Rosewill RCX-Z775-LX user manual

Rosewill

Rosewill RCX-Z775-LX user manual

ST X-NUCLEO-LED61A1 quick start guide

ST

ST X-NUCLEO-LED61A1 quick start guide

Shuttle Spacewalker HOT-685 user manual

Shuttle

Shuttle Spacewalker HOT-685 user manual

Radica Games DAVID-II 716 Operating and maintenance instruction manual

Radica Games

Radica Games DAVID-II 716 Operating and maintenance instruction manual

NEC PD78052 user manual

NEC

NEC PD78052 user manual

manuals.online logo
manuals.online logoBrands
  • About & Mission
  • Contact us
  • Privacy Policy
  • Terms and Conditions

Copyright 2025 Manuals.Online. All Rights Reserved.