manuals.online logo
Brands
  1. Home
  2. •
  3. Brands
  4. •
  5. Diamond
  6. •
  7. Commercial Food Equipment
  8. •
  9. Diamond ES13/A4 User guide

Diamond ES13/A4 User guide

Mod: ES13/A4
Production code: ES13
10/2016
OPERATION MANUAL INSTRUCTIONS FOR USE & MAINTENANCE
REFRIGERATED CABINETS - HARMONY
We congratulate you on your new refrigerated display cabinet.
A good knowledge of the features of this product will make its use safer and cheaper.
1) HA NDLING AND TRANSPORT
The equipment is packed in a wooden crate (g.A) which is suitable for lifting
by fork lifts or transpallette in order to avoid possible damages.The equipment
must be moved by qualied and authorised personnel.The wooden packing can be
recycled, therefore it has to be disposed in the special waste plan for recycling. It is
advisable to use a wooden board for any handling of the cabinet in order to avoid
damages of the structure (g. B).
Carefully unpack the cabinet, paying attention so as not to damage it
or throw parts and / or accessories necessary for the assembling (i.e.
screws) away.
During the handling of the cabinet to install it on its place, the cabinet
must be never pulled on its side ends.
2) COMPLAINTS
On receipt of the refrigerated equipment verify immediately if there are transport
damages. In case the unit is damaged in any way, notify immediately the driver and,
within 3 days, the shipping company by registered letter.
Every complaint must arrive at the manufacturer within 8 days from receipt of the
equipment.After this term the manufacturer will not take any responsibility.
3) IMPORTANT INSTRUCTIONS AND SUGGESTIONS
Before using the equipment it is important to read these instructions carefully as
improper use can be dangerous. Before connecting the refrigerated unit, make sure
that the power supply voltage is as indicated on the label (g. C).To guarantee
the electrical safety of this equipment, it must be connected to a grounded power
socket in compliance with the current legislation of the destination country.
For usage of the unit, as every electrical device, basic rules have to be followed:
- Do not touch or plug the equipment with damp or wet hands or feet;
- Do not pull the electrical cable to unplug it;
- Do not expose it to the atmospheric agents;
- Do not allow children to use it without adult supervision;
- Before starting any cleaning or maintenance operation, it is necessary
to unplug the equipment;
- In case of breakdown or bad functioning, disconnect the unit and do not attempt
to make any modication.
4) WORKING TEMPERATURE
This equipment is manufactured in conformity with the ambient conditions of
climatic class 3 (25°C – 60% R.H.) EN 441-4.The refrigerated unit maintains its
performance characteristics with an ambient temperature and relative humidity
of no more than: + 25° C and 60% R.H. (relative humidity). In case the ambient
conditions are not included in the above mentioned ones, a lower performance
must be expected.
5) INSTALLATION
The equipment must be installed in a suitable, dry, non-aired place and on a level
oor in order to prevent noise and bad working of the unit and also to avoid higher
energy consumption and a shorter compressor life (g. G).
The refrigerated equipment should never be installed:
- near sources of heat such as radiators, direct or indirect sunlight or other
equipment which produce heat (g. F);
- in line with draughts coming from doors, windows or air-conditioning systems (g.
F).
Do not close or obstruct the ventilation openings of the refrigerating unit, because
this would stop the airow which cools the refrigeration unit causing bad working.
6) CLEANING
IMPORTANT – DURINGTHE WHOLE CLEANING OPERATION USE
WORKING GLOVES OF CLASS II TO PROTECTYOUR HANDS ALL
THETIME
Before switching on the unit, take away the protective lm that covers some
external and internal parts of the cabinet (for example the display surface). Clean
the equipment thoroughly, both inside and outside, using warm water and a solution
of bicarbonate of soda (1 tea spoon every 2 liters) or white vinegar. Carefully dry
the unit with a soft cloth. Never use detergent products, metal pads or abrasive
substances. Never use sharp objects; any damage resulting from the use of these
objects will not be covered by warranty. Never wash the cabinet with water jets.
7) ELECTRICAL POWER / CONNECTION
First of all make sure that there is an efcient ground system in compliance with the
current legislation regarding electrical safety.When in doubt, request a careful check
from a qualied technician.The unit is equipped with the plug and electrical cable
mod. Schuco (g. D).
The necessary operations are:
1)Verify that the power supply voltage is as indicated on the machine rate plate (g.
C) 230V/50 Hz monophase, or 220V/60Hz or 110V/60Hz.
2) In case of incompatibility between the socket and the plug of the unit,
the plug should be replaced with a suitable one by a qualied technician.
Do not use adapter sockets.
3 ) Do not connect any other appliance to the same power socket.
GB
D
F
E
A
B
C
4) Do not pull the electrical cable or the unit to unplug the equipment from the
socket (g. E).
5) Pay attention that the power supply cable is laid in such a way as to prevent it
from being damaged or becoming hazardous to people and things.
6) In case the power supply cable is damaged, it should be replaced only by a
qualied technician.
8) OPERATION START
After the refrigerated equipment has been installed and cleaned, the power supply
voltage has been checked and the plug has been connected, switch on the unit.
When the unit has reached the working temperature, put in the products already
cooled. Do not exceed the 2/3 of the available room with the product’s level. Leave
some room between the displayed products in order to allow a good airow and
never obstruct the air intake situated on the front side.
9) PERIODICAL
MAINTENANCE
We suggest to carry out a
thorough cleaning of the
counter once a month for
the good working, the good
preservation of the food and
the aesthetics preservation of
the equipment.The periodical
cleaning can be made by
qualied people, who should
know the procedure described
in this paragraph. Attention!
Before starting any cleaning
operation it is necessary to
turn off the equipment by
the on/off red switch and to unplug or disconnect the equipment by the general
power security switch of your shop.
IMPORTANT – DURINGTHE WHOLE CLEANING OPERATION USE
WORKING GLOVES OF CLASS II TO PROTECTYOUR HANDS ALL
THETIME.
Remove all goods from the refrigerated unit and keep them in a fridge or in a
refrigerated ambient suitable for their preservation.
Carefully and thoroughly clean the display surface, the shelves, the glasses, with
specic cleaners for any surface. Never use abrasive substances, metal pads or
other stuff which can damage the unit.
After every cleaning operation it is necessary to rinse with warm water and dry the
unit with a soft cloth.
Clean the condenser, after having removed the cover grid, with a dry paint brush
(g. G) or a vacuum cleaner, removing all dust. Pay attention not to bend or damage
the ns, the tubes or the blades of the fans. Never neglect this operation, as it is
basic for the good working of the unit and to avoid possible breakings.When you
have nished this operation, t the cover grid in its original position.
When the cleaning operation is over, make sure that everything is clean and dry
before connecting the equipment to the power supply again.When the unit reaches
the correct working temperature, it is possible to reload it. In case of long absences
(i.e. holidays etc.) the unit has to be unplugged, emptied completely, cleaned and
dried to prevent bad smells.
10) DEFROSTING
The defrosting takes place automatically during the running of the unit.The
defrosting cycles are 4 a day and last for about 30’ each and are controlled by the
thermostat in the electric control panel.
During the defrosting phase the temperature of the unit could be altered, but when
this cycle is over, in a short time the working temperature will return to normal.
The water from defrost is collected in a drip tray equipped with automatic
evaporation.
11) EL ECTRONIC THERMOSTAT
TEMPERATURE MODIFICATION
The thermostat is already set at the factory. In case the temperature is altered, the
manufacturer will not take any responsibility.Any modication will have to be made
by qualied people.
- Press
for 5 seconds to display the selected parameter value; press
or
to
reach the required temperature;
- Press
to conrm.
12)TEMPERATURE
The thermostat regulates the temperature into
the equipment and the working temperature is
already preset at the factory.
A lower performance must be expected from
the refrigerated unit when:
- the equipment is set on the lowest temperature
- the equipment is positioned in an ambient with higher temperature or relative
humidity than above indicated
- the amount of displayed goods exceeds the maximum recommended and the
proper air circulation is prevented.
In those cases the goods are kept at higher temperatures, the refrigerating unit has
to run non-stop and ice may form on the evaporator. It is necessary therefore to
turn the equipment off to allow the complete melting of the ice.
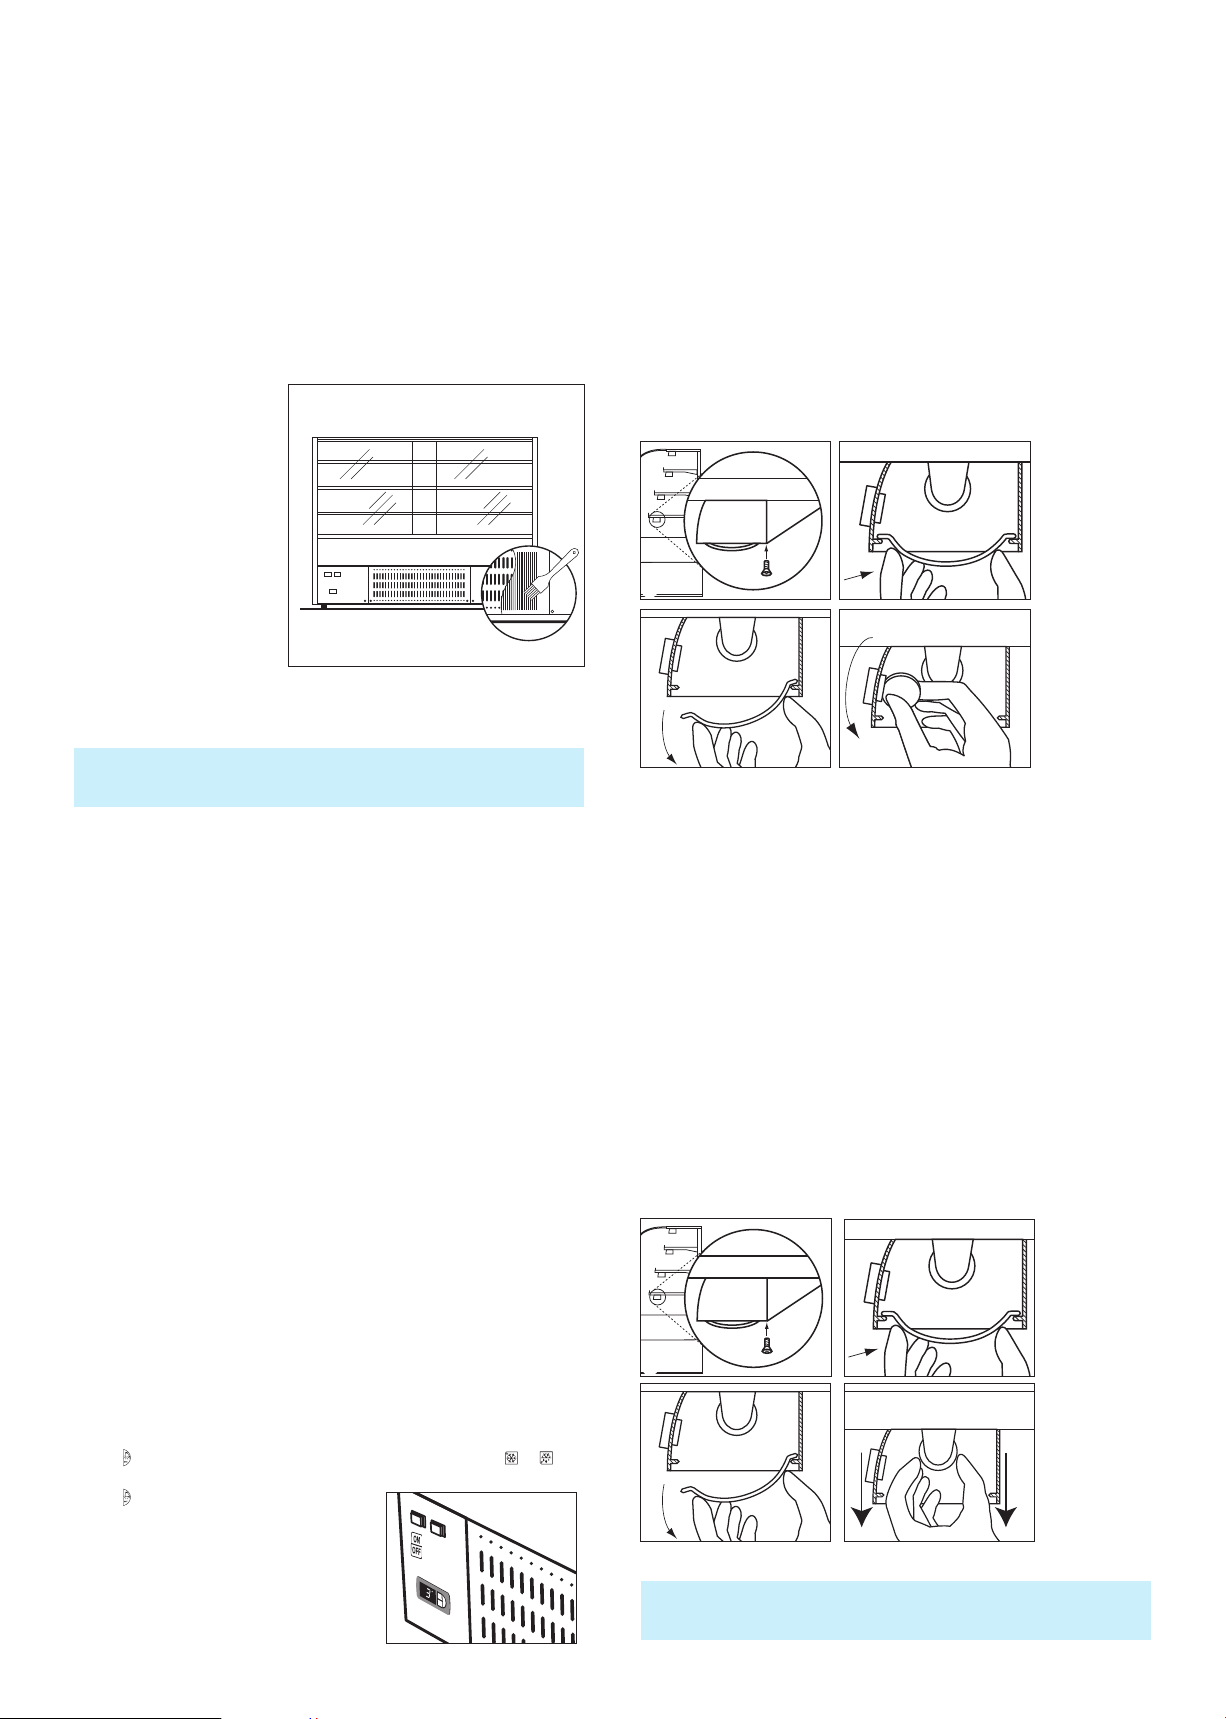
13) REPLACEMENT OFTHE THERMOMETER BATTERY
Before replacing the thermometer battery it is necessary to turn off the equipment
by the on/off red switch and to unplug or disconnect the equipment by the general
power supply.
1) Unscrew the screws of the plastic cover.
2-3) Press the plastic cover on the front part ant let it turn downwards.
4) Using a coin unscrew the battery cover and replace the battery.
5) For the assembling repeat the operation on the contrary way.
14)TECHNICAL ASSISTANCE (servicing)
If the equipment does not run properly or does not work at all, in your own
interest before calling for servicing, we suggest to check the following points:
1) if the plug is well inserted in the socket;
2) if the power reaches the socket to which the equipment is connected;
3) if the thermostat is set as recommended;
4) if the network voltage is the same as requested for the unit (+-6%);
5) if the evaporator is covered with ice (in this case proceed as indicated at
paragraph 12);
6) if the condenser is clean (see paragraph 9);
7) if there are air draughts, if the cabinet is installed in the correct position (see
paragraph 5) and if the ambient temperature is as indicated (see paragraph 4).
15) REPLACEMENT OF LAMPS (neon tube)
The replacement and the substitution of lamps must be made by qualied technician
and when the unit is disconnected from the power net.
1) Before replacing the lamp disconnect the equipment by the general power supply.
2-3) Unscrew the screws of the plastic cover and take it out by pressing it on the
front part.
4) Unfasten the neon tube from the steel hook and take the neon tube out.
5) For the assembling repeat the operation on the contrary way.
IN CASE OF REQUEST FOR SERVICE, CONTROL AND/OR
REPLACEMENTSYOU WILL HAVE TO CONTACTTHE SUPPLIER
WHERETHE CABINET WAS BOUGHT.
G
43
2
1
23
43

This manual suits for next models

1

Other Diamond Commercial Food Equipment manuals

Diamond FRM/4G-L User manual

Diamond

Diamond FRM/4G-L User manual

Diamond ASM/185 User manual

Diamond

Diamond ASM/185 User manual

Diamond TP4N/H-R2 User manual

Diamond

Diamond TP4N/H-R2 User manual

Diamond cookmax CXGFT465LC/650 User manual

Diamond

Diamond cookmax CXGFT465LC/650 User manual

Diamond D701-EKS User manual

Diamond

Diamond D701-EKS User manual

Diamond GGN-1 User manual

Diamond

Diamond GGN-1 User manual

Diamond MD10/B5-R2 Owner's manual

Diamond

Diamond MD10/B5-R2 Owner's manual

Diamond 6 GN 1/1 User manual

Diamond

Diamond 6 GN 1/1 User manual

Diamond TP2B/L User guide

Diamond

Diamond TP2B/L User guide

Diamond Minicold ISO 80 Plus User manual

Diamond

Diamond Minicold ISO 80 Plus User manual

Diamond HL30/A1 User manual

Diamond

Diamond HL30/A1 User manual

Diamond GVV-1 User manual

Diamond

Diamond GVV-1 User manual

Diamond TVA-38D User manual

Diamond

Diamond TVA-38D User manual

Diamond RVE/4C-CM User manual

Diamond

Diamond RVE/4C-CM User manual

Diamond FRU-511/N Service manual

Diamond

Diamond FRU-511/N Service manual

Diamond GR 40 G Technical specifications

Diamond

Diamond GR 40 G Technical specifications

Diamond PD18/A7-R2 Owner's manual

Diamond

Diamond PD18/A7-R2 Owner's manual

Diamond RM32 User manual

Diamond

Diamond RM32 User manual

Diamond CBT31/TS User manual

Diamond

Diamond CBT31/TS User manual

Diamond BN129/V-E8/T2 Owner's manual

Diamond

Diamond BN129/V-E8/T2 Owner's manual

Diamond ORLANDO LINE User manual

Diamond

Diamond ORLANDO LINE User manual

Diamond INN/V5-A2 User manual

Diamond

Diamond INN/V5-A2 User manual

Diamond ATLANTA ATL/10-AN-B5 User manual

Diamond

Diamond ATLANTA ATL/10-AN-B5 User manual

Diamond GCC-1 User manual

Diamond

Diamond GCC-1 User manual

Popular Commercial Food Equipment manuals by other brands

Costco 5P-08WT manual

Costco

Costco 5P-08WT manual

Beper BT.651Y manual

Beper

Beper BT.651Y manual

Blue Seal EF30 Installation & operation manual

Blue Seal

Blue Seal EF30 Installation & operation manual

Tecfrigo Snelle 400 GS installation instructions

Tecfrigo

Tecfrigo Snelle 400 GS installation instructions

Follett PFT Series Operation and maintenance manual

Follett

Follett PFT Series Operation and maintenance manual

MEFE CAT 206 PTR User manual and maintenance

MEFE

MEFE CAT 206 PTR User manual and maintenance

Salva IVERPAN FC-18 User instructions

Salva

Salva IVERPAN FC-18 User instructions

Allure Melanger JR6t Operator's manual

Allure

Allure Melanger JR6t Operator's manual

saro FKT 935 operating instructions

saro

saro FKT 935 operating instructions

Hussmann Rear Roll-in Dairy Installation & operation manual

Hussmann

Hussmann Rear Roll-in Dairy Installation & operation manual

Cornelius IDC PRO 255 Service manual

Cornelius

Cornelius IDC PRO 255 Service manual

Moduline HSH E Series Service manual

Moduline

Moduline HSH E Series Service manual

MINERVA OMEGA DERBY 270 operating instructions

MINERVA OMEGA

MINERVA OMEGA DERBY 270 operating instructions

Cuppone BERNINI BRN 280 Installation

Cuppone

Cuppone BERNINI BRN 280 Installation

Arneg Atlanta Direction for Installation and Use

Arneg

Arneg Atlanta Direction for Installation and Use

HURAKAN HKN-ISE30 manual

HURAKAN

HURAKAN HKN-ISE30 manual

MKN OPGGSGARG Series operating instructions

MKN

MKN OPGGSGARG Series operating instructions

GILES GBF-50-VH Operation & service manual

GILES

GILES GBF-50-VH Operation & service manual

manuals.online logo
manuals.online logoBrands
  • About & Mission
  • Contact us
  • Privacy Policy
  • Terms and Conditions

Copyright 2025 Manuals.Online. All Rights Reserved.