manuals.online logo
Brands
  1. Home
  2. •
  3. Brands
  4. •
  5. Diamondback
  6. •
  7. Automobile Accessories
  8. •
  9. Diamondback 180 User manual

Diamondback 180 User manual

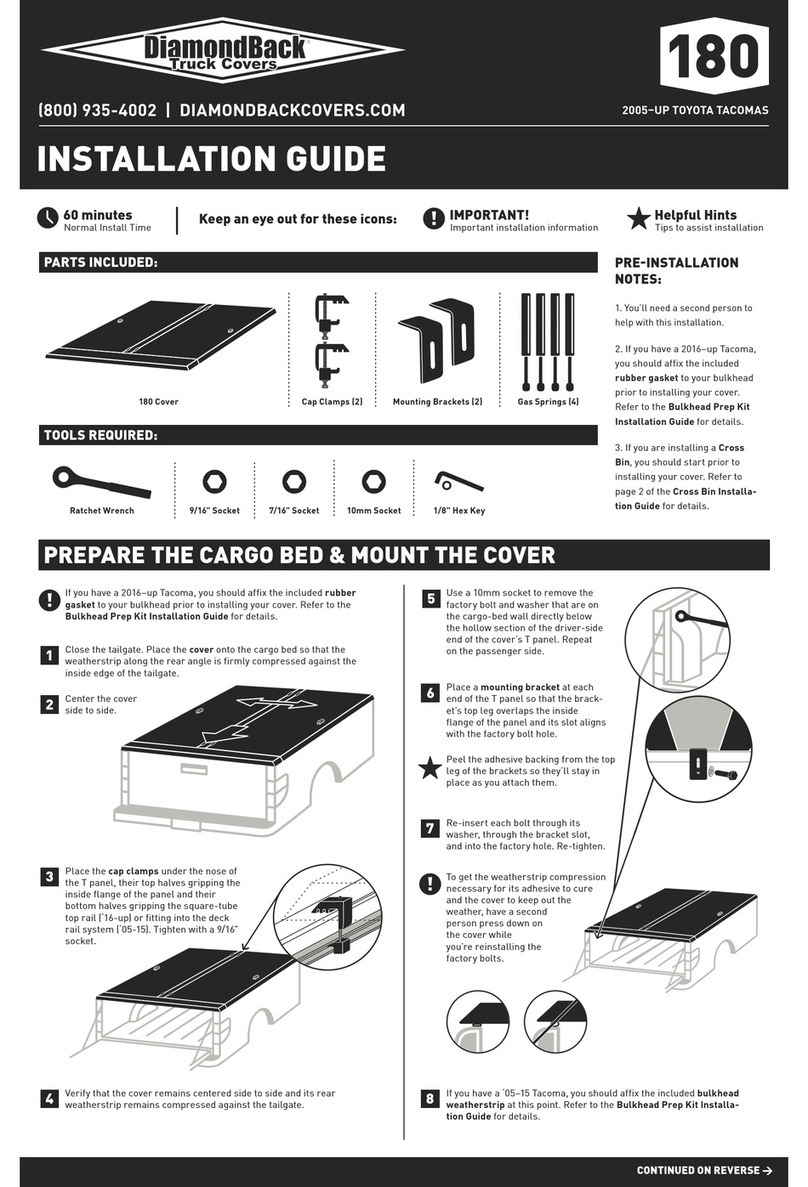
Mounting Brackets (2)
INSTALLATION GUIDE CVR-180.3
DiamondBackCovers.com / 800 935 4002
Important installation information
IMPORTANT!
Keep an eye out for these icons:
Normal install time
60 minutes
Tips to assist installation
Helpful Hints
270
’05–up Toyota Tacoma180
CONTINUED ON REVERSE >
Cap Clamps (2)
1/8"
Hex Key Gas Springs (4)
TOOLS REQUIRED:
9/16"
Socket
7/ 1 6"
Socket
10 mm
Socket
Ratchet Wrench
PARTS INCLUDED:
180 Cover
PRE-INSTALLATION NOTES:
You’ll need a second person to
help with this installation.
If you have a 2016–up Tacoma, you should affix the included
rubber gasket to your bulkhead prior to installing your cover.
Refer to the Bulkhead Prep Kit Installation Guide for details.
If you are installing a Cross Bin, you should
start before installing the cover. Refer to page 2
of the Cross Bin Installation Guide for details.
PREPARE THE CARGO BED & MOUNT THE COVER
Close the tailgate. Place the cover onto the cargo bed so that the
weatherstrip along the cover’s rear angle is firmly compressed
against the inside edge of the tailgate.
1
Center the cover side to side.
2
Place the cap clampsunder the nose of the T
panel, their top halves gripping the inside
flange of the panel and their bottom
halves gripping the square-tube top rail
(‘16-up) or fitting into the deck rail
system (‘05-15). Tighten with a
9/16" socket.
3
4Verify that the cover remains centered side to side and its rear
weatherstrip remains compressed against the tailgate.
Use a 10mm socket to remove the
factory bolt and washer that are on the
cargo-bed wall directly below the
hollow section of the driver-side end
of the cover’s T panel. Repeat on the
passenger side.
Re-insert each bolt through its
washer, through the bracket slot, and
into the factory hole. Re-tighten.
5
Place a mounting bracket at each end
of the T panel so that the bracket’s top
leg overlaps the inside flange of the
panel and its slot aligns with the factory
bolt hole.
6
Peel the adhesive backing from the top
leg of the brackets so they’ll stay in
place as you attach them.
7
To get the weatherstrip compres-
sion necessary for its adhesive to
cure and the cover to keep out the
weather, have a second person
press down on the cover while
you’re reinstalling the
factory bolts.
If you have a ‘05–15 Tacoma, you should affix the included bulk-
head weatherstrip at this point. Refer to the Bulkhead Prep Kit
Installation Guide for details.
8
Use the 1/8" hex key to loosen the set screws on the linkages of the
forward lock rods.
9
Double-check both panels to ensure they open, close, lock & seal
correctly. If at any point the weatherstrip does not touch the bed
rails, readjust the lock rods and mounting brackets as needed.
12
Your panels should be difficult to operate at first. After finishing
installation below, leave the panels closed as much as possible
for 3–4 days to break in the weatherstrip. After that period, you
should find that the panels open and close without difficulty.
1/8"hex key
Adjust the length of the forward lock rods and retighten the set
screws so that:
A. with the lock handles in the open position, the rod tips clear
the square-tube top rail or deck rail system and
B. with the handle in the closed position, the rod tips do not
strike the bulkhead.
10
MAY 2017
DiamondBackCovers.com JULY 2018
ADJUST THE LOCK RODS
With the lock handle in the
closed position, position the
lock rods tight against the
underside of the square-tube
top rail or the deck rail system
so that they’ll
draw the panels
down and com-
press the weath-
erstrip. Tighten
the rod guide
brackets with a
7/ 1 6" s o ck e t .
7/16" socket
11
Leave the cover closed and locked for
24 hours to allow the weatherstrip
adhesive, which is pressure-sensitive,
to fully cure.
To avoid premature failure of your gas
springs, attach them barrel up, shaft down.
Attach the gas springs to the ball studs.
13
14
ATTACH THE GAS SPRINGS
Adhesive cure time
24 hours

Other Diamondback Automobile Accessories manuals

Diamondback HD User manual

Diamondback

Diamondback HD User manual

Diamondback 270 User manual

Diamondback

Diamondback 270 User manual

Diamondback 270 User manual

Diamondback

Diamondback 270 User manual

Diamondback 180 User manual

Diamondback

Diamondback 180 User manual

Diamondback HD User manual

Diamondback

Diamondback HD User manual

Diamondback 270 User manual

Diamondback

Diamondback 270 User manual

Diamondback 270 User manual

Diamondback

Diamondback 270 User manual

Diamondback 270 User manual

Diamondback

Diamondback 270 User manual

Diamondback 270 User manual

Diamondback

Diamondback 270 User manual

Diamondback HD User manual

Diamondback

Diamondback HD User manual

Diamondback 270 User manual

Diamondback

Diamondback 270 User manual

Diamondback HD User manual

Diamondback

Diamondback HD User manual

Diamondback 180 User manual

Diamondback

Diamondback 180 User manual

Diamondback 180 User manual

Diamondback

Diamondback 180 User manual

Diamondback 270 User manual

Diamondback

Diamondback 270 User manual

Diamondback HD User manual

Diamondback

Diamondback HD User manual

Popular Automobile Accessories manuals by other brands

Whispbar K511W Fitting instructions

Whispbar

Whispbar K511W Fitting instructions

AC Schnitzer 5131 501 110 Fitting instructions

AC Schnitzer

AC Schnitzer 5131 501 110 Fitting instructions

Metra Electronics 99-8714 installation instructions

Metra Electronics

Metra Electronics 99-8714 installation instructions

Mopar 82212686 manual

Mopar

Mopar 82212686 manual

Fortin EVO ALL Addendum

Fortin

Fortin EVO ALL Addendum

FormaCars 80010 user manual

FormaCars

FormaCars 80010 user manual

CCM 040-1191-2 instruction manual

CCM

CCM 040-1191-2 instruction manual

DU-HA 70822 manual

DU-HA

DU-HA 70822 manual

Dynojet POWER VISION PV3-2509C installation guide

Dynojet

Dynojet POWER VISION PV3-2509C installation guide

Safe Fleet Prime Design AluRack AR-2002 manual

Safe Fleet

Safe Fleet Prime Design AluRack AR-2002 manual

Vitebo VTB-88 user manual

Vitebo

Vitebo VTB-88 user manual

Cequent Towing Products 75132 installation instructions

Cequent Towing Products

Cequent Towing Products 75132 installation instructions

Dakota Digital VHX-64P-GTO Instrument Installation

Dakota Digital

Dakota Digital VHX-64P-GTO Instrument Installation

Leitner FORD SUPER DUTY 2017-UP manual

Leitner

Leitner FORD SUPER DUTY 2017-UP manual

SUPERTOOTH buddy manual

SUPERTOOTH

SUPERTOOTH buddy manual

Graco NAUTILUS 65 DLX instruction manual

Graco

Graco NAUTILUS 65 DLX instruction manual

Gecko GG500027 User manual and warranty

Gecko

Gecko GG500027 User manual and warranty

RBP Stealth Power RBP-510-SP installation guide

RBP

RBP Stealth Power RBP-510-SP installation guide

manuals.online logo
manuals.online logoBrands
  • About & Mission
  • Contact us
  • Privacy Policy
  • Terms and Conditions

Copyright 2025 Manuals.Online. All Rights Reserved.