manuals.online logo
Brands
  1. Home
  2. •
  3. Brands
  4. •
  5. Diamondback
  6. •
  7. Automobile Accessories
  8. •
  9. Diamondback HD User manual

Diamondback HD User manual

MOUNT THE PANELS
Utility Knife
INSTALLATION GUIDE CVR-1
DiamondBackCovers.com / 800 935 4002
HD SE
Important installation information
IMPORTANT!
Keep an eye out for these icons:
Normal install time
45 minutes
Tips to assist installation
Helpful Hints
Cap Clamps (4)
Bed-Rail
Edge Trim (4) 1/8" Hex Key
Gas
Springs (4)
Cab Panel
Tail Panel
Center Panel
TOOLS REQUIRED:
9/16"
Socket
7/ 1 6"
Socket
Ratchet Wrench
PARTS INCLUDED:
PRE-INSTALLATION NOTES:
It’s possible for one person to install a DiamondBack solo, but the
whole process, especially positioning the panels and adjusting the
lock rods, is much easier with two people.
If you are installing a cab guard or headache rack, you should
mount it prior to mounting your DiamondBack cover. Refer to its
installation guide for details.
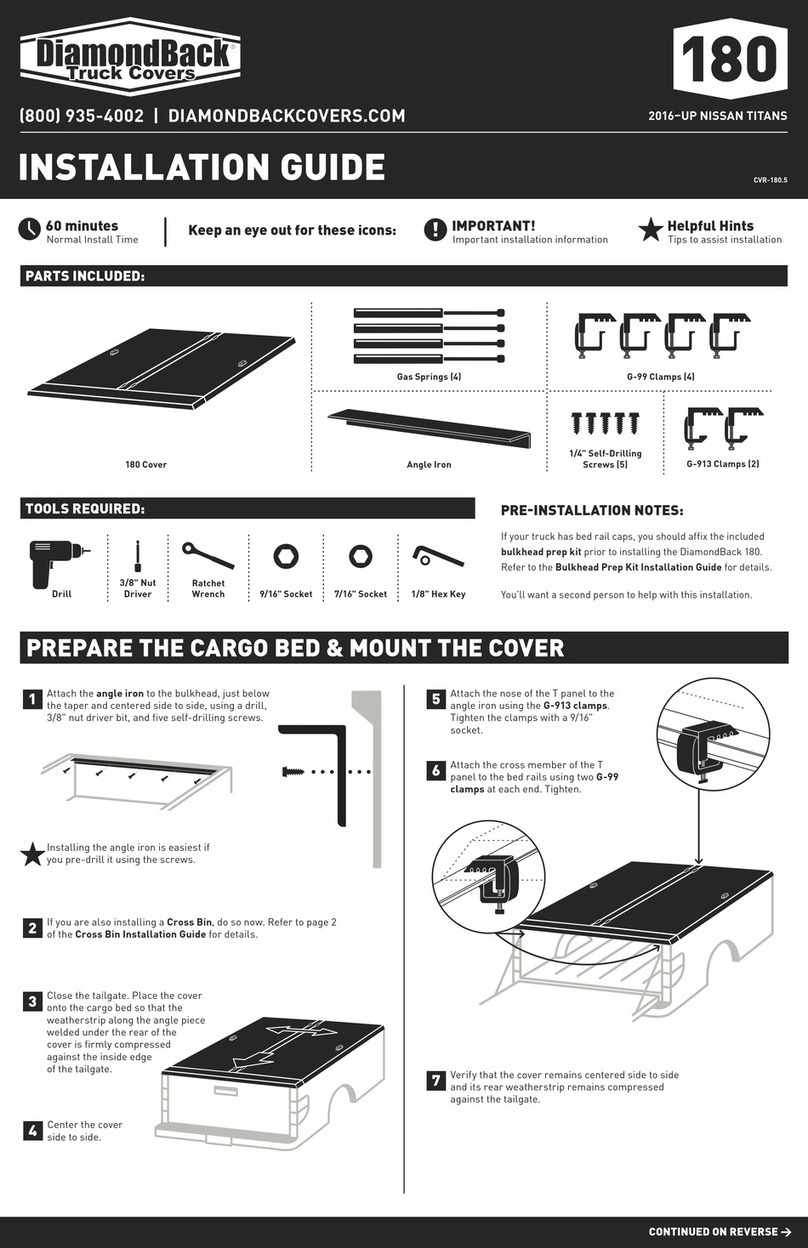
Position the cover front to back so that the
leading edge of the closed cab panel lines up with
the outside edge of the center of the bulkhead.
6
Center the cover side to side on
the truck.
7
8Tighten the cap clamps
with a 9/16" socket.
Road vibration can loosen your clamps. Retighten them after
100 miles. Check them every time you haul on top.
Repeat steps 3–4 for the
cab panel, starting this
time with the loop-shaped
hinge knuckle on the
passenger side.
5
Since the cover is
slightly tapered,
make sure the
arrow sticker on
the underside of
the center panel is
pointing toward
the tailgate.
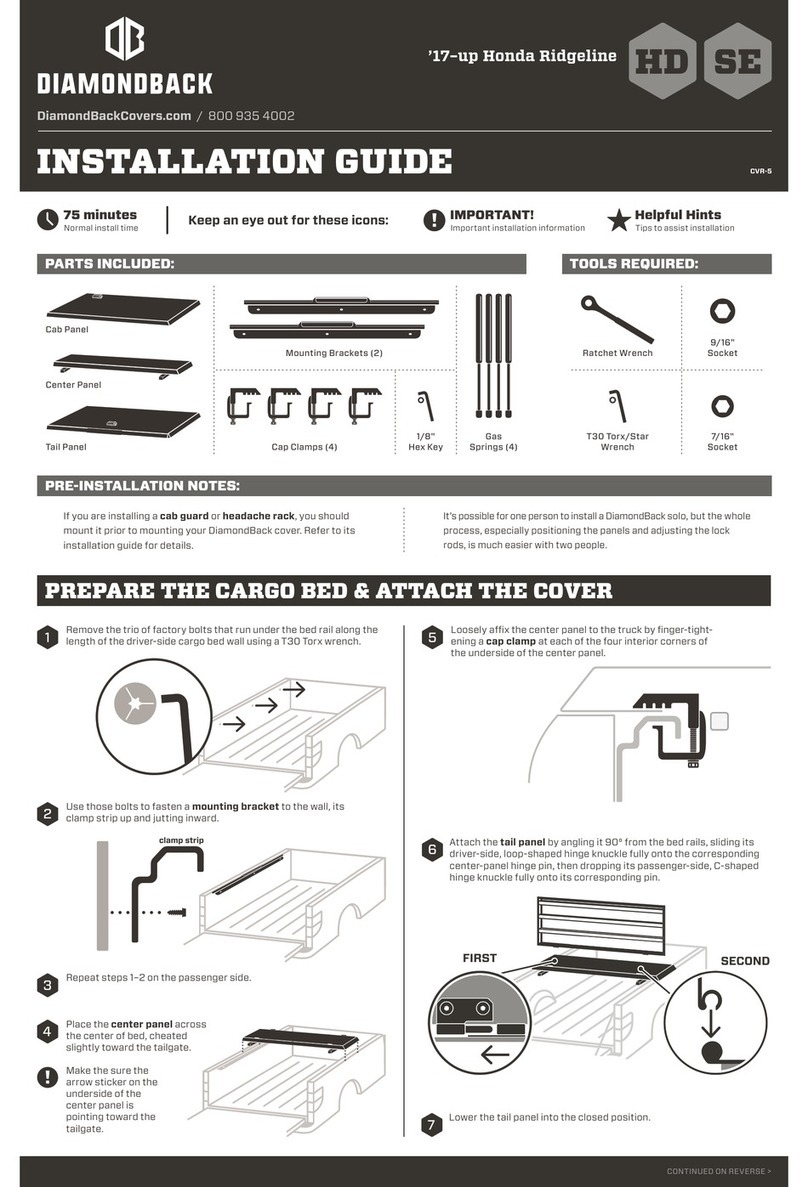
Place the center panel across the
center of the bed, cheated slightly
toward the tailgate.
1Lower the tail panel into the closed position.
4
1
2
Attach the tail panel by angling it 90° from the bed rails, sliding its
driver-side, loop-shaped hinge knuckle fully onto the corresponding
center-panel hinge pin, then dropping its passenger-side, C-shaped
hinge knuckle fully onto its corresponding pin.
3
FIRST SECOND
90°
To avoid hinge damage, make sure the drop-on hinge
is fully mated before beginning to close the panel.
FULLY MATED
CONTINUED ON REVERSE >
Loosely affix the center panel to the truck by finger-tightening a cap
clamp at each of the four interior corners of the underside of the
center panel.
2
ADJUST THE LOCK RODS
ATTACH THE SAFETY CATCH & GAS SPRINGS
PREP FOR THE LOCK RODS
If you are also installing a Cross Bin, do so now. Refer
to the Cross Bin Installation Guide for details.
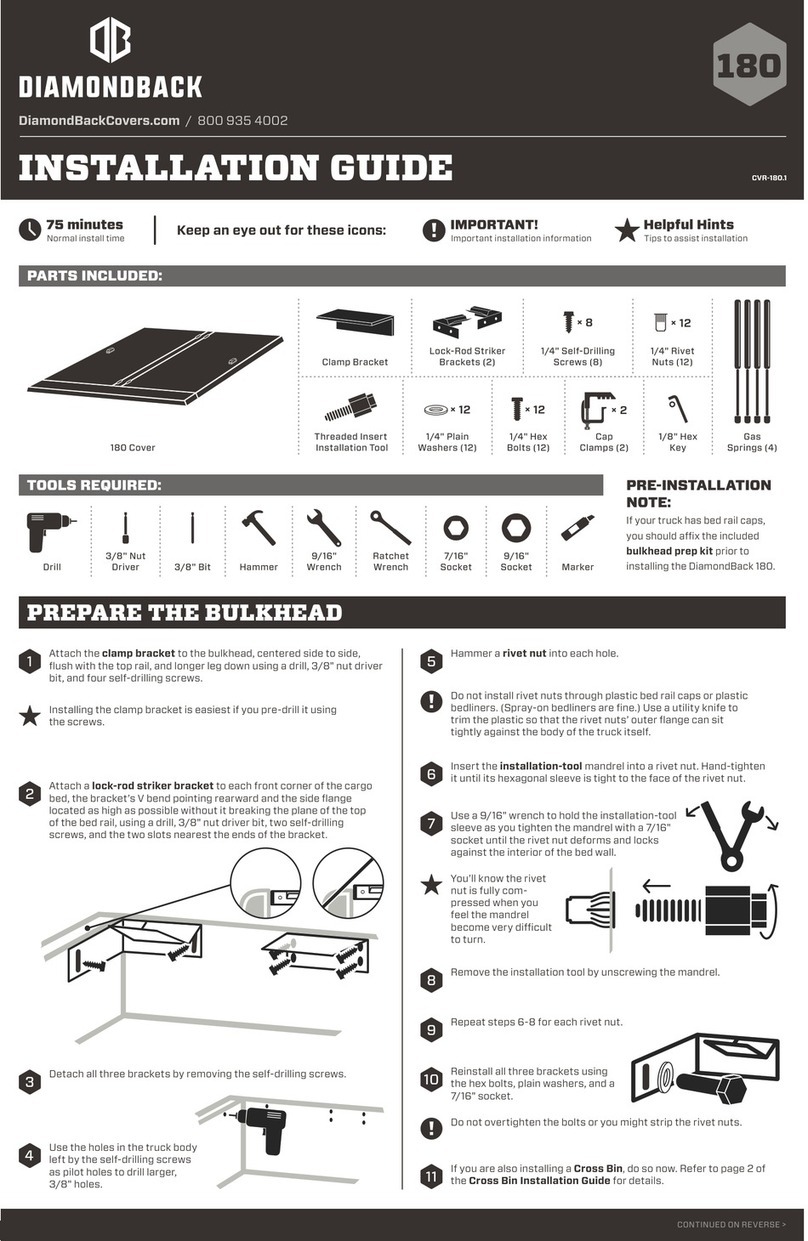
9If a DiamondBack HD, unpin each of the four lock-rod guide-bracket slide plates
by using a 7/16" socket to move one of its bolts to the second, unoccupied slot.
If plastic extends beyond the bottom of the vertical face of the metal
bed rails, trim a two-inch length of it flush with the bed rail’s bottom
edge at each of the four points where a lock rod will pass under the rails.
10
Adjust the lock rods and retighten their set screws so that
A. with the lock handle in the open position, the rod tips clear
the bed rails,
B. with the handle in the closed position, the rod tips do not
strike the bed walls, and
C. the first bend in the rods points downward.
13
Loosen the set screws on the
tailgate-panel lock-rod linkages.
1/8" hex key
12
Your panels should be hard to operate at first. After finishing
install below, leave the panels closed as much as possible for
3–4 days to break in the weatherstrip. After that period, you
should find that the panels open and close without difficulty.
Repeat steps 12 through 14 for the cab panel.
15
7/16" socket
7/16"
Using the access panels is easiest when
you press down as you open or close them.
For best weather protection, have a second person
press down on the cover while you adjust the lock rods.
Position the lock rods tight
against the underside of
the bed rails so that they’ll
draw the panels down and
compress the weather-
strip. Tighten the rod guide
brackets with a 7/16"
socket.
14
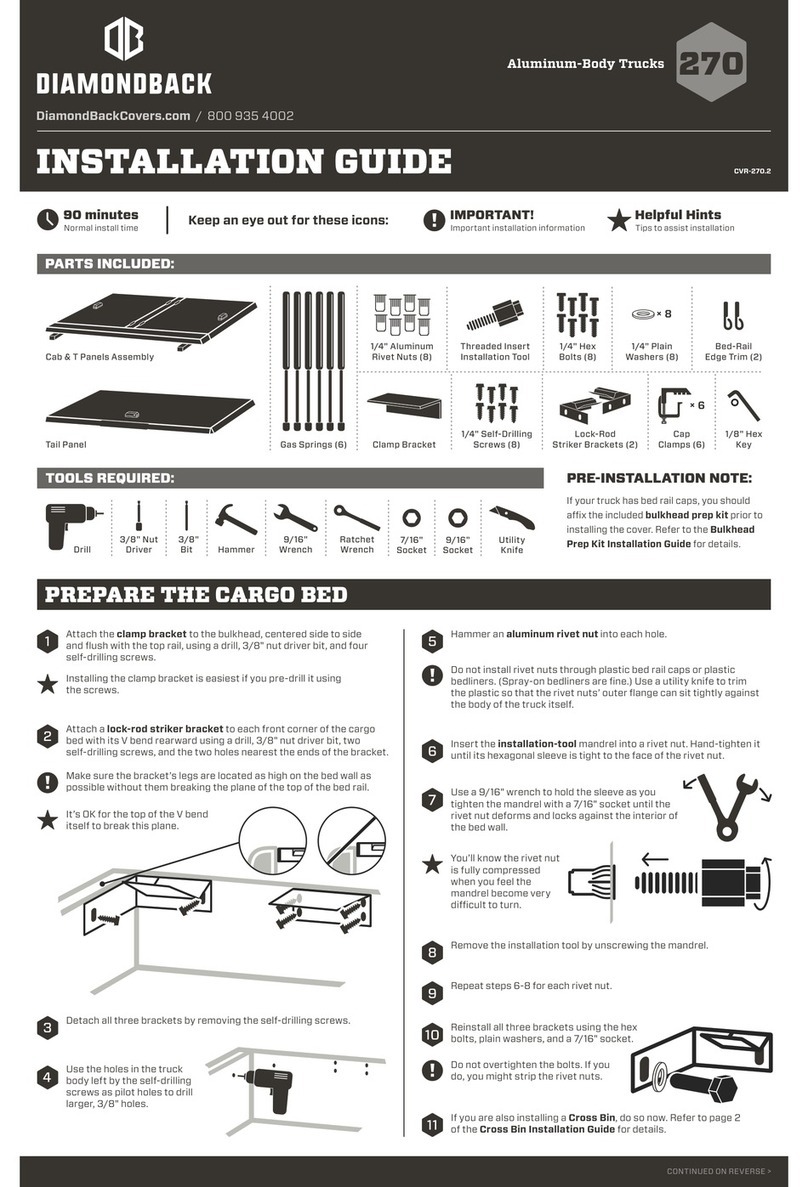
Attach the three remaining gas springs
(barrel up, shaft down).
18
If your truck has bed rail caps, affix the included
bulkhead weatherstrip. Refer to the Bulkhead
Prep Kit Installation Guide for details.
19
Adhesive cure time
24 hours
Leave the cover closed and locked for 24
hours to allow the weatherstrip adhesive,
which is pressure-sensitive, to fully cure.
20
Fit the safety catch, which is hanging
from the driver side of the cab panel,
around the bottom ball stud.
16
plastic
metal
Attach a gas spring to the ball studs
alongside the safety catch.
17
To avoid premature
failure of your gas
springs, attach them
barrel up, shaft down.
If some of your gas springs have
heavier poundage printed on their
sides than others, use the stron-
ger ones on the cab panel.
Peel the red adhesive backing from the edge trim pieces. Affix them
to the metal bed rail at the four points where a rod will pass under-
neath, the bottom curl of their j’s touching the bottom edge of the rail.
11
Affix the edge trim to the painted metal only, behind the plastic
bed liner or bed rail cap, if present.
Using a tool to widen the curl of the ‘j’ can
make this step easier.
Step 11 is unnecessary on ’07–13 Silverados
and Sierras.
You may need to pull the plastic bed rail cap away from the metal bed rail to
provide enough clearance to get the edge trim on.
DiamondBackCovers.com SEPTEMBER 2018

This manual suits for next models

1

Other Diamondback Automobile Accessories manuals

Diamondback 180 User manual

Diamondback

Diamondback 180 User manual

Diamondback HD User manual

Diamondback

Diamondback HD User manual

Diamondback 270 User manual

Diamondback

Diamondback 270 User manual

Diamondback 270 User manual

Diamondback

Diamondback 270 User manual

Diamondback 270 User manual

Diamondback

Diamondback 270 User manual

Diamondback HD User manual

Diamondback

Diamondback HD User manual

Diamondback HD User manual

Diamondback

Diamondback HD User manual

Diamondback 270 User manual

Diamondback

Diamondback 270 User manual

Diamondback 270 User manual

Diamondback

Diamondback 270 User manual

Diamondback 270 User manual

Diamondback

Diamondback 270 User manual

Diamondback 180 User manual

Diamondback

Diamondback 180 User manual

Diamondback 270 User manual

Diamondback

Diamondback 270 User manual

Diamondback HD User manual

Diamondback

Diamondback HD User manual

Diamondback 180 User manual

Diamondback

Diamondback 180 User manual

Diamondback 180 User manual

Diamondback

Diamondback 180 User manual

Diamondback 270 User manual

Diamondback

Diamondback 270 User manual

Popular Automobile Accessories manuals by other brands

Atera SIGNO 045 035 User information

Atera

Atera SIGNO 045 035 User information

STO N SHO SNS 344a Installation procedures

STO N SHO

STO N SHO SNS 344a Installation procedures

STO N SHO SNS 238 Installation procedures

STO N SHO

STO N SHO SNS 238 Installation procedures

Advantech VITA-350 user manual

Advantech

Advantech VITA-350 user manual

POOL-LINE 110003 Assembly instructions

POOL-LINE

POOL-LINE 110003 Assembly instructions

AKM AKD7756-HF user manual

AKM

AKM AKD7756-HF user manual

Phonocar VM495 instruction manual

Phonocar

Phonocar VM495 instruction manual

Nav TV PCM41-CAM Install manual

Nav TV

Nav TV PCM41-CAM Install manual

Dakota Digital VFD3-73F-PU manual

Dakota Digital

Dakota Digital VFD3-73F-PU manual

Aim MyChron 3 XG LOG Technical documentation

Aim

Aim MyChron 3 XG LOG Technical documentation

Omix-Ada Rugged Ridge 12300.52 quick start guide

Omix-Ada

Omix-Ada Rugged Ridge 12300.52 quick start guide

Paser UNICOM SONY installation manual

Paser

Paser UNICOM SONY installation manual

PUTCO 92009-60 Wiring instructions

PUTCO

PUTCO 92009-60 Wiring instructions

Tronsmart CCTA user manual

Tronsmart

Tronsmart CCTA user manual

bosal Oris  048983 FITTING INSTRUCTION

bosal

bosal Oris 048983 FITTING INSTRUCTION

Yakima BackSwing installation instructions

Yakima

Yakima BackSwing installation instructions

TAUBENREUTHER 50-5212100-RCP58-BK manual

TAUBENREUTHER

TAUBENREUTHER 50-5212100-RCP58-BK manual

Tomei 663006 instruction manual

Tomei

Tomei 663006 instruction manual

manuals.online logo
manuals.online logoBrands
  • About & Mission
  • Contact us
  • Privacy Policy
  • Terms and Conditions

Copyright 2025 Manuals.Online. All Rights Reserved.