dibea R701 User manual

Robotic Vacuum Cleaner
Model:R701
User Manual

Table of ContentsTable of Contents
Safety InstructionsSafety Instructions
Product FeaturesProduct Features
Product ComponentsProduct Components
Main body and accessories
Main body diagram
Dustbin
Charging Station/ Remote Control
Display Panel
Product OperationProduct Operation
Charging BatteryCharging Battery
Starting up/Standby/Sleeping
Scheduling
Suction and Sweeping
Cleaning mode
Install water tankInstall water tank
Product MaintananceProduct Maintanance
Cleaning side brushes
Cleaning dust bin and filter
Cleaning sensors and wheels
Cleaning rolling brush
Product SpecificationProduct Specification
Cleaning suction passage and dust sensor
TroubleshootingTroubleshooting
Cleaning charge poles
Replace BatteryReplace Battery
Service GuidanceService Guidance
Safety InstructionsSafety InstructionsSafety InstructionsSafety Instructions
Table of ContentsTable of Contents
Before using this product,please read the safety instruction and follow all those regular safety precautions.
Read this user manual thoroughly and carefully before using the product.
Please keep the user manual well.
Any operations that oppose to description in this user manual may cause damage to human or product.
regular safety precautions
Note
Only ceritified technician may disassemble the product. User are not allowed disassemble or repair
product.
Only use the adapter provided by the factory.Using other un-matched adapter may cause electric shock,
fire or product damage.
Do not touch the power cord, plug or adapter when your hands are wet.
Do not make clothes or part of a body drawn into the product's wheel.
Do not make this product close to cigarette,lighter,match or any flammables.
If the product is needed to clean, clean it after charging is stopped.
Do not over-bend the power cord or pressure the power cord with heavy or sharp objects.
This product is used only indoors, do not use it outdoors.
Do not sit on top of this product or attach an object(over 10kg) on the top of it.
Do not use this product in wet or moist environment(bathroom for example).
Before using,remove all the damageable objects(textile,glass,lighting,etc)and objects that could
get caught in the brushes or suck passage(cords,papers,curtains,etc).
Do not place this product where it is easy to drop off(table,chairs,etc).
Take out the battery assy during transportation or when you do not need to use it for a long time.
Before charging, check and make sure to plug the adapter into the wall socket properly.
To avoid stumbling, inform all the people in the house when the robot is working.
Empty the dust bin when it is full before using the product(clean it at least once a week).
Use this product in temperature from 0°to 40°(centigrade degree).
Do not place this product in high temperature environment.
The battery must be removed from the product before it is scrapped.
19
Users need to replace the battery in time when it depletes and dispose the old one safely.
Caution
Children, mentally challenged people or lack related exprience and knowledge are not allowed to use
Caution
this product without special guidance.
Do not use the product somewhere higher than the user in case it drops off and hurts people.
Do not use the product in open areas without protective guard.

Product FeaturesProduct FeaturesProduct FeaturesProduct FeaturesProduct Features
Intelligent Suction AdjustmentIntelligent Suction AdjustmentIntelligent Suction AdjustmentIntelligent Suction Adjustment
This product is able to automatically adjust its suction power when meeting different floor
environments.Not only could it make cleaning more efficiently, but also it helps save more
than 30%
Considerate DesignsConsiderate DesignsConsiderate DesignsConsiderate Designs
Easy to operate.By pressing the
" " button, you could
easily direct the robot.
Washable DustbinWashable Dustbin
The dustbin and filter could be washed .
The dustbin and filter could be washed by
water easily without costing too much time
Besides,it could avoid dust blowing in the
air to cause a second polluting by washing
the dust bin under water.
Product FeaturesProduct FeaturesProduct FeaturesProduct FeaturesProduct FeaturesProduct FeaturesProduct FeaturesProduct Features
Intelligent Suction AdjustmentIntelligent Suction AdjustmentIntelligent Suction Adjustment
Considerate DesignsConsiderate DesignsConsiderate Designs
Washable DustbinWashable DustbinWashable DustbinWashable Dustbin
Various Cleaning ModesVarious Cleaning ModesVarious Cleaning ModesVarious Cleaning ModesVarious Cleaning ModesVarious Cleaning ModesVarious Cleaning Modes
Four cleaning modes are provided to meet your needs
Auto cleaning modeAuto cleaning modeAuto cleaning modeAuto cleaning mode
The robot will clean a room automatically and adjust
its cleaning according to the situation.
NoteNoteNoteNoteNote To start the auto mode, only press
Note
button on the machine or
with the remote control.
Product FeaturesProduct FeaturesProduct FeaturesProduct FeaturesProduct FeaturesProduct Features
2Spot cleaning modeSpot cleaning modeSpot cleaning modeSpot cleaning modeSpot cleaning mode
The robot will spiral intensely when it detects a
dirtier area.You could use the remote control
to start the spot cleaning.Once if finishes
cleaning the dirty area,the robot will change to
the auto cleaning mode automatically.
3Edge cleaning mode
When the robot detects obstacles(wall for example).
Edge cleaning modeEdge cleaning modeEdge cleaning modeEdge cleaning mode
It will change to the edge cleaning mode automatically.
And it will start cleaning along the abstacles with its
two side brushes.
33
33
4Scheduling modeScheduling modeScheduling modeScheduling modeScheduling mode
When certain time is scheduled,the robot will leave
the home base and start working in the scheduled
time.

Product PartsProduct PartsProduct PartsProduct PartsProduct PartsProduct PartsProduct Parts
Main body and accessoriesMain body and accessoriesMain body and accessoriesMain body and accessories
Item Description Quantity
1
2
3
4
5
Main body
Charging home base
Adapter
Remote control
Water tank
Hepa filter
Side brushes
User manual
6
7
8
1pc
1pc
1pc
1pc
1pc
1pc
2pairs
1pc
Product PartsProduct PartsProduct PartsProduct PartsProduct PartsProduct PartsProduct Parts
Main bodyMain bodyMain bodyMain bodyMain bodyMain body
Bumper
LED display
Touch key
Cover
Bumper
Power On/Off
Suction passage
Rolling brush assy
Left wheel
Left side brush
Battery cover
Nose wheel
Charging pole
Right side brush
Charge socket
Right wheel
Bottom cover
Middle cover
Dustbin

Product PartsProduct PartsProduct PartsProduct PartsProduct PartsProduct Parts Product PartsProduct PartsProduct PartsProduct PartsProduct PartsProduct Parts
DustbinDustbinDustbinDustbin Assy
Primary filter
Handle
Dustbin
Hepa filter
Hepa frame
Dustbin Assy
Rotating Brush AssyRotating Brush AssyRotating Brush AssyRotating Brush Assy
Rotating brush cover
Brush sleeve
Ball bearing
Bearing seat
Rotating brush frame
Brush stick
Charging StationCharging StationCharging StationCharging Station
Power light
Charging socket
Top cover
Charging poles
Remove ControlRemove ControlRemove ControlRemove ControlRemove Control
1.Display screen
2.Schedule
3.Recharge
4.Direction button
5.On/Off
6.Cleaning mode
7.Clock setting
8.Spot cleaning
NoteNoteNoteNote
Install two batteries into the remote control before use.And take out the batteries
when you do not need to use it for a long time.

Product ComponentsProduct ComponentsProduct ComponentsProduct Components
Display PanelDisplay PanelDisplay PanelDisplay PanelDisplay Panel
LED panel shows different meaning
LED panel shows different status
Full charge
Low power
Charging
Suction stuck
NO dustbin
2. Normal working led light
3. Spot cleaning led light
4. Auto recharging led light
5. Power led light
6. Clock setting led light
7. Shedule led light
Product ComponentsProduct ComponentsProduct ComponentsProduct Components
"Sunday" "Monday" "Tuesday" "Wednesday" "Thursday" "Friday" "Saturday"
ButtonsButtonsButtonsButtons
1. auto cleaning button/confirm button
A.when in standby mode, long press this button 3 seconds to change to sleeping mode;
when in sleeping mode, press this button to switch to standby mode;
B.when in standby mode/working mode,press this button to start cleaning
D.when in changing schedule mode,press this button to confirm schedule mode.
2. auto recharging button
A.when in standby mode, press this button the robot will search charging dock
C.when in checking schedule mode,press this button to switch to schedule/setting mode.
B.when in checking schedule mode, press this button you can check different
reserve information
C.when in changing schedule mode,press this button to add minutes/hours/weeks
3. mode selection+ button
A.when in schedule mode, press this button to switch to specified mode, press to
confirm mode.
B.when in checking schedule mode, press this button to check different week reserve
information.
C.when in changing schedule mode,press this button to reduce minutes/hours/weeks
4. schedule button/one-click setting/remove reservation button
A.when in standby mode, press this button to switch to schedule mode.
B.when in checking/changing schedule mode, press this button to standby mode.
C.when in standby mode, long press this button 3 seconds to set the time is appointed
time everyday.
B.when in checking/changing schedule mode, press this button switch to standby mode.
D.when in checking schedule mode, long press this button 2 seconds to remove
reservation setting
5. time button
A.when in standby mode, press this button to switch to checking time mode
B.when checking/changing schedule mode, press this button to switch to standby mode.
6. take out dustbin button
press this button, you can open the middle cover and take out dustbin

Product OperationProduct OperationProduct OperationProduct OperationProduct OperationProduct Operation
1. Battery charging
A.Place charging home base
Put charging home base against the wall
and remove obstacles about 1 meter at two
sides and about 2 meters forward like right picture
B.Press power On/Off button to open the robot.
C.Two choices for charging
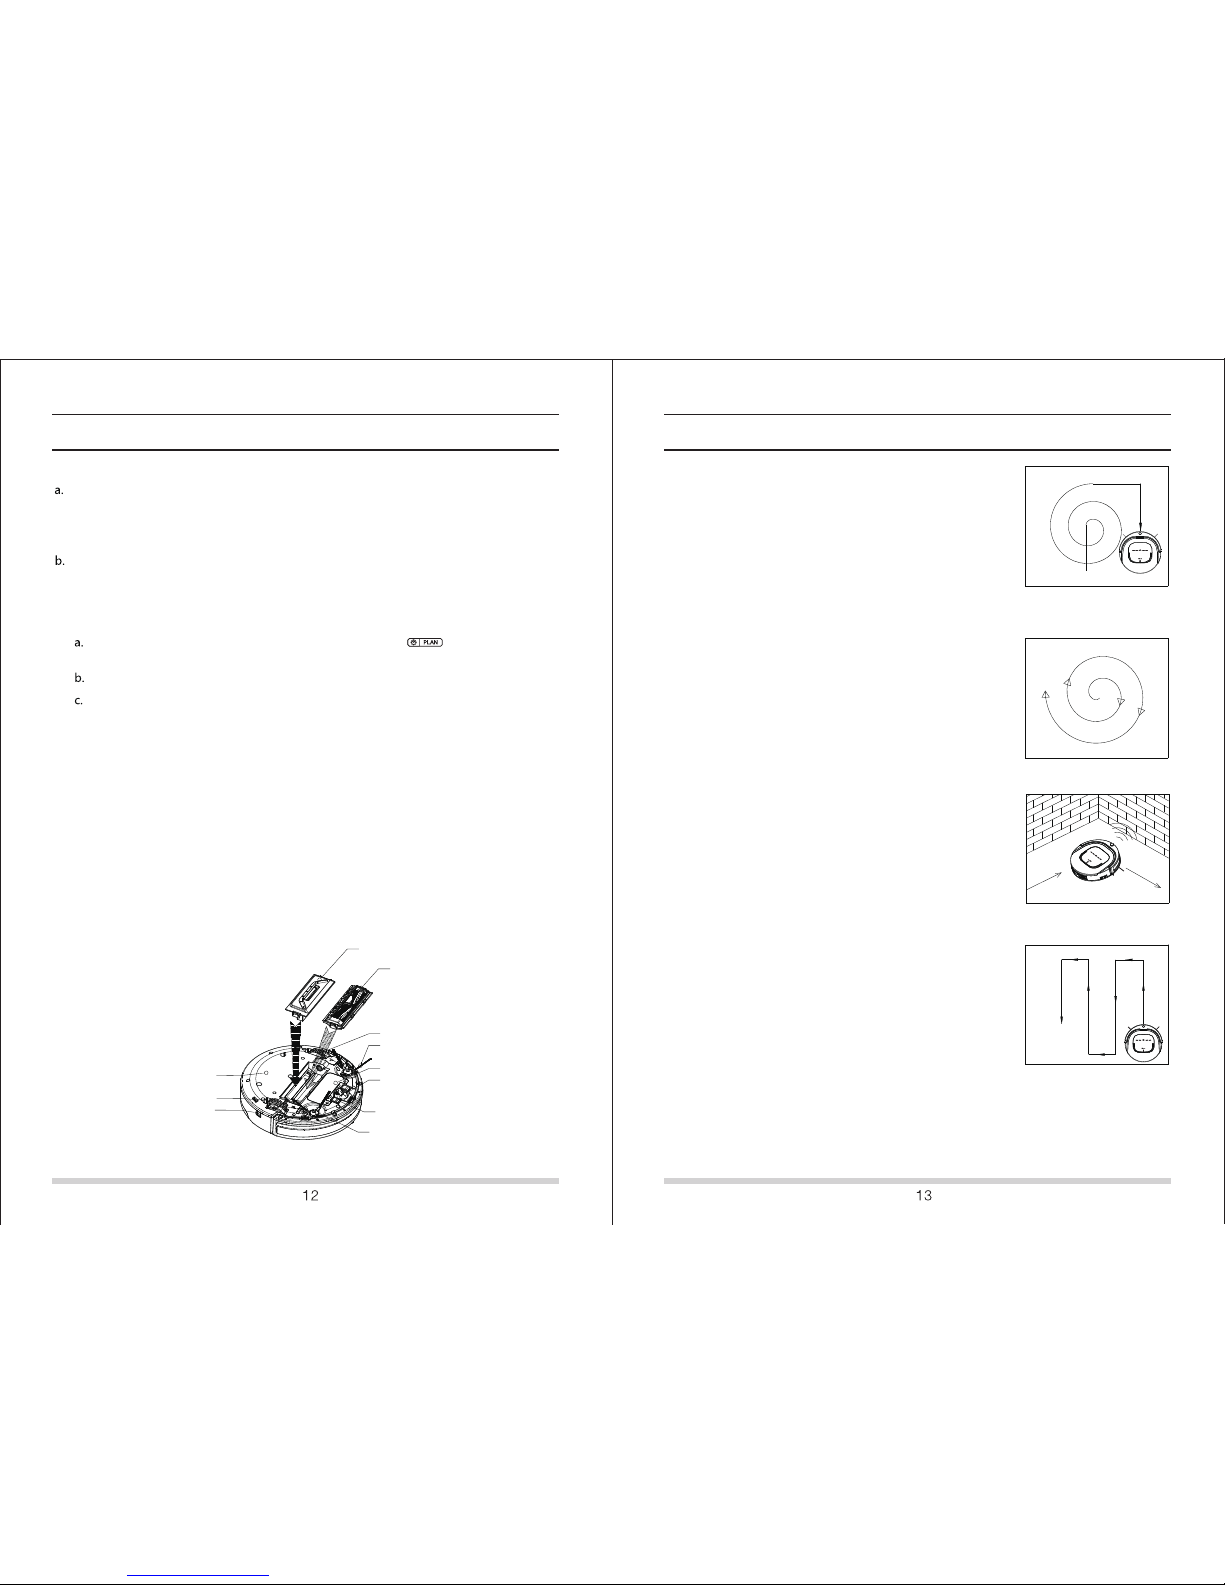
a.directly plug adapter into the robot and other end to power socket as fig a.
b.press button on the main body or remote control to make robot to home
base for charging as fig b
Note:Note:Note:Note:
a. During charging, LED panel will show '11:11'.
b. After finishing charging, LED panel will show "FULL"
c. Low power in standby mode, robot will speack"please charge", LED panel will show
d. Low power in working mode, robot will return to charging station automatically, and
LED panel will show
Ways to effectively extend battery life:Ways to effectively extend battery life:Ways to effectively extend battery life:Ways to effectively extend battery life:Ways to effectively extend battery life:Ways to effectively extend battery life:
a. Before first use, charge the robot for 12 hours.
b. Once the battery uses up, recharge it as soon as possible.
c. The robot will automatically return to charging home base when cleaning is done
or power is low.
d. If the robot is not used for a long time, take out the battery and put it in a safe place.
e. If robot is not used more than 3 months, please charge it for 12 hours.
2. Starting up/ Standby/ Sleeping/ Shut down
A.Starting up
a. Make sure power button is in "on" statue.
b. Press button on main body or remote control to start cleaning.
Note:
If the rotot is in sleeping mode, press on main body or remote control to change
Note:Note:Note:
it to the standby mode first and press it again to start cleaning.
Product OperationProduct OperationProduct OperationProduct OperationProduct OperationProduct Operation
B. Standby
Standby means the robot is connected to power supply and wait for your further operation,
change to standby via followed ways:
a. when the robot is working, press switch to standby
b. press "On/Off" button on the remote control
C. Sleeping
When robot is in sleeping mode, press on the main body or remote control to wake
it up. To conserve battery life to a maximum degree, switch to sleeping mode via followed
ways:
a. when in standby mode, long press button 3 seconds switch to sleeping mode.
b. when in standby mode, no operation more than 60 seconds, it will switch to sleeping mode
automatically.
D. Shut down
Directly turn off power.
1. Battery charging1. Battery charging1. Battery charging1. Battery charging
2. Starting up/ Standby/ Sleeping/ Shut down2. Starting up/ Standby/ Sleeping/ Shut down2. Starting up/ Standby/ Sleeping/ Shut down
3. Scheduling3. Scheduling3. Scheduling3. Scheduling
You can schedule the robot to make it clean automatically at a certain time every day.
The robot can only be set when it 's in Standby or Charging mode. If the robot is in sleep mode,
press on main body or ON/OFF button on remote control to wake up the robot. If the robot is
in cleaning mode, stop it before scheduling.
1. Scheduling by the LED panel on robot
A. Setting robot clock
Press to check the time and the panel shows the current time. The will flash.
Press to set the hour. The left two numbers will flash. Press to decrease the hour.
Press to increase the hour. Press to set the minute, the right two numbers will flash.
Press to decrease the minute, press to increase the minute. Press to set the day.
The day indicator light will flash. Press to decrease the day. Press to increase the day.
Press to save the setting and back to check the time.
( During scheduling, press back to standby mode, settings won't be saved.)
B. Check the scheduling
In standby mode, short press to check the schedule. The will flash. The day will be shown on
the display panel. Press to set the next day. Press to set the previous day.
C. Setting scheduling time
D. Cancel scheduling
In modifying schedule, set the scheduling time as 00:00 and confirm, then the scheduling will be cancelled.
E. One-click scheduling/ cancellation
In standby mode, long press the for 2 seconds to set the current time as daily scheduled working
time.
In checking schedule mode, long press for 2 seconds to cancel all the scheduling.
To set scheduling time,follow the same steps as setting robot clock.

Product OperationProduct OperationProduct OperationProduct Operation
Note:
The scheduled time of scheduling by robot panel is based on the robot clock.
For example, if you set 9:00 to be the scheduling time, the robot will start cleaning every 9:00
(robot clock). So you should set the robot clock first before scheduling.
Once the robot is scheduled, it will start cleaning automatically at the scheduled time everyday.
2. Scheduling by remote control
A. Scheduling time setting
Make sure the robot is in standby/ charging mode, long press on the remote control,
and go into the scheduling mode.
Press PLAN button until the remote displays flashed figure "00:00"
After scheduling time is setted, use remote control press"On/Off" button, display panel
show the scheduling time.
Note: When scheduling, the figures displayed on the screen is the delayed time. For example,
02:30 on the screen means the robot will start working 2 and a half hours later from now on.(The
"00" means hour while the right one means minute.) Once the time is scheduled, the robot will
always work according to the setting everyday.
1. Random cleaning mode
2. Spiral Cleaning
3. Edge cleaning
In random cleaning mode, robot will cleaning straightly,
and will turn direction randomly when meet obstacles,
just in order to clean effeciently.
In spiral cleaning mode, robot will clean in a spiral
pattern. It is suitable for an open area.
4 .
4 cleaning modes:
cleaning. The robot will clean along the obstacles.
Zig-Zag cleaning mode is suitable for open area or the
environment with less obstacles.
In cleaning mode, press MODE to choose edge
Zig-Zag cleaning
.
Press ON/OFF again, scheduled setting will be cancelled.
B. Cancel scheduling
( If the robot shows 00:00 on panel, then the scheduling is cancelled. If not, press ON/ OFF again).
Product OperationProduct OperationProduct OperationProduct Operation
Random cleaning
Spiral cleaning
Edge cleaning
Zig-Zag cleaning
Switching suction and rolling brushSwitching suction and rolling brushSwitching suction and rolling brushSwitching suction and rolling brush
Suction and rolling brush can be switched on the botton of robot as picture below:
suction assy
rolling brush
wheel
side brush
battery cover
nose wheel
charging pole
wheel
charging socket
bottom cover
side brush

mop
water tank
plug
ab
c
Product OperationProduct Operation
Install water tankInstall water tank
Note:
Remove the mop and water tank when cleaning on the carpet or rug.
Prevent the friction of mop and wheels and do not put the mop on wheels.
Warning: The external and internal of the robot must be kept free from water.
Cleaning side brushesCleaning side brushes
Cleaning dust bin and filterCleaning dust bin and filter
Product OperationProduct Operation
push
A. Push to open the cover B. Take out the dust bin
C. Take out the HEPA filter
D. Open the dust bin and
take out the primary filter E. Empty the dust bin
F. Wash the dust bin and primary filter with
water. Clean the HEPA filter with cleaning brush
G. Install the primary and HEPA filter to
the dust bin.

Product MaintainingProduct Maintaining
Cleaning sensors and wheelsCleaning sensors and wheels
Clean the sensors and wheels with soft dry cloth like in pitcure below:
Cleaning charging polesCleaning charging poles
Clean the home base and charging poles with soft dry cloth like in pitcure below:
Product MaintainingProduct Maintaining
Cleaning rolling brush and assy
Remove the rolling brush and assy from the main body, and clean them with soft dry cloth or cleaning
tools. ( the rolling brush can be washed by water)
Note: Install the rolling brush and assy one by one after they are dry.
Cleaning suction passage and dust sensorCleaning suction passage and dust sensorCleaning suction passage and dust sensor
Take off suction passage assy from robot, and cleaning it via brush or mop as picture.
Note: sensor can not touch water or liquid directly

Product SpecificationsProduct Specifications
Classification
Mechanical
Specifications
Items Detail
Diameter
Height
Net weight
Electrical
Specifications
Cleaning
Specifications
Power rating
Battery
Dust bin capacity
Charging type
Cleaning mode
Charging time
Cleaning time
Auto/manual charging
Random/ Spot/ Edge/ Zig-Zag/ Scheduling
4-6 hours
80 min
Main body button type Touch (LED display)
Replace the BatteryReplace the Battery
A. Remove the screws on battery cover with a screw driver.
B. Remove the battery cover.
C. Grasp the insulating tape at two sides of the battery and lift the battery.
D. Unplug the wire connector that links battery and robot.
E. Take out the battery and replace it.
Note: Only use the battery provided by the factory, or else the battery could be damaged.
TroubleshootingTroubleshooting
Error codes for sensorsError codes for sensors
Front bumper right infared sensors detect
obstacle
Left anti-drop sensor detect cliff, front bumper right
infared sensors detect obstacle
Clean front sensor lens and
bottom anti-drop sensor lens
Front anti-drop sensors detect cliff, front bumper
right infared sensors detect obstacle
Left and front anti-drop sensors detect cliff, front bumper
right infared sensors detect obstacle
ExxB
Right anti-drop sensors detect cliff, front bumper right
infared sensors detect obstacle
ExxC
Left and right anti-drop sensors detect cliff, front bumper
right infared sensors detect obstacle
ExxD
ExxE
Front,left and right anti-drop sensors detect cliff, front
bumper right infared sensors detect obstacle
Front bumper left infared sensors detect obstacle
Front bumper middle infared sensors detect obstacle
Front bumper left and middle infared sensors detect
obstacle
Front bumper right infared sensors detect obstacle
Front bumper left and right infared sensors detect obstacle
Front bumper middle and right infared sensors detect
obstacle
Front bumper left, middle and right infared sensors detect
obstacle
Front bumper wall detection infared sensors detect
obstacle
Front bumper wall detection sensors and left infared
sensors detect obstacle
Front bumper wall detection sensors and middle infared
sensors detect obstacle
Front bumper wall detection sensors, left and middle infared
sensors detect obstacle
Front bumper wall detection sensors and right infared
sensors detect obstacle
Front bumper wall detection sensors, left and right
infared sensors detect obstacle
Front bumper wall detection sensors, right and middle
infared sensors detect obstacle
Front bumper wall detection sensors, left, right and
middle infared sensors detect obstacle
ExxF
Ex1x
Ex2x
Ex3x
Ex5x
Ex6x
Ex7x
Ex8x
Ex9x
ExAx
ExBx
ExCx
ExDx
ExEx
ExFx
Error Code
Cause Solution
Exx8
Exx9
ExxA
Clean front bumper sensor
lens
Ex4x
Clean front bumper sensor lens
Right and front anti-drop sensors detect cliff, front bumper
right infared sensors detect obstacle

Troubleshooting
Fan overloaded
Left wheel overloaded
Right wheel overloaded
Left and right wheel overloaded
Left side brush overloaded
Left wheel and left side brush overloaded
Right wheel and left side brush overloaded
Left and right wheel, left side brush overleaded
Right side brush overleaded
L01x
L0x1
L0x2
L0x3
L0x4
L0x5
L0x6
L0x7
L0x8
Check if fan is pressed and clean dust bin
Left wheel and right side brush overleaded
L0x9
Right wheel and right side brush overleaded
L0xA
Left and right wheel, right side brush overleaded
L0xB
Left and right side brush overleaded
L0xC
Left wheel, left and right side brush overleaded
L0xD
Right wheel, left and right side brush overleaded
L0xE
L0xF
Check if it is stuck or wired
by obstacles
Error Code
Cause Solution
Left and right wheel, left and right side brush overleaded
Note: If above solution doesn't work, please try below:
1. Reset the robot by powering off it and then turn on it, and check again.
2. If itstill notwork after reset the robot, contact the after service.
Error codes for motorsError codes for motors
Service Guidance
If you have any questions about the product or this manual, please contact our
after-service team:
Tel: +86-512-8860 8088
Fax: +86-512-8860 8099
E-mail: [email protected]
Suzhou Dibea Electrical Technology Co., Ltd.
www.dibea.com
Table of contents
Other dibea Vacuum Cleaner manuals

dibea
dibea D960 User manual

dibea
dibea D008 User manual

dibea
dibea DV-888DC Operator's manual

dibea
dibea D500 Pro User manual

dibea
dibea C17 User manual

dibea
dibea x500 User manual

dibea
dibea DW300 Pro User manual

dibea
dibea D18E Pro User manual

dibea
dibea F20B MAX User manual

dibea
dibea GT100 Aurora User manual