Diedrich Roasters IR-5 User manual

REV.01.2023 DIEDRICH ROASTERS® ALL RIGHTS RESERVED
MANUAL IR5IR12 ROASTER
QUICK START GUIDE
KEEP THIS GUIDE W ITH THE
ROASTER AT ALL TIMES

DIEDRICH ROASTERS®
Manual IR-5/IR-12 Roaster
Quick Start Guide
1
Technical Support Hotline
+1.844.343.3742 M-F 7A-3:30PM PT
Rev.01.2023 DIEDRICH ROASTERS® ALL RIGHTS RESERVED
PLEASE READ AND FULLY UNDERSTAND THIS PROCEDURE PRIOR TO
STARTING THE SEASONING PROCESS
DRUM SEASONING PROCEDURE
The drum of the roaster must be seasoned before roasted coffee is fit for consumption. Use an inexpensive coffee for
the seasoning process. Do not use a Robusta coffee as it does not emit as much oil for seasoning the drum.
The new drum requires from 8 to 12 seasoning roasts to become properly oiled. Each seasoning roast requires about
50% of roaster capacity (IR 1 / 2.5 USE FULL BATCH) of coffee, enough to fully cover the drum's lower surfaces.
During seasoning, the roaster should be operated for 30 – 60 minutes with the oily beans tumbling in the drum at a
temperature of 425°F – 460°F or until the beans become dry.
After completion of each seasoning roast, discard the roasted coffee after it cools. It may take additional roasts to
achieve the best flavor from your new roaster. Seasoning the roasting drum will also give you the opportunity to
become familiar with the roaster's controls and the roasting process.
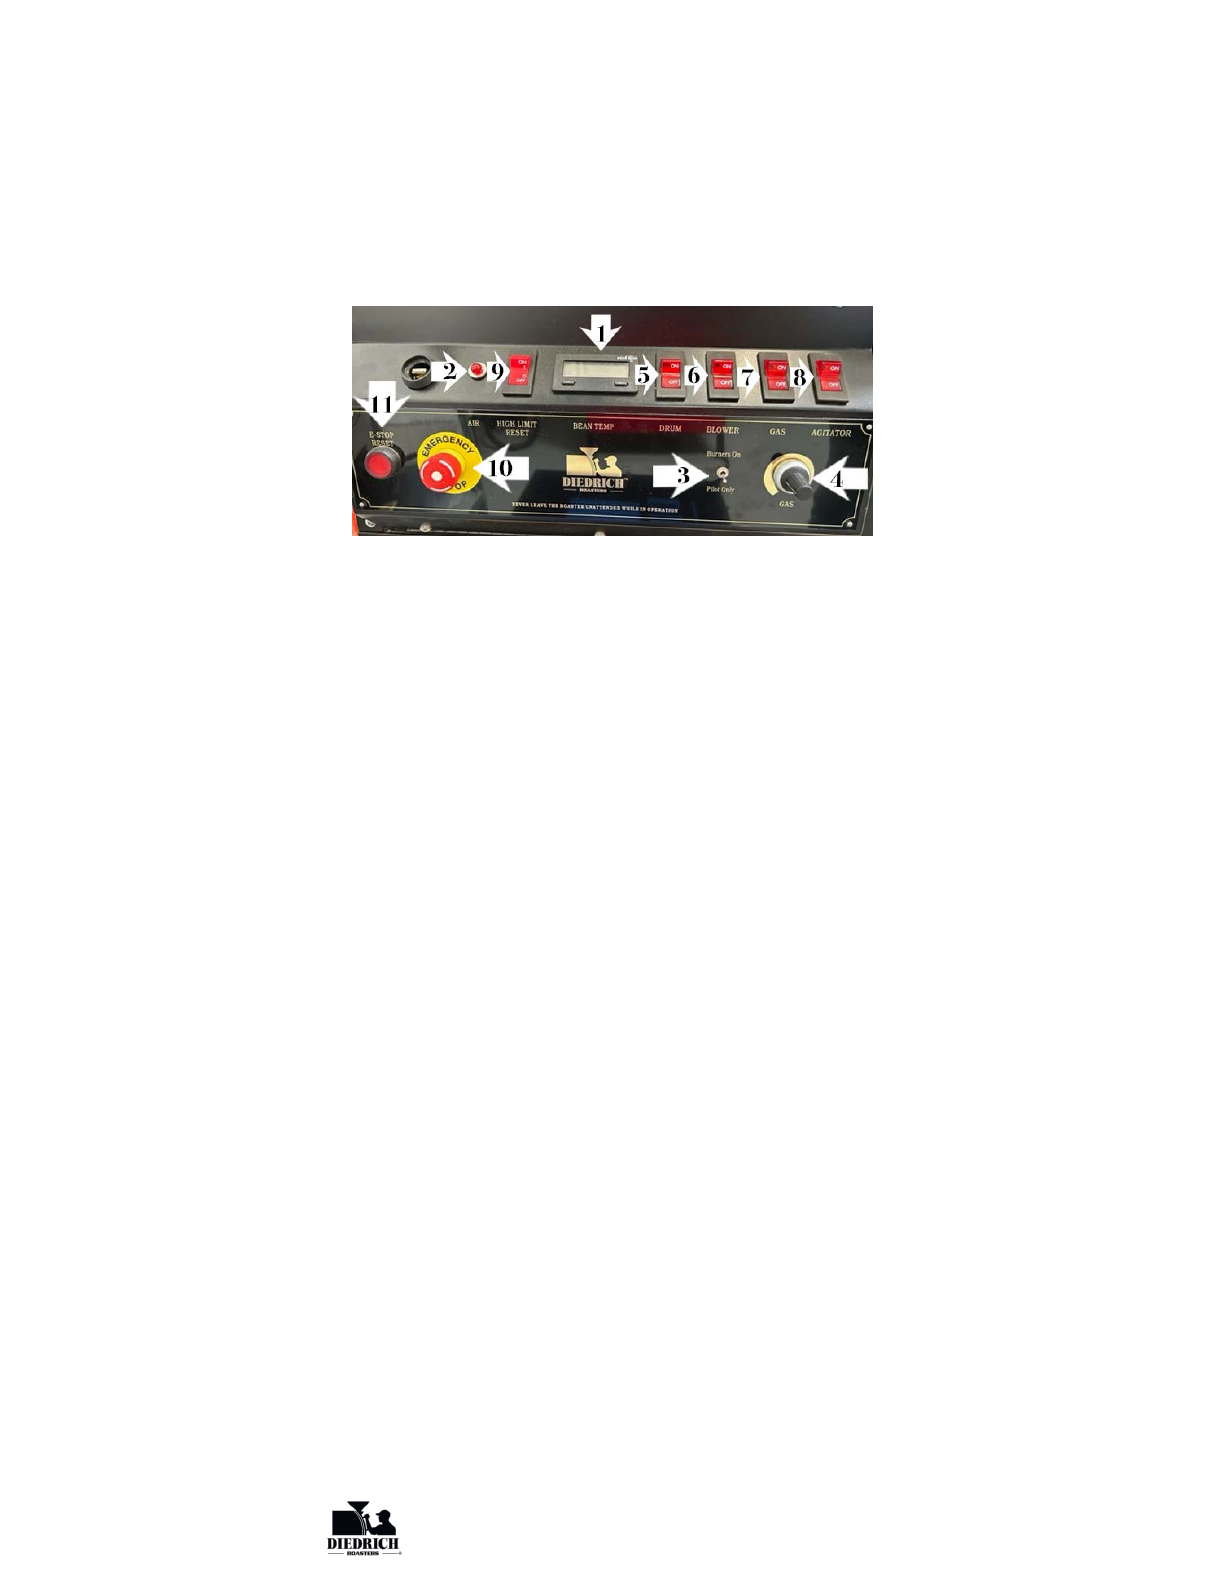
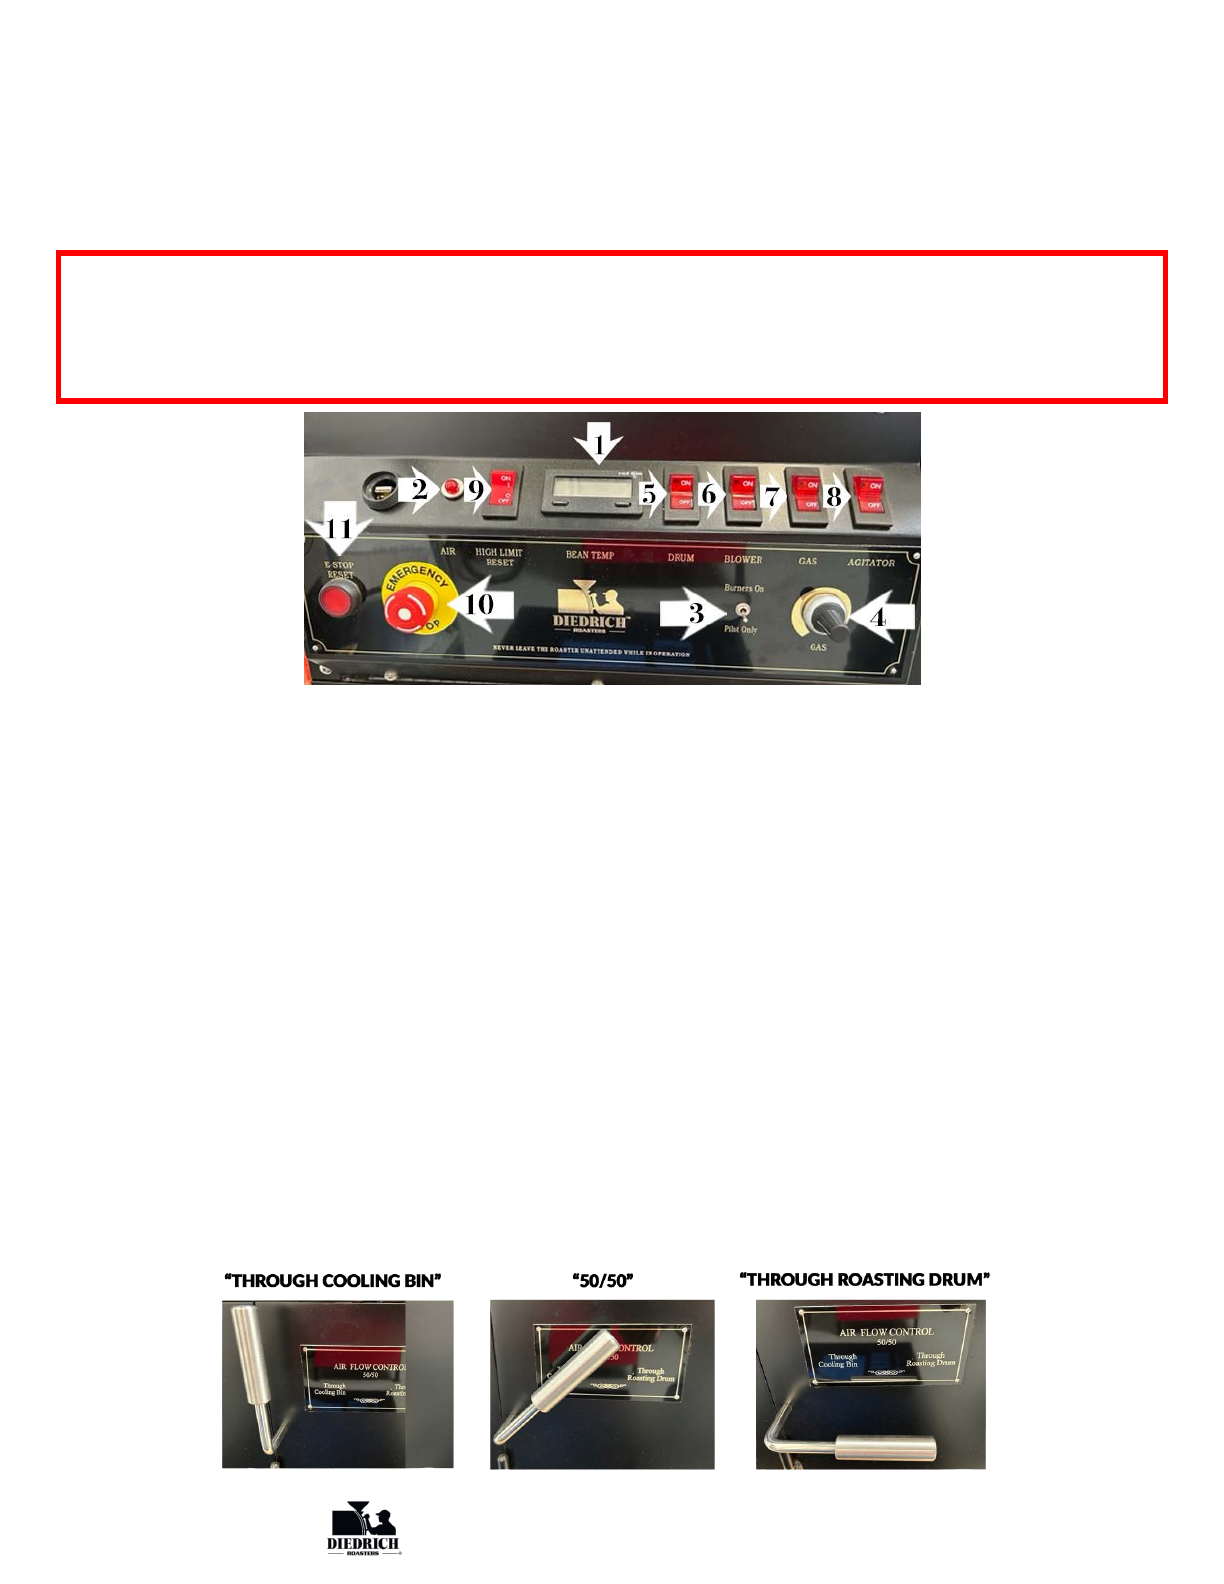
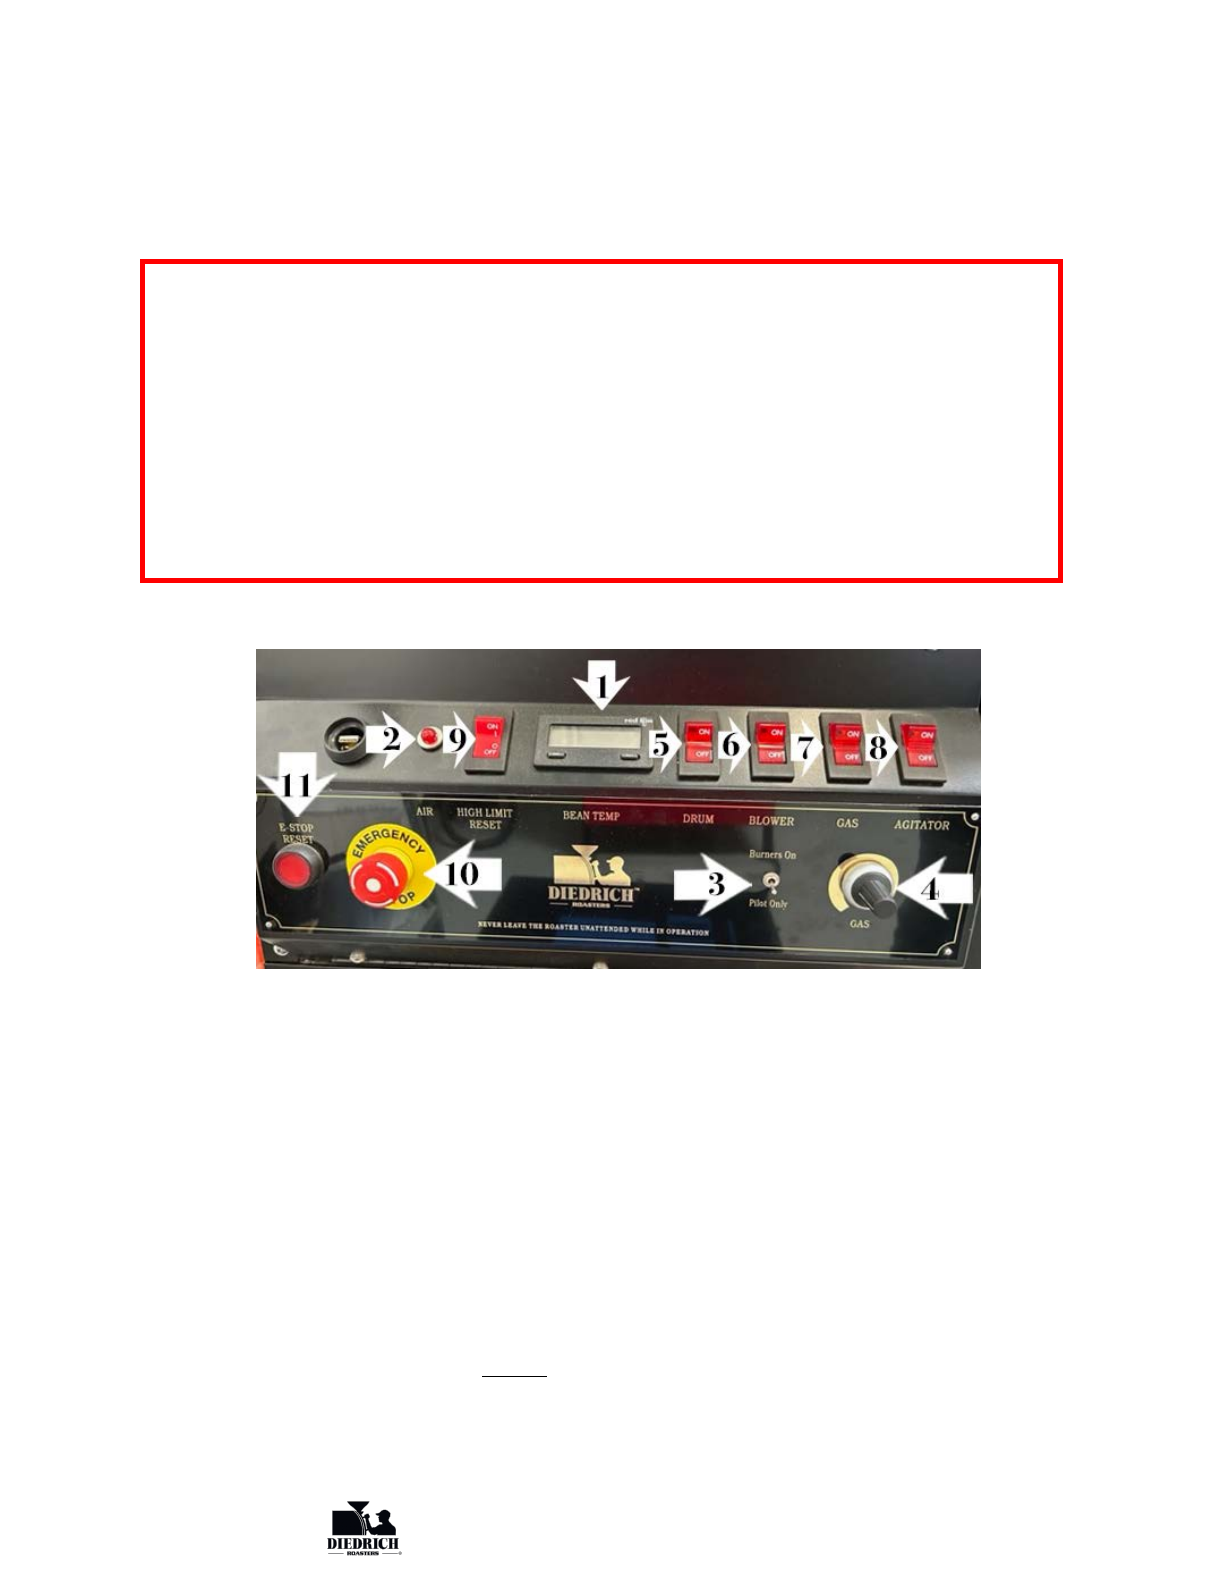
1. Preheat the roaster to ~ 420ºF.
2. Fill hopper with the pre-described amount of beans.
3. Move the air control lever to the “THROUGH COOLING BIN” position.
4. Activate the hopper gate handle to load the green beans from the hopper into the drum to start the
roasting/seasoning process.
5. Set the gas output to approximately 50%.
The coffee will change in color from green to a pale yellow (4-6 minutes).
During this progression look through the drum door view window, you will start to see chaff, the bean's
outer skin, separating from the coffee bean. Unwashed coffee has considerably more chaff than washed
coffees and decaf coffees have almost no chaff. The bean development and color can be observed by
using the sample trier.
6. When the coffee reaches the yellow stage ~280°F, move the air control handle to the “50/50" (middle)
position. This allows for a more uniform heat.
As the coffee reaches the yellow stage, the moisture in the coffee that was a good conductor of heat early
on in the roast, is now turning to steam. At this stage in the roast, the air flowing through the roasting drum
becomes a more uniform heat medium.

DIEDRICH ROASTERS®
Manual IR-5/IR-12 Roaster
Quick Start Guide
2
Technical Support Hotline
+1.844.343.3742 M-F 7A-3:30PM PT
Rev.01.2023 DIEDRICH ROASTERS® ALL RIGHTS RESERVED
ATTENTION!
ALL SYSTEMS (Electrical, Gas, and HVAC) MUST BE CONNECTED, FUNCTIONING, AND
INSPECTED (if required) PRIOR TO USING THIS QUICK START GUIDE
As the coffee reaches a temperature of 340°F (171°C) the chemical changes in the coffee start an exothermic
reaction (the chemistry creates its own heat). This exothermic reaction continues through the remainder of the
roast and therefore the gas % should be reduced during this period until the end of roast.
7. When the coffee approaches ~385°F “1st crack”, reduce fuel % and let the roast progress in the full
roasting stage until the coffee develops through the second crack (~435°F) and oil begins to appear at
the tips of the beans (try and reach ~460°F slowly).
8. When you begin to notice the first traces of oil, turn the gas control “OFF.” Note: Due to the exothermic
reaction (the chemistry creates its own heat), the bean temperature can continue to rise on its own with
gas turned off.
WARNING!
Pay close attention to the temperature at this point. DO NOT LET THE TEMPERATURE RISE
ABOVE 480°F! The roaster is equipped with a High Temperature Limit System that shuts the gas off
at 485°F. However, the temperature can continue to rise due to the exothermic reaction of the bean. If
the coffee is not removed from the drum before 500°F, the coffee may ignite. Have a water source or
CO2 fire extinguisher nearby.
High Temperature Limit Module Explanation
At 475°F, the main burner shuts off, but the pilot does NOT shut off (No alarm sounds). At 485°F, the
alarm will sound and the High Temperature limit shuts down the roaster's entire gas system. (If this
happens, wait for temperature to reduce and reset the roaster.)
9. Let the coffee roast in its own liberated heat until the beans are fully oiled and almost black. Leave the
coffee turning in the drum for 30 – 60 minutes or until the beans are dry to help fully coat (season) the
drum.
10. Once the beans become less oily, turn on the “AGITATOR” and move the air lever control to the
“THROUGH COOLING BIN” position and discharge the coffee into the Cooling Bin.
Repeat seasoning cycle if scorching or tipping occurs during normal roasting.

DIEDRICH ROASTERS®
Manual IR-5/IR-12 Roaster
Quick Start Guide
3
Technical Support Hotline
+1.844.343.3742 M-F 7A-3:30PM PT
Rev.01.2023 DIEDRICH ROASTERS® ALL RIGHTS RESERVED
ROASTING FOR CONSUMPTION
1. Preheat the empty drum until the Bean temp display (1) reads 415º F or until you reach
your desired charge temperature.
2. Load the green beans into the hopper funnel after the roaster's empty drum has been
preheated.
3. Prior to starting the roasting process, move the airflow control lever to the "Through
Cooling Bin" position.
4. Move the hopper gate lever up to release the green beans from the hopper into the drum.
5. Move the lever down to close the hopper gate.
6. Adjust the flame control to an appropriate heat setting batch size.
7. When the beans appear yellow in color (~270°F), move the air flow control lever to the
"50/50" (mid) position.
8. When the beans approach “1st crack” (~385°F), move the air control lever to the
“Through Roasting Drum” position.
9. Reduce gas setting and approach the desired finish temperature.
10. In preparation for discharge of the roasted beans, move the air flow control lever to the
“Through Cooling Bin” position.
11. Turn on the “Agitator” (8)
12. Switch the flame “Pilot Only” (3)
13. Using the Sample Trier, sample the beans frequently.
14. When the beans reach the desired color /development, move the Drum Door lever up to
discharge the beans into the Cooling Bin.
15. After the coffee has been in the Cooling Bin for a minute or so, turn off the “Agitator” (8)
and spread out the coffee.
16. With the Agitator “OFF”, the cool air can find a path through the beans allowing the
coffee to cool faster.
17. When the beans have cooled to room temperature, position a container under the cooling
bin chute.
18. Turn “ON” the “Agitator” (8), and discharge the beans from the Cooling Bin.

DIEDRICH ROASTERS®
Manual IR-5/IR-12 Roaster
Quick Start Guide
4
Technical Support Hotline
+1.844.343.3742 M-F 7A-3:30PM PT
Rev.01.2023 DIEDRICH ROASTERS® ALL RIGHTS RESERVED
You must familiarize with the components of this roaster
before utilizing this Quick Start Guide!
(refer to Installation & Operation Manual pgs. 14,15, &16)
Initial Start-Up Procedure
1. Ensure Emergency Stop Button is disengaged (out) position (If pushed in, twist knob to release
2. Ensure the “Pilot Only/Burners On” switch is in the "PILOT ONLY” position (3).
3. Verify that the air flow handle in the “COOLING BIN” position.
4. Confirm that the “GAS” knob (4) is turned all the way to the left (counterclockwise) = Minimum
position.
5. A. For Standard roasters:
Activate the switches sequentially as follows:
•a (5)
•Blower (6)
•Gas (7)
B. For Universal roasters:
Turn on the switches sequentially as follows:
•Drum (5)
•Gas (7)
Wait for the green air light to illuminate,
•Blower (6) switch.
6. Once the pilot is lit, switch to the "Burners On" (3) position and use the gas control knob to adjust the
flame intensity. (NOTE: It may take several attempts as air may need to be purged from the gas line.)
7. Move the Gas (7) knob to desired flame setting and watch the “Bean Temperature Display” (1).
8. Allow the roaster warm to 400°F - 450°F Check the exhaust and gas connections for leaks.
*PERFORM DRUM SEASONING PROCEDURE
on page 1 of this Guide
prior to roasting for consumption!*

DIEDRICH ROASTERS®
Manual IR-5/IR-12 Roaster
Quick Start Guide
5
Technical Support Hotline
+1.844.343.3742 M-F 7A-3:30PM PT
Rev.01.2023 DIEDRICH ROASTERS® ALL RIGHTS RESERVED
ATTENTION!
ALL SYSTEMS (Electrical, Gas, and HVAC) MUST BE CONNECTED, FUNCTIONING, AND
INSPECTED (if required) PRIOR TO USING THIS QUICK START GUIDE
COMPONENT DESCRIPTIONS
1 = BEAN TEMP display: Drum bean temperature
2 = AIR INDICATOR LIGHT:
Standard Model roasters have a red light. It is illuminated when airflow is diminished causing
the gas ignition system to shut down. (clean all roaster air ducts and impeller housing)
Universal Model roasters have a green light. It will be illuminated during normal operation.
When light goes out, this indicates abnormal airflow caused by outside air disturbances.
3 = PILOT ONLY / BURNERS ON switch: Toggles gas system from pilot to main burners
4 = GAS knob: Controls the flame intensity of burners 5 = DRUM switch: Starts drum rotation
6 = BLOWER switch: Starts blower motor
7 = GAS switch: Starts gas ignition system
8 = AGITATOR switch: Starts bean stir in Cooling Bin 9 = RESET switch: When temperature
exceeds 485°F, the temperature high limit module will trip. Once cool, reset used to reignite
pilot/burners
10=EMERGENCY STOP button: Stops all functions of the roaster
11=E-STOP RESET button: Twist the Emergency Stop button (10) to release and press this
button to reset.

DIEDRICH ROASTERS®
Manual IR-5/IR-12 Roaster
Quick Start Guide
6
Technical Support Hotline
+1.844.343.3742 M-F 7A-3:30PM PT
Rev.01.2023 DIEDRICH ROASTERS® ALL RIGHTS RESERVED
Things to Remember:
•Keep your roaster clean! – the most common issue occurs when the
Impeller Housing and associated ducting is not scraped down to the metal
surface and vacuumed out. This roaster is equipped with an “Air Pressure
Switch” that will disrupt the gas ignition system when excessive build-up
(1/8” max.) is present.
•Frequent cleaning will also keep the air velocity more constant, rendering
your coffee quality more consistent.
•Don’t forget to grease the bearings.
SHUT DOWN PROCEDURE
1. Turn the “Gas” switch (7) OFF and set the “Gas” (4) knob to the “MINIMUM” position
2. Make sure the “Pilot Only/Burners On” (3) toggle switch is in the “Pilot Only” position.
3. After the temperature reading has dropped to 250ºF (120ºC) or lower, set the “Blower”
(6) and “Drum” (5) switches to “OFF”.
4. Remove the chaff from the lower compartments of the roaster.
5. Open the side doors to remove chaff and for general cleaning.
6. Inspect for smoldering chaff. If found, extinguish with water (a small spray bottle is
recommended for this purpose).
7. Using a vacuum, clean the cooled chaff out of the roaster.
Other manuals for IR-5
1
This manual suits for next models
1
Table of contents
Other Diedrich Roasters Kitchen Appliance manuals
Popular Kitchen Appliance manuals by other brands

Silvercrest
Silvercrest SKMK 1200 A1 operating instructions

Mr. Coffee
Mr. Coffee TM20 instruction manual

Silvercrest
Silvercrest SFW 350 C1 operating instructions

Silvercrest
Silvercrest SSW 400 A1 operating instructions

Goldmedal
Goldmedal 2080BG instruction manual

Turn Key
Turn Key TK-12-5L instruction manual