manuals.online logo
Brands
  1. Home
  2. •
  3. Brands
  4. •
  5. Dimplex
  6. •
  7. Heater
  8. •
  9. Dimplex EF 6/20 User manual

Dimplex EF 6/20 User manual

1
GB
EF 6/20
EF 6/20 TI
EF 6/20 TID
EF 6/10
1. Warnings
1.1. General
You are requested to read carefully all the information in these
instructions. It gives important information concerning the safety,
installation and mounting, use and servicing of the appliance. Keep
these instructions carefully and if applicable pass them on the final
owner.
The manufacturer is not responsible if the following directions are
not followed.
- Dispose of the packaging properly.
- If the appliance is damaged, check immediately with the
supplier before installation.
- In order to guarantee the safe operation of the heater, it must
only be mounted and connected according to the directions in
the operating instructions.
- The appliance is only to be used for its stated uses.
- In the event of a fault disconnect the electricity supply to the
appliance (pull out the plug, alternatively turn off or remove
the fuse).
- When the appliance is out of operation for a long period,
disconnect the electricity supply to the appliance.
- Repairs to electrical appliances must only be performed by a
competent electrician.
1.2. Specific to this appliance
It is only suitable for domestic use or similar purposes within
enclosed space.
- It is particularly important that the appropriate safety
regulations for bathrooms, showers etc. are fulfilled. The
heater is to be installed in such a way that it cannot be
touched from a bath or shower and that the switch cannot be
operated. The installation and electricity supply can only take
place in safety zone 3 according to VDE 0100 Part 701.
- The heater is very hot inside. By covering the heater or by
placing or moving it within the specified minimum clearances
could cause a heat build up and possible lead to material
igniting. You must observe the minimum clearances.
- No materials can be used in the room where the appliance is
installed whose fumes or the material could give rise to
ignition, explosion or thermal decomposition due to the high
temperatures. In such case (e.g. sticking down of floor
coverings) first ensure that the appliance have cooled down
to room temperature.
- The surfaces, especially the grille, become hot during
operation. For this reason ensure that small children or infirm
people cannot touch these surfaces.
- No objects should be inserted through the openings of the
appliance. This could lead to functional faults, possibly to the
ignition of the object.
- Warning! There may be dangers following the automatic
switching on of connected heaters in your absence, e.g.
heaters which have been moved or covered in the meantime
could cause a fire.
- Supply cord must not be placed over the hot heater.
2. Description
These instructions are valid for:
Rapid Heater EF 6/10, Heating capacity 1000W;
Rapid Heater EF 6/20, Heating capacity 2000W;
Rapid Heater EF 6/20 TID, Heating capacity 2000W with 24 h
clock;
Rapid Heater EF 6/20 TI, Heating capacity 2000 – 1000 W with
60 min timer.
Supply voltage: 1/N/PE ~ 230V 50Hz.
Dimensions: (B x H x T) 300 x 400 x 100 mm
Mounting: vertical on a wall
The fan heater is supplied with a thermostat, supply cord and plug.
The heater is splashproof IPX3, construction class I.
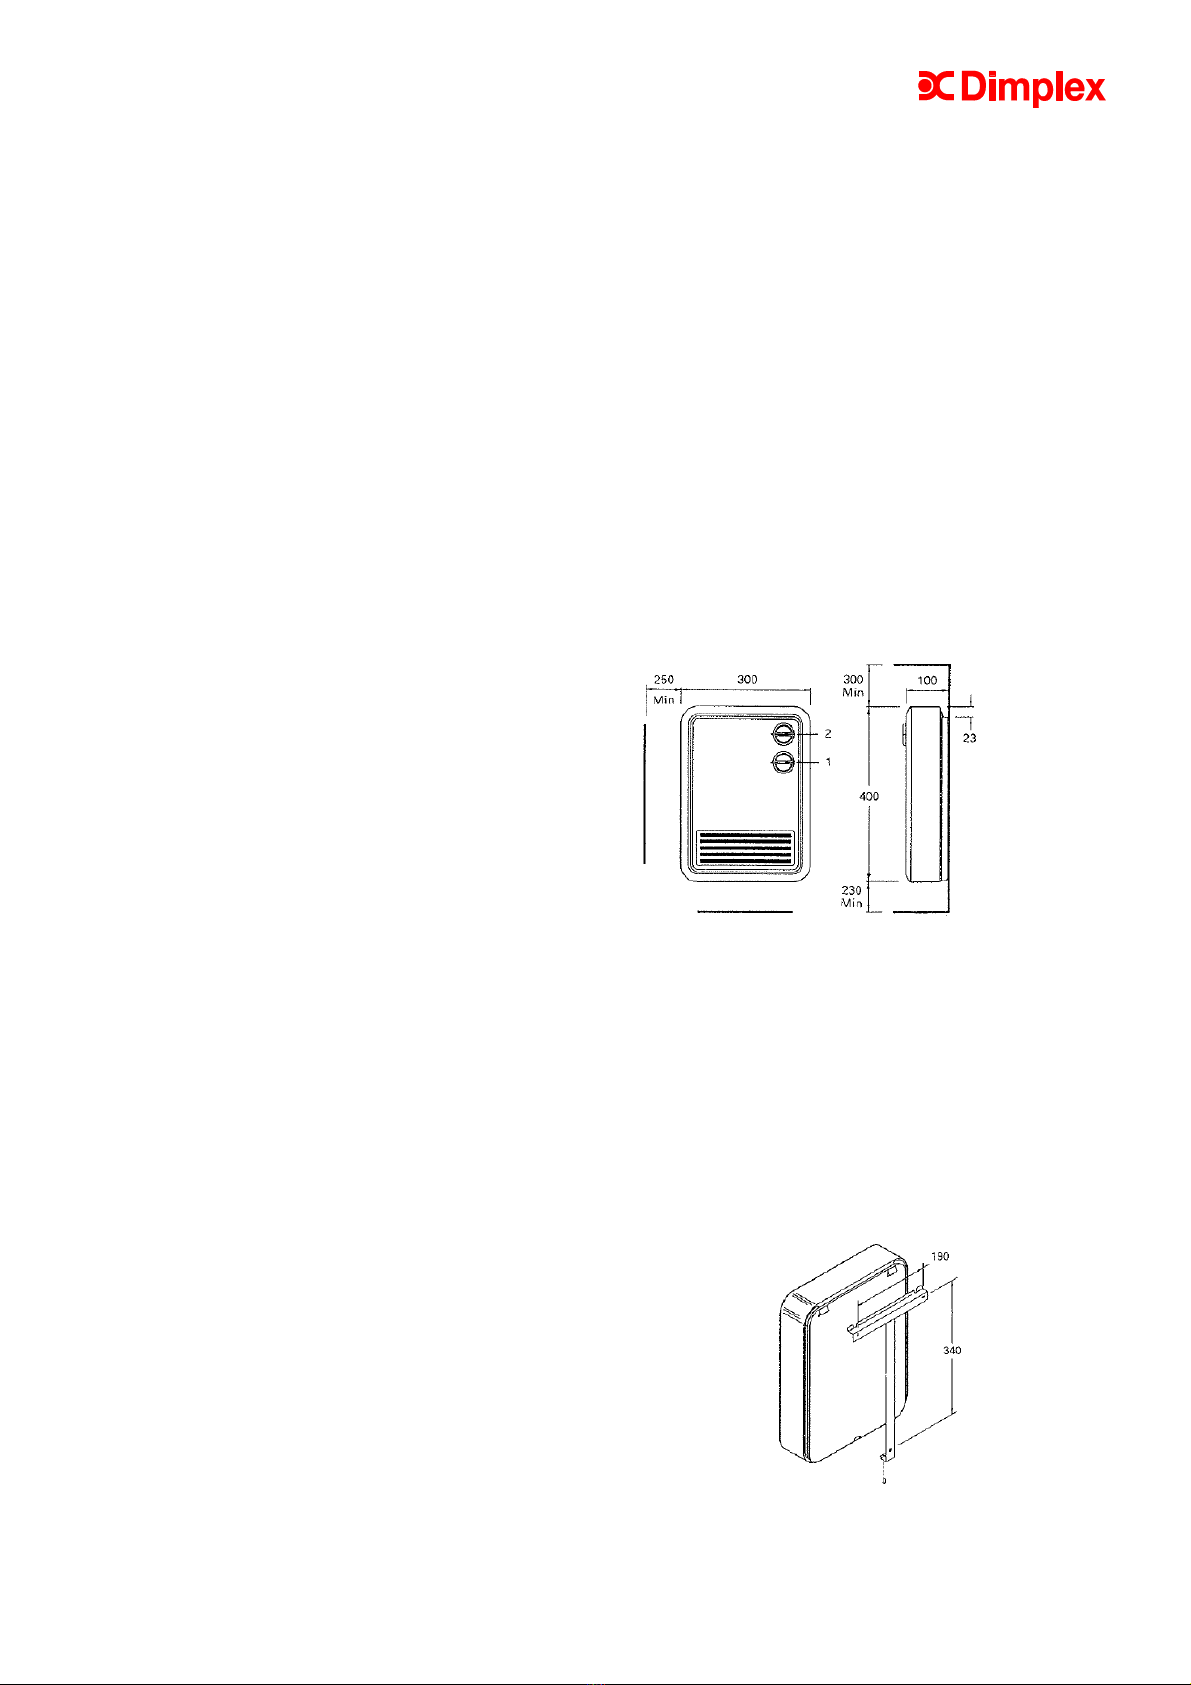
3. Minimum clearances, mounting
The rapid heater must only be installed in the vertical position. The
heater must not be located immediately below a fixed socket
outlet.
The minimum clearances given in the diagram must be observed.
Dimensions in mm
Furthermore a clearance of at least 750mm is to be maintained
from the front of the heater. With easily combustible objects such
as curtains or heat sensitive plastic, ensure that these are not
blown upon the hot air stream.
The rapid heater must only be mounted on a vertical non-
inflammable wall.
The heater must be secured to the wall with 3 screws (see
diagram). Use the screws and wall plugs in the enclosed plastic
bag.
Installation
Fix the heater as shown in the diagram.
2
4. Electrical connection
The heater is supplied complete with a plug. Moving a socket or
replacing the supply cord (with a longer one) can only be carried
out by a qualified electrician respecting the appropriate
requirements.
5. Heater operation
The required room temperature can be set by rotating the
thermostat knob (1) clockwise.
The thermostat has at its lowest setting ∗a frost protection
position. At this setting, the thermostat switches on the heater at
approximately 5°C background temperature.
The models EF 6/20 TID and EF 6/20 TI are additionally provided
with a timer.
EF 6/20 TI
During the operation of the timer (2), the heater gives its full output
of 2000W and the thermostat does not operate. The thermostat
then takes over the control of the heater at low output (1000W).
EF 6/20 TID
The switch on the timer unit controls the electrical supply to the
heater. The heater is switched on by the slide switch (4). The Off
position is marked “O”. In the hand position the heater is controlled
manually, i.e. by the operation of the thermostat. The clock
position indicates automatic operation, i.e. the heater is
automatically switched on and off by the timer (3). The thermostat
(1) ensures a constant room temperature during the “on” periods.
For automatic operation, turn the dial clockwise until the correct
time of day is indicated opposite the datum mark to the left of the
dial. The timer only runs when the heater is connected to the
electrical supply.
Select the times you require the heater to come “on” by pulling the
appropriate segments forward. Each segment will provide heat for
30 minutes. The timer may be set to give as many “on” periods of
any length as may be required. The programme will repeat every
24 hours until it is changed.
Automatic operation can be overridden at any time by switching to
“manual” or “off”.
6. Important information about heater operation
Caution! The surfaces of the heater become hot during heating.
The air circulation through the heater must not be obstructed. Do
not cover the heater; do not place any objects on, by or in front of
the heater.
For your safety the heater is fitted with a thermal cut-out. If the air
circulation is obstructed (e.g. hanging something over or blocking
the grille) the heater switches off automatically.
In order to bring the heater back into operation remove the cause
of the overheating. The electrical supply to the heater must be
interrupted for a few minutes (disconnect the electrical supply).
When the heater has cooled sufficiently, it can be brought back
into operation.
In order to maintain its full heating capacity, it is necessary to keep
the air entry and exit openings dust free. Please clean it with a
vacuum cleaner before the heating season.
7. Faults
If the heater is not heating, please check whether the heater is
switched on and the thermostat knob is set to a high enough
position, then whether it is switched on at the distribution board or
the fuse is in order.
If this is so, call your electrical installer. Give him the “order no.” for
the heater. You will find this on the rating label.
8. Cleaning the appliance
The heater does not require any special maintenance or attention.
Switch off the heater before cleaning and allow to cool.
Cleaning within the heater must only be carried out by a competent
electrician.
The outside can be cleaned by wiping it over with a soft damp cloth
and then dried. Do not use abrasive cleaning powders or furniture
polish, as this can damage the surface finish.
9. Guarantee
The guarantee terms issued by our representatives in the country
of purchase are applicable for this appliance. The dealer from
whom the appliance was purchased will provide details at any time
on request. Presentation of a receipt is essential for the
implementation of the guarantee terms.

This manual suits for next models

3

Other Dimplex Heater manuals

Dimplex FXL18N User manual

Dimplex

Dimplex FXL18N User manual

Dimplex DDF250 Supplement

Dimplex

Dimplex DDF250 Supplement

Dimplex Studio 842 User manual

Dimplex

Dimplex Studio 842 User manual

Dimplex DPH1563 User manual

Dimplex

Dimplex DPH1563 User manual

Dimplex DLX Series Installation instructions manual

Dimplex

Dimplex DLX Series Installation instructions manual

Dimplex EWA-C Series User manual

Dimplex

Dimplex EWA-C Series User manual

Dimplex PLX 050/TI User manual

Dimplex

Dimplex PLX 050/TI User manual

Dimplex OFRB7 User manual

Dimplex

Dimplex OFRB7 User manual

Dimplex EvoRad2BTA User manual

Dimplex

Dimplex EvoRad2BTA User manual

Dimplex QXD1500E User manual

Dimplex

Dimplex QXD1500E User manual

Dimplex EF 10/20 S User manual

Dimplex

Dimplex EF 10/20 S User manual

Dimplex QM070 Quantum User manual

Dimplex

Dimplex QM070 Quantum User manual

Dimplex FSR 15...35 GW Quick guide

Dimplex

Dimplex FSR 15...35 GW Quick guide

Dimplex CABR User manual

Dimplex

Dimplex CABR User manual

Dimplex OCR15FA User manual

Dimplex

Dimplex OCR15FA User manual

Dimplex LPC Series User manual

Dimplex

Dimplex LPC Series User manual

Dimplex PLX 3000 User manual

Dimplex

Dimplex PLX 3000 User manual

Dimplex SCH5 User manual

Dimplex

Dimplex SCH5 User manual

Dimplex HL 185 T User manual

Dimplex

Dimplex HL 185 T User manual

Dimplex ECR15 User manual

Dimplex

Dimplex ECR15 User manual

Dimplex DES 1821 User manual

Dimplex

Dimplex DES 1821 User manual

Dimplex XMS718N User manual

Dimplex

Dimplex XMS718N User manual

Dimplex WFE3BE User manual

Dimplex

Dimplex WFE3BE User manual

Dimplex RFV-800 "D" Series User manual

Dimplex

Dimplex RFV-800 "D" Series User manual

Popular Heater manuals by other brands

ELECTROTEK ET-QH01 instruction manual

ELECTROTEK

ELECTROTEK ET-QH01 instruction manual

BIEMMEDUE BH 50 instruction manual

BIEMMEDUE

BIEMMEDUE BH 50 instruction manual

Sealey RD800 instructions

Sealey

Sealey RD800 instructions

Akai FH11AL instruction manual

Akai

Akai FH11AL instruction manual

THERMOFAN TF2400S installation guide

THERMOFAN

THERMOFAN TF2400S installation guide

Marley 2500 & C2500 Series Installation, operation & maintenance manual

Marley

Marley 2500 & C2500 Series Installation, operation & maintenance manual

Winterwarm WWH-EC instruction manual

Winterwarm

Winterwarm WWH-EC instruction manual

Logik L20ORW14E instruction manual

Logik

Logik L20ORW14E instruction manual

Master B35CED owner's manual

Master

Master B35CED owner's manual

Bimar HO427 Instruction book

Bimar

Bimar HO427 Instruction book

EINHELL PS 12 operating instructions

EINHELL

EINHELL PS 12 operating instructions

EUROM EK5001 operating instructions

EUROM

EUROM EK5001 operating instructions

Sears 583.409110 Operation and maintenance

Sears

Sears 583.409110 Operation and maintenance

Holmes HCH7502 owner's guide

Holmes

Holmes HCH7502 owner's guide

Quadro HOL-1320T user manual

Quadro

Quadro HOL-1320T user manual

Vortice THERMOLOGIKA DESIGN Instruction booklet

Vortice

Vortice THERMOLOGIKA DESIGN Instruction booklet

IRSAP The Radiator Company Ovali Fitting instructions

IRSAP

IRSAP The Radiator Company Ovali Fitting instructions

Jaga BRIZA 12 PLUG & PLAY manual

Jaga

Jaga BRIZA 12 PLUG & PLAY manual

manuals.online logo
manuals.online logoBrands
  • About & Mission
  • Contact us
  • Privacy Policy
  • Terms and Conditions

Copyright 2025 Manuals.Online. All Rights Reserved.