EnglishDeutsch
 logo
Brands
  1. Home
  2. •
  3. Brands
  4. •
  5. DIVERSIFIED WOODCRAFTS
  6. •
  7. Educational Equipment
  8. •
  9. DIVERSIFIED WOODCRAFTS AUGMENTED REALITY Series User manual

DIVERSIFIED WOODCRAFTS AUGMENTED REALITY Series User manual

Other DIVERSIFIED WOODCRAFTS Educational Equipment manuals

DIVERSIFIED WOODCRAFTS ARS-4030 User manual

DIVERSIFIED WOODCRAFTS

DIVERSIFIED WOODCRAFTS ARS-4030 User manual

DIVERSIFIED WOODCRAFTS ARS-4030 User manual

DIVERSIFIED WOODCRAFTS

DIVERSIFIED WOODCRAFTS ARS-4030 User manual

Popular Educational Equipment manuals by other brands

DISCOVER talking pen user guide

DISCOVER

DISCOVER talking pen user guide

pitsco Smart Buddies 45895 quick start guide

pitsco

pitsco Smart Buddies 45895 quick start guide

RS 3.5 quick start guide

RS

RS 3.5 quick start guide

Quanser QNET 2.0 quick start guide

Quanser

Quanser QNET 2.0 quick start guide

CAE Healthcare METIman user guide

CAE Healthcare

CAE Healthcare METIman user guide

Turning Technologies Pulse quick start guide

Turning Technologies

Turning Technologies Pulse quick start guide

fischertechnik STEM Coding Pro Assembly instruction

fischertechnik

fischertechnik STEM Coding Pro Assembly instruction

Experia IRiS Light Wand instruction manual

Experia

Experia IRiS Light Wand instruction manual

Pitsco Education FLO user guide

Pitsco Education

Pitsco Education FLO user guide

Sphero RVR RV01 user manual

Sphero

Sphero RVR RV01 user manual

Limbs & Things 60905 user guide

Limbs & Things

Limbs & Things 60905 user guide

JP TURN Connect T101 user guide

JP

JP TURN Connect T101 user guide

TruCorp AirSim Advance user manual

TruCorp

TruCorp AirSim Advance user manual

LeapFrog Mr. Pencil's Scribble, Write & Read instruction manual

LeapFrog

LeapFrog Mr. Pencil's Scribble, Write & Read instruction manual

ScienTECH 2261 Product tutorial

ScienTECH

ScienTECH 2261 Product tutorial

Rompa 20019 manual

Rompa

Rompa 20019 manual

Duinotech XC4322 user manual

Duinotech

Duinotech XC4322 user manual

Enabling Devices Spinning Light Show user guide

Enabling Devices

Enabling Devices Spinning Light Show user guide

https://manuals.online logo
https://manuals.online logoBrands
  • About & Mission
  • Contact us
  • Privacy Policy
  • Terms and Conditions

Copyright 2026 Manuals.Online. All Rights Reserved.

ARS | AUGMENTED REALITY SERIES
https://system76.com/weekendproject/
REQUIRED HARDWARE
This tutorial focuses on installing and calibrating the software, but doesn’t cover the details of the hardware
setup. (Note: Do not plug the Kinect or projector unit until instructed by the tutorial.)
For detailed information on the hardware setup, see the AR Sandbox hardware tutorial.
Diversied Woodcrafts’ ARS Series includes:
A Our rst generation Kinect
B: Our short-throw digital projector (BenQ MW632ST)
C: Our Linux-friendly computer
D: Our 40"w x 30"D x 8"H Sandbox
(Not Included) Roughly 200 pounds of white sand like Sandtastik White Sandbox Sand
ARS | AUGMENTED REALITY SERIES
https://system76.com/weekendproject/
INSTALL SOFTWARE
A: Turn the computer on; make sure internet is connected
B: Open a terminal and run these three commands (Note: All commands must be typed exactly as shown;
upper and lowercase will make a difference):
sudo add-apt-repository -ys ppa:system76-dev/weekend-project
sudo apt-get update
sudo apt-get install arsandbox
C: Find out what your user-name is by running this command in the terminal:
whoami
D: Add yourself to the vrui-grp group with this command, replacing USERNAME with the user-name
returned by the whoami command above:
sudo adduser USERNAME vrui-grp
E: Reboot your computer so all the above changes take effect.
CALIBRATE KINECT
A: Plug-in the Kinect to the laptop and to the power source
B: Open the terminal and run:
KinectUtil getCalib 0
This will download the intrinsic calibration parameters directly from your Kinect’s rmware and then
write the result to a le in /etc/Vrui-3.1/Kinect-2.8/
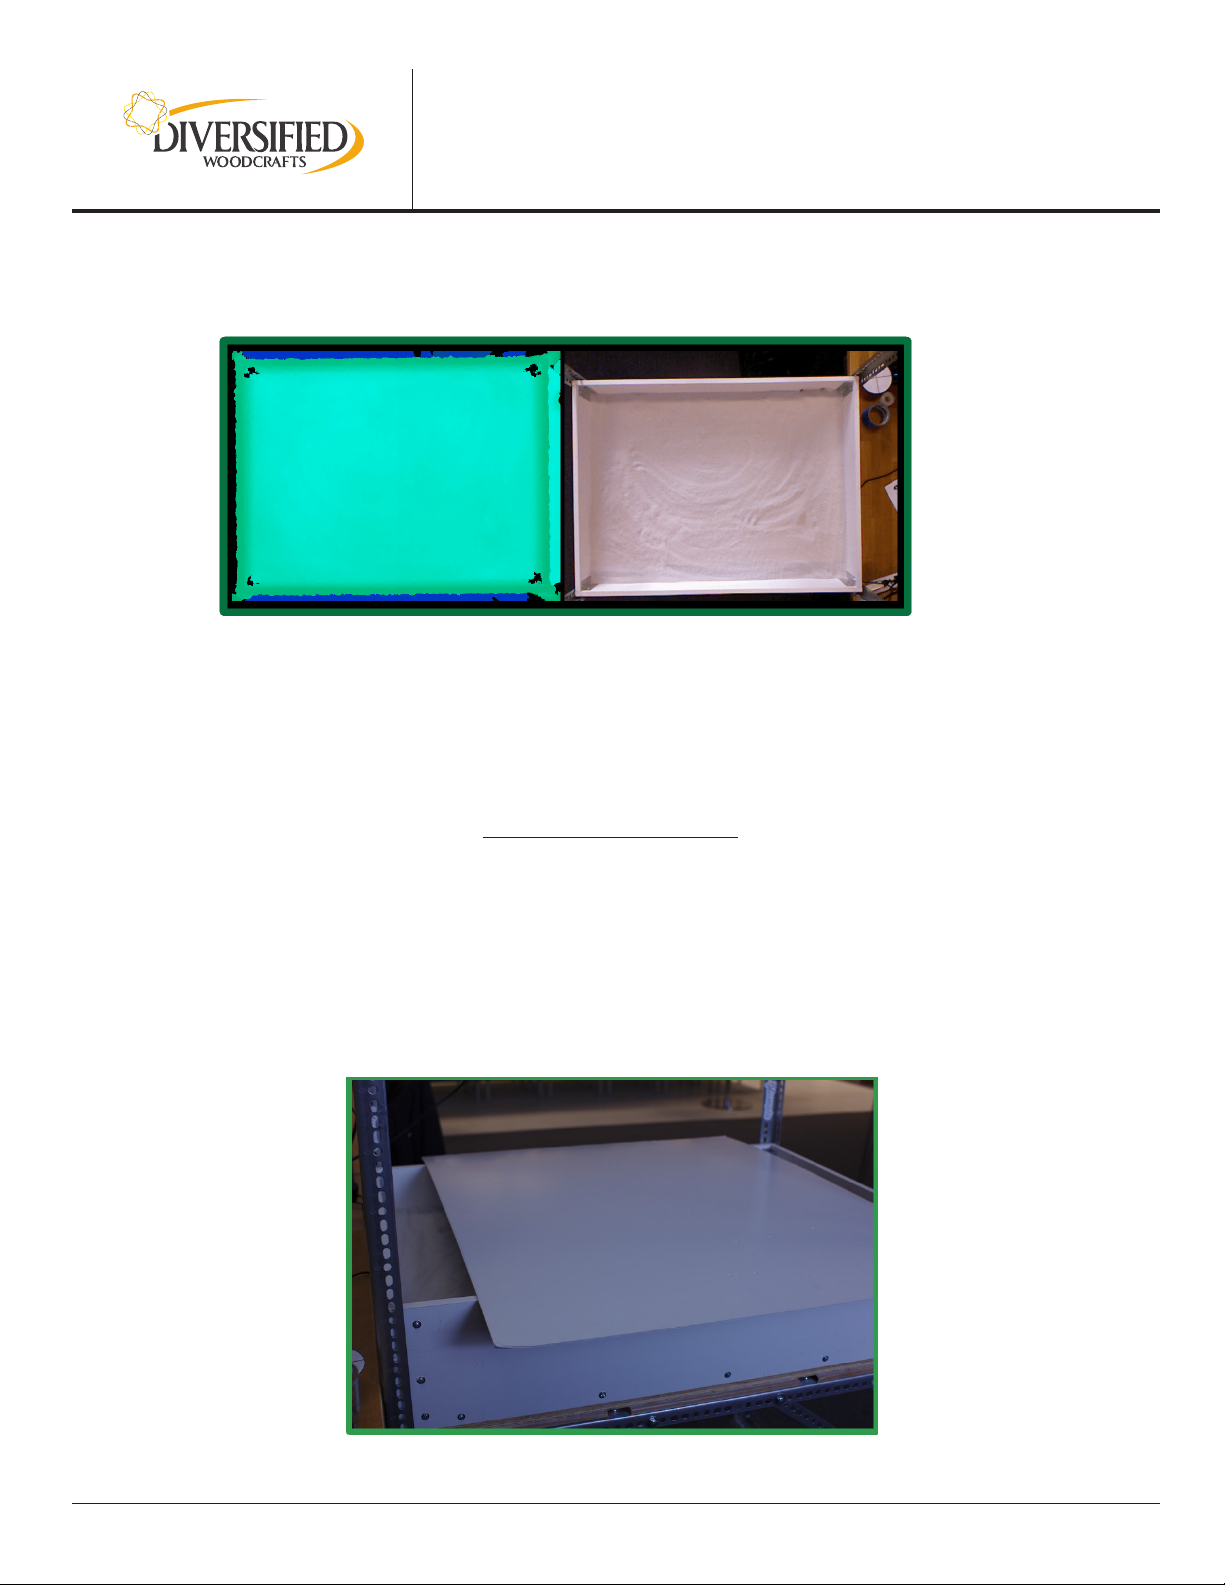
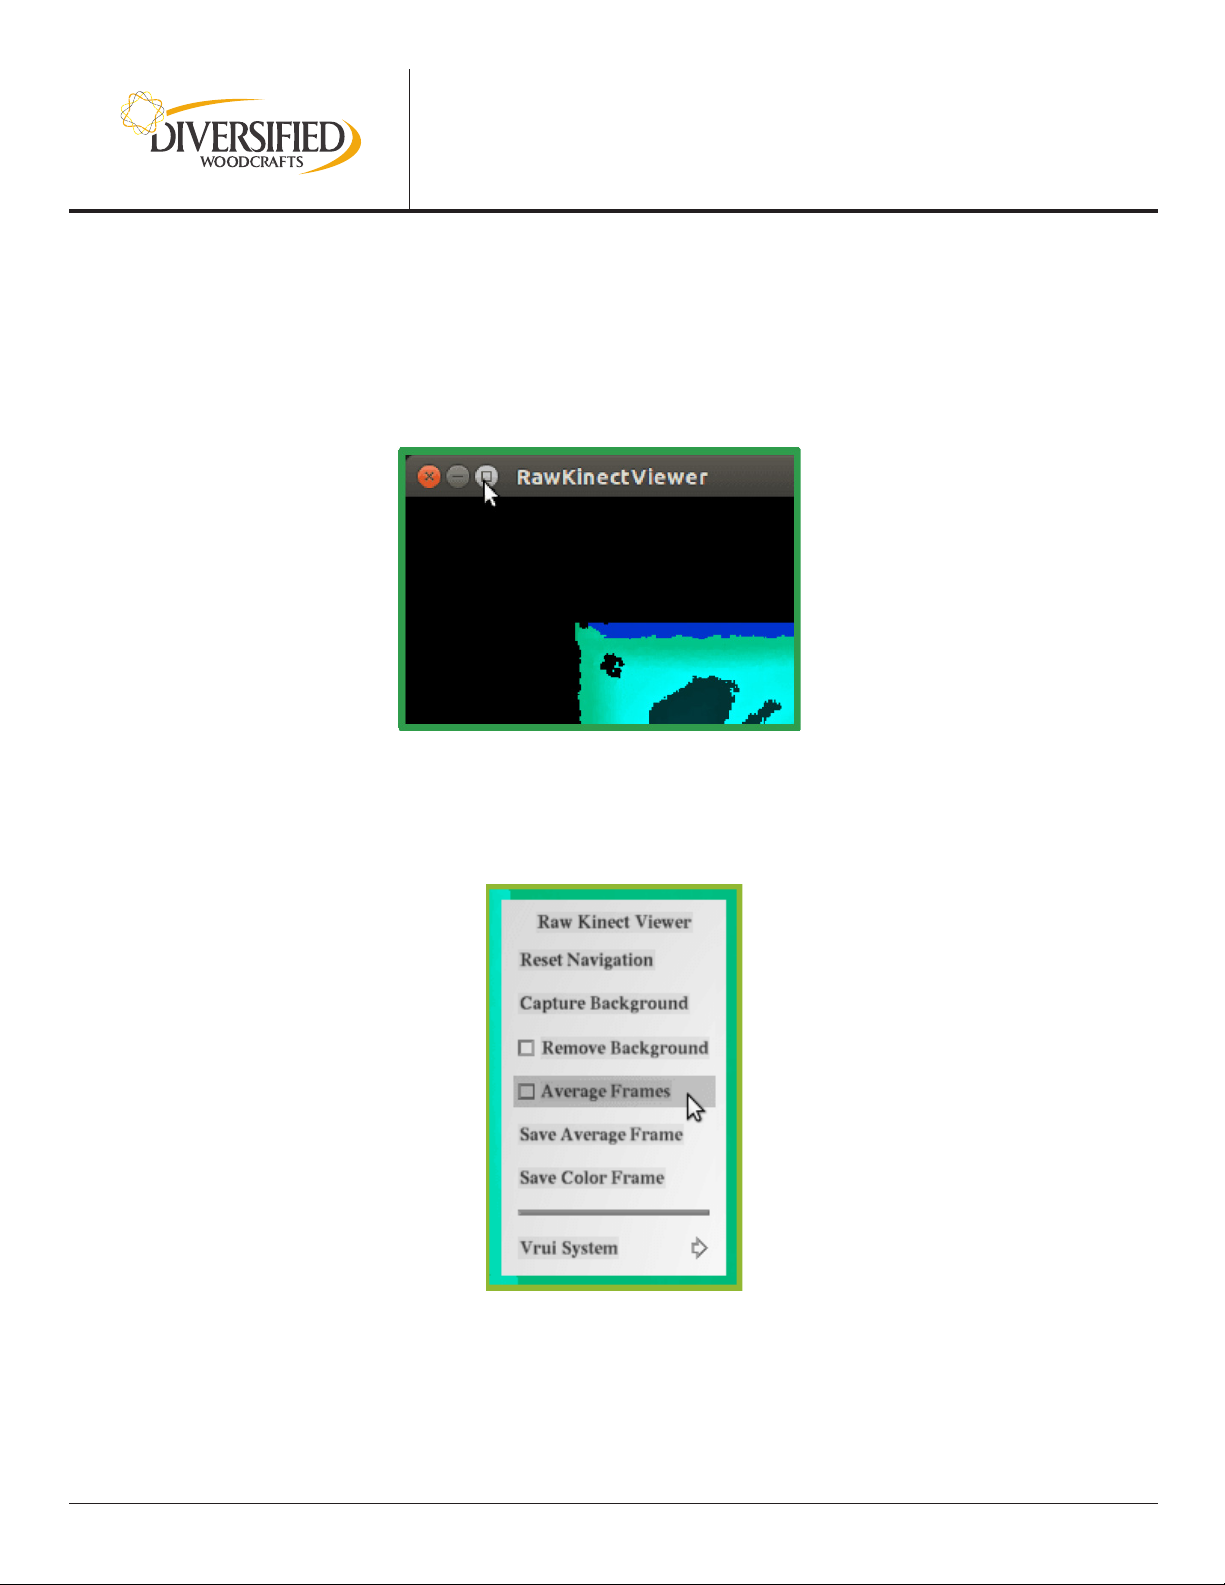
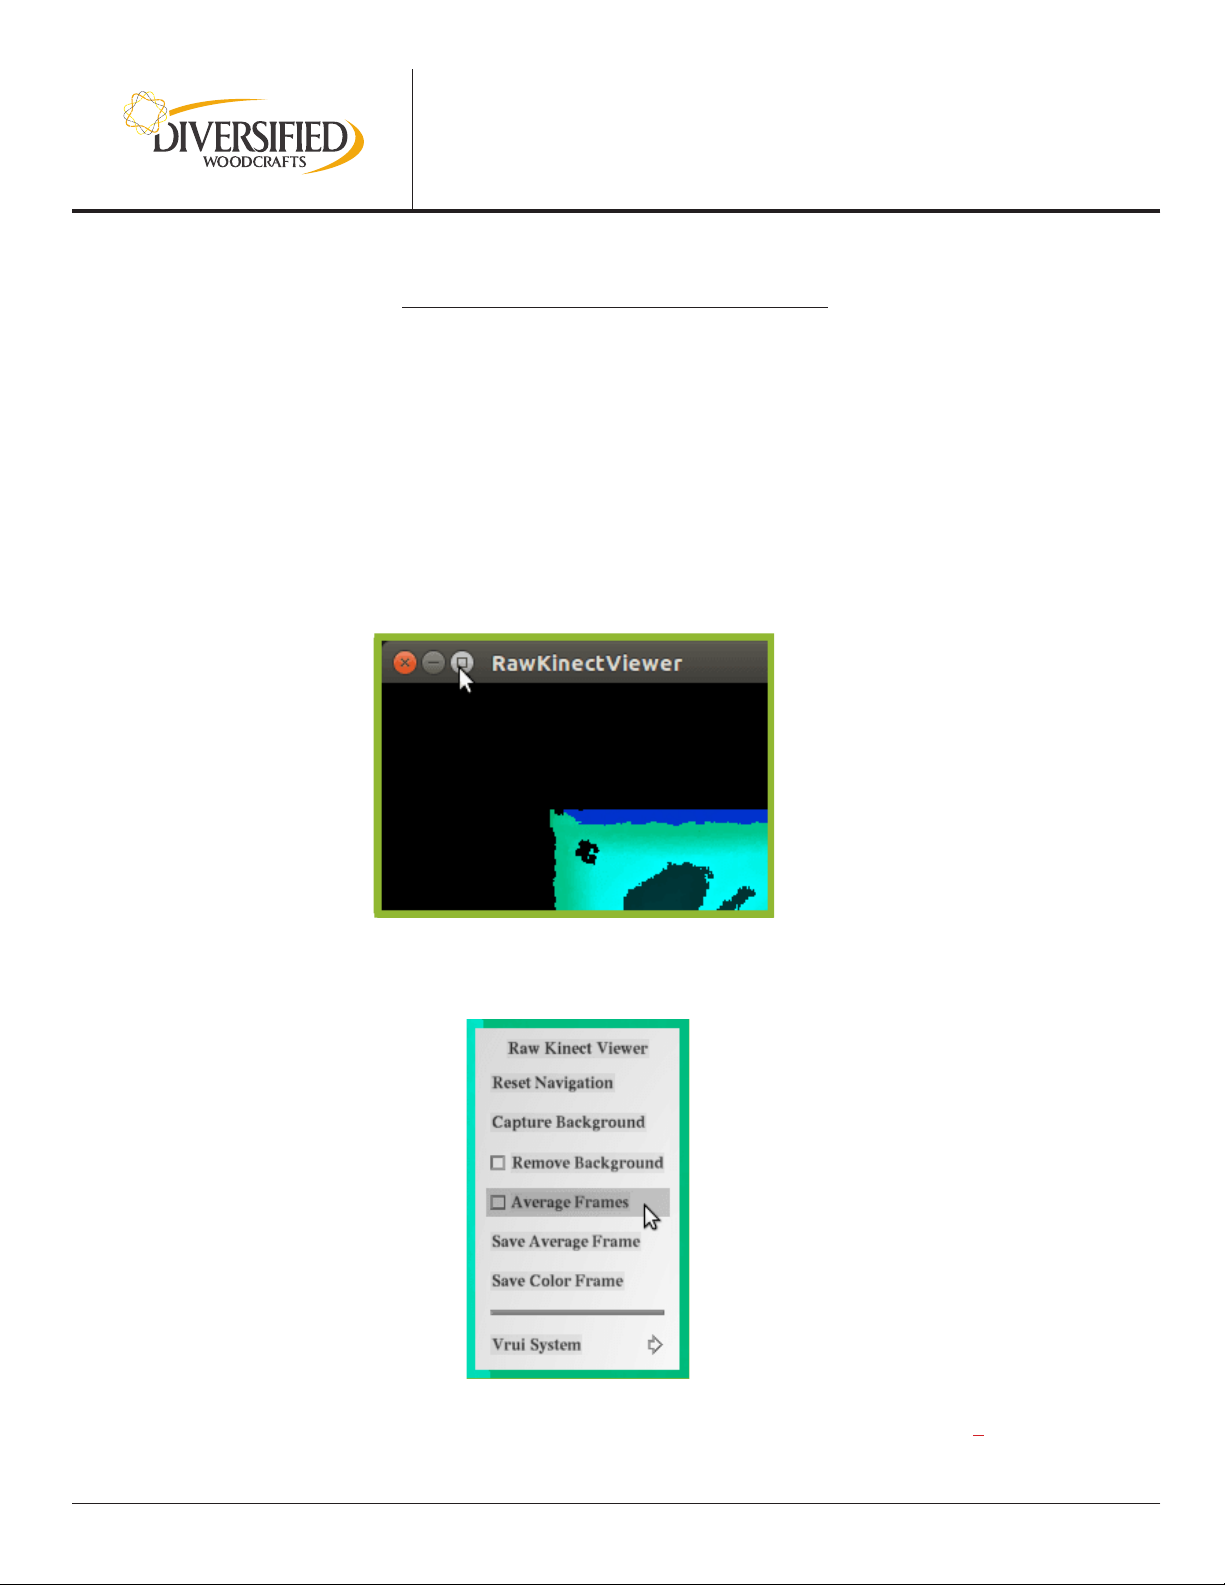
ALIGN KINECT ABOVE SANDBOX
A: Open the terminal and run:
RawKinectViewer -compress 0
B: Maximize this window so it’s easier to see
your sandbox:
ARS | AUGMENTED REALITY SERIES
https://system76.com/weekendproject/
The image on the left is the depth view, the right is the standard camera view:
The Augmented Reality Sandbox only uses the depth view (left), but the camera view (right) is still helpful
in aligning your Kinect.
C: The depth view needs to cover the entire interior of your sandbox. It’s okay if it overlaps it slightly.
D: Hit Esc to close the RawKinectViewer.
CALCULATE BASE PLANE
A: There are two ways to calculate the base plane. If you haven’t yet lled your sandbox with sand, you
can calculate the base plane using a region on the oor of your sandbox.
On the other hand, if you’ve already led your sandbox with sand, you can calculate the base plane
by placing a piece of poster board (or a similar at surface) on top of your sandbox, which is what
we’ll do in this example:
ARS | AUGMENTED REALITY SERIES
https://system76.com/weekendproject/
B: From a terminal, launch: the RawKinectViewer:
RawKinectViewer -compress 0
C: Maximize this window so it’s easier to see your sandbox:
D: Press and hold the right mouse button, move your cursor over Average Frames, then release the
mouse button:
ARS | AUGMENTED REALITY SERIES
https://system76.com/weekendproject/
E: Press and hold the 1 key, move your cursor over Extract Planes, then release the 1 key:
F: You now need to draw a rectangle that ts within the interior of your at surface (in the depth view).
You want some space between your rectangle and the edges of your at surface.
Start with your cursor near the top-left corner of your at surface. Press and hold the 1 key,
drag out a rectangle toward the bottom-right corner, then release the 1 key:
ARS | AUGMENTED REALITY SERIES
https://system76.com/weekendproject/
G: Hit Esc to close the RawKinectViewer.
H: In the terminal you’ll see two lines printed. Select the portion of the 2nd line shown below, then right
click and select Copy:
I: Edit the BoxLayout.txt le by running this command from the terminal:
gedit /etc/SARndbox-1.6/BoxLayout.txt
J: Paste the line you just copied over the rst line in the BoxLayout.txt le.
You also need edit this line, replacing the “=” (equal sign) with a “,” (comma).
You should end up with a rst line something like this:
K: Save the le and close gedit
ARS | AUGMENTED REALITY SERIES
https://system76.com/weekendproject/
MEASURE 3D EXTENTS OF SAND SURFACE
A: This step requires you to have led your sandbox with sand. You want the sand surface to be as level
as possible, but it doesn’t need to be perfectly level.
If you placed a piece of poster board (or another at surface) on top of your sandbox in the previous
step, you’ll need to remove it for this step.
B: From a terminal, again launch: the RawKinectViewer:
RawKinectViewer -compress 0
C: Maximize this window so it’s easier to see your sandbox:
D: Press and hold the right mouse button, move your cursor over Average Frames, then release
the mouse button:
E: Press and hold the 1 key, move your cursor over Measure 3D positions, then release the 1 key:
ARS | AUGMENTED REALITY SERIES
https://system76.com/weekendproject/
You’ll now measure the 3D extents of the interior of the sandbox
F: Use the color-coded depth map to make sure you position your cursor over the sand surface and not
over the sides of your sandbox. Position your cursor so that there’s a small amount of space between
the sand surface and the sides of your sandbox.
First, move your cursor to the lower-left interior corner, then press the 1 key:
Note there is no feedback from the computer when you press the 1 key.
ARS | AUGMENTED REALITY SERIES
https://system76.com/weekendproject/
G: Second, move your cursor to the lower-right interior corner, then press the 1 key:
H: Third, move your cursor to the upper-left interior corner, then press the 1 key:
ARS | AUGMENTED REALITY SERIES
https://system76.com/weekendproject/
I Finally, move your cursor to the upper-right interior corner: then press the 1 key:
J: Hit Esc to exit RawKinectViewer .
K: In the terminal you’ll see four lines printed. You need to highlight these four lines as shown below,
then right click and select Copy: