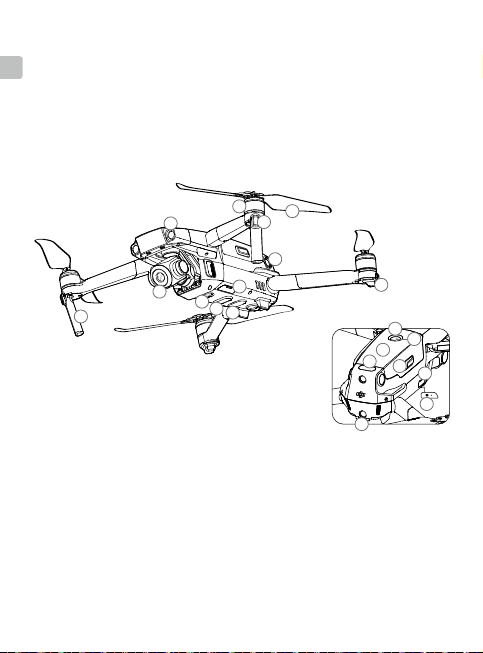
dji MAVIC 2 ZOOM User manual

V1.0
MAVIC 2
ZOOM
Quick Start Guide
Kurzanleitung
Guía de inicio rápido
Guide de démarrage rapide
Guida rapida
Snelstartgids
Guia de início rápido
Краткое руководство пользователя


Contents
Quick Start Guide 2
Kurzanleitung 12
Guía de inicio rápido 22
Guide de démarrage rapide 32
Guida di avvio rapido 42
Snelstartgids 52
Guia de início rápido 62
Краткое руководство пользователя 72
EN
DE
ES
FR
IT
NL
PT-PT
RU

2
EN
Aircraft
The DJITM MAVICTM 2 Zoom features omnidirectional Vision Systems and Infrared Sensing
Systems*, and comes with a fully stabilized 3-axis gimbal camera with an equivalent 24-
48 mm 2x optical zoom lens capable of shooting 4K videos and 12-megapixel photos
that support up to 4x FHD lossless zoom. DJI signature technologies such as Obstacle
Sensing and Intelligent Flight Modes like HyperLapse, ActiveTrackTM 2.0, QuickShot,
Panorama, and Advanced Pilot Assistance Systems, help you capture complex shots
effortlessly. The Mavic 2 Zoom boasts a maximum ight speed of 44.7 mph (72 kph) and a
maximum ight time** of 31 minutes.
13
14
19
18
16
17
15
20
1
2
3
4
56
7
8
910
11
12
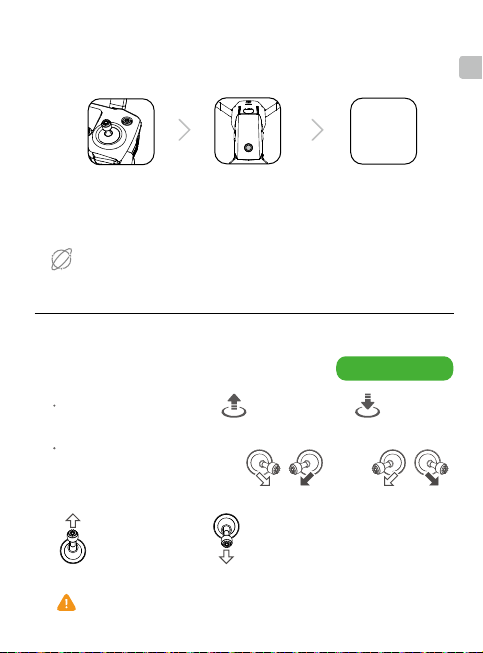
1. Gimbal and Camera
2. Forward Vision System
3. Downward Vision System
4. Lateral Vision System
5. Downward Infrared
Sensing System
6. Auxiliary Bottom Light
7. microSD Card Slot
8. Front LEDs
* The Vision Systems and Infrared Sensing Systems are affected by surrounding conditions. Read the
Disclaimer and Safety Guidelines, User Manual, and watch the tutorial videos in the DJI GOTM 4 app or on the
ofcial DJI website to learn more. http://www.dji.com/mavic-2
** Maximum ight time was tested in an environment with no wind while ying at a consistent 15.5 mph (25 kph). This
value is for reference only.
9. Motors
10. Propellers
11. Antennas
12. Aircraft Status Indicator
13. Upward Infrared Sensing
System
14. Backward Vision System
15. Intelligent Flight Battery
16. Battery Level LEDs
17. Power Button
18. Battery Buckles
19. USB-C Port
20. Link Button/Linking
Status Indicator

3
EN
12 13
14 15
17
16
18
Remote Controller
Built into the remote controller is the DJI’s long-range transmission technology OCUSYNCTM 2.0,
offering a maximum transmission range of 5 mi (8 km) and displaying video from the aircraft
to the DJI GO 4 app on your mobile device at up to 1080p. An on-board LCD screen gives
real-time aircraft data information and the detachable control sticks make the remote controller
easier to store.
Maximum run time: 2 hours and 15 minutes*
1. LCD Screen
2. Flight Pause Button
3. 5D Button
4. Removable Control Sticks
5. Power Button
6. Antennas
7. RTH Button
8. Control Sticks Storage Slot
9. Reserve Video-Downlink
Port (USB)
10. Mobile Device Clamp
11. Flight Mode Switch
12. Gimbal Dial
13. Zoom Adjustment Dial
14. Record Button
15. Focus/Shutter Button
16. Video-Downlink/Power Port
(micro USB)
17. C1 Button (Customizable)
18. C2 Button (Customizable)
Folded
* The remote controller is able to reach its maximum transmission distance (FCC) in a wide-open area
with no electromagnetic Interference at an altitude of about 400 ft (120 m).
The maximum runtime is tested in a laboratory environment. This value is for reference only.
1
3
4
6
7
2
8
9
10
11
5

4
EN
DJI GO 4 is compatible with iOS 9.0 (or later) or Android 4.4 (or later).
1. Download the DJI GO 4 App and Watching Tutorial Videos
Search “DJI GO 4” in the App Store or Google Play or scan the
QR code below to download the app on your mobile device.
Watch the tutorial videos at www.dji.com/mavic-2 or in DJI GO 4 by
tapping the icon in the top right corner of your screen.
2. Preparing the Aircraft
Remove the gimbal
cover from the camera.
Unfold the front arms. Unfold the rear arms.
Unfolded
Unfold the front arms and the propellers before the rear ones. All arms and propellers
must be unfolded before takeoff.
1
2
3
1
2
3
Press the propellers
down rmly and rotate
in the lock direction.
Match the propellers
to motors.
Marked Unmarked
Tutorial videos
DJI GO 4

5
EN
B
A
A
B
Remove the remote controller cable before charging.
3. Charging the Batteries
Use the provided charger to fully
charge the Intelligent Flight Battery
before rst use.
Remove the Intelligent Flight Battery
Charging Time:
~1 hour 30 minutes
Charging Time:
~2 hour 15 minutes
Power Outlet
100 - 240V
Low
High
Checking the Battery Levels and Powering On/O
Press once to check the battery level.
Press, then press and hold to turn on/off.
Press once to check the battery level on
the LCD screen.
Press once, then press and hold to turn on/
off the remote controller.

6
EN
1
2
3
Ensure the control sticks are rmly mounted.
The remote controller cable with the Lightning connector is mounted by default. Use
the appropriate cable for your mobile device to connect to the remote controller. When
using an iPad or tablet, use the USB port on the remote controller.
Do not use the Micro USB and the USB ports simultaneously for linking video.
4. Preparing the Remote Controller
Unfold the antennas and mobile device clamps,
then attach the control sticks.
Place one end of the RC cable to the
end of the slot.
Attach your mobile device within the clamps.
Set the antennas parallel to each other
Optimal Transmission Range
Strong
Weak

7
EN
DJI GO 4
App
6. Flight
Ready to Go (GPS)
OR
Auto Takeoff
Left stick up (slowly)
to take off
Left stick down (slowly) until you touch the
ground
Hold a few seconds to stop the motors
Auto Landing
Before taking off, make sure the Aircraft Status Bar in
DJI GO 4 displays “Ready to Go”.
Combination stick command to
start/stop the motors
Auto Takeo / Landing
Manual Takeo / Landing
The motors can only be stopped mid-ight when the ight controller detects critical
error.
5. Preparing for Takeoff
Power on the remote controller Power on the aircraft Launch DJI GO 4
Use your DJI account to activate the aircraft. Activation requires an internet connection.
Internet

8
EN
Remote Controller Operation
In DJI GO 4
Left Stick
Up
Down
Turn Left Turn Right
Right Stick Forward
Backward
Left Right
QuickShot
TapFlyWaypoints
HyperLapseNormal
Point of Interest
ActiveTrack
Cinematic Mode
The default ight control is known as Mode 2. The left stick controls the aircraft's altitude
and heading, while the right stick controls its forward, backward, left and right movements.
The gimbal dial controls the camera's tilt.
Press the Flight Pause button for emergency braking during ight.
Watch the tutorials in DJI GO 4 or at the ofcial DJI website to learn more.
Always set an appropriate RTH altitude before takeoff. When the aircraft is returning to
the Home Point, you should guide it with the control sticks.

9
EN
120m
≥10 m/s
Fly in Open
Areas
Strong GPS
Signal
Maintain Line of
Sight
Fly Below 400 Feet
(120 m)
Avoid flying over or near obstacles, crowds, high voltage power lines, trees or
bodies of water.
DO NOT fly near strong electromagnetic sources such as power lines and base
stations as it may affect the onboard compass.
DO NOT use the aircraft in adverse weather conditions such as rain, snow, fog
and wind speeds exceeding 10 m/s or 22 mph.
No Fly Zone
Stay away from the rotating propellers
and motors.
Learn more at:
http://flysafe.dji.com/no-fly
MAVIC is a trademark of DJI.
Copyright © 2018 DJI All Rights Reserved. Designed by DJI. Printed in China.
7. Fly Safe
It’s important to understand basic ight guidelines, for the safety of both you and
those around you. Don't forget to read the Disclaimer and Safety Guidelines.

10
EN
Specications
Aircraft
Weight 905 g
Max Speed 44.7 mph (72 kph) in Sport mode without wind
Max Service Ceiling Above
Sea Level 19685 ft (6000 m)
Operating Temperature 14° to 104° F (-10° to 40° C)
GNSS GPS + GLONASS
Operating Frequency 2.4-2.4835 GHz; 5.725-5.850 GHz
Transmitter Power
(EIRP) 2.4 GHz
FCC: ≤26 dBm; CE/MIC: ≤20 dBm; SRRC: ≤20 dBm
5.8 GHz
FCC: ≤26 dBm; CE: ≤14 dBm; SRRC: ≤26 dBm
Gimbal
Controllable Range Pitch: -90° to +30°
Camera
Sensor 1/2.3" CMOS; Eective pixels: 12M
Lens FOV: approx. 83° (24 mm), approx. 48° (48 mm)
35 mm format equivalent: 24-48 mm
Aperture: f/2.8 (24 mm) - f/3.8 (48 mm)
Focus: 0.5 m to ∞
ISO Range Video: 100-3200
Photo: 100-1600 (auto); 100-3200 (manual)
Electronic Shutter Speed 8-1/8000 s
Max Image Size 4000×3000
Still Photography Modes Single shot
Burst shooting: 3/5/7 frames
Auto Exposure Bracketing (AEB): 3/5 bracketed frames at 0.7 EV Bias
Interval
Video Recording Modes 4K Ultra HD: 3840×2160 24/25/30p
2.7K: 2688×1512 24/25/30/48/50/60p
FHD: 1920×1080 24/25/30/48/50/60/120p
Video Storage Bitrate 100 Mbps
Photo JPEG, DNG (RAW)
Video MP4, MOV (MPEG-4 AVC/H.264, HEVC)
Supported SD Cards microSD
Max Capacity: 128 GB (UHS-I Speed Grade 3 rating required)
Remote Controller
Operating Frequency 2.4-2.4835 GHz; 5.725-5.850 GHz
Max Transmission Distance
(Unobstructed and free of
interference) FCC: 5 mi (8 km); CE/MIC: 3.1 mi (5 km); SRRC: 3.1 mi (5 km)
Operating Temperature 32° to 104° F (0° to 40° C)
Battery 3950mAh @ 3.83V

11
EN
For more information, read the User Manual:
http://www.dji.com/mavic-2
※ This content is subject to change without prior notice.
MAVIC is a trademark of DJI.
Copyright © 2018 DJI All Rights Reserved. Designed by DJI. Printed in China.
Transmitter Power
(EIRP) 2.4 GHz
FCC: ≤26 dBm; CE/MIC: ≤20 dBm; SRRC: ≤20 dBm
5.8 GHz
FCC: ≤26 dBm; CE: ≤14 dBm; SRRC: ≤26 dBm
Operating Voltage 1800mA @ 3.83V (when charging the mobile device)
Supported Mobile Device
Size Thickness supported: 6.5 - 8.5 mm, Max length: 160 mm
Supported USB port types: Lightning, Micro USB (Type-B)
USB-C
Charger
Voltage 17.6±0.1 V
Rated Power 60 W
Intelligent Flight Battery
Capacity 3850 mAh
Voltage 17.6 V (max)
15.4 V (typical)
Battery Type LiPo 4S
Energy 59.29 Wh
Net Weight Approx. 297 g
Charging Temperature
Range 41° to 104° F (5° to 40° C)
Max Charging Power 80 W

12
DE
Fluggerät
Die DJITM MAVICTM 2 Zoom verfügt über ein omnidirektionales Sichtsystem, Infrarotsensorsystem und
eine voll stabilisierte 3-Achsen-Gimbal-Kamera, derem Objektiv mit 2-fachem optischen Zoom 24 –
48 mm entspricht und Videos mit 4K aufzeichnet, sowie Fotos mit 12 MP aufzeichnen kann. Es wird
bis ein bis zu vierfacher verlustfreier Zoom bei Aufzeichnungen in FHD unterstützt. Mit exklusiven DJI
Technologien wie der Hinderniserkennung sowie intelligenten Flugmodi wie Hyperlapse, ActiveTrackTM
2.0, QuickShot und Panorama oder auch fortschrittlichen Assistenzsystemen für den Piloten,
gelingen selbst komplexe Aufnahmen mühelos. Die Mavic 2 Zoom besticht durch eine maximale
Fluggeschwindigkeit von 72 km/h und eine maximale Flugzeit** von 31 Minuten.
13
14
19
18
16
17
15
20
1
2
3
4
56
7
8
910
11
12
1. Gimbal und Kamera
2. Vorwärts gerichtetes
Sichtsystem
3. Abwärts gerichtetes
Sichtsystem
4. Seitliches Sichtsystem
5. Nach unten gerichtetes
Infrarotsensorsystem
6. Hilfsbeleuchtung
7. Einschub für die Micro-SD-
Karte
8. Vordere LEDs
9. Motoren
* Die Sicht- und Infrarotsensorsysteme reagieren empndlich auf die Umgebungsbedingungen. Näheres erfahren
Sie im Haftungsausschluss, in den Sicherheitsvorschriften, in der Bedienungsanleitung und in den Video-Tutorials
in der DJI GOTM 4 App oder auf der ofziellen DJI-Website. http://www.dji.com/mavic-2
** Die maximale Flugzeit wurde ohne Wind und bei einer konstanten Geschwindigkeit von 25 km/h getestet. Dieser
Wert dient nur als Referenz.
10. Propeller
11. Antennen
12. Statusanzeige des Fluggeräts
13. Nach oben gerichtete
Infraroterkennung
14. Rückwärts gerichtetes Sichtsystem
15. Intelligent Flight Battery
16. Akkuladezustands-LED
17. Ein/Aus-Taste
18. Batterieklammern
19. USB-C-Anschluss
20. Koppeltaste/
Kopplungsstatus-LED

13
DE
12 13
14 15
17
16
18
Fernsteuerung
In die Fernbedienung integriert ist DJIs Langstrecken-Übertragungstechnologie OCUSYNCTM 2.0, die
eine maximale Übertragungsweite von 8 km und die Videoübertragung vom Fluggerät an die DJI GO 4
App auf Ihrem Mobilgerät mit bis zu 1080p ermöglicht. Das integrierte LCD-Display liefert in Echtzeit
wichtige Informationen zum Fluggerät, und die abnehmbaren Steuerknüppel erleichtern das Verstauen.
Maximale Betriebszeit: 2 Std. und 15 Minuten*
1. LCD-Bildschirm
2. Flugpausentaste
3. 5D-Taste
4. Abnehmbare Steuerknüppel
5. Ein/Aus-Taste
6. Antennen
7. Rückkehrtaste
8. Staufach für Steuerknüppel
9. USB-Anschluss (Assistant
Video-Downlink)
10. Mobilgeräteklammer
11. Flugmodusschalter
12. Gimbal-Rädchen
13. Zoom-Einstellrädchen
14. Videotaste
15. Taste für Fokus/Verschluss
16. Video-Downlink-/Lade-Anschluss
(Micro-USB)
17. C1-Taste (frei belegbar)
18. C2-Taste (frei belegbar)
Zusammengeklappt
* Die Fernsteuerung erreicht ihre maximale Übertragungsreichweite (FCC) auf oenem Gelände ohne elektromagnetische
Störquellen bei einer Flughöhe von ca. 120 m.
Die maximale Laufzeit wurde unter Laborbedingungen getestet. Dieser Wert dient nur als Referenz.
1
3
4
6
7
2
8
9
10
11
5

14
DE
DJI GO 4 ist mit iOS 9.0 (oder höher) sowie Android 4.4 (oder höher) kompatibel.
1. Die DJI GO 4 App herunterladen und Video-Tutorials ansehen
Suchen Sie im App Store oder auf Google Play nach „DJI GO 4“
oder scannen Sie den QR-Code, um die App auf Ihr Mobilgerät
herunterzuladen.
Sehen Sie sich die Video-Tutorials auf www.dji.com/mavic-2 oder in der
DJI GO 4 App durch Tippen auf das Symbol in der oberen rechten Ecke
des Bildschirms an.
2. Fluggerät vorbereiten
Entfernen Sie die Gimbal-
Abdeckung von der Kamera.
Klappen Sie die
vorderen Arme aus.
Klappen Sie die
hinteren Arme aus.
Ausgeklappt
Klappen Sie die vorderen Arme und die Propeller aus, bevor Sie die hinteren Arme ausklappen.
Vor dem Losiegen müssen alle Arme und Propeller ausgeklappt sein.
1
2
3
1
2
3
Drücken Sie die Propeller
herunter, und drehen Sie sie in
die Verriegelungsrichtung.
Ordnen Sie die Propeller
den richtigen Motoren zu.
Markiert Nicht markiert
Video-Tutorials
DJI GO 4

15
DE
B
A
A
B
Das Fernsteuerungskabel muss vor dem Auaden entfernt werden.
3. Die Akkus laden
Verwenden Sie das im Lieferumfang enthaltene
Ladegerät, um die Intelligent Flight Battery vor der
ersten Verwendung vollständig aufzuladen.
Intelligent Flight Battery entnehmen.
Ladezeit:
ca. 1 Std. 30 Minuten
Ladezeit:
ca. 2 Std. 15 Minuten
Steckdose
100 – 240 V
Niedrig
Hoch
Ladezustand prüfen und Ein/Ausschalten
Drücken Sie die Taste einmal, um den Akku-
Ladezustand zu überprüfen.
Drücken Sie die Taste einmal kurz und dann
lang, um das Gerät ein-/auszuschalten.
Drücken Sie die Taste einmal, um den
Akkuladezustand auf dem LCD-Display zu
überprüfen.
Drücken Sie die Taste noch einmal,
und halten Sie sie gedrückt, um die
Fernsteuerung ein-/auszuschalten.

16
DE
1
Stellen Sie sicher, dass die Steuerknüppel fest montiert sind.
Das Fernsteuerungskabel mit dem Lightning-Anschluss ist standardmäßig montiert. Verwenden
Sie zur Verbindung mit der Fernsteuerung das richtige Kabel für Ihr Mobilgerät. Wenn Sie ein
iPad oder Tablet verwenden, nutzen Sie den USB-Anschluss der Fernsteuerung.
Verwenden Sie die Micro-USB- und USB-Anschlüsse nie gleichzeitig für die Videoverbindung.
4. Fernsteuerung vorbereiten
Klappen Sie die Antennen und die Mobilgeräteklammern
auf, und montieren Sie die Steuerknüppel.
Stecken Sie ein Ende des RC-Kabels in das
Ende des Schlitzes.
Sichern Sie Ihr Mobilgerät mit den Klammern.
Stellen Sie die Antennen
parallel zueinander ein
Optimaler Sendebereich
Stark
Schwach
2
3

17
DE
DJI GO 4
App
6. Flug
Ready to Go (GPS)
ODER
Automatisches Starten
Linken Knüppel langsam
nach oben bewegen,
um zu starten
Drücken Sie den linken Knüppel nach unten
(langsam), bis das Fluggerät den Boden berührt.
Einige Sekunden halten, um die Motoren
auszuschalten
Automatisches Landen
Vergewissern Sie sich vor dem Losiegen, dass die
Statusleiste in DJI GO 4 „Bereit“ anzeigt.
Knüppelkombination zum Ein-/
Ausschalten der Motoren
Automatisches Starten/Landen
Die Motoren können während des Fluges nur gestoppt werden, wenn der Flugcontroller einen
kritischen Fehler erkennt.
5. Vorbereitung für den Start
Fernsteuerung einschalten Fluggerät einschalten DJI GO 4 starten
Verwenden Sie Ihr DJI-Konto, um das Fluggerät zu aktivieren. Für die Aktivierung wird eine
Internetverbindung benötigt.
Internet

18
DE
Die Fernsteuerung verwenden
In DJI GO 4
Linker Knüppel
Steigflug
Sinkflug
Linksdrehung Rechtsdrehung
Rechter Knüppel
Vorwärts
Rückwärts
Links Rechts
QuickShot
TapFlyWegpunkte
Bewegter ZeitrafferNormal
Point of Interest
ActiveTrack
Cinematic
Die Standard-Flugsteuerung wird als Modus 2 bezeichnet. Mit dem linken Steuerknüppel steuern
Sie die Höhe und Flugrichtung des Fluggeräts, und mit dem rechten Steuerknüppel steuern Sie ihre
Vorwärts-, Rückwärts-, Links- oder Rechtsbewegung. Mit dem Gimbal-Rädchen wird die Neigung
der Kamera verstellt.
Drücken Sie die Taste „Flugpausentaste“ zur Notbremsung während des Fluges.
Näheres erfahren Sie in den Tutorials in der DJI GO 4 App oder auf der ofziellen DJI-Website.
Stellen Sie vor jedem Start immer eine geeignete Höhe für die Rückkehrfunktion ein. Wenn das
Fluggerät zum Startpunkt zurückkehrt, sollten Sie es mit den Steuerknüppeln korrigieren, falls
nötig.
Other manuals for MAVIC 2 ZOOM
3
Table of contents
Languages:
Other dji Quadcopter manuals

dji
dji MAVIC MINI User manual

dji
dji Matrice 100 User manual

dji
dji Phantom 2 Vision + User manual

dji
dji Phantom 3 Advanced User manual

dji
dji Mini 2 User manual

dji
dji PHANTOM Instruction manual

dji
dji GeoSnap PPK Quick setup guide

dji
dji FPV Series Operating instructions

dji
dji Phantom 2 Vision + User manual

dji
dji Flamewheel F450 User manual

dji
dji Phantom 1 User manual

dji
dji Tello User manual

dji
dji Matrice 100 User manual

dji
dji MATRICE 30 Series User manual

dji
dji Air 2S User manual

dji
dji Matrice 100 User manual

dji
dji Phantom 2 Vision + User manual

dji
dji FlameWheel 550 User manual

dji
dji PHANTOM 3 PROFESSIONAL User manual

dji
dji Flamewheel F450 User manual