dji Inspire 1 Pro User manual

INSPIRE 1 PRO
V1.0
2015.12
User Manual

2
©2015 DJI. All Rights Reserved.
Using this manual
Legends
Warning Important Hints and Tips Reference
Before Flight
The following tutorials and manuals have been produced to ensure you to make full use of your Inspire 1
Pro.
1. In the Box
2. Safety Guidelines and Disclaimer
3. Quick Start Guide
4. Intelligent Flight Battery Safety Guidelines
5. User Manual
Watching all the tutorial videos and reading the Disclaimer before ight is recommended. Afterwards,
prepare for your rst ight by using the Quick Start Guide. Refer to this manual for more comprehensive
information.
Watch the video tutorials
Please watch the tutorial video below to learn how to use Inspire 1 Pro correctly and safely:
http://www.dji.com/product/inspire-1-pro-and-raw/video
Download the DJI GO app
Download and install the DJI GO app before use. Scan the QR code or visit
“http://m.dji.net/djigo” to download the app.
For the best experience, use mobile device with Android V 4.1.2 or above. Requires iOS 8.0 or later.
Searching for Keywords
Search for keywords such as “battery” and “install” to nd a topic. If you are using Adobe Acrobat
Reader to read this document, press Ctrl+F on Windows or Command+F on Mac to begin a search.
Navigating to a Topic
View a complete list of topics in the table of contents. Click on a topic to navigate to that section.

©2015 DJI. All Rights Reserved.
3
Contents
Using this manual 2
Legends 2
Before Flight 2
Watch the video tutorials 2
Download the DJI GO app 2
Product Prole 5
Introduction 6
Feature Highlights 6
Assemble the Aircraft 6
Installing the Gimbal and Camera 7
Aircraft Diagram 11
Remote Controller Diagram 11
Aircraft 13
Flight Controller 14
Flight Mode 14
Flight Status Indicator 14
Return to Home (RTH) 15
Dynamic Home Point 17
Vision Positioning System 18
Flight Recorder 20
Attaching and Detaching the Propellers 20
DJI Intelligent Flight Battery 20
Remote Controllers 25
RemoteControllerProle 26
Remote Controller Operations 26
Dual Remote Controllers Mode 31
Remote Controller Status LED 33
Linking the Remote Controller 34
Remote Controller Compliance Version 36
Used with the DJI Focus 36

4
©2015 DJI. All Rights Reserved.
INSPIRE 1 PRO User Manual
Gimbal and Camera 37
CameraProle 38
Status LED 39
Gimbal 40
DJI GO App 43
Camera 44
Library 48
Explore 48
Me 48
Flight 49
Flight Environment Requirements 50
Flight Limits and Flight Restriction Area 50
PreightChecklist 54
Calibrating the Compass 54
Auto Take-off and Auto Landing 55
Flight Test 56
Starting/Stopping the Motors 56
FAQ 58
Appendix 61
Specications 62
Intelligent Flight 66
How to Update Firmware 66
FCC Compliance 68

©2015 DJI. All Rights Reserved.
5
Product Prole
This chapter describes the features of
Inspire 1 Pro, instructs you to assemble
the aircraft and explains the components
on the aircraft and remote controllers.

6
©2015 DJI. All Rights Reserved.
Product Prole
Introduction
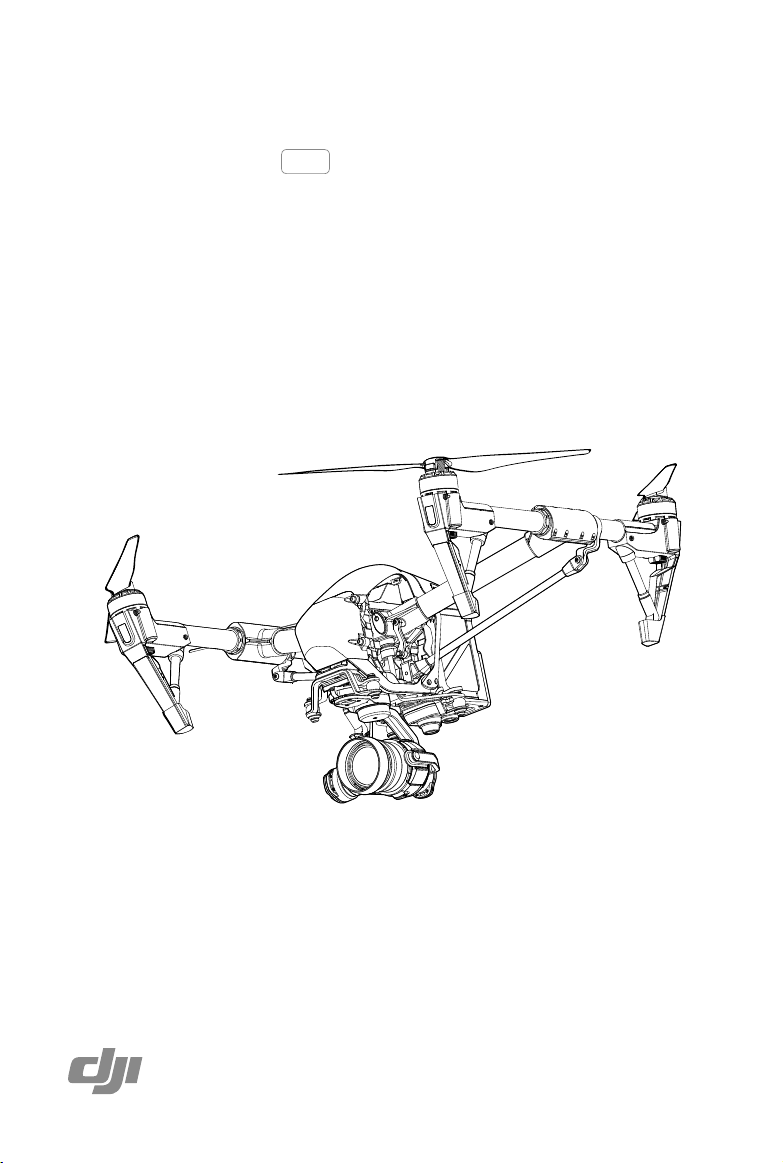
The Inspire 1 Pro is brand new quadcopter capable of capturing 4K video and transmitting an HD video
signal (up to 5km) to multiple devices straight out of the box. Equipped with retractable landing gear, it
can capture an unobstructed 360 degree view from its camera. The built-in camera has an integrated
gimbal to maximize stability and weight efficiency while minimizing space. When no GPS signal is
available, Vision Positioning technology provides hovering precision.
Feature Highlights
The Inspire 1 Pro is a professional aerial lmmaking and photography platform that is ready to y right out
of the box. Featuring an onboard camera equipped with a 15mm f/1.7 (35 mm format equivalent 30 mm)
lens and 3-axis stabilized gimbal, it shoots sharp 16mp stills and stable video at up to 4K. Its retractable
landing gear pulls up out of view, giving the camera an unobstructed 360 degree view of the world below.
HD Video Downlink: Low latency, HD downlink powered by an enhanced version of the DJI Lightbridge
system. It also provides dual controllers mode.
Landing gear: Retractable landing gear that enables an unobstructed panoramic view from the camera.
DJI Intelligent Flight Battery: 4500 mAh DJI Intelligent Flight Battery employs new battery cells and a
battery management system.
Flight Controller: The next generation ight controller system provides a more reliable ight experience.
A new ight recorder stores the ight data from each ight, and Vision Positioning enhances hovering
precision when no GPS is available.
Assemble the Aircraft
Unlocking Travel Mode
The aircraft is in Travel Mode during delivery. Follow these steps to change it to Landing Mode before
your rst ight:
1. Insert the Intelligent Flight Battery into the battery compartment.
2. Power on the Remote Controller and the Intelligent Flight Battery.
3. Toggle the Transformation Switch up and down at least four times.
4. Power off the aircraft.
Travel Mode Toggle×4 Landing Mode

©2015 DJI. All Rights Reserved.
7
INSPIRE 1 PRO User Manual
Battery must be fully charged before using it for the rst time. Refer to "Charging the Intelligent
Flight Battery" (P23) for more information .
If you have purchased the dual remote controller version, you must use the Master remote
controller to deactivate Travel Mode. Refer to "Setting Up Dual Remote Controllers Mode" (P32)
section for more information about Master remote controller.
Be sure to remove the gimbal from the aircraft before switch from Landing Mode to Travel Mode.
Place the aircraft on the smooth and reective surface (e.g. table or tile) before switching between
the travel modes to the landing mode. Do not place the aircraft on the rough and sound-absorbing
surface (e.g. carpet) before switching between the travel modes and landing mode.
Installing the Gimbal and Camera
The following steps use the DJI MFT 15mm f/1.7 ASPH as illustration of how to mount the camera lens to
the camera body. Be sure to power off the battery before installation.
1. Remove the camera body cap.
2. While holding down the Lens Release Button, rotate the Lens Lock clockwise to unlock it.
3. Remove the lens cap and rear cap.
The Zenmuse X5 currently supports the following lenses, and will support more lenses in the
future.
DJI MFT 15mm f/1.7 ASPH
Panasonic Lumix G Leica DG Summilux 15mm f/1.7 ASPH
Olympus M.Zuiko Digital ED 12mm f/2.0
Olympus M.Zuiko 17mm f/1.8 (Balancing ring will be available on the DJI Store soon)
Lens Release Button
1
2
3

8
©2015 DJI. All Rights Reserved.
INSPIRE 1 PRO User Manual
To remove the camera lens, power off the battery and then:
1. While holding down the Lens Release Button, rotate the Lens Lock clockwise to unlock it.
2. While holding down the Lens Release Button, rotate the camera lens counterclockwise to detach it.
Lens Release Button
It is recommended to wrap the dust cover around the lens for aerial applications. The DJI
specied dust cover can be installed on the DJI MFT 15mm f/1.7 ASPH and the Panasonic
Lumix G Leica DG Summilux 15mm f/1.7 ASPH. Purchase an appropriate dust cover for the
Olympus M.Zuiko Digital ED 12mm f/2.0 if necessary.
It is important to tighten the Lens Lock after attaching the camera lens, as this can reduce the
vibrations of the lens when the aircraft is moving in ight. Always loosen the Lens Lock before
attaching and detaching the camera lens.
A lter can be installed in place of the Camera Balancing Ring. Remember to use a lter that
fullls the weight requirement.
The Lens Hood can only be installed on the DJI MFT 15mm f/1.7 ASPH or Panasonic Lumix G
Leica DG Summilux 15mm f/1.7 ASPH. DO NOT install the Lens Hood on the Olympus M.Zuiko
Digital ED 12mm f/2.0.
Be sure to set the lens to AF mode.
Always hold down the Lens Release Button before rotating the Lens Lock to unlock it.
Lens Hood
Balancing Ring (or Filter)
6
7
Micro-SD
Click
5
4
4. Align the two Lens Mount Indexes on the camera body and camera lens, and insert the camera lens
into the body of the camera.
5. Rotate the camera lens clockwise until you hear a click.
6. Rotate the Lens Lock counterclockwise to lock it.
7. Mount the Balancing Ring (or a lter) and the Lens Hood.
8. Insert the Micro SD card.

©2015 DJI. All Rights Reserved.
9
INSPIRE 1 PRO User Manual
Filters must have a weigh 7 - 11 g, with those weighing 10 - 11 g performing the best.
Outside this range, the lter will decrease gimbal performance. DJI MFT 15mm f/1.7 ASPH
supports lters have a size of 46mm. The Balancing Ring must be installed on the camera
lens when a lter is not used.
Be careful not to damage the Gimbal Connector and its metal contacts when attaching or storing
the Zenmuse X5.
Attach the Zenmuse X5
Ensure to power off the aircraft.
1. Rotate the Gimbal Lock to the unlocked position.
2. Align the key on the damping plate with the slot on the gimbal’s pan motor.
3. While aligning the white lines on the Gimbal Connector and Gimbal Lock, insert the Gimbal Connector.
4. Rotate the Gimbal Lock to the locked position.
24
Key
Slot
3
1

10
©2015 DJI. All Rights Reserved.
INSPIRE 1 PRO User Manual
Preparing Remote Controller
Tilt the Mobile Device Holder to the desired position then adjust the antenna as shown.
1. Press the button on the side of the Mobile Device Holder to release the clamp, adjust it to t then attach
your mobile device.
2. Connect your mobile device to the remote controller with a USB cable.
3. Plug one end of the cable into your mobile device, and the other end into the USB port on the back of
the remote controller.
Attaching 1345T Quick-Release Propellers
Following the steps below to attach the 1345T Quick-Release propellers.
1. Pair the propellers and motors with arrows of the same color (red or white).
3
12
Propeller Lock
Rotate the propeller lock until
the arrows are aligned and you
hear a click.
Attach the propeller onto
the motor.
Once again, rotate the propeller
lock until you hear a click.

©2015 DJI. All Rights Reserved.
11
INSPIRE 1 PRO User Manual
Aircraft Diagram
[1]
[2]
[3]
[4]
[5]
[6]
[7]
[8]
[9]
[10 ]
[11 ]
[12 ]
[13 ]
GPS
Propeller (P20)
Motor
Front LED (P14)
Landing gear
Gimbal and Camera (P37)
Intelligent Flight Battery (P20)
Aircraft Micro-USB Port
Rear LED (P14)
Camera Micro-USB Port
Camera Micro-SD Card Slot (P38)
Vision Positioning Sensors (P18)
Aircraft Status Indicator (P15)
Remote Controller Diagram
[1] Antennas (P31)
Relays aircraft control and video signal.
[2] Mobile Device Holder
Mounting place for your mobile device.
[3] Control Stick
Controls aircraft orientation.
[4] Return Home (RTH) Button (P15)
Press and hold the button to initiate Return to
Home (RTH).
[5] Transformation Switch (P29)
Toggle the switch up or down to raise or lower
the landing gear.
[1]
[2]
[4]
[5]
[6]
[7]
[8]
[9]
[3]
[12]
[13]
[7]
[8]
[10] [11] [9]
[1]
[2]
[3]
[4]
[5]
[6]

12
©2015 DJI. All Rights Reserved.
INSPIRE 1 PRO User Manual
[6] Battery Level LEDs
Displays the current battery level.
[7] Status LED
Displays the power status.
[11]
[12]
[16] [17] [18] [19]
[10]
[13]
[14]
[15]
[8] Power Button
Used to power on or power off the remote controller.
[9] RTH LED
Circular LED around the RTH button displays RTH status.
[10] Camera Settings Dial
Turn the dial to adjust camera settings.
Only functions when the remote controller is
connected to a mobile device running the DJI
GO app.
[11] Playback Button
Playback the captured images or videos.
[12] Shutter Button
Press to take a photo. If in burst mode, the
set number of photos will be taken with one
press.
[13] Flight Mode Switch
Used to switch between P, A and F mode.
[14] Video Recording Button
Press to start recording video. Press again to
stop recording.
[15] Gimbal Dial
Use this dial to control the tilt of the gimbal.
[16] Mini-HDMI Port
Connect an HD compatible monitor to this
port to get a live HD video preview of what the
camera sees.
[17] Micro-USB Port
For connecting the remote controller to your
computer.
[18] CAN Bus Port
Reserved for future use.
[19] USB Port
Connect to mobile device to access all of the
DJI GO app controls and features.
[20]
[21]
[22]
[23]
[20] GPS Module
Used to pinpoint the location of the remote
controller.
[21] Back Left Button
Customizable button in DJI GO app.
[22] Power Port
Connect to a power source to charge the
remote controller’s internal battery.
[23] Back Right Button
Customizable button in DJI GO app.

©2015 DJI. All Rights Reserved.
13
Aircraft
This chapter describes the features of
the Flight Controller, Vision Positioning
System and the Intelligent Flight Battery.

14
©2015 DJI. All Rights Reserved.
Flight Status Indicator
The Inspire 1 Pro comes with the Front LED, Rear LED and Aircraft Status Indicator. The positions of these
LEDs are shown in the gure below:
The Front and Rear LED show the orientation of the aircraft. The Front LED displays solid red and the
Rear LED displays solid green.
Aircraft Status Indicator shows the system status of the ight controller. Refer to the table below for more
information about the Aircraft Status Indicator:
Aircraft
Flight Controller
The Inspire 1 Pro’s ight controller is based on DJI ight controller with several enhancements such
as new ight mode and new safe mode. Three safe modes are available: Failsafe, Return Home and
Dynamic Home Point. These features ensure the safe return of your aircraft if the control signal is lost. A
ight recorder stores crucial ight data for each ight.
Flight Mode
Three ight modes are available. The details of each ight mode are found in the section below:
P mode (Positioning) : P mode works best when GPS signal is strong. There are three different states of
P mode, which will be automatically selected by the Inspire 1 Pro depending on GPS signal strength and
Vision Positioning sensors:
P-GPS: GPS and Vision Positioning both are available, and the aircraft is using GPS for positioning.
P-OPTI: Vision Positioning is available but the GPS signal is not. Aircraft is using only Vision
Positioning for hovering
P-ATTI: Neither GPS or Vision Positioning available, aircraft is using only its barometer for positioning,
so only altitude is controlled.
A mode (Attitude): The GPS and Vision Positioning System is not used for holding position. The aircraft
only uses its barometer to maintain altitude. If it is still receiving a GPS signal, the aircraft can automatically
return home if the Remote Controller signal is lost and if the Home Point has been recorded successfully.
F mode (Function): Intelligent Orientation Control (IOC) is activated in this mode. For more information
about IOC, refer to the IOC in Appendix.
Use the Flight Controller mode switch to change the ight mode of the aircraft, refer to the “Flight
Mode Switch” on P29 for more information.
Front LED Rear LED
Aircraft Status Indicator

©2015 DJI. All Rights Reserved.
15
INSPIRE 1 PRO User Manual
Aircraft Status Indicator Description
Normal
Red, Green and Yellow Flash
Alternatively Power on and self-check
Green and Yellow Flash Alternatively Aircraft warming up
Green Flashes Slowly Safe to Fly (P mode with GPS and Vision Positioning)
X2 Green Flashes Twice Safe to Fly (P mode with Vision Positioning but without GPS)
Yellow Flashes Slowly Safe to Fly (A mode but No GPS and Vision Positioning)
Warning
Fast Yellow Flashing Remote Controller Signal Lost
Slow Red Flashing Low Battery Warning
Fast Red Flashing Critical Low Battery Warning
Red Flashing Alternatively IMU Error
—
Solid Red Critical Error
Red and Yellow Flash Alternatively Compass Calibration Required
Return to Home (RTH)
The Return to Home (RTH) brings the aircraft back to the last recorded Home Point. There are three cases
that will trigger RTH procedure; they are Smart RTH, Low Battery RTH and Failsafe RTH.
GPS Description
Home Point
The Home Point is the location at which your aircraft takes off when the
GPS signal is strong. You can view the GPS signal strength through
the GPS icon ( ). If you are using the Dynamic Home Point
setting, the Home Point will be updated to your current position as you
move around and when the Aircraft Status Indicator blinks green.
Smart RTH
Using the RTH button on the remote controller (refer to “RTH button” on P30 for more information) or the
RTH button in the DJI GO app when GPS is available to enables smart RTH. The aircraft return to the
latest recorded Home Point, you may control the aircraft's orientation to avoid collision during the Smart
RTH. Press the Smart RTH button once to start the process, press the Smart RTH button again to exit
Smart RTH and regain the control.

16
©2015 DJI. All Rights Reserved.
INSPIRE 1 PRO User Manual
Battery Level
Warning Remark Aircraft Status
Indicator DJI GO app Flight Instructions
Low battery
level warning
The battery
power is low.
Please land the
aircraft.
Aircraft status
indicator blinks
RED slowly.
Tap “Go-home” to have
the aircraft return to the
Home point and land
automatically, or “Cancel” to
resume normal ight. If no
action is taken, the aircraft
will automatically go home
and land after 10 seconds.
Remote controller will sound
an alarm.
Fly the aircraft
back and land
it as soon as
possible, then
stop the motors
and replace the
battery.
Critical Low
battery level
warning
The aircraft
must land
immediately.
Aircraft status
indicator blinks
RED quickly.
The DJI GO app screen will
ash red and aircraft starts to
descend. Remote controller
will sound an alarm.
The aircraft
will begin to
descend and land
automatically.
Estimated
remaining
ight time
Estimated
remaining ight
based on current
battery level.
N/A N/A N/A
Low Battery RTH
The low battery level failsafe is triggered when the DJI Intelligent Flight Battery is depleted to a point that
may affect the safe return of the aircraft. Users are advised to return home or land the aircraft immediately
when these warnings are shown. DJI GO app will advise user to return the aircraft to the Home Point
when low battery warning is triggered. Aircraft will automatically return to the Home Point if no action is
taken after 10 seconds countdown. User can cancel the RTH by pressing once on the RTH button. The
thresholds for these warnings are automatically determined based on the current aircraft altitude and its
distance from the Home Point.
Aircraft will land automatically if the current battery level can only support the aircraft to land to the ground
from the current altitude. User can use the remote controller to control the aircraft’s orientation during the
landing process.
The Battery Level Indicator is displayed in the DJI GO app, and is described below
Battery level indicator
Critical Low battery level
warning(Red)
Low battery
level warning
Sufcient battery
level(Green)
Remaining ight time
Power requires
to return home

©2015 DJI. All Rights Reserved.
17
INSPIRE 1 PRO User Manual
Aircraft automatically descends and lands if RTH is triggered when the aircraft ies within a 20
meter (65 feet) radius of the Home Point.
Aircraft cannot avoid obstruction during the Failsafe RTH, therefore it is important to set an
reasonable Failsafe altitude before each ight. Launch the DJI GO app and enter “Camera”
view and select “MODE” to set the Failsafe altitude.
Aircraft will stop ascending and immediately return to the Home Point if you move the throttle
stick if the aircraft reaches 20 m altitudes or beyond during Failsafe.
When the critical battery level warning activates and the aircraft is descending to land
automatically, you may push the throttle upward to hover the aircraft and navigate it to a more
appropriate location for landing.
Color zones and markers on the battery level indicator reect estimated remaining ight time
and are adjusted automatically, according to the aircraft’s current status.
Failsafe RTH
Failsafe RTH is activated automatically if remote controller signal (including video relay signal) is lost for
more than 3 seconds provided that Home Point has been successfully recorded and compass is working
normally. Return home process may be interrupted and the operator can regain control over the aircraft if
a remote controller signal is resumed.
Failsafe Illustration
GPS
Dynamic Home Point
Dynamic home point is useful in situations when you are in
motion and require a Home Point that is different from the
takeoff point. GPS module is located at the position shown in
the gure below:
Ensure the space above the GPS module is not
obstructed when using Dynamic Home Point.
5 Go Home(20m can be set)
Fast Blinking Yellow
1 Record Home Point (HP)
Blinking Green
3 Remote Controller Signal Lost
Fast Blinking Yellow
2 Conrm Home Point
Blinking Green
6 Landing after Hovering 15secs
Fast Blinking Yellow
4
Signal Lost Lasts 3secs.
Fast Blinking Yellow
Height over HP>20m
Elevate to 20m
Height over HP<=20m
20m

18
©2015 DJI. All Rights Reserved.
INSPIRE 1 PRO User Manual
There are two options for Dynamic Home Point.
1. Set the aircraft current coordinate as the new Home Point.
2. Set the remote controller’s coordinate as the new Home Point.
Setting Up Dynamic Home Point
Follow the steps below to setup Dynamic Home Point:
1. Connect to the mobile device and launch the DJI GO app and go to the “Camera” page.
2. Tap“ ”and select“ ”, to reset the remote controller’s coordinates as the new Home Point.
3. Tap“ ”and select“ ”, to reset the aircraft’s coordinates as the new Home Point.
4. The aircraft status indicator blinks green to show Home Point is set successfully.
Vision Positioning System
DJI Vision Positioning is a positioning system that uses ultrasonic and image data to help the aircraft
identify its current position. With the help of Vision Positioning, your Inspire 1 Pro can hover in place
more precisely and y indoors or in other environments where there is no GPS signal available. The main
components of DJI Vision Positioning are located on the bottom of your Inspire 1 Pro, including [1]two
sonar sensors and[2]one monocular camera.
Using Vision Positioning
Vision Positioning is activated automatically when the Inspire 1 Pro is powered on. No manual action is
required. Vision Positioning is typically used in the indoor environment where no GPS is available. By
using the sensors on the Vision Positioning system, Inspire 1 Pro can perform precision hovering even
when no GPS is available.
[2]
[1]

©2015 DJI. All Rights Reserved.
19
INSPIRE 1 PRO User Manual
Follow the steps below to use Vision Positioning:
1. Toggle the switch to “P” as shown the gure to the right:
2. Place the Inspire 1 Pro on a flat surface. Notice that the Vision Positioning
system cannot work properly on surfaces without pattern variations.
3. Power on the Inspire 1 Pro. The aircraft status indicator will ash twice in green
light, which indicates the Vision Positioning system is ready. Gently push the
throttle up to lift off, and the Inspire 1 Pro will hover in place.
The performance of your Inspire 1 Pro’s Vision Positioning System is subject to the surface you are
ying over. The ultrasonic waves may not be able to accurately measure the distance over sound
absorbing materials, and the camera may not function correctly in suboptimal environments. The
aircraft will switch from “P” mode to “A” mode automatically if both GPS and Vision Positioning
System are not available. So operate the aircraft cautiously when in any of the following situations:
Flying over monochrome surfaces (e.g. pure black, pure white, pure red, pure green).
Flying over a highly reective surfaces.
Flying at high speeds (over 8m/s at 2 meters or over 4m/s at 1 meter).
Flying over water or transparent surfaces.
Flying over moving surfaces or objects.
Flying in an area where the lighting changes frequently or drastically.
Flying over extremely dark (lux < 10) or bright (lux > 10,000) surfaces.
Flying over surfaces that can absorb sound waves (e.g. thick carpet).
Flying over surfaces without clear patterns or texture.
Flying over surfaces with identical repeating patterns or textures (e.g. tiles with same design).
Flying over inclined surfaces that will deect sound waves away from the aircraft.
In the event of loss of remote controller’s signal, the aircraft will hover for 8 seconds and then
auto-land if it is in “P” mode.
Keep the sensors clean at all times. Dirt or other debris may adversely affect the effectiveness
of the sensors.
The effective hovering altitudes of the aircraft is from 0 to 2.5 meters.
Vision Positioning system may not function properly when the aircraft is ying over water.
Vision Positioning system may not be able to recognize pattern on the ground in low light
conditions (less than 100lux).
Do not use other ultrasonic devices with frequency of 40 KHz when Vision Positioning system is
in operation.
Vision Positioning system may not be able to stabilize the aircraft when flying close to the
ground (below 0.5 meters) in fast speed.
Keep the animals away from the aircraft when Vision Positioning system is activated. The sonar
sensor emits high frequency sound that is only audible to some animals.

20
©2015 DJI. All Rights Reserved.
INSPIRE 1 PRO User Manual
Intelligent Flight Battery Charger
Battery must be fully charged before using it for the rst time. Refer to "Charging the Intelligent
Flight Battery" P23 for more information.
Flight Recorder
Flight data is automatically stored in the internal storage device of the aircraft. User can gain access to
these data through the DJI GO app. This includes ight duration, orientation, distance, aircraft status
information, speed, and other parameters.
Attaching and Detaching the Propellers
Attaching the Propellers
Refer to "Attaching Propellers" on p10 for details.
Detaching the Propellers
Release the propeller lock and remover the propeller.
Check that the propellers and motors are installed correctly and rmly before every ight.
Ensure that all propellers are in good condition before each ight. DO NOT use old, chipped,
or broken propellers.
To avoid injury, STAND CLEAR of and DO NOT touch propellers or motors when they are spinning.
ONLY use original DJI propellers for a better and safer ight experience.
DJI Intelligent Flight Battery
The DJI Intelligent Flight Battery has a capacity of 4500mAh, voltage of 22.2V, and smart charge-
discharge functionality. It can only be charged with an appropriate DJI approved charger.
Other manuals for Inspire 1 Pro
5
Table of contents
Other dji Quadcopter manuals

dji
dji Matrice 100 User manual

dji
dji MAVIC PRO User manual

dji
dji Mavic 2 Enterprise User manual

dji
dji MAVIC PRO User manual

dji
dji Inspire 1 User manual

dji
dji Phantom 2 Vision + User manual

dji
dji SPARK User manual

dji
dji mavic User manual

dji
dji CINESSD Station User manual

dji
dji Phantom 3 Advanced User manual

dji
dji Matrice 200 Series V2 Instruction Manual

dji
dji AGRAS T16 User manual

dji
dji Phantom 3 Advanced User manual

dji
dji PHANTOM 4 User manual

dji
dji LIGHTBRIDGE User manual

dji
dji mavic Instruction Manual

dji
dji Phantom 1 User manual

dji
dji MAVIC MINI User manual

dji
dji MAVIC MINI User manual

dji
dji AGRAS MG-1S User manual