DL PD 900FR User manual

PD 900FR
Руководство по монтажу и обслуживанию устройств «антипаника», предназначенных для установки в дверях аварийных и
эвакуационных выходов
Istruzioni per l’installazione e la manutenzione dei dispositivi antipanico per uscite di sicurezza da consegnare all'utilizzatore
Assembling and maintenance instructions for panic exit devices for emergency exits to be delivered to the user
Instructions de montage et d'entretien des dispositifs anti-panique pour issues de secours à remettre à l'utilisateur
An den Benutzer auszuhändigende Montage- und Wartungsanleitung von Paniktürverschlüssen für Notausgänge
ВАЖНО - IMPORTANTE - IMPORTANT
IMPORTANT - WICHTIG
Безопасность устройства соответствует
требованиям стандартов NF EN 1125:2008, ГОСТ
31471-2011.
Внесение конструктивных изменений, не
описанных в настоящем руководстве,
запрещено.
Le caratteristiche di sicurezza per le persone di
questo prodotto sono di importanza fondamentale
ai fini della sua conformità alla NF EN 1125:2008.
Non sono ammesse modifiche di nessun tipo, fatta
eccezione per quelle che sono descritte in queste
istruzioni.
The safety features for persons are of paramount
importance for this product in order to ensure
compliance with the NF EN 1125:2008 Standard.
No modifications of any kind are permitted, except
for those described in these instructions.
Les caractéristiques de ce produit concernant la
sécurité des personnes sont d'une importance
fondamentale en vue de sa conformité à la norme
NF EN 1125:2008. Aucune modification n'est
admise, à l'exception de celles décrites dans les
présentes instructions.
Die Sicherheitsmerkmale des vorliegenden
Produktes für Personen sind für die
Übereinstimmung mit NF EN 1125:2008
wesentlich. Mit Ausnahme der in dieser Anleitung
beschriebenen Änderungen sind keine weiteren
Änderungen zulässig.
1
PROTEZIONE ANTIBATTERICA
Doorlock applica alla propria
gamma di dispositivi antipanico* ed
accessori, lo speciale trattamento
AntiGerm caratterizzato da
un'elevata azione antibatterica
(ANTIBACTERIAL PROTECTION).
Antigerm è composto da ioni
d'argento che vengono rilasciati
lentamente eliminando e inibendo
lo sviluppo di virus e batteri.
L'efficacia dell'azione antibatterica è
stata scientificamente testata,
AntiGerm, assolutamente sicura per
l'uomo, elimina in pochi minuti oltre
650 specie batteriche riducendo il
livello dei batteri di oltre il 99.99% .
*(eccetto per la versione inox/pvd)
ANTIBACTERIAL PROTECTION
Doorlock applies the special
AntiGerm treatment to its range of
antipanic devices and accessories,
whose features include a highly
effective antibacterial action
(ANTIBACTERIAL PROTECTION).
Antigerm contains silver ions that
are slowly released, eliminating and
preventing the development and
proliferation of virus and bacteria.
The efficacy of the antibacterial
protection has been scientifically
tested making AntiGerm completely
safe for human beings, whilst taking
just a few minutes to eliminate over
650 different species of bacteria,
reducing the bacteria level by over
99.99% .
*(except for the inox/pvd version)
PROTECTION ANTIBACTÉRIENNE
Doorlock soumet sa gamme de
dispositifs antipanique* et ses
accessoires au traitement AntiGerm
qui assure une importante action
anti-microbes (ANTIBACTERIAL
PROTECTION). Antigerm est un
composé à base de ions d'argent à
libération lente qui élimine les virus
et les bactéries en empêchant leur
développement. L'efficacité de
l'action anti-microbes de AntiGerm a
été scientifiquement éprouvée. Non
dangereux pour les êtres humains, il
élimine en quelques minutes plus
de 650 espèces de bactéries en
réduisant le niveau de microbes de
plus de 99.99%.
*(sauf pour la version inox/pvd)
ANTIBAKTERIELLER SCHUTZ
Doorlock verwendet für seine
Panikverschlüsse* und Zubehör die
spezielle durch eine hohe
antibakterielle Wirkung
charakterisierte AntiGerm-
Behandlung. AntiGerm besteht aus
Silberionen, die allmählich
freigegeben werden und die Bildung
von Viren und Bakterien verhindern.
Die antibakterielle Wirkung ist
wissenschaftlich nachgewiesen.
AntiGerm ist absolut unbedenklich
für den Menschen und eliminiert
innerhalb weniger Minuten 650
Bakterienspezies. Es werden
99,99% der Erreger abgetötet.
*(außer Version Inox/Pvd)
Сертификат ISO 22196 по результатам испытаний,
проведенных в независимых лабораториях IMSL в
Великобритании
Certificazione ISO 22196 come dimostrato nei test dei
laboratori indipendenti IMSL del Regno Unito
ISO 22196 Certification as per the results of the tests
conducted at the independent IMSL laboratories in the
United Kingdom
Certification ISO 22196 comme d'après les essais
effectués par des laboratoires indépendants IMSL du
Royaume Uni
Zertifizierung ISO 22196, wie nachgewiesen in Tests
der unabhängigen britischen Labors IMSL
0
2
1
3
4
5
6
7MRSA
0 6 12 18 24
0
2
1
3
4
5
6
7
0 6 12 18 24
0
2
1
3
4
5
6
7
0 6 12 18 24
0
2
1
3
4
5
6
7
0 6 12 18 24
Escherichia coli Salmonella enterica Legionella pneumophila
Без AntiGerm С AntiGerm
Время (часы)
Log CFU cm
10
2
АНТИБАКТЕРИАЛЬНАЯ ЗАЩИТА
Компания Дорлок применяет
специальную обработку AntiGerm в
своем ассортименте устройств
«антипаника» и аксессуаров к ним*,
которая включает в себя
высокоэффективное антибактериальное
воздействие (антибактериальную
защиту). AntiGerm содержит ионы
серебра, которые медленно
высвобождаются, устраняя и
предотвращая развитие и
распространение вирусов и бактерий.
Эффективность антибактериальной
защиты научно протестирована, что
делает AntiGerm полностью безопасной
для человека, позволяя за несколько
минут устранить более 650 различных
видов бактерий, уменьшая их уровень
более чем на 99.99 %.
*(за исключением версии Inox/pvd)
E
F
I
D
R
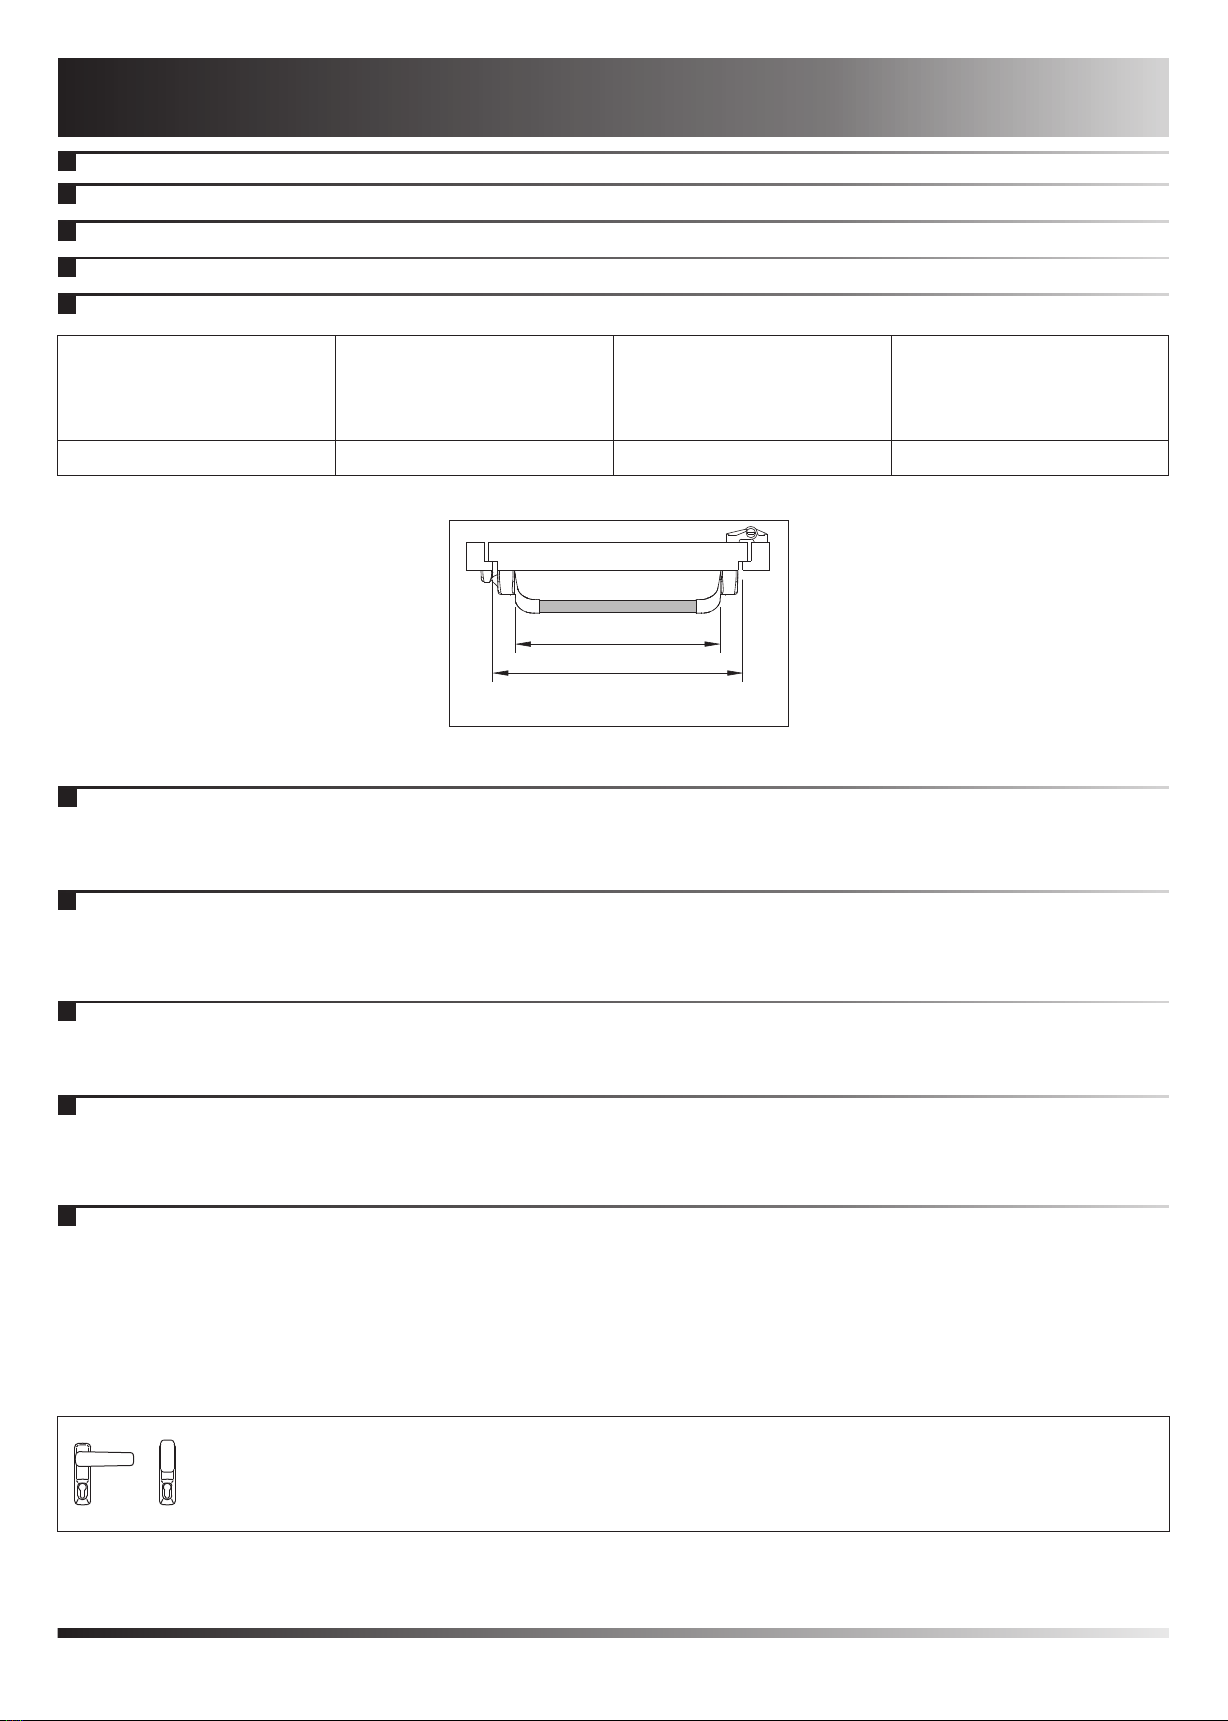
La lunghezza efficace della barra di azionamento, quota X, deve essere quanto più possibile prossima alla larghezza efficace della porta, quota Y, alla quale il
maniglione antipanico è destinato, in ogni caso, mai meno del 60% (vedi Fig.1).
Le ante della porta e i loro telai devono essere costituiti di materiale di sufficiente rigidità tale che eventuali distorsioni che si verifichino durante l’uso non siano
maggiori di 5 mm in qualunque posizione.
Il fissaggio del dispositivo sull’anta deve essere effettuato su materiale che garantisca la resistenza a trazione per ogni vite > di 1,5KN.
Рабочая длина (размер Х) перекладины должна быть максимально близка к рабочей ширине (размер Y) двери, на которую устанавливается настоящее
устройство, но в любом случае не менее 60% (см. Рисунок 1).
Полотна двери и дверные коробки должны быть изготовлены из материалов с достаточной жесткостью, чтобы возникающие во время эксплуатации
деформация не превышало 5 мм. в любом положении. Устройство крепится на полотно двери с помощью материалов, обеспечивающих прочность на
растяжении каждого винта > 1.5 KH.
The effective length (dimension X) of the bar shall be as near as possible to the effective width (dimension Y) of the door for which the device is intended, but never less
than 60 % (see Fig.1).
The door leaves and frames must be made of a material with sufficient rigidity to ensure that any distortions that occur during use can not exceed 5 mm in any position.
The device must be fitted to the door leaf using materials that guarantee a tensile strength for each screw of > 1,5KN.
La longueur efficace de la barre d'actionnement (cote X) doit être le plus près possible de la largeur efficace de la porte (cote Y) à laquelle le fermeture anti-panique est
destinée, et jamais inférieure à 60% (voir Fig.1).
Le matériau de construction des vantaux des portes et de leurs cadres doit être suffisamment rigide pour que les déformations provoquées par l'emploi ne dépassent
pas 5 mm dans toutes les positions.
Le dispositif doit être monté sur un matériau de porte garantissant la résistance de toutes les vis à la traction > à 1,5KN.
Die wirksame Länge der Betätigungsstange (X-Abmessung) muß der wirksamen Länge der Tür (Y-Abmessung) entsprechen, für die paniktuerverschluesse
vorgesehen sind. Diese Länge darf nie weniger als 60% der Türlänge betragen (siehe Fig.1).
Die Türflügel und Rahmen müssen aus einem ausreichend steifen Material gefertigt sein, um eine eventuelle Verbiegung während der Betätigung auf max. 5 mm in
jeder Position zu begrenzen.
Die Befestigung des Panikverschlusses an der Tür muss auf Material erfolgen, das eine Zugfestigkeit von > 1,5KN pro Schraube gewährleistet.
X
Y
Используйте только внешнюю ручку, указанную в главе 2 настоящего руководства по эксплуатации.
Utilizzare esclusivamente i dispositivi di accesso dall’esterno indicati in queste istruzioni al capitolo 2.
Only use the outside access devices indicated in Chapter 2 of this instruction manual.
Utiliser uniquement les dispositifs d'accès de l'extérieur décrits au chapitre 2 de ces instructions.
Ausschließlich Außenbeschlag von der Außenseite einsetzen, wie in dieser Anleitung in Kapitel 2 angegeben.
2
Il campo di applicazione di questi dispositivi antipanico è limitato come segue :
E
F
I
D
Максимальная ширина двери
Massima larghezza della porta
Max door width
Max largeur de la porte
Maximal breite der Tür
Максимальная масса двери
Massima massa della porta
Max door mass
Max masse de la porte
Maximal türgewicht
Максимальная высота двери
Massima altezza della porta
Max door heigth
Max hauteur de la porte
Maximal höhe der Tür
Температурный диапазон
Intervallo di temperatura
Temperature range
Plage/Intervalle de température
Temperaturbereich
R
1Область применения -Campo di applicazione - Field of application
Domaine d'application - Anwendungsgebiet
The scope of these panic exit devices is limited as follows:
Le domaine d'application de ces dispositifs anti-panique est limité comme suit :
Der Anwendungsbereich dieser Paniktürverschlüsse ist wie folgt begrenzt:
Область применения настоящего устройства «антипаника» ограниченна следующими характеристиками:
3400 mm200 Kg 1500 mm -10°C +60°C
Рисунок 1
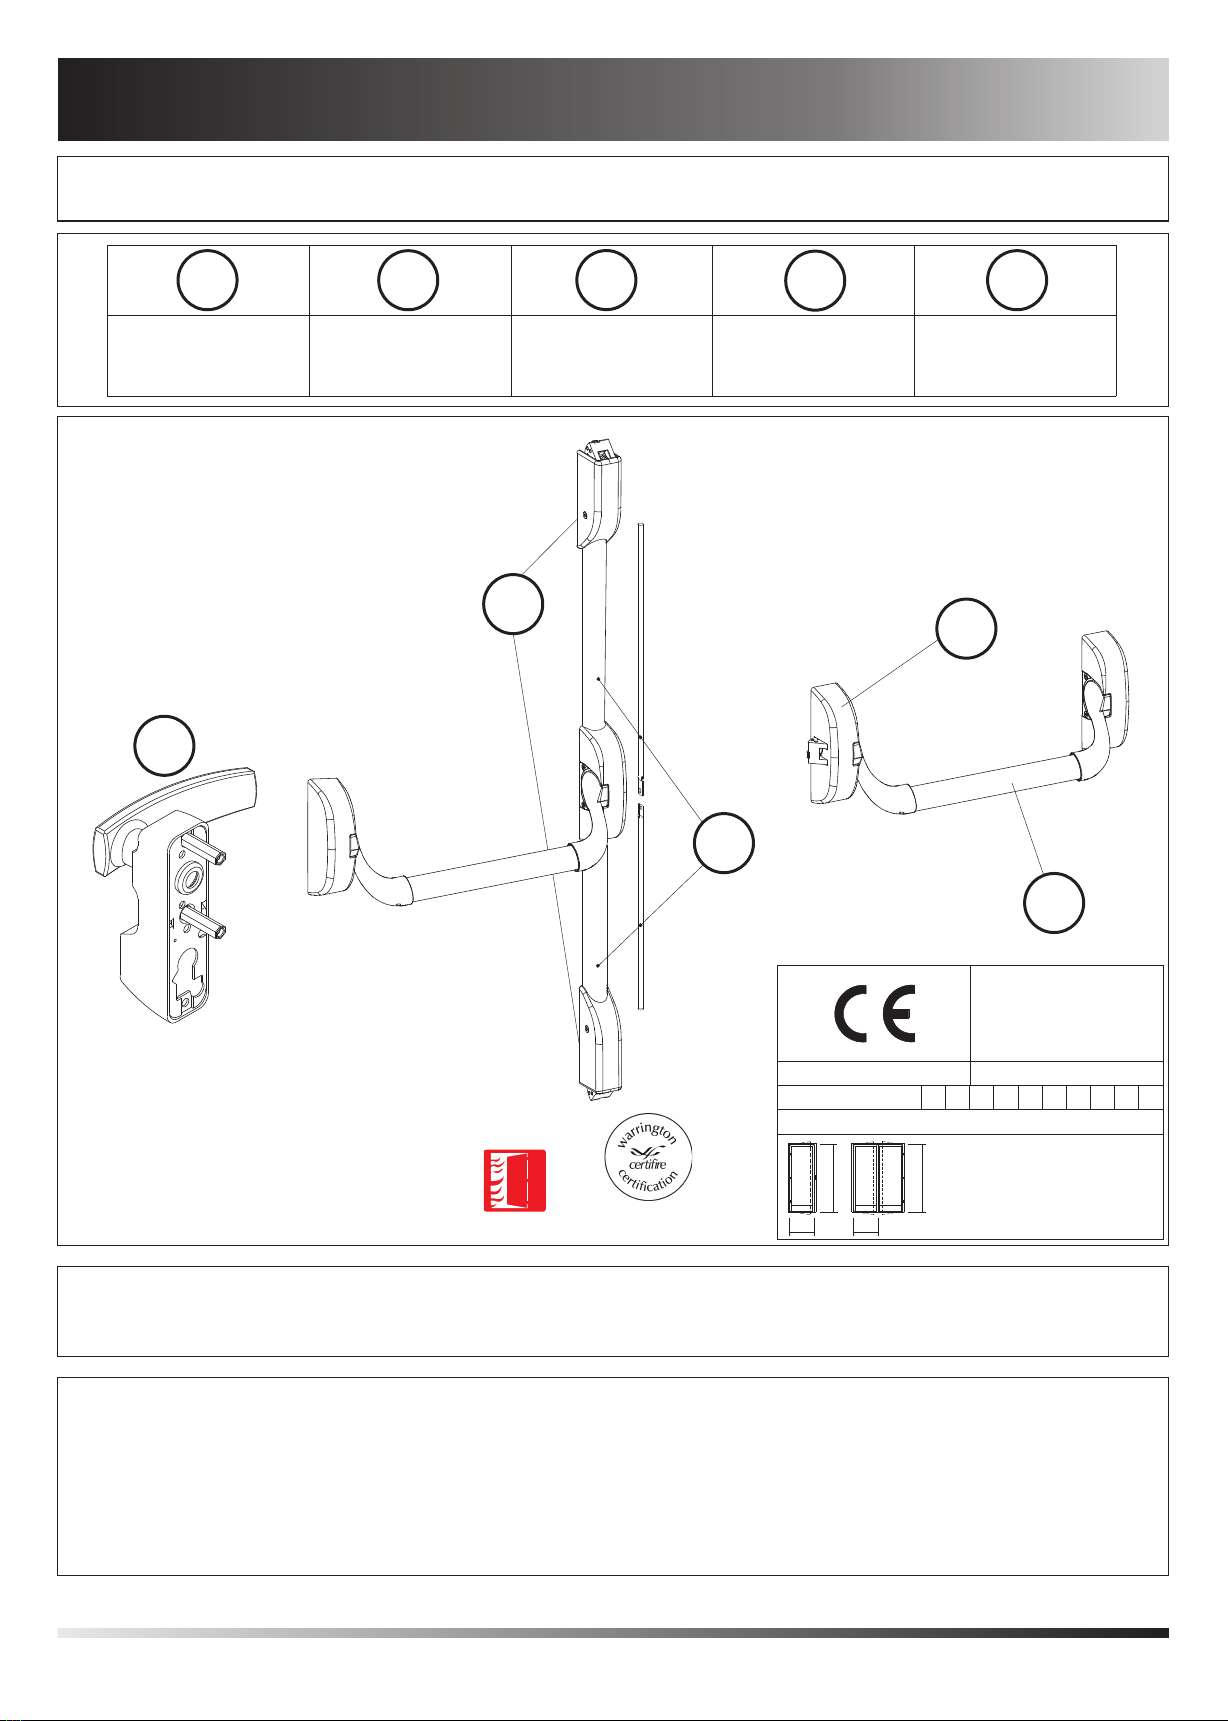
Устройства могут использоваться на противопожарных и дымозащитных дверях - Prodotti idonei per porte tagliafuoco/tagliafumo - Products suitable for fire/smoke doors
Produits indiqués pour portes coupe-feu/pare-fumée - Die Produkte sind für den Einsatz an Feuer-/Rauchschutztüren geeignet
2Продукция, предназначенная для использования на противопожарных и дымозащитных дверях
Idoneità dei prodotti all’uso su porte tagliafuoco/tagliafumo - Suitability of products for use on fire/smoke doors
Produits indiqués pour l'emploi sur portes coupe-feu et pare-fumée - Die Produkte sind für den Einsatz an Feuer-/Rauchschutztüren
geeignet
376B14 2 2 A
1121 - AAA006
NF EN 1125:2008
09
ISEO Serrature S.p.A.
Via S. Girolamo, 13
25055 - Pisogne - BS
Italy
Sostanze pericolose: nessuna
A
3
Пригодность продукции для противопожарных и дымозащитных дверей была подтверждена тестами в соответствии со стандартом EN 1634-1.
L’idoneità all’uso su porte tagliafuoco/tagliafumo di questi prodotti è stata certificata in base ad una prova in conformità alla norma EN 1634-1.
The suitability for use of the products on fire/smoke doors has been certified by tests to the EN 1634-1 Standard.
Ces produits ont été certifiés comme aptes à être montés sur des portes coupe-feu/étanche aux fumées sur la base d'un essai conforme à la norme EN 1634-1.
Die Eignung dieser Produkte mit Feuer-/Rauchschutztüren wurde auf der Basis einer Prüfung nach der Norm EN 1634-1 zertifiziert.
L
H
Hmax=3400mm
Lmax=1500mm
H
L
Продукция имеет Сертификат ICIM за номером 017AD-018AD и сертификат соответствия требованиям EC описанные в стандарте NF EN 1125:2008 в
соответствии с директивой 305/2011/EU и сертификата соответствия ГОСТ 31471-2011.
Questi prodotti hanno la Certificazione di Prodotto ICIM numero 017AD-018AD e la certificazione CE di conformità ai requisiti prescritti dalla norma NF EN
1125:2008 ai sensi del Regolamento Prodotti da Costruzione CPR 305/2011/EU.
These product have the Certification of product ICIM number 017AD-018AD and the certification CE of conformity to the requirements prescribed by the norm NF
EN 1125:2008 to the senses of the Construction Products Regulation CPR 305/2011/EU.
Ces produits ont la Certification de Produit ICIM numéro 017AD-018AD et la certification CE de conformité aux qualités prescrites par la règle NF EN 1125:2008
aux sens du Règlement Produits de Construction CPR 305/2011/EU.
Diese Produkte haben die Beglaubigung von Produkt ICIM Nummer 017AD-018AD und die Beglaubigung CE von Übereinstimmung zu den von der Norm
vorgeschriebenen Erfordernissen NF EN 1125:2008 zu den Sinnen Bauproduktenverordnung CPR 305/2011/EU.
APPROVED PRODUCT
CF 5232
75430
75431
75435
75434
75436
75432
75433
3
4
Ручка
Защелки
12345
5Тяги
и кожухи
1
2
Механизм
Балка
1. Перед началом монтажа устройства, удостовериться в правильности установки двери и отсутствии препятствий для ее движения. Не устанавливать устройство на
двери с сотовым заполнителем, если производителем не указано, что устройства предназначены специально для данного типа дверей. Рекомендуется убедиться, что
конструкция двери позволяет должным образом использовать устройство, т.е. проверить, чтобы расстояние от оси петель до двери и зазор между дверными полотнами
позволяют одновременно открывать оба дверных полотна (см. параграф 3), или убедиться, что зазор между дверными полотнами не отличается от зазора, указанного
производителем устройства «антипаника», или удостовериться, что рабочие элементы не мешают друг другу во время работы и т. д. Примечание: Устройства для
запасных выходов, произведенные в соответствии с настоящим Европейским и Российским Стандартами, обеспечивают высокий уровень безопасности для людей и
достаточный уровень безопасности для имущества, при условии, что они устанавливаются на двери и дверные коробки, находящиеся в надлежащем состоянии.
2. Для того, чтобы удостовериться в том, что устройство подходит для установки на противопожарную дверь, перед монтажом устройства «антипаника» на
противопожарную/противодымную дверь, проверьте сертификаты пожарной безопасности двери, на которую это устройство устанавливалось во время
соответствующих испытаний.
3. Обратите внимание, что уплотнители двери не должны препятствовать правильной работе устройства.
4. При установке на оба дверных полотна фальцованных двухстворчатых дверей необходимо удостовериться, что каждое полотно открывается при использовании
устройства, установленного на это полотно, и что оба полотна свободно открываются при одновременном использовании обоих установленных устройств. В таких
случаях может понадобиться использование толкателя открывания активной дверной створки.
5. Если устройства «антипаника» производятся в разных размерах, необходимо удостовериться в установке необходимого размера.
6. В случае, когда около запасного выхода не много места, или дверь, на которую установлено устройство, не открывается шире, чем на 90°, должны использоваться
устройства «антипаника» 2 категории (клавишные).
7. Если устройства «антипаника» предназначены для установке на стеклянные двери, стекло должно быть закаленным или многослойным.
8. При установке устройств «антипаника» на деревянные, металлические или стеклянные двери без дверных коробок, может понадобиться использование различных
систем установки. Для более надежной установки рекомендуется использовать сквозные анкерные болты с внутренней и внешней резьбой.
9. Устройства «антипаника» не используются на дверях, открывающихся в обе стороны (маятниковых), кроме случаев, когда они специально разработаны
производителем для использования на таких типах дверей.
10. Во время монтажа строго соблюдать все инструкции по установке. Инструкции по сборке и инструкции по обслуживанию должны быть предоставлены
пользователю организацией, выполняющей монтаж.
11. Горизонтальная перекладина обычно устанавливается на высоте между 900 мм и 1100 мм от уровня чистого пола при закрытой двери. Если известно, что
большинством посетителей данного помещения будут дети, необходимо установить перекладину ниже.
12. Горизонтальная перекладина собирается таким образом, чтобы обеспечить ее использование по всей длине.
13. Запирающие элементы и запорные планки устанавливаются таким образом, чтобы обеспечить их плотное соединение. При убранных запирающих элементах
дверь должна свободно двигаться на петлях.
14. Если устройства «антипаника» устанавливаются на фальцованных двухстворчатых дверях с автоматическими устройствами закрывания дверей, необходимо
установить на двери координатор закрывания, обеспечивающий правильный порядок закрытия дверей, и соответствующий требованиям стандарта EN 1158. Эта
рекомендация особенно важна при работе с противопожарными/противодымными дверьми.
15. Для блокировки дверей в закрытом положении нельзя использовать никакие устройства, кроме устройств, описанных в Европейском Стандарте NF EN 1125:2008.
Это требование не отменяет требований ГОСТ 31471-2011. Это требование также не отменяет требований по монтажу автоматических закрывающих устройств.
16. Если для закрывания двери необходимо использовать доводчик двери, необходимо удостовериться, что это не затрудняет использование двери детьми,
престарелыми и людьми с ограниченными физическими возможностями.
17. Все входящие в комплект запорные планки или защитные панели должны быть установлены в соответствии с требованиями Европейского Стандарта NF EN
1125:2008.
18. Непосредственно над перекладиной на внутренней поверхности двери или на самой перекладине, если она имеет плоскую форму, достаточную для размещения
шрифта нужного размера, необходимо нанести текст «Чтобы открыть дверь, нажмите на перекладину» или соответствующую пиктограмму. Размер пиктограммы не
2
должен быть менее 8000 мм . Цвет - белый на зеленом фоне. Стрелка на рисунке должна быть направлена на рабочий элемент.
19. На поверхности соприкосновения ригеля и запорных планок нанести смазку, рабочая температура которой подходит для условий эксплуатации (например, FINA
Marson EPL2 или эквивалентная).
R
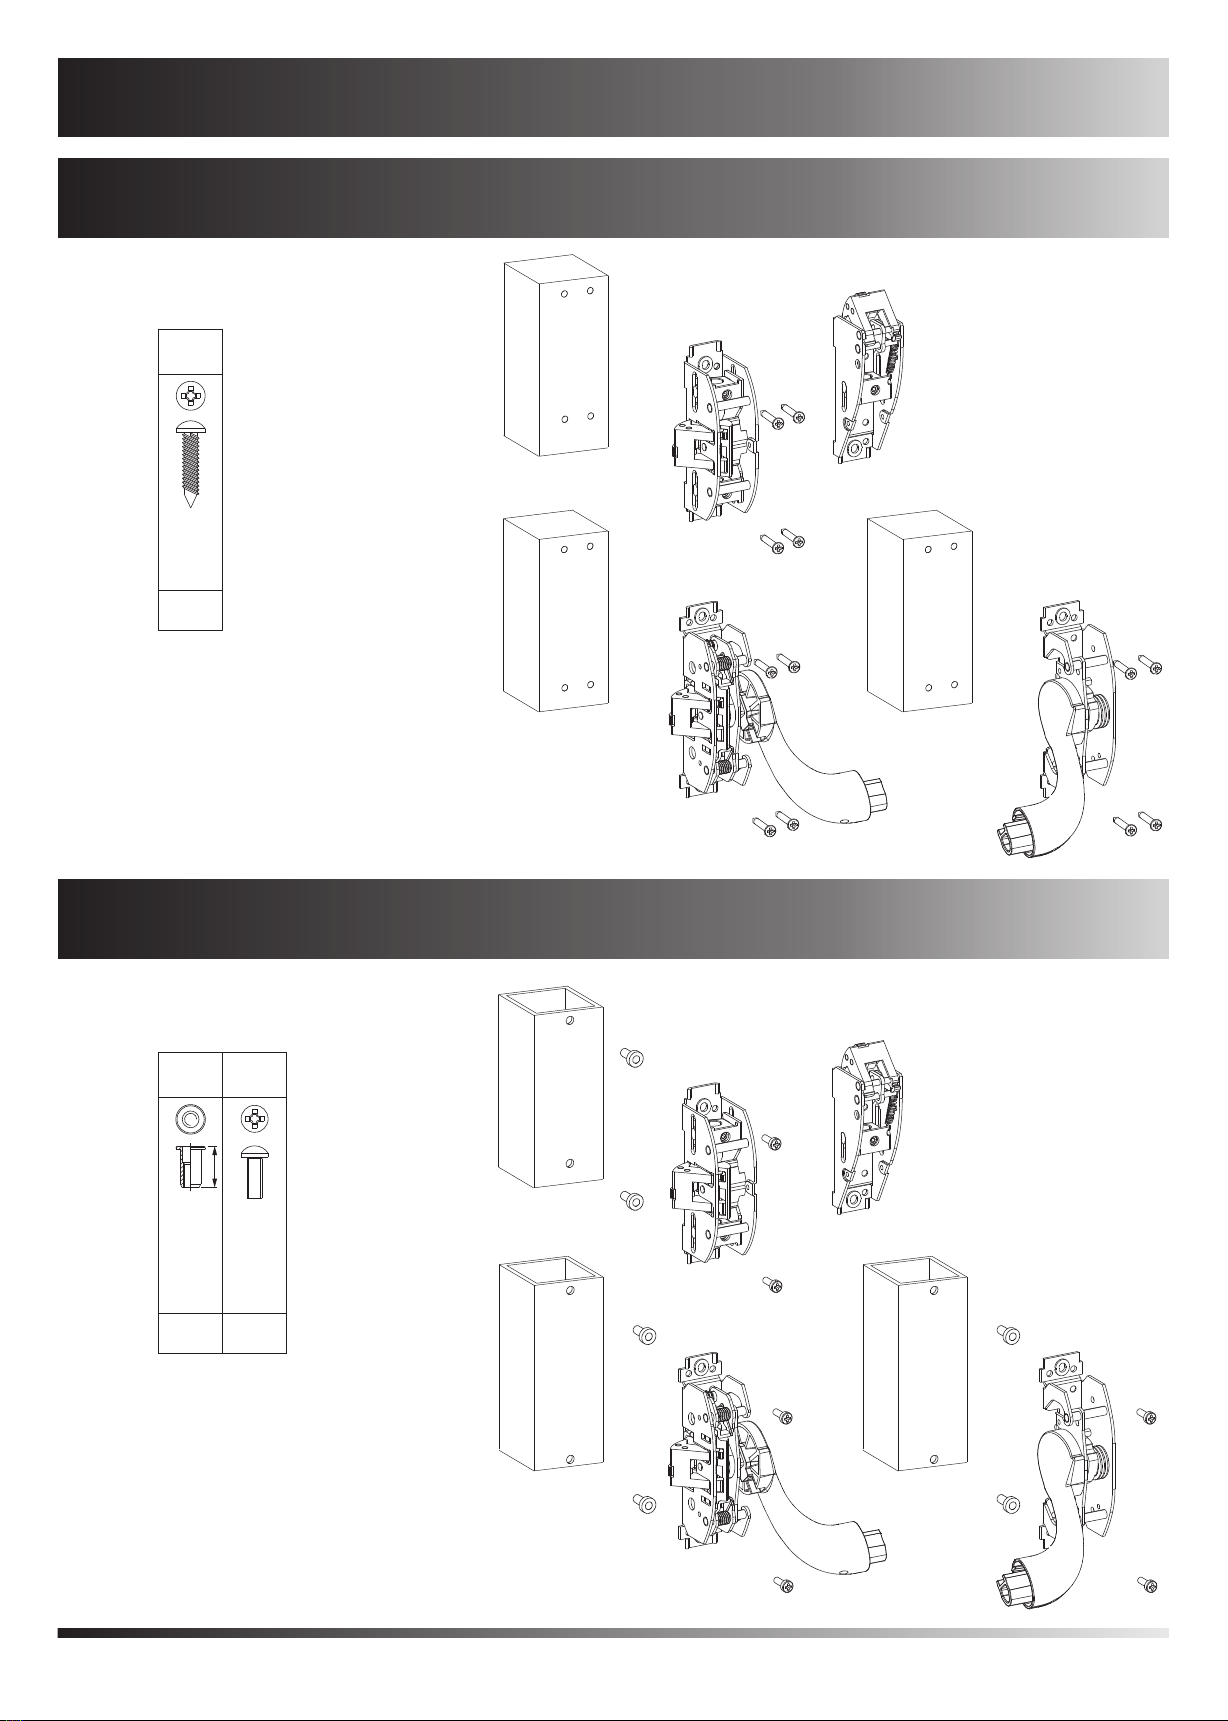
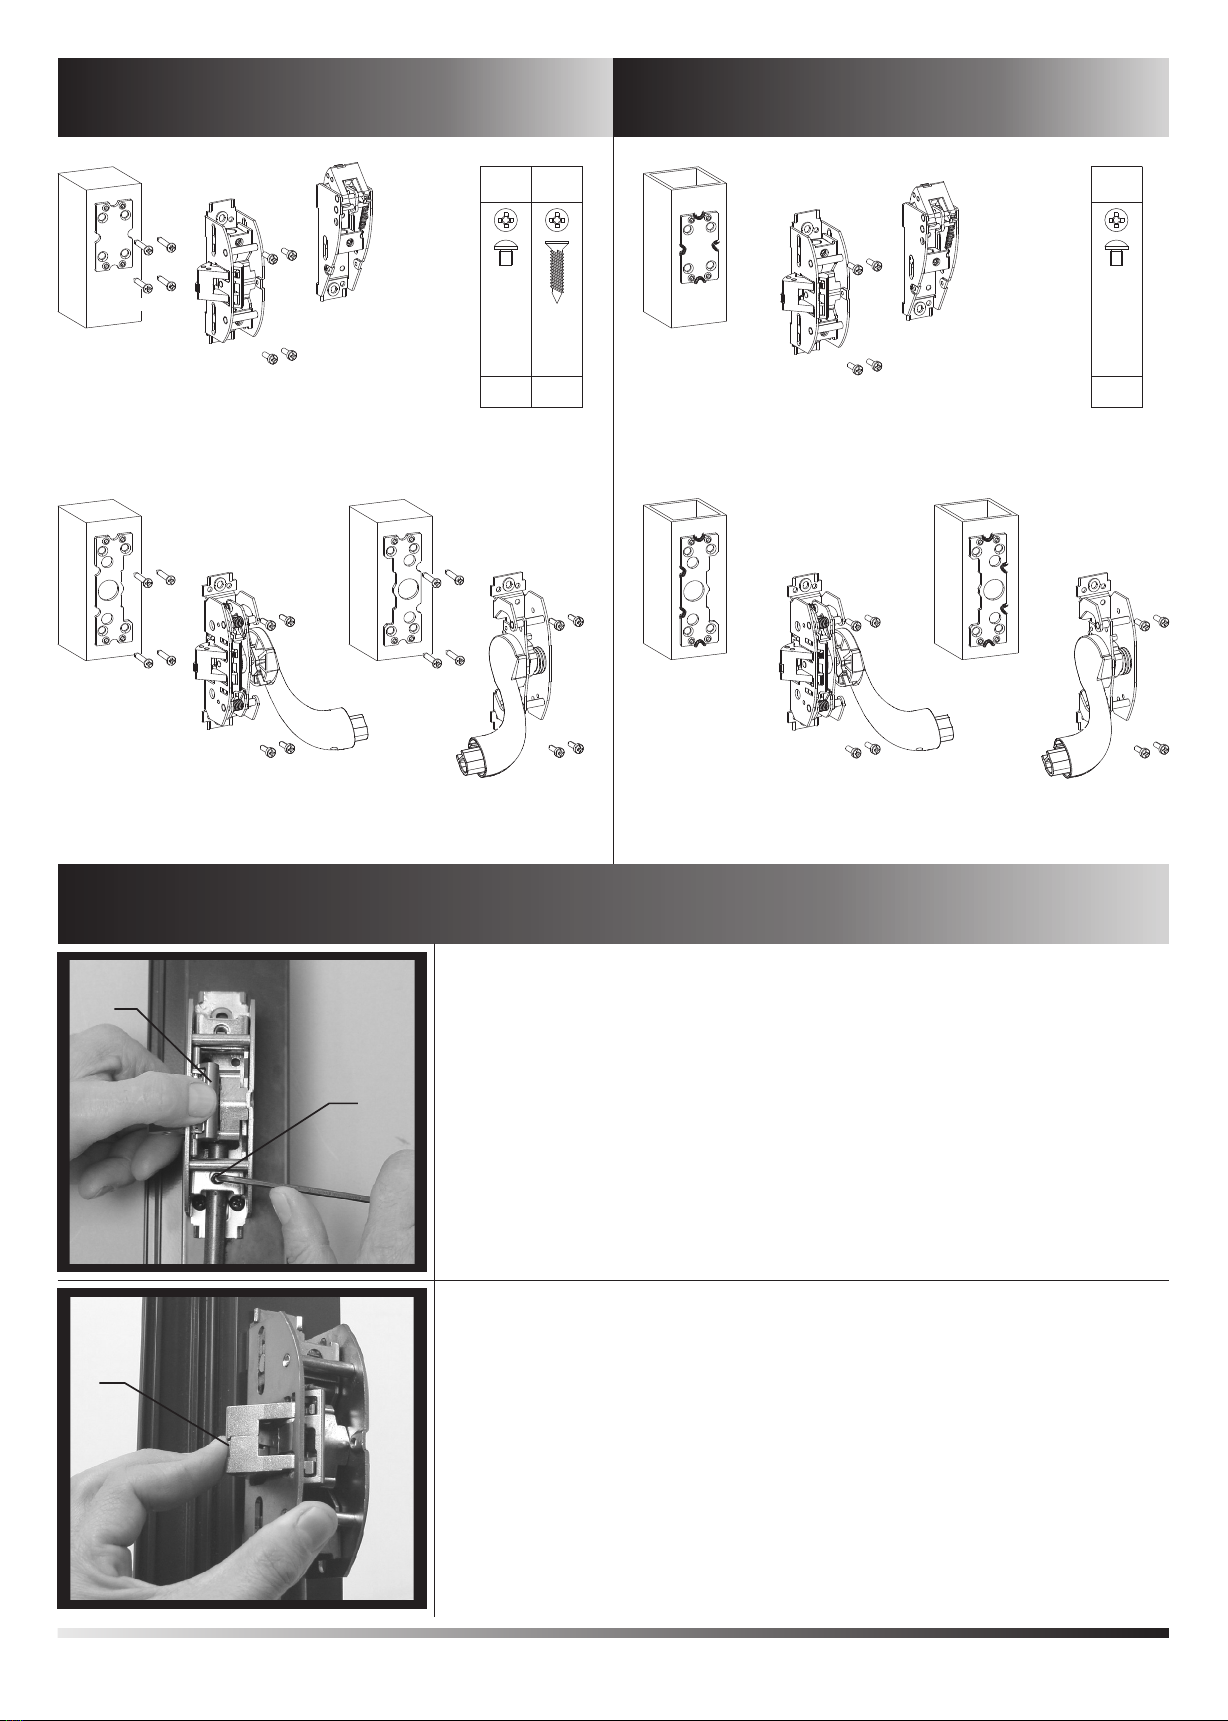
4Инструкция по установке
Istruzioni per l’installazione - Assembling Instructions
Instructions de montage - Montageanleitung
4
3Варианты установки устройства «антипаника» на двери
Configurazioni certificate - Certified configurations
Configurations certifiées - Zertifizierte Konfigurationen

5
1 - Before assembling an exit device on a door, the door must be inspected to ensure it is mounted correctly and nothing can obstruct its movement. Never assemble the
exit devices on honeycomb core doors unless they have been specifically designed by the manufacturer for this type of door. It is advisable to check that the
construction of the door allows the device to be used; i.e. verify that the distance of the hinge axis from the door and the interference of the door leaves allow both door
leaves to be opened together (see paragraph 3), or check that the clearance between the door leaves does not differ from that indicated by the manufacturer of the exit
device, or check that the operating elements do not interfere, and so on.
NB: The devices for panic emergency exits manufactured to this European Standard ensure a high level of safety to persons and sufficient safety for things, provided
they are fitted on doors and frames in good condition.
2 - Before assembling a panic exit device on a fire/smoke door, check the fire resistance certification for the door on which the exit device was fitted during the relative
tests to ensure it is suitable for use on the fire door.
3 - Pay attention that the seals and gaskets fitted on the door do not prevent the panic exit device from working properly.
4 - On rebated double doors, when panic exit devices are assembled on both leaves, it is essential to check that each leaf opens when the relative device is activated and
also that both leaves open freely when both panic exit devices are activated at the same time. It may be necessary to use an operating bar to move the active leaf in
these cases.
5 - If the panic exit devices are manufactured in different sizes, make sure that the right size is assembled.
6 - Category 2 panic exit devices (standard projection) must be used in situations where there is not a lot of space around the emergency exit, or when the doors the panic
exit devices are assembled on cannot open wider than 90°.
7 - If the panic exit devices are designed to be fitted on a glass door, the glass must be tempered or laminated.
8 - When fitting the panic exit devices on wooden, metal or glass doors without frames, it may be necessary to use different fixing systems. Use male and female through
bolts to guarantee more secure fixing.
9 - The panic exit devices are not to be used on double-action doors (double-swing), unless they are specifically designed by the manufacturer.
10 - All fixing instructions must be followed carefully during assembling. These instructions and all maintenance instructions must be delivered to the user by the
assembling operator.
11 - The horizontal bar should normally be assembled at a height of between 900 mm and 1100 mm from finished floor level, when the door is closed. If it is known that
most of the occupants of the premises are children, it is necessary to consider lowering the height of the bar.
12 - The horizontal bar must be assembled so as to provide use of the entire length.
13 - The closing elements and the keepers must be fitted so they connect securely. Make sure that when the closing elements are retracted, there are no projections that
prevent the door from rotating freely.
14 - If the panic exit devices are to be fitted on rebated double doors and automatic closing devices, a door coordination device conforming to the EN 1158 Standard must
also be fitted to guarantee the correct closing sequence of the doors. This recommendation is most important for fire/smoke doors.
15 - No devices must be used to block the door in a closed position other than those indicated in the NF EN 1125:2008 European Standard. This does not preclude the
:2008 European Standard. This does not preclude the
assembling of automatic closing devices.
16 - If a door closer must be used in order to close the door, make sure this does not make the door difficult to use for children, the elderly and the disabled.
17 - All the keepers or protection plates supplied must be fitted in compliance to the NF EN 1125:2008 European Standard.
18 - Indications must be applied to the inside of the door with the words "Push the bar to open the door” or a pictogram, immediately above the horizontal bar or on the
actual bar if it has a flat surface that can hold the words in the size required. The pictogram must be no smaller than 8000 mm2 and it must be white on a green
background. It must be drawn so that the arrow points towards the operating element, if assembled.
19 - Lubricate the contact surfaces of the latch and the keepers with grease whose working temperature is suitable for the conditions of use (e.g. FINA Marson EPL2 or
E
1 - Prima di montare un dispositivo di uscita su una porta, la porta deve essere controllata per assicurasi che sia montata in modo corretto e non incontri ostacoli nel
movimento. Si sconsiglia di fissare i dispositivi di uscita su porte con interno alveolare a meno che essi non siano appositamente progettati dal produttore per questo
tipo di porte. Si consiglia di verificare che la costruzione della porta consenta l'uso del dispositivo, cioè di verificare che la distanza dell'asse delle cerniere dalla porta e
l'interferenza delle ante consentano a entrambe le ante di essere aperte contemporaneamente (vedere il punto 3), oppure verificare che il gioco tra le ante della porta
non differisca da quello definito dal produttore del dispositivo di uscita, oppure verificare che gli elementi di azionamento non interferiscano, ecc.
NOTA: I dispositivi per le uscite antipanico fabbricati in conformità alla presente norma europea forniranno un grado elevato di sicurezza per le persone e un'adeguata
sicurezza per le cose a condizione che siano montati su porte e telai in buone condizioni.
2 - Prima di montare un dispositivo antipanico su una porta tagliafuoco/tagliafumo, si deve esaminare il certificato di resistenza al fuoco della porta sulla quale il
dispositivo di uscita è stato sottoposto a prova per accertarne l’idoneità all’uso su una porta tagliafuoco.
3 - Si deve porre attenzione affinché le guarnizioni o le guarnizioni di tenuta montate sulla porta completa non impediscano il corretto funzionamento del dispositivo per le
uscite antipanico.
4 - Su porte a due ante con montanti con battuta e quando su entrambe le ante sono installati dispositivi per le uscite antipanico, è indispensabile controllare che
ciascuna anta si apra quando è azionato il relativo dispositivo per le uscite antipanico e anche che entrambe le ante si aprano liberamente quando entrambi i
dispositivi antipanico sono azionati contemporaneamente. Per questa applicazione può essere richiesto l’uso di una barra di trascinamento per spostare l’anta attiva.
5 - Nel caso in cui i dispositivi per le uscite antipanico siano fabbricati in più di una misura, è importante che sia scelta la misura corretta.
6 - I dispositivi per le uscite antipanico di categoria 2 (sporgenza standard) devono essere utilizzati in situazioni in cui lo spazio per l’uscita non è ampio oppure nel caso in
cui le porte su cui sono installati i dispositivi per le uscite antipanico non siano in grado di aprirsi oltre i 90°.
7 - Nel caso in cui un dispositivo per le uscite antipanico sia progettato per il montaggio su una porta a vetri, è essenziale che il vetro sia temperato o stratificato.
8 - Per montare dispositivi per le uscite antipanico su porte di legno, di metallo o di vetro senza telaio, potrebbe essere necessario usare sistemi di fissaggio diversi. Per
ottenere un fissaggio più solido si possono usare bulloni passanti maschi e femmine.
9 - I dispositivi per le uscite antipanico non sono previsti per l’uso su porte a doppia azione (doppia oscillazione) se non espressamente progettati dal produttore.
10 - Durante l’installazione devono essere seguite scrupolosamente le istruzioni di fissaggio. Tali istruzioni e tutte le istruzioni di manutenzione devono essere consegnate
dall’installatore all’utilizzatore.
11 - Normalmente la barra orizzontale deve essere installata a un’altezza compresa tra 900 mm e 1 100 mm dal livello del pavimento finito, quando la porta è in posizione
di chiusura. Nel caso in cui si sappia che la maggior parte degli occupanti dei locali è rappresentata da bambini, si deve considerare di ridurre l’altezza della barra.
12 - La barra orizzontale deve essere installata in modo tale da fornire la massima lunghezza utile.
13 - Gli elementi di chiusura e le controbocchette devono essere fissati in modo che si innestino in maniera sicura . Si deve porre attenzione affinché nessuna sporgenza
degli elementi di chiusura, quando sono in posizione arretrata, impedisca alla porta di ruotare liberamente.
14 - Nel caso in cui i dispositivi per le uscite antipanico debbano essere montati su porte a due ante con montanti con battuta e dispositivi di chiusura automatica, si deve
montare un dispositivo per il coordinamento delle porte conforme alla EN 1158 che assicuri la corretta sequenza di chiusura delle porte. Tale raccomandazione è
particolarmente importante per le porte tagliafuoco/tagliafumo.
15 - Per il bloccaggio della porta in posizione di chiusura non si devono montare dispositivi diversi da quelli specificati nella norma europea NF EN 1125:2008. Ciò non
preclude l’installazione di dispositivi di chiusura automatica.
16 - Nel caso in cui per riportare la porta in posizione di chiusura si debba usare un chiudiporta, si dovrebbe porre attenzione a non rendere difficile l'uso della porta ai
bambini, agli anziani e agli infermi.
17 - Tutte le controbocchette o le piastre di protezione fornite devono essere montate in modo tale da assicurare la conformità alla norma europea NF EN 1125:2008.
18 - Sulla superficie interna della porta deve essere apposta una scritta che indichi "Per aprire spingere la barra" oppure un pittogramma, immediatamente sopra la barra
orizzontale o sulla barra se questa ha una superficie piana sufficiente per la dimensione dei caratteri richiesta. L’area del pittogramma non deve essere minore di
8000 mm2 e i suoi colori devono essere bianco su sfondo verde. Deve essere progettato in modo tale che la freccia punti verso l’elemento di azionamento, se
installato.
19 - Lubrificare le superfici di contatto tra scrocco e controbocchetta con grasso che abbia una temperatura di impiego adeguata alle condizioni di utilizzo (es. FINA Marson
EPL2 o altro equivalente).
I

7
Zur Gewährleistung nach der europäischer Norm NF EN 1125:2008, sind folgende regelmäßige Wartungskontrollen in Abständen von nicht mehr als einem Monat oder
mindestens 20.000 Öffnungszyklen durchzuführen:
a) Inspektion und Betätigung des Paniktürverschlusses, um sicherzustellen, dass sämtliche Teile des Verschlusses in einem zufriedenstellenden betriebsfertigen
Zustand sind; mit einem Dynamometer die zum Öffnen des Verschlusses erforderlichen Kräfte messen und registrieren;
b) sicherstellen, dass das/die Schließblech/e nicht blockiert ist/sind;
c) sicherstellen, dass der Paniktürverschluß entsprechend Punkt 19 in Kapitel 3 geschmiert wurde;
d) sicherstellen, dass seit der ursprünglichen Montage keine zusätzlichen Verschlüsse an der Tür montiert wurden;
e) regelmäßig sicherstellen, dass alle Teile des Systems weiterhin mit der ursprünglich mit dem System gelieferten Liste der zertifizierten Teile konform sind;
f) regelmäßig sicherstellen, dass die Betätigungsstange korrekt fest sitzt und mit einem Dynamometer die zum Öffnen des Verschlusses erforderlichen Kräfte messen;
sicherstellen, dass die Betätigungskräfte nicht zu stark von den bei der ursprünglichen Installation gemessenen Werten abweichen.
D
Per garantire prestazioni in conformità alla norma europea NF EN 1125:2008, devono essere effettuati i seguenti controlli di manutenzione ordinaria ad intervalli non
maggiori di un mese o almeno ogni 20000 cicli:
a) ispezionare ed azionare il dispositivo per le uscite antipanico per verificare che tutti i componenti siano in condizioni di funzionamento soddisfacenti; utilizzando un
dinamometro misurare e registrare le forze di azionamento per aprire il dispositivo di uscita;
b) verificare che la/e controbocchetta/e non sia/siano ostruita/e;
c) verificare che il dispositivo per le uscite antipanico sia lubrificato come indicato al punto 19 del paragrafo 3;
d) verificare che non siano stati aggiunti dispositivi di bloccaggio aggiuntivi alla porta dalla sua installazione originale;
e) verificare periodicamente che tutti i componenti del sistema siano ancora corretti in conformità all’elenco dei componenti certificati, forniti in origine con il sistema;
f) verificare periodicamente che l’elemento di azionamento sia serrato correttamente e, utilizzando un dinamometro, misurare le forze di azionamento per aprire il
dispositivo di uscita; verificare le che forze di azionamento non siano cambiate significativamente dalle forze di azionamento registrate al momento dell’installazione
originale.
5
I
Инструкция по обслуживанию
Istruzioni per la manutenzione - Maintenance instructions
Instructions d'entretien - Wartungsanleitung
To ensure performances which comply with the NF EN 1125:2008 European Standard, the following routine maintenance checks are to be performed at intervals of no
more than one month, or at least every 20,000 cycles:
a) inspect and operate the panic exit device to check that all the components are in good working condition; use a dynamometer to measure and record the operating
force required to open the exit device;
b) check that the keeper/s are not blocked;
c) check that the panic exit device is well greased as indicated in section 19 of paragraph 3;
d) check that no extra blocking devices have been fitted on the door since it was originally assembled;
e) periodically check that all the system components are correct according to the list of certified components, initially supplied with the system;
f) periodically check that the operating element closes properly and measure the operating force needed to open the exit device using a dynamometer; check that there
has been no significant change in the operating force recorded during initial assembling.
E
Afin de s'assurer que les performances sont conformes à la norme européenne EN 1125, il convient d'effectuer des contrôles d'entretien de routine à intervalles d'un mois
maximum (ou au moins tous les 20 000 cycles) :
a) inspecter et manoeuvrer la fermeture anti-panique pour s'assurer que tous les composants sont en état satisfaisant de fonctionnement ; en utilisant un
dynamomètre, mesurer et enregistrer les forces de manoeuvre pour ouvrir la fermeture d'issue de secours ;
b) s'assurer que la (ou les) gâche(s) est (sont) libre(s) de toute obstruction ;
c) vérifier que la fermeture anti-panique est lubrifiée conformément au point 19 du paragraphe 3 ;
d) vérifier qu'aucun dispositif de verrouillage supplémentaire n'a été ajouté à la porte depuis son installation initiale ;
e) vérifier périodiquement que tous les composants du système sont encore conformes à la liste des composants certifiés fournis avec le système ;
f) vérifier périodiquement que l'élément manoeuvrable est correctement serré et, en utilisant un dynamomètre, mesurer les forces de manoeuvre pour ouvrir la
fermeture d'issue de secours. Vérifier que les forces de manœuvre n'ont pas changé de manière significative par rapport aux forces de manoeuvre initiales.
F
Чтобы обеспечить соответствие функциональных характеристик устройства требованиям Европейского Стандарта NF FN 1125:7008. необходимо с
периодичностью не менее чем один раз в месяц или не реже чем через 20,000 циклов выполнять следующие проверки:
a) осмотреть и опробовать устройство «антипаника», убедиться, что все компоненты находятся в рабочем состоянии; с помощью динамометра замерить и
записать рабочее усилие, требуемое для открытия устройства;
b) убедиться, что запорная планка/планки не заблокированы;
c) убедиться, что устройство «антипаника» должным образом смазано, как описано в разделе 19 параграфа 3;
d) удостовериться, что после монтажа двери на нее не было установлено дополнительных запирающих устройств;
e) периодически проверять, чтобы все компоненты системы соответствовали перечню сертифицированных компонентов, которые изначально поставлялись с
системой;
f) периодически проверять правильность запирания рабочего элемента и замерять с помощью динамометра рабочее усилие, необходимое для открытия
устройства; убедиться, что замеренное значение усилия не слишком сильно отличается от значений, полученных замеров сразу же после монтажа
R

6
D1 - Vor der Montage des Verschlusses an der Türe, muß die Türe auf einwandfreie Funktion und Leichtgängigkeit geprüft werden. Es wird empfohlen, den Verschluss an
Türen mit Wabenfüllung nicht zu montieren, es sei denn, der Beschlag ist vom Hersteller speziell für diese Türen entwickelt worden. Es wird empfohlen sicherzustellen,
ob die Türe für die Montage des Verschlusses geeignet ist, also der Achsabstand der Scharniere und die Beeinflussung der Türflügel ein gleichzeitiges Öffnen
ermöglichen (siehe Punkt 3), oder ob das Spiel zwischen den Türflügeln von den Angaben des Herstellers des Verschlusses abweicht, oder ob die beweglichen Teile
sich nicht gegenseitig beeinträchtigen etc..
HINWEIS: Die gemäß der vorliegenden europäischen Norm hergestellten Paniktürverschlüsse gewährleisten eine hohe Sicherheit für Personen und eine
angemessene Sicherheit für Sachenwerte, vorausgesetzt sie werden auf in gutem Zustand befindlichen Türen und Rahmen montiert.
2 - Vor Montage eines Paniktürverschlusses an Feuer-/Rauchschutztüren muß die Bescheinigung der Feuerbeständigkeit der Tür untersucht werden, auf der der
Paniktürverschluss für die Prüfung montiert wurde, um die Eignung an einer Feuerschutztür festzustellen.
3 - Es muss darauf geachtet werden, dass die an der Tür montierten Dichtungen die korrekte Funktion des Paniktürverschlusses nicht beeinträchtigen.
4 - Bei zweiflügeligen Türen mit überfälztem Mittelanschlag und Montage von Panikverschlüssen an beiden Flügeln muss geprüft werden, dass sich jeder Flügel öffnet,
wenn der jeweilige Verschluß betätigt wird. Für diesen Zweck kann eine Betätigungsstange zum Mitnehmen des aktiven Flügels geliefert werden.
5 - Falls Paniktürverschlüsse in mehreren Größen hergestellt werden, muss die richtige Größe eingesetzt werden.
6 - Paniktürverschlüsse der Kategorie 2 (Normalüberstand) müssen in Situationen verwendet werden, in denen der Fluchtraum eingeschränkt ist oder die Türen, an
denen die Verschlüsse montiert sind, sich nicht weiter als 90° öffnen.
7 - Falls ein Paniktürverschluss für die Montage an einer Glastür vorgesehen ist, muss das Glas gehärtet oder beschichtet sein (Verbundglas).
8 - Zur Montage von Paniktürverschlüssen an rahmenlosen Glas-, Metall oder Holztüren kann der Einsatz von anderen Befestigungssystemen erforderlich sein. Für
solidere Befestigungen können durchgehende Schrauben und Muttern verwendet werden.
9 - Die Paniktürverschlüsse sind, wenn nicht ausdrücklich vom Hersteller angegeben, nicht für Pendeltüren vorgesehen.
10 - Während der Montage müssen die Anleitungen zur Befestigung genau befolgt werden. Diese Anleitungen sowie alle Wartungsanleitungen sind vom Monteur an den
Benutzer auszuhändigen.
11 - Die horizontale Betätigungsstange des Paniktürverschlusses sollte normalerweise in einer Höhe zwischen 900 mm und 1100 mm über der Oberfläche des fertigen
Fußbodens bei geschlossener Türe montiert werden. Falls bekannt ist, dass die Mehrheit der Benutzer der Räumlichkeit kleine Kinder sind, sollte eine Reduzierung
der Höhe des Paniktürverschlusses in Betracht gezogen werden.
12 - Die horizontale Betätigungsstange muß so montiert werden, dass eine maximale Nutzbreite erreicht wird.
13 - Die Schließelemente und die Schließbleche müssen so befestigt werden, dass sie sicher ineinander schließen. Es muss darauf geachtet werden, dass die
Schließelemente in geöffnetem Zustand weder überhängen noch den freien Lauf der Tür behindern.
14 - Falls der Paniktürverschluss an zweiflügeligen Türen mit überfälztem Mittelanschlag und Türschließern montiert werden müssen, sollte ein Schließfolgeregler nach
EN 1158 installiert werden, um die richtige Schließfolge der Tür sicherzustellen. Dies ist besonders wichtig bei Feuer-/Rauchschutztüren.
15 - Für das Zuhalten der Tür in der geschlossenen Stellung ist es ausreichend, die in der europäischen Norm NF EN 1125:2008 aufgeführten Vorrichtungen zu
verwenden. Dies verbietet aber nicht die Installation von Türschließern.
16 - Falls ein Türschließer installiert wird, sollte beachtet werden, dass hierdurch die Betätigung der Tür durch Kinder, ältere Personen oder Behinderte nicht erschwert
wird.
17 - Alle beiliegenden Schließbleche oder Unterlegplatten müssen unter Berücksichtigung der europäischen Norm NF EN 1125:2008 montiert werden.
18 - An der Innenseite der Türe sollte unmittelbar oberhalb des Paniktürverschlusses oder auf der Betätigungsstange selbst, wenn sie eine ausreichend große ebene
Fläche für die Beschriftung hat, ein Schild mit der Aufschrift „Zum Öffnen hier drücken“ oder ein Piktogramm angebracht werden. Die Fläche für das Piktogramm muss
mindestens 8000 mm² betragen und das Piktogramm weiß auf grünem Hintergrund sein. Es muss so ausgelegt sein, dass der Pfeil auf die Betätigungsstange zeigt,
falls montiert.
19 - Die Kontaktflächen zwischen Falle und Schließblech mit einem Fett schmieren, das eine für den Anwendungsbereich angemessene Einsatztemperatur besitzt (z.B.
FINA Marson EPL2 oder gleichwertig).
F1 - Avant d'installer une fermeture pour issues de secours sur une porte, il convient de vérifier la porte afin de s'assurer qu'elle est montée correctement sans obstacles
dans son mouvement. Il n'est pas recommandé, par exemple, de fixer les fermetures pour issues de secours sur des portes à âme creuse à moins que spécifiquement
conçue par le producteur de ce type de portes. Il est recommandé de vérifier que la construction de la porte permet l'utilisation du dispositif, c'est-à-dire, vérifier que
les paumelles excentrées et le débattement engageant des vantaux permettent aux deux vantaux de s'ouvrir simultanément (voir point 3), ou vérifier que le jeu entre
les vantaux ne soit pas différent de celui défini par le producteur de fermeture pour issue de secours, ou vérifier que les éléments manoeuvrables n'interfèrent pas,
etc.
NOTE Les fermetures anti-panique fabriquées conformément à la norme européenne garantissent la sécurité des personnes et des biens à condition qu'ils soient
installés sur des portes et huisserie de porte en bon état.
2 - Avant d'installer une fermeture anti-panique pour issue de secours sur une porte coupe-feu et/ou étanche aux fumées, il y a lieu d'examiner la certification
d'homologation du bloc-porte résistant au feu sur lequel la fermeture pour issue de secours a été essayée pour prouver de l'aptitude à être utilisée sur une porte
résistant au feu.
3 - Il convient de s'assurer qu'aucun joint d'étanchéité ou de calfeutrement, installé sur le bloc-porte complet, ne compromet la manoeuvre correcte de la fermeture
anti-panique.
4 - Sur les portes à deux vantaux à recouvrement des bords jointifs où les deux vantaux sont équipés de fermetures anti-panique, il est essentiel de vérifier que chaque
vantail s'ouvre lorsque sa fermeture anti-panique est actionnée, et également que les deux vantaux s'ouvrent librement lors de la manoeuvre simultanée des deux
fermetures anti-panique. L'utilisation d'un dispositif d'augmentation d'ouverture pour actionner le vantail actif peut être requise pour cette application.
5 - Lorsque les fermetures anti-panique sont fabriquées en plusieurs dimensions, il est important que l'installateur choisisse la dimension appropriée.
6 - Il convient d'utiliser des fermetures anti-panique de catégorie 2 (projection normale) dans les situations où la largeur de la voie d'évacuation est restreinte ou lorsque
les portes devant être équipées de fermetures anti-panique ne peuvent s'ouvrir à plus de 90°.
7 - Lorsqu'une fermeture anti-panique est installée sur une porte avec un panneau en verre, il convient que celui-ci soit en verre trempé ou feuilleté.
8 - Des fixations différentes peuvent être nécessaires pour installer les fermetures anti-panique sur les portes en bois, en métal ou les portes en glace sans encadrement.
Pour une fixation plus sûre, des vis à douille traversantes, des renforts et des rivets peuvent être utilisés.
9 - À moins qu'elles ne soient spécialement conçues par le fabricant, les fermetures anti-panique ne sont pas prévues pour être utilisées sur des portes à double action
(va-et-vient).
10 - Il y a lieu de suivre soigneusement les instructions de pose pendant l'installation. Il convient que l'installateur communique ces instructions et toutes les instructions
d'entretien à l'utilisateur.
11 - Il convient normalement d'installer la barre horizontale à une hauteur comprise entre 900 mm et 1 100 mm du sol fini, lorsque la porte est en position verrouillée.
Lorsque l'on sait que la majorité des occupants des locaux sont de jeunes enfants, il convient de réduire la hauteur de l'élément manoeuvrable.
12 - Il convient d'installer la barre horizontale de manière à fournir une longueur effective maximale.
13 - Il y a lieu de monter les pênes et les gâches de manière à permettre leur engagement en toute sécurité. Il convient de veiller à ce qu'aucune projection des pênes, en
position rétractée, n'empêche le libre battement des portes.
14 - Lorsque les fermetures anti-panique doivent être installées sur des portes à deux vantaux à recouvrement et équipées de systèmes automatiques de fermeture, un
dispositif de sélection de vantaux conforme à l'EN 1158 est généralement installé afin d'assurer la séquence de fermeture correcte des portes. Cette
recommandation est particulièrement importante eu égard aux blocs-portes résistant au feu/étanches aux fumées.
15 - Il convient de n'installer aucun système de verrouillage de porte en position fermée, autre que ceux spécifiés dans la norme européenne NF EN 1125:2008. Ceci
n'empêche pas l'installation de systèmes automatiques de fermeture.
16 - Lorsqu'un ferme-porte doit être utilisé pour ramener la porte en position fermée, il convient de veiller à ne pas empêcher l'utilisation de la porte par les enfants, les
personnes âgées et les handicapés.
17 - Il convient que toutes gâches ou plaques de protection prévus soient installés de façon à assurer la conformité à la norme européenne NF EN 1125:2008.
18 - Il est recommandé de prévoir une signalisation indiquant «pousser la barre pour ouvrir», ou un pictogramme sur la face intérieure de la porte, immédiatement au
dessus de la barre horizontale ou sur la barre lorsqu'elle présente une surface plane suffisante sur laquelle il est possible d'inscrire la signalétique requise. Il convient
que la surface de la zone du pictogramme ne soit pas être inférieure à 8 000 mm2 et il convient qu'il soit de couleur blanche sur un fond vert. Il convient qu'il soit conçu
de manière à ce que la flèche pointe vers l'élément manoeuvrable, lorsqu'il est installé.
19 - Lubrifier les surfaces de contact entre le pêne demi-tour et la gâche avec de la graisse ayant une température d'emploi adaptée aux conditions d'utilisation (par ex.
FINA Marson EPL2 ou autre produit correspondant).
8
V2
V2
V2
V2
V3 V3
V3
V3 V3
L+25
V3
V2
V2
V3
V2
V1 Ø4.2x19
M4x16
M4x6
V7
V6 M4x5
UNI 7687
M5X14
UNI 9201-A/M5-8
M5x13
V8
V9
Ø4.2x19
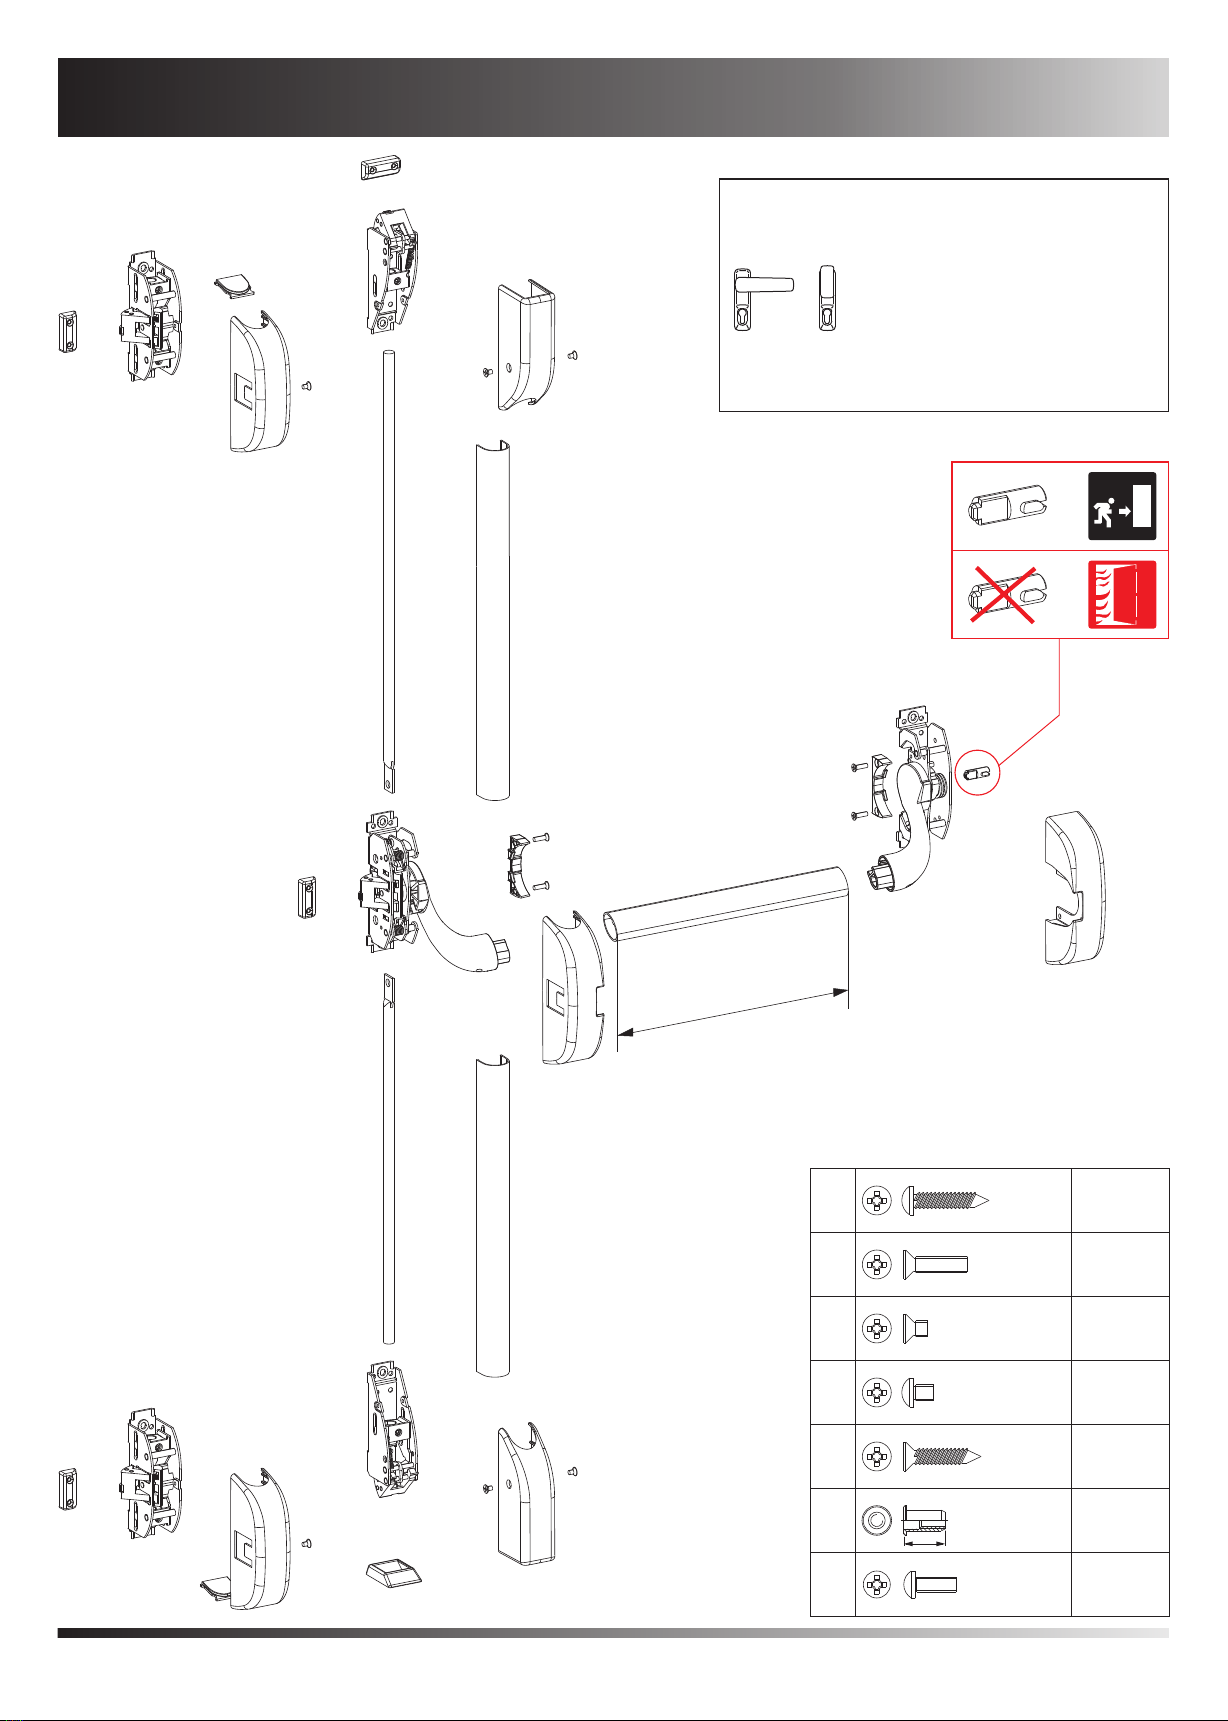
6Изображение в разобранном виде
Esploso - Exploded
Éclaté - Explosionszeichnung
Инструкции по монтажу поставляются в
"
упаковках внешних нажимных ручек
Le istruzioni di montaggio sono in dotazione
"
ai comandi esterni.
The assembling instructions are supplied
"
with the external controls
Les instructions de montage sont fournies
"
avec les commandes extèrieures
Die Montageanleitung ist der
"
Aussensteuerung beigefügt
13
Фиксатор открытого положения

9
O
OO
O
O
V
O
O
7Типы запирания и их монтаж
Tipi di bocchette e loro fissaggio - Different keeps and their installation
Types de gâches et leur fixation - Verschiedene Schliessbleche und deren Montage
V
P
V
P
10
V1
Ø4.2x19
V1
V1
V1
V1
V9
V9
V8
V8
V9
V9
V8
V8
V8
V8
V9
V9
V1 V1
V1 V1
V1 V1
V1 V1
8Способы крепления механизма «антипаника»
Sistemi di fissaggio del maniglione - Fixing methods for panic device
Système de fixation de l'antipanique - Montagemoeglichkeiten der Stangengriffe
8aШурупы-саморезы
Con 4 viti autofilettanti - Self-threading screws
Avec 4 vis autofileteuse - Selbsschneidende Schrauben
8bС помощью резьбовых заклепок
Con rivetti - With rivets
Avec rivets - Mit Nieten
M5x13
V8
UNI 7687
M5X14
V9
UNI 9201-A/M5-8
13
11
8c
С помощью прикручивания на дверь
монтажной пластины
Con piastra avvitata - With a screwed plate
Avec une platine vissée - Mit aufgeschraubter Platte 8d
С помощью приваренной к двери
монтажной пластины
Con piastra saldata - With a welded plate
Avec une platine soudée - Mit geschweißter Platte
V6
M4x5
V7
Ø4.2x19
V6
V6
V6
V6
V6 V6
V6
V6
V6
V6
V6
V6
V6 V6
V6 V6
V7
V7
V7
V7
V7
V7
V7
V7
V6
V6
V6
V6
V6 V6
V6 V6
V7
V7 V7
V7
9Монтаж верхней и нижней защелок
Per scrocchi laterali con autobloccaggio - For laterla self-loking latch bolts
Pour penes lateraux avec autobloquant - Für seiten klinken mit selbstsperrung
A
B
C
- ПРЕДУПРЕЖДЕНИЕ!
При фиксации штанги винтом "В" нажмите на элемент "А", чтобы обеспечить
запирание защелки, когда дверь закрыта.
- ATTENZIONE !
Si consiglia di premere sull’elemento “A” durante il fissaggio dell’asta con la vite “B”, per
assicurare l’autobloccaggio dello scrocco quando la porta è chiusa.
- WARNING!
While fixing the rod with screw “B”, press on item “A” to ensure the latch bolt self locking
when the door is closed.
- ATTENTION !
Pendant le fixage de la tige au moyen de la vis “B”, presser sur l'élément “A” afin
d'assurer l'autobloquant du pêne quand la porte est fermée.
- ACHTUNG !
Wahrend der Fixierung der Stange mit Schraube “B”, drücken an Element “A” für die
Selbstsperrung der Klinke mit der geschlossene Tür.
- После крепления нажмите в точку "С" и проверьте, что защелка не
поворачивается.
- Dopo il fissaggio, verificare che premendo lo scrocco nel punto “C” non ruoti.
- After fixing, press in point “C” and check that the latch bolt does not rotate.
- Après le fixage vérifier l'absence de rotation du pêne en pressant sur le point “C”.
- Nach der Fixierung kontrollieren Sie, daß es keine Rotation der Klinke an Punkt “C”
gibt.
V6
M4x5

10aРасположение устройства «антипаника» на двери
Posizionamento del maniglione sulla porta - Positioning of the panic device on the door
Positionnement de l'antipanique sur la portel - Lage des Stangengriffes auf dem Tuerblatt
y
X
X2 X1
y
D+31
d
L
D+34
D+18
ab
c
Bmax = 1050
H
H1
Размер "D" после закрепления должен быть в пределах 9–12 мм. Если размер створки "Х" (или размеры "Х1" и "Х2" для двух створок) и/или эксцентричность петли требует расстояние "D"
больше 12 мм, установка балки невозможна. Компания Дорлок готова проверить с помощью графических средств возможность установки выходного устройства «антипаника» на дверях
определенного типа и размеров. Для корректной работы противовзломного механизма уменьшите расстояние между защелкой и запорной планкой до нуля (Размер G).
La quota "D", ad installazione completata, deve risultare compresa tra mm 9 e mm 12. Quando la quota "X" dell'anta (o le quote "X1" e "X2"delle 2 ante)e/o il decentramento "Y" della cerniera
richiedono una distanza "D" superiore a mm. 12 non è possibile l'installazione del maniglione La Doorlock è disponibile a verificare graficamente la possibilità di installazione del maniglione su
porte di tipo e dimensioni definite. Per un corretto funzionamento dell’autobloccante la distanza tra scrocco e bocchetta deve essere ridotta a mm 0 (quota G).
Dimension “D”, after fixing, has to turn out between 9mm and 12mm. When the wing dimension "X" (or dimensions "X1" and "X2" of the two wings) and/or the eccenticity of the hinge require a
distance "D" higher than 12mm, the installation of the "push bar" is not possible. Doorlock is willing to check, by graphic means, the possibility of installing the panic exit device in doors of defined
type and dimensions. For proper working of the anti-thrust mechanism reduce distance between Latch and Keep to zero ( dimension G ).
La cote “D”, à installation completee, doit étre compris entre mm 9 et mm 12. Alors que la cote "X" de la porte (ou les cotes "X1" et "X2" des deux portes) et/ou l'excentration de la charnière
demandent une distance "D" qui dépasse 12mm, l'installation de la serrure antipanique ne peut pas être effectuée. La Doorlock est disponible pour verifier graphiquement la possibilié
d'installation de la fermeture sur des portes de type et dimensions definis. Pour un juste fonctionnement du système auto-blocage la distance entre le lançant et la gâche doit être reduit à mm 0
(cote G).
Mass “D”, nach der Montage, muss zwischen 9mm und 12 mm liegen. Wenn das Flügelmass "X" (oder die Masse "X1" und "X2" beider Flügel) bzw. die Dezentralisierung des Bandes einer Weite
"D" höher als mm. 12 bedarf, ist es unmöglich, das antipanische Beschlag anzubauen. Die Firma Doorlock bietet Ihren Kunden an, die Anbaumöglichkeiten des Paniktuerverschluesse an Türen
von bestimmten Art und Massen graphisch zu analysieren. Fuer einen einwandfreien Betrieb der Riegelsicherung muss der Abstand zwischen Schliessblech und Riegel auf null eingestell
werden (Mass G).
До чистого пола
Al pavimento finito
To the finished floor
Au plancher fini
An den gefertigten Boden
12
c.1 c.2
G
G
G
D+7
D+23
a.1
a.2
G
G
80
D+7
G
a.2
Рис.2
a.2
34 min
88.513588.5
81 81
14 min
35 min
V1 V1
V1
V1
Обязательно (Рис.2)
Obbligatorio (Fig.2)
Compulsory (Fig.2)
Obligatoire (Fig.2)
Zwangmaessing (Fig.2)

D+7 D+7
D+7
D+23
D+7 D+23
K1
e
K
a
e
980 - 1180
L
b
G
До чистого пола
Al pavimento finito
To the finished floor
Au plancher fini
An den gefertigten Boden
13
a.2
a.1
e.2 e.1
a.2 e.2
G
G
G
G
G
80
Размер "D" после закрепления должен быть в пределах 9-12 мм. Если размер створки "Х" (или размеры "Х1" и "Х2" для двух створок) и/или эксцентричность петли требует расстояние "D"
больше 12 мм, установка балки невозможна. Компания Дорлок готова проверить с помощью графических средств возможность установки выходного устройства «антипаника» на дверях
определенного типа и размеров. Для корректной работы противозломного механизма уменьшите расстояние между защелкой и запорной планкой до нуля (Размер G).
La quota "D", ad installazione completata, deve risultare compresa tra mm 9 e mm 12. Quando la quota "X" dell'anta (o le quote "X1" e "X2"delle 2 ante)e/o il decentramento "Y" della cerniera
richiedono una distanza "D" superiore a mm. 12 non è possibile l'installazione del maniglione La Doorlock è disponibile a verificare graficamente la possibilità di installazione del maniglione su
porte di tipo e dimensioni definite. Per un corretto funzionamento dell’autobloccante la distanza tra scrocco e bocchetta deve essere ridotta a mm 0 (quota G).
Dimension “D”, after fixing, has to turn out between 9mm and 12mm. When the wing dimension "X" (or dimensions "X1" and "X2" of the two wings) and/or the eccenticity of the hinge require a
distance "D" higher than 12mm, the installation of the "push bar" is not possible. Doorlock is willing to check, by graphic means, the possibility of installing the panic exit device in doors of defined
type and dimensions. For proper working of the anti-thrust mechanism reduce distance between Latch and Keep to zero ( dimension G ).
La cote “D”, à installation completee, doit étre compris entre mm 9 et mm. 12 Alors que la cote "X" de la porte (ou les cotes "X1" et "X2" des deux portes) et/ou l'excentration de la charnière
demandent une distance "D" qui dépasse 12mm, l'installation de la serrure antipanique ne peut pas être effectuée. La Doorlock est disponible pour verifier graphiquement la possibilié
d'installation de la fermeture sur des portes de type et dimensions definis. Pour un juste fonctionnement du système auto-blocage la distance entre le lançant et la gâche doit être reduit à mm 0
(cote G).
Mass “D”, nach der Montage, muss zwischen 9mm und 12 mm liegen. Wenn das Flügelmass "X" (oder die Masse "X1" und "X2" beider Flügel) bzw. die Dezentralisierung des Bandes einer Weite
"D" höher als mm. 12 bedarf, ist es unmöglich, das antipanische Beschlag anzubauen. Die Firma Doorlock bietet Ihren Kunden an, die Anbaumöglichkeiten des Paniktuerverschluesse an Türen
von bestimmten Art und Massen graphisch zu analysieren. Fuer einen einwandfreien Betrieb der Riegelsicherung muss der Abstand zwischen Schliessblech und Riegel auf null eingestell
werden (Mass G).
10bРасположение устройства «антипаника» на двери
Posizionamento del maniglione sulla porta - Positioning of the panic device on the door
Positionnement de l'antipanique sur la portel - Lage des Stangengriffes auf dem Tuerblatt
106.5106.5
81
14 min
81
D+7
35 min 35 min
V1 V1
V1
V1
Рис.3 Рис.4
Обязательно (Рис.3-4)
Obbligatorio (Fig.3-4)
Compulsory (Fig.3-4)
Obligatoire (Fig.3-4)
Zwangmaessing (Fig.3-4)

14
1
3
2
5
H/K
4
CLIK
1
3
2
5
H1/K1
CLIK
4
K
H
H1
K1
H+97
H+9
H1+97
H1+9
K+65
K+9
K1+65
K1+9
11
Подрезка соединительных штанг и декоративных кожухов
Taglio barra, aste e coperture
Bar, connecting- rods and covers shortening
Coupe barre, tringles et couvertures
Kuerzung Stange, Verbindungstange und Haube
12
Крепление верхней штанги
Fissaggio asta superiore
Fixing of upper bar
Fixation de la tringle supérieure
Oberstangebefestigung
13
Крепление нижней штанги
Fissaggio asta inferiore
Fixing of lower bar
Fixation de la tringle inférieure
Unterstangebefestigung

15
1
23
CLIK
CLOSE
SX DX
OPEN
135°
14 Выбор направления запирания механизма «антипаника»
Determinazione della mano - Right or left hand selection
Main droite ou gauche à choisir - Öffnungshand wählen
15 Монтаж декоративной крышки и фиксация механизма «антипаника» в открытом положении
Dispositivo fermo a giorno - Latch retainer device
Arrêt de sûreté - Sichtbare Sperrvorrichtung
16 Установка заглушек
Montaggio carter - Assembling cover
Montage du carter - Montege des Gehaüses

Линия пола
Filo pavimento
Floor line
Ligne du plancher
Bodenlinie
b
a
e
e.1 (D=9)+23
d
e.2 (D=9)+7
c
c.2 (D=9)+18
c.1 (D=9)+34
V1
V7
V7
V7
V1
V7
V1
V1
V7
V7
V1
V1
V1
V1
V7
V7
V7
V7
V7
V7
V7
V1
V1
V1
V1
V1 V1
V7
V7
V7
V1
V1
V7
V1
V1
V7
L
10
16
10
V7
V1 V1
V7
HH1
H
K
H1
K1
K1
K
11.5
33.5
68.5
88.5
131.5
0
- 9.25
0
+ 9.25
91.5
8.5
O
11.5
33.5
68.5
88.5
- 9.25
0
+ 9.25
8.5
91.5
O
+ 44.5
+ 9.25
+ 79.5
+ 106.5
+ 14.5
0
- 9.25
0
+ 9.25
- 9.25
0
- 59.5
+ 59.5
0
+ 35.5
+ 56.5
0
- 35.5
- 56.5
+ 27
- 27
- 5
0
+ 10
- 10
0
+ 35.5
+ 56.5
- 35.5
- 56.5
0
+ 59.5
- 59.5
+ 17.5
+ 109.5
+ 124
- 79.5
- 44.5
- 17.5
- 109.5
- 124
- 106.5
- 14.5
0
16
0
- 10
0
+ 10
- 10
0
+ 10
+ 10
- 10
0
+ 10
- 10
0
- 25
- 41
e.2 (D=12)+7
- 28
e.1 (D=12)+23
- 44
a.2 (D=9)+7
a.2 (D=12)+7
+ 9.25
- 9.25
0
- 25
- 28
a.1 (D=9)+23
a.1 (D=12)+23
- 41
- 44
c.2 (D=12)+18
c.1 (D=12)+34
115.5
131.5
134.5
118.5
Popular Door Lock manuals by other brands


Hewi
Hewi 162XAH 640 Series Mounting instructions

Assa Abloy
Assa Abloy CLIQ eCLIQ Connect key operating instructions

FingerprintDoorLocks
FingerprintDoorLocks YL-T8 user manual

Assa Abloy
Assa Abloy EL460 manual

Proxess
Proxess PX10110003 Service manual

SECO-LARM
SECO-LARM Enforcer Access SD-962AR-36A installation manual