manuals.online logo
Brands
  1. Home
  2. •
  3. Brands
  4. •
  5. SECO-LARM
  6. •
  7. Door Lock
  8. •
  9. SECO-LARM Enforcer Access SD-962AR-36A User manual

SECO-LARM Enforcer Access SD-962AR-36A User manual

Other manuals for Enforcer Access SD-962AR-36A

2

Other SECO-LARM Door Lock manuals

SECO-LARM SD-997A-GBQ User manual

SECO-LARM

SECO-LARM SD-997A-GBQ User manual

SECO-LARM E-941D 600Q Series User manual

SECO-LARM

SECO-LARM E-941D 600Q Series User manual

SECO-LARM SD-995C-LE25 User manual

SECO-LARM

SECO-LARM SD-995C-LE25 User manual

SECO-LARM SD-995C User manual

SECO-LARM

SECO-LARM SD-995C User manual

SECO-LARM SD-997SMB-AQ User manual

SECO-LARM

SECO-LARM SD-997SMB-AQ User manual

SECO-LARM E-942FC-1300 User manual

SECO-LARM

SECO-LARM E-942FC-1300 User manual

SECO-LARM Enforcer SD-994C User manual

SECO-LARM

SECO-LARM Enforcer SD-994C User manual

SECO-LARM SD-998C-D3Q User manual

SECO-LARM

SECO-LARM SD-998C-D3Q User manual

SECO-LARM SD-996C-NUQ User manual

SECO-LARM

SECO-LARM SD-996C-NUQ User manual

SECO-LARM Enforcer SD-997A User manual

SECO-LARM

SECO-LARM Enforcer SD-997A User manual

SECO-LARM SD-996C-U1VQ User manual

SECO-LARM

SECO-LARM SD-996C-U1VQ User manual

SECO-LARM SLI SD-997B-1SQ User manual

SECO-LARM

SECO-LARM SLI SD-997B-1SQ User manual

SECO-LARM SD-997BQ User manual

SECO-LARM

SECO-LARM SD-997BQ User manual

SECO-LARM SD-997B-GBQ User manual

SECO-LARM

SECO-LARM SD-997B-GBQ User manual

SECO-LARM SD-993C-D3Q User manual

SECO-LARM

SECO-LARM SD-993C-D3Q User manual

Popular Door Lock manuals by other brands

Dorma MUNDUS PREMIUM US 10 Mounting instruction

Dorma

Dorma MUNDUS PREMIUM US 10 Mounting instruction

Defiant LG600BRA4BGT Instructions for installation

Defiant

Defiant LG600BRA4BGT Instructions for installation

TRU-BOLT M1740024 manual

TRU-BOLT

TRU-BOLT M1740024 manual

Opera ARCA SLIDE installation instructions

Opera

Opera ARCA SLIDE installation instructions

tell CODELOCK CL5500 Series installation instructions

tell

tell CODELOCK CL5500 Series installation instructions

ABH LR6000 installation instructions

ABH

ABH LR6000 installation instructions

Assa Abloy effeff 827A-IP Mounting instructions

Assa Abloy

Assa Abloy effeff 827A-IP Mounting instructions

Iseo MA1A installation guide

Iseo

Iseo MA1A installation guide

ID Lock 150 user manual

ID Lock

ID Lock 150 user manual

Lockly ACCESS TOUCH PRO user manual

Lockly

Lockly ACCESS TOUCH PRO user manual

iLoq G50S user guide

iLoq

iLoq G50S user guide

SDC Z7835 installation instructions

SDC

SDC Z7835 installation instructions

ilco 452 Installation

ilco

ilco 452 Installation

Samsung shs-h705 user guide

Samsung

Samsung shs-h705 user guide

TRU-BOLT 08102017 user manual

TRU-BOLT

TRU-BOLT 08102017 user manual

CDVI 500-LADJ quick start guide

CDVI

CDVI 500-LADJ quick start guide

Igloohome Deadbolt 2S Metal Grey Installer/user guide

Igloohome

Igloohome Deadbolt 2S Metal Grey Installer/user guide

eSSL FL-300 user manual

eSSL

eSSL FL-300 user manual

manuals.online logo
manuals.online logoBrands
  • About & Mission
  • Contact us
  • Privacy Policy
  • Terms and Conditions

Copyright 2025 Manuals.Online. All Rights Reserved.

SECO-LARM U.S.A., Inc.
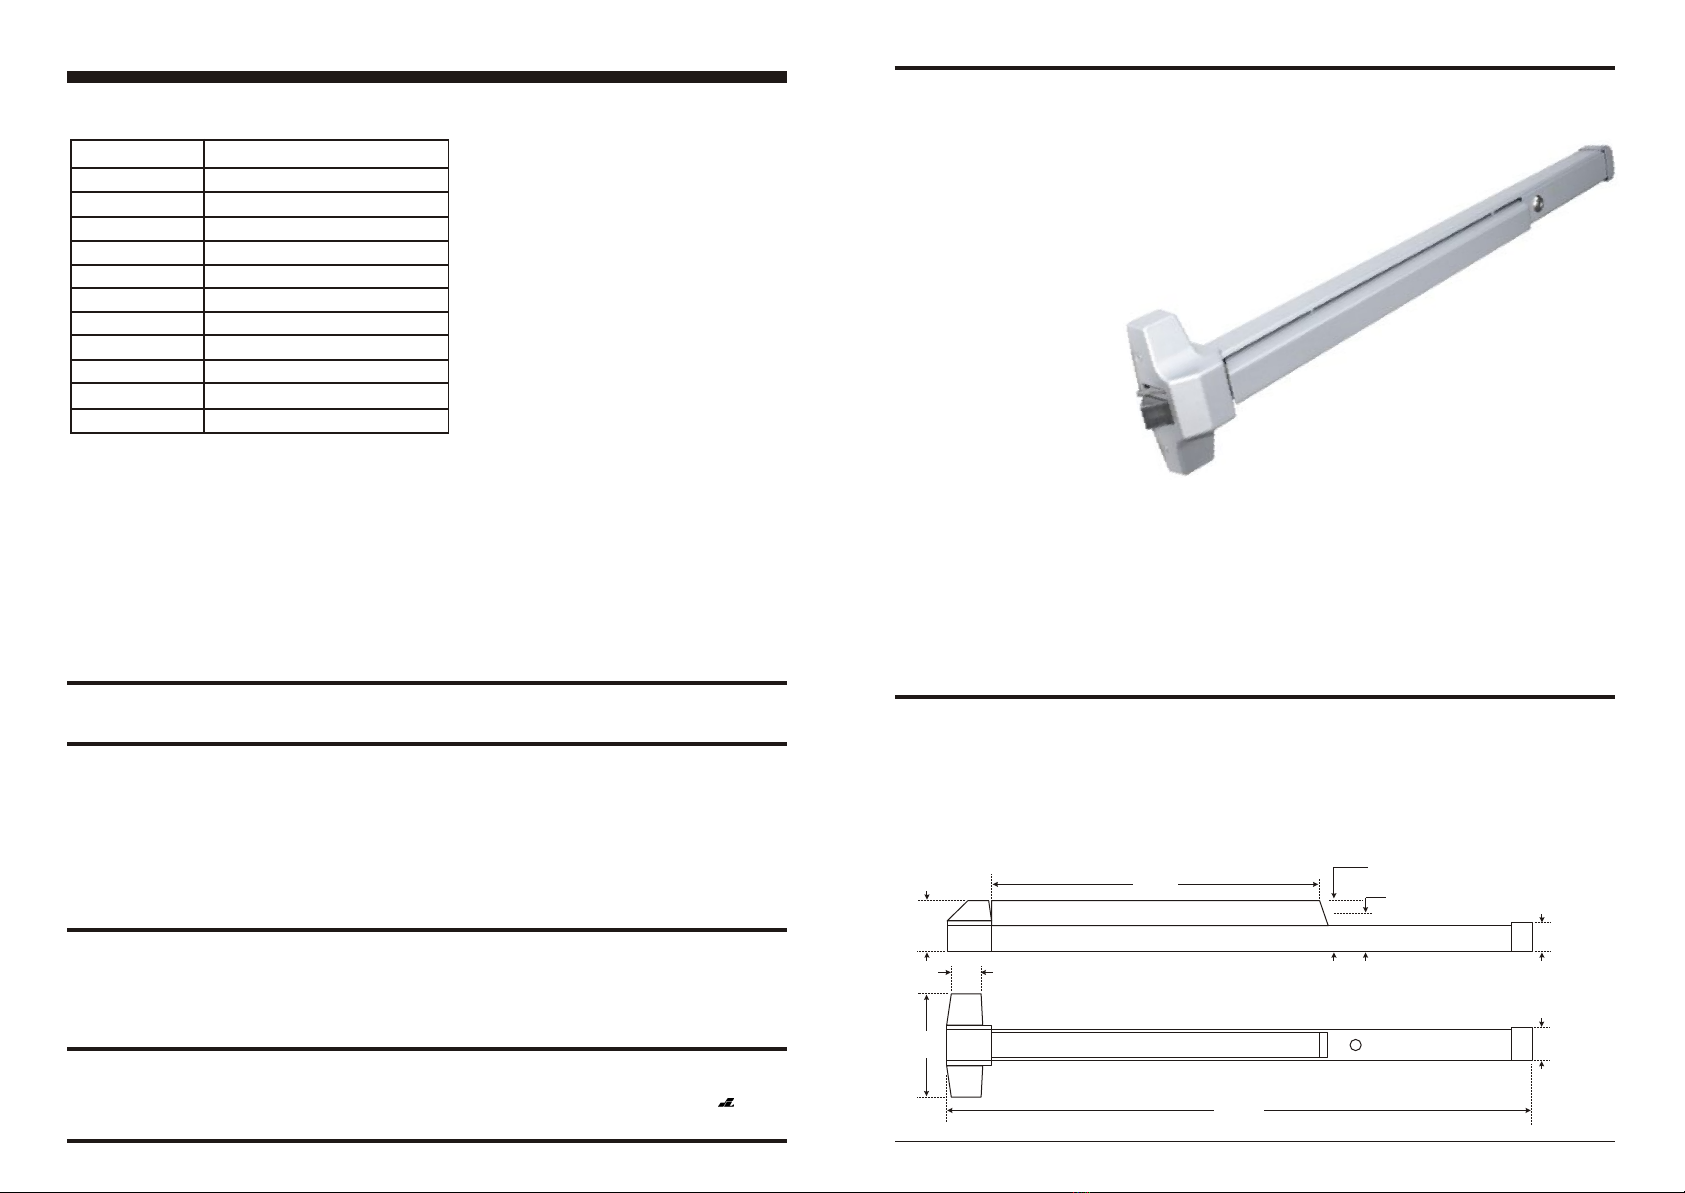
Fig. 1 -- Dimensions:
SECO-LARM's SD-962AR-36A exit device, when mounted on the inside of a door to block entry to a protected premises,
securely locks the door from outside access while allowing users inside the protected premises to exit. The stainless-steel
enclosure protects the exit device from abuse, yet easily unlocks the door from the inside by users who require exit. It can
be connected to a door handle with a lock, or any physical locking device, on the outside of the door in order to allow
entry to personnel with keys to the protected premises.
What It Does:
Rim Exit Device Installation Manual
Made in Taiwan
ExitDevicebIMPg1.cdr
U.S.A., Inc.
16842 Millikan Avenue, Irvine, CA 92606
Tel: 800-662-0800 / 949-261-2999 Fax: 949-261-7326
Website:www.seco-larm.com
E-mail:sales
@
seco-larm.com
PITSW6
®
This SECO-LARM product is warranted against defects in material and workmanship whileused in normal
service for a period of one (1) year from the dateof sale to the original consumer customer. SECO-LARM’s obligation is
limited to the repair or replacement of any defective part ifthe unit is returned, transportation prepaid, to SECO-LARM.
This Warranty is void if damage is caused byor attributed to acts of God, physical or electrical misuse or abuse,neglect,
repair, or alteration, improper or abnormal usage, orfaulty installation, or if for any other reason SECO-LARM determines
that such equipment is not operating properly as a result of causesother than defects in material and workmanship.
The sole obligation of SECO-LARM, and the purchaser’s exclusive remedy, shall be limited to replacement or repair only, at
SECO-LARM’s option. In no event shall SECO-LARM be liable for anyspecial, collateral, incidental, or consequential
personal or property damages of any kind to the purchaser or anyoneelse.
SD-962AR-36A
1-3/4" thick, wood or metal
Non-Handed
Stainless-steel, 3/4" throw
Stainless-steel, 5/8"
For 5/8" stop, plus shim for 1/2" stop
Stainless-steel
Steel
High-density rust-resistant alloy
Steel
Steel
Allen-typedoggingstandard
Features:
•For exit doors --
Allows exit from inside while locked from outside.
•Reversiblenon-handeddesign.
•For metal or wood doors up to 13/4" thick.
•Stainless steel 3/4" throw latch bolt.
•Separate deadlocking latch --
Prevents the use of credit cards
or similar means to open the latch bolt.
Rim Exit Device
SD-962AR-36A
ENFORCER®
Installation Manual
Incorrect mounting which leads to exposure to rain or moisture inside the enclosure coulddamage the
The information and specifications printed in this manual are current at the time ofpublication. However, the
SECO-LARM policy is one of continual development and improvement. For this reason,SECO-LARM reserves the right
to change specifications without notice. SECO-LARM is also not responsiblefor misprints or typographical errors.
Copyright © 2007 SECO-LARM U.S.A., Inc. Allrights reserved. This material may not be reproduced or copied, in
whole or in part, without the written permission of SECO-LARM.
•Allen-type 1/4-turn dogging lock --
Allows the exit device to be unlocked
for extended periods of time.
•Includes all needed hardware for typical installation.
•Works with standard external door handle/lock devices
(not included).
•Fits doors from 30" to 48" wide.
•Heavy-duty steel construction.
•Stainless steel spring.
1
2/
2
”
(64mm) 3
1/
4
”
(44mm)
191/2”
(495mm)
1
2/
2
”
(64mm)
2”
(51mm)
3
5/
4
”
(146mm)
323/4”
(832mm)
Extended
Depressed
Specifications:
SECO-LARM®
WARRANTY
For Doors
Hand
Latchbolt
Dead Latch
Strike
Spring
Chassis
Cover
RailAssembly
EndCap
Dogging
WARNING:
device and void the warranty.
NOTICE:
3
1/
4
”
(44mm)
2”
(51mm)
Rim Exit Device Installation ManualRim Exit Device Installation Manual
SECO-LARM U.S.A., Inc.
Fig. 2 -- Parts Description
Chassis
Cover
Chassis Mechanism
Housing
Strike
Push Bar
Dogging
Device --
UseAllenkey
to lock in the
open position
so door can be
opened from
outside the
protected
premises.
End Cap
Bracket
Fig. 3 -- Possible Applications:
Single Door
Double Door
with Mullion
Double Door
without
Mullion
Door Trim
Trim Trim
Trim Trim
Mullion
1
2/
4
”
1
2/4”
3
2/
4
”
1. Mark the center line of the exit bar on the center of the door by drawing a line across the door
at 40" above the floor. See fig. 4.
2. Fold the included template, and align the center lines on the template with the center line just
drawn on the door. Then mark the position of the mounting holes for the latch assembly. See fig. 5.
3. Move the template against the door stop and then mark the mounting holes for the strike.
4. Drill the holes as marked on the door and the mullion. See fig. 6.
Note:
1. For doors with a door stop depth of under 5/8", it may be necessary to use the included 1/8"
strike shim.
2. For doors with a door stop depth of 5/8" or more, the strike shim may not be necessary.
ExitDevice
ExitDevice ExitDevice
Fig. 4 -- Mounting
Location Fig. 5 -- Using
the Template Fig. 6 -- Mounting
the Strike
Fig. 7 -- Final Installation
Insideface
of door
Door
Stop
Mullion Mullion
Strike
shim
(ifneeded)Strike
Door
Stop
Insideface
of door
Door Door
Door Door
40”
r
F
l
o
o
Door
Draw line here
Line 40”
above floor
TemplateTemplate
End Cap