Dobiy DM6-80m User manual

Distance Beyond
Handheld Laser
Distance Meter
Shenzhen Dobiy Electronic Co., Ltd.
www.dobiy.com
Laser Distance Meter
DM6
MAX
MIN
ON
=
MEASURE
MENU
TIMER
CLEAR
OFF
Shenzhen Dobiy Electronic Co., Ltd.

Contents
Safety Instructions…………………..……….. 2
Start-up……………………………..………… 9
Menu functions………………………..……… 13
Operation……………………………..………. 16
Measuring………………………………..…… 17
Functions…………………………………..…. 20
Appendix…………………………………..…. 30
English
Congratulations on the purchase of our product.
Carefully read the Safety Instructions and
the User Manual before using this product.
The person responsible for the instrument must ensure
that all users understand these directions and adhere to
them.
1
Contents
Contents
Handheld Laser Distance Meter
EN
Symbols used
Use of the instrument
Permitted use
The symbols used in the Safety
Instructions have the following
meanings:
Indicates a potentially hazardous
situation or an unintended use which, if
not avoided, will result serious injury.
Indicates a potentially hazardous
situation or an unintended use which, if
not avoided, may result in minor injury
and/or in appreciable material,
financial and environmental damage.
WARNING:
CAUTION:
Important paragraphs which must
be adhered to in practice as they enable
the product to be used in a technically
correct and efficient manner.
ŸMeasuring distances
ŸComputing functions, e.g. areas and
volumes
ŸIndirect measurement(Pythagoras
proposition )
ŸPlus or minus measurement
Safety Instructions
2
EN
Safety Manua

ŸTil t measu re me nt
Ÿ
Ÿ
Ÿ
Ÿ
Ÿ
Ÿ
Ÿ
Ÿ
Ÿ
Ÿ
Pr oh ibite d use
Us ing th e instrument w it hou t
instr uction
Us ing o ut si de th e sta te d li mits
Deac tivati on of s afety sys tems a nd
rem oval o f ex pl ana tor y and haza rd
lab els
Opening of the equ ipme nt by us in g
tool s (scr ew -dr iver s,etc. ), as far as
no t spec ific ally p er mitte d fo r cer tai n
ca ses
Carryi ng out mod ificat ion or
con ve rsi on o f the pr oduc t
Us e aft er misapp rop riation
Use o f acc esso ries fr om oth er
man ufact ures w itho ut t he ex pre ss
ap pr oval
Deliber at e or irrespo nsi bl e beha viour
on sca ffo ld ing, w he n usi ng l adder s,
wh en me asu ri ng ne ar m achines
which a re runni ng, or near parts of
machi nes or in stal lation s which ar e
unp rot ect ed , ai ming di rectly into
the sun
Del ibe ra te d azz lin g of third parti es ;
also in t he d ar k
Inade qua te sa fe guar ds at t he
survey ing s ite (e .g. w hen me asur ing
3
EN
Safety Manua

Areas of responsibility
Responsibilities of the manufacturer of
the original equipment:
It is responsible for supplying the
product, including the User Manual and
original accessories, in a completely safe
condition.
Limits of use
�See section “Technical Date”.
This product is designed for use in areas
permanently habitable by humans, do
not use the product in explosion
hazardous areas or in aggressive
environments.
Responsibilities of the manufacturer of
non-original equipment:
The
。
manufacturers of non-original
equipment for the product are
responsible for developing,
implementing and communicating safety
concepts for their products. They are se
safetalso responsible for the
effectiveness of they concepts in
combination with the equipment
4
EN

5
WARNING
Ÿ
Ÿ
Ÿ
The person responsible for the
instrument must ensure that the
equipment is used in accordance with
the instructions. This person is also
accountable for the deployment of
personnel and for their training and for
the safety of the equipment when in use.
The person in charge of the instrument
has the following duties:
To understand the safety instructions
on the product and the instructions
in the User Manual.
To be familiar with local safety
regulations relating to accident
prevention.
To inform local dealer immediately if
the equipment becomes unsafe.
Responsibilities of the person in charge
of the instrument:
EN
Safety Manua

Hazards in use
measurements if the instrument is
defective or if it has been dropped or has
been misused or modified.
Carry out test measurements
periodically. Particularly after the
instrument has been subject to
abnormal use, and before, during or
after important measurements.
Make sure the optics is kept clean and
that there is no mechanical damage to
the bumpers.
In using the instrument for distance
measurements or for positioning moving
objects ( e.g. cranes, building
equipment, platforms, etc. ) unforeseen
events may cause erroneous
measurements.
Precautions:
CAUTION:
Precautions:
Only use this product as a measuring
sensor, not as a controlling device. Your
system must be configured and operated
Watch out for erroneous distance
CAUTION:
6
EN
Safety Manua
in such a way, that in case of an
erroneous measurement, malfunction of
the device or power failure due to
installed safety measures ( e.g. safety
limit switch ), it is assured that no
damage will occur.
Flat batteries must not be disposed of
with household waste.Care for the
environment and take them to the
collecting points provided in accordance
with national or local regulations.
Dispose of the product appropriately in
accordance with the national
regulations in force in your country.
Always prevent access to the product by
unauthorized personnel.
Technical Support:
11local dealer.
WARNING:
The product must not be disposed
of with household waste.
The term "electromagnetic
compatibility" is taken to mean the
capability of the product
Electromagnetic Compatibility
( EMC )
7
EN
Safety Manua

to function smoothly in an environment
where electromagnetic radiation and
electrostatic discharges are present, and
without causing electromagnetic
interference to other equipment.
The product conforms to the most
stringent requirements of the relevant
standards and regulations. Yet, the
possibility of it causing interference in
other devices cannot be totally excluded.
Never attempt to repair the product
yourself. In case of damage, contact the
local dealership.
WARNING:
CAUTION:
Laser classification
Integrated distance meter
2
8
EN
Safety Manua

9
The distance meter produces a visible
laser beam which emerges from the front
of the instrument.
It is a Class 2 laser product in
accordance with:
IEC60825-1:2007“Radiation safety of
laser products”
Do not stare into the laser beam or direct
it towards other people unnecessarily.
Eye protection is normally afforded by
aversion responses including the blink
reflex.
Looking directly into the beam with
optical lens ( e.g. binoculars, telescopes )
can be hazardous.
Do not look directly into the beam with
optical lens.
Laser Class 2 products:
WARNING:
Precautions:
CAUTION:
Looking into the laser beam may be
EN
Safety Manua

Inserting / replacing batteries
1 Remove battery compartment lid and
attach hand strap.
2 Insert batteries, observing correct
polarity.
3 Close the battery compartment again.
Replace the batteries when the symbol
10
Labeling
Start-up
EN
Start
Made in China
AVOID EXPOSURE
Laser radiation is emitted from this aperture
Dobiy Electronic Co,.Ltd www.doby.com.cn
Dm6
Original laser distance meter
Power: 3V nominal = / 400mA max
Maximum radiant power: < 1 mW
Emitted wavelength: 620-690 nm
Beam divergence: 0.16x0.6 mrad
Pulse duration: 1x10⁻⁹ s
Battery: 2 x 1.5V LR6 (AA)

flashes permanently in the display.
Only use alkaline batteries.
Remove the batteries before any
long period of non-use to avoid the.
danger of corrosion.
Multifunctional end-piece
The instrument can be adapted for
the following measuring situations:
For measurements from an edge,
fold out the positioning bracket
until it first locks in place.Until the
display shows
11
EN
Start
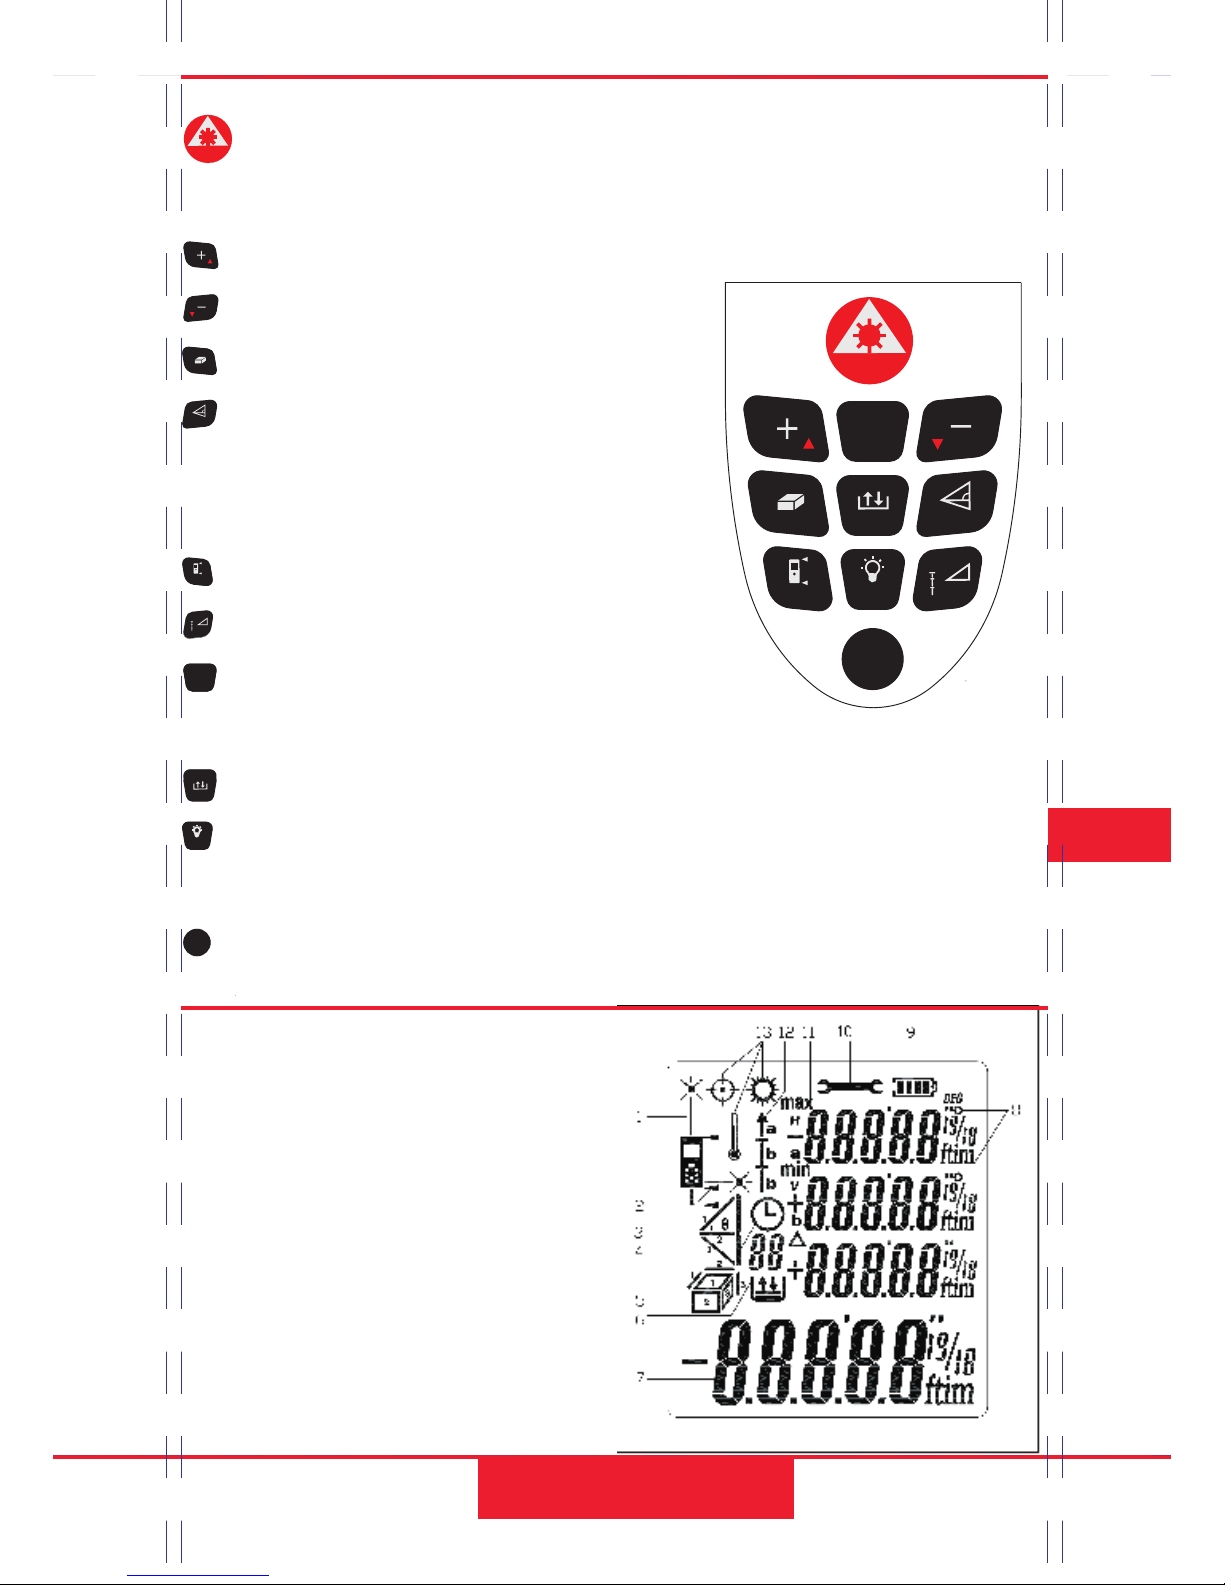
Keypad
ON / DIST ( On / measuring )
- button
Plus (+) - button
Minus (-) - button
Area / volume - button
Indirect measurement
Reference - button
Angle button / Marking
Menu / Confirming
Storage - button
Background light / Timing
– button
Clear / off – button
( Pythagoras proposition )
– button
- button
测量
面积
体积
勾股
基准
标线
角度
=
设置
存储
定时
清除
关机
Display
12
MEASURE
=
MENU
TIMER
CLEAR
OFF
1 Laser active
2 Reference
3 Indirect
measurement
(Pythagoras
proposition )
4 Timer
EN
Start
MEASURE
=
MENU
TIMER
CLEAR
OFF

5 Area / volume measurement
6 Store records
7 Showing data
8 Showing unit
9 Battery status
10 Hardware failure
11 Dynamic continuous
measurements
12 Stake out function
13 Error operating indication
Battery power Instruction
Supply Standard
Components
Battery power is 100%
Battery power is 75%
Battery power is 50%
Battery power is 25%
Battery power is 0%
Laser Distance Meter
QTY
Hand strap 1 pc
Battery 2 pcs
Operating Instructions 1 pc
Protection package 1 pc
13
EN
Start
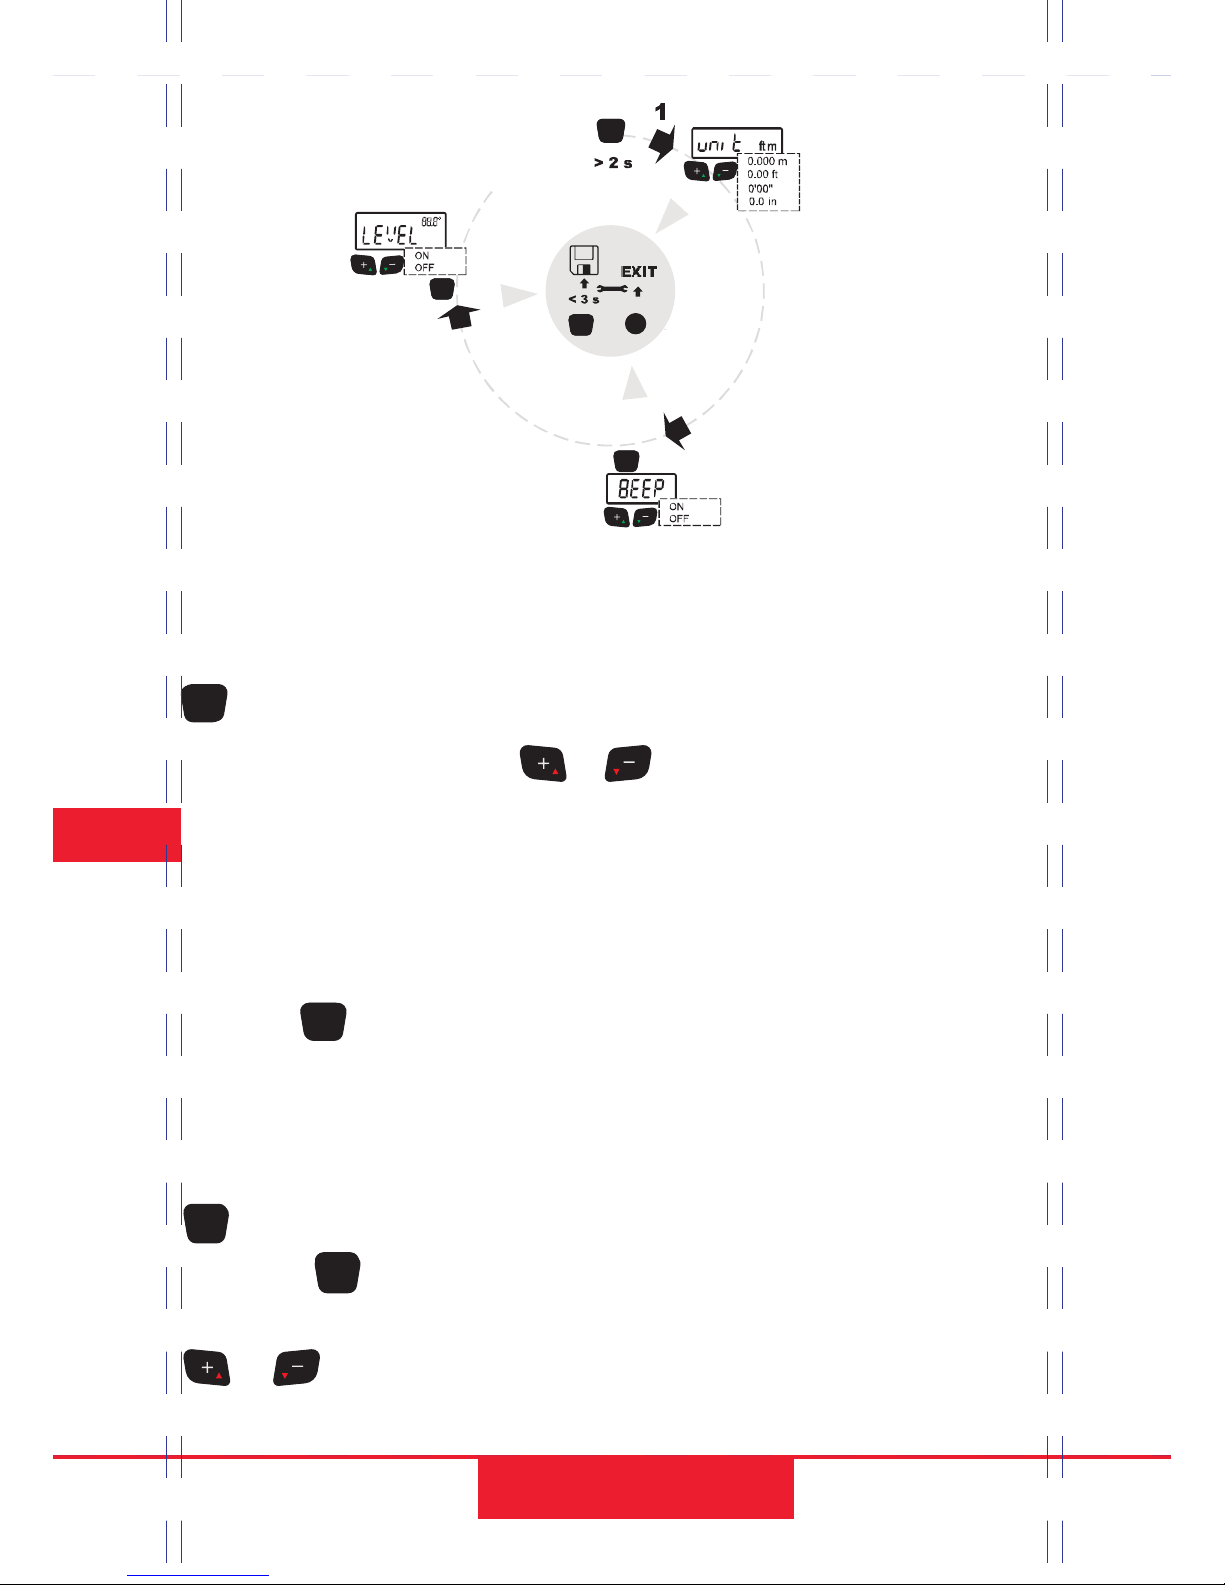
Menu functions
Settings
Navigation in the menu
The menu allows settings to be altered
and permanently stored. After
switching off the device or replacing the
batteries, the settings are still stored
unchanged.
The menu allows settings to be made at
the user level. The instrument can be
specifically set to your personal
requirements.
General description
button ( pressed long ) - You are in the
MENU, the units set and the first menu
item "Unit" are displayed. button
( pressed short ) pages through each
menu item. or button to make
changes in menu items. button
( pressed short )brings up the next menu
item.A long press on the button in the
menu confirms the new settings made in
the submenu items.Pressing the button
for longer in the menu allows you to quit
the settings function without saving.
=
设置
=
设置
=
设置
=
设置
清除
关机
14
EN
Menu functions
=
MENU
=
MENU
=
MENU
=
MENU
CLEAR
OFF
清除
关机
=
设置
=
设置
=
设置
=
设置
3
2
1/16
Setting the unit for distance
measurements
button ( pressed long ) - You are in
the MENU. Press button to
change the unit of distance
measurements. The following units
are available: m ( meter ) , ft ( feet ),
in ( inch ), ft +/ in ( feet – inch-
1/16) button ( pressed long ) the
instrument will remember of the
current state.
or
=
设置
=
设置
Beep
button ( pressed long ) - You are in the
MENU. button ( pressed short ) pages
show BEEP. You could press
button to choose on or off.or
=
设置
=
设置
15
EN
Menu functions
=
MENU
=
MENU
=
MENU
=
MENU
=
MENU
=
MENU
=
MENU
=
MENU
=
MENU
CLEAR
OFF

16
button ( pressed long ) the instrument
will remember of the current state.
=
设置
Press and hold down the key when
switching on the device until the
character appears permanently in the
display with beep sounds.Every further
press of the key releases a distance
measurement Press the key and hold to
switch the device and Laser continuous
operation off.
测量
测量
清除
关机
Measuring with the tripod
The reference must be appropriately
adjusted in order to be able to take
correct measurements with a tripod.
You can switch the reference by button.
The setting can be shown on the display.
基准
Illuminating Display
button(pressed short),the illuminating
display can be turned on or off.
定时
Laser continuous
EN
Menu functions
=
MENU
MEASURE
MEASURE
TIMER
CLEAR
OFF

17
Switching on or off
Switches on the instrument and
laser. The display shows the battery
symbol until the next button is pressed.
Pressing this button for longer
switches the instrument off.
The instrument switches off
automatically after 3 minutes of
inactivity.
测量
清除
关机
CLEAR button
The last action is canceled. While
making area or volume measurements,
each single measurement can be deleted
and remeasured in series.
清除
关机
Reference setting
The default reference setting is from the
rear of the instrument.It will show 。
。
on the display. Press this button to
take the next measurement from the
front edge. The display will show
Press this button, the rear reference
is set again.
基准
基准
Operation
EN
Instrument operation
MEASURE
CLEAR
OFF
CLEAR
OFF

Level Gauge
or
button ( pressed long ), you are in the
MENU.Then press this button again and
again till the menu item "LEVEL" is
displayed. You could press
button to choose the level gauge on or
off. Press long, the instrument will
remember the current state. ( Not
including Type DM2 )
=
设置
=
设置
=
设置
Measuring
Single distance measurement
Press to activate the laser. Press
again to trigger the distance
measurement. The result is
displayed immediately.
测量 测量
Tit measurementl
The tilt sensor measures tilts
between ± 45°.
During the measurement of tilt, the
instrument should be held without
transverse tilt, as far as possible,
( ± 10°). ( Not including Type DM2 )
18
EN
Instrument operation
MEASURE MEASURE
=
MENU
=
MENU
=
MENU

Press button to activate horizontal
measurement in the instrument. The
following symbol appears in the
display If the button is active, the
horizontal distance is displayed in the
summary line for each distance
measurement ( up to max. +/- 45°and
up to max. a transverse tilt of +/-10°).
Press the button to collect the
measurement data, and the data will be
on the display. And hypotenuse
distance and angle will be on the
auxiliary display. ( Not including Type
DM2 )
标线
角度
测量
Horizontal measurement
Press this button to set a 5-second
time delay.
Or press and hold down this button until
the desired time delay is reached ( max.
60 seconds )Once the key is released the
remaining seconds until measurement (
e.g. 59, 58, 57... ) are displayed in a
countdown. The last 5 seconds are
counted down with a beep. After the last
beep the measurement is taken and the
value is displayed. The timer can be
used for all measurements.
定时
Timer ( self-triggering )
19
EN
Measuring
MEASURE
TIMER
Table of contents


