Dometic CK 155 User manual

CK155
Extractor hood
Installation and Operating Manual. . . . . . . . 4
Dunstabzugshaube
Montage- und Bedienungsanleitung . . . . . . 9
Hotte d'aspiration
Instructions de montage
et de service . . . . . . . . . . . . . . . . . . . . . . . . . 15
Spisfläkt
Monterings- och bruksanvisning . . . . . . . . 21
Liesituuletin
Asennus- ja käyttöohje . . . . . . . . . . . . . . . .26
EN
DE
FR
SV
FI
HOT & COOKING
CK
DometicCK155_IOM__EMEA(en-de-fr-sv-fi)_.book Seite 1 Donnerstag, 23. Januar 2020 2:46 14

© 2020 Dometic Group. The visual appearance of the contents of this manual is
protected by copyright and design law. The underlying technical design and the
products contained herein may be protected by design, patent or be patent
pending. The trademarks mentioned in this manual belong to Dometic Sweden AB.
All rights are reserved.
DometicCK155_IOM__EMEA(en-de-fr-sv-fi)_.book Seite 2 Donnerstag, 23. Januar 2020 2:46 14

CK155
3
C
B
A
bk
bk rd
D
wt
wt
12 V
3
4
2
1
1
17025
6130
2
DometicCK155_IOM__EMEA(en-de-fr-sv-fi)_.book Seite 3 Donnerstag, 23. Januar 2020 2:46 14

EN
Safety instructions CK155
4
Please read this instruction manual carefully before installation and first
use, and store it in a safe place. If you pass on the product to another
person, hand over this instruction manual along with it.
Contents
1 Safety instructions . . . . . . . . . . . . . . . . . . . . . . . . . . . . . . . . . . . . . . . . . . . . . . .4
2 Control elements . . . . . . . . . . . . . . . . . . . . . . . . . . . . . . . . . . . . . . . . . . . . . . .6
3 Mounting the extractor hood. . . . . . . . . . . . . . . . . . . . . . . . . . . . . . . . . . . . . .6
4 Cleaning of the fan filter . . . . . . . . . . . . . . . . . . . . . . . . . . . . . . . . . . . . . . . . . .7
5 Disposal . . . . . . . . . . . . . . . . . . . . . . . . . . . . . . . . . . . . . . . . . . . . . . . . . . . . . . .8
6 Warranty . . . . . . . . . . . . . . . . . . . . . . . . . . . . . . . . . . . . . . . . . . . . . . . . . . . . . .8
7 Technical data . . . . . . . . . . . . . . . . . . . . . . . . . . . . . . . . . . . . . . . . . . . . . . . . . .8
1 Safety instructions
Please observe the prescribed safety instructions and stipulations from the
vehicle manufacturer and service workshops.
The manufacturer accepts no liability for damage in the following cases:
•Faulty assembly or connection
•Damage to the product resulting from mechanical influences and incorrect
connection voltage
•Alterations to the product without express permission from the manufacturer
•Use for purposes other than those described in the operating manual
Note the following basic safety information when using electrical devices to protect
against:
•Electric shock
•Fire hazards
•Injury
DometicCK155_IOM__EMEA(en-de-fr-sv-fi)_.book Seite 4 Donnerstag, 23. Januar 2020 2:46 14

EN
CK155 Safety instructions
5
1.1 Handling the device
!WARNING!
•Installation and repair of the extractor hood may only be carried out by
qualified personnel who are familiar with the risks involved and the
relevant regulations.
•Inadequate repairs may cause serious hazards. For repair service,
please contact the service centre in your country (addresses on the
back page).
•People (including children) whose physical, sensory or mental
capacities or whose lack of experience or knowledge prevent them
from using this product safely should not use it without the supervision
or instruction of a responsible person.
•Installation work and electrical wiring must be performed by skilled
technicians in compliance with all applicable regulations and
standards.
•When cutting or drilling into walls or ceilings, make sure that no
electrical cables or hidden devices are damaged.
•To reduce the risk of fire, use only pipes of the UL94-HB class or
higher.
•The distance between the gas hob flame and the extractor hood must
be at least 50 cm.
•Do not flambé under the extractor hood.
!CAUTION!
•The extractor hood must be installed securely so that it cannot fall
down.
•Only operate the extractor hood if you are certain that the housing and
the cables are not damaged.
•Make sure that no combustible objects are stored or installed near the
air outlet. A distance of at least 50 cm must be maintained.
•Do not reach into the air outlet or insert any foreign objects into the
device.
•Accessible parts may become hot when used with cooking appli-
ances.
DometicCK155_IOM__EMEA(en-de-fr-sv-fi)_.book Seite 5 Donnerstag, 23. Januar 2020 2:46 14

EN
Control elements CK155
6
2 Control elements
3Mountingtheextractorhood
3.1 Placing
The ventilator is intended for use in caravans, motorhomes and boats and designed
to be placed above the food preparation area, preferably built into an existing top
cupboard.
The distance from the gas-stoveflame to the lower edge of the cooker hood must not
be less than 50 cm.
The ventilator part A-B-C (fig. 1, page 3) should be placed in the roof, on a surface
that is as even and horizontal as possible. If the ventilator is positioned on a sloping
surface, part Ashould be rotated so that one of the three drainage openings points
downwards. An inclination of up to 20° is acceptable without reducing the ventila-
tion when the motor is not running.
3.2 Fitting the ventilator
Key
Icon Description
Lighting: On/off
Fan motor: On/off
Speed: Half/Full
No. in fig. 1,
page 3 Description
1Fan
2, 3 Fuse holder with fuse 4 AT (5 x 20 mm)
4 Battery (12 Vg)
bl Black
rd Red
wt White
DometicCK155_IOM__EMEA(en-de-fr-sv-fi)_.book Seite 6 Donnerstag, 23. Januar 2020 2:46 14

EN
CK155 Cleaning of the fan filter
7
➤Make a hole with a diameter of 105 mm through the roof of the vehicle.
➤Place the ventilator part Ain the hole and mark the six screw holes.
➤Remove part Aand apply a thin ring of some permanently plastic sealing com-
pound around each hole.
➤Put the rubber ring into the groove underneath of part A. It is important that the
lower part is firmly tightened so that the rubber gasket fits closely against the roof.
➤Fasten the hood Bin the lower part A.
➤Fasten the upper part Cin the lower part A.
➤Make a hole in the bottom of the cupboard (fig. 2, page 3).
➤To access the mounting screw holes, remove the lamps.
➤Fasten the ventilator hood Dwith screws.
➤Fit the hose to the fan and hood.
➤Tighten the hose with the hose clips.
➤Connect the fan to the battery according to the figure.
4 Cleaning of the fan filter
I
➤Remove the filter and clean it with warm water and a synthetic detergent (such as
washing-up liquid).
NOTE
The filter of the extractor hood must be cleaned regularly, as grease
accumulates here. How often cleaning is necessary depends on how
often you cook and how often the extractor hood is switched on. Do not
wait for the performance of the extractor hood to noticeably decline
before you clean the filter.
DometicCK155_IOM__EMEA(en-de-fr-sv-fi)_.book Seite 7 Donnerstag, 23. Januar 2020 2:46 14

EN
Disposal CK155
8
5Disposal
➤Place the packaging material in the appropriate recycling waste bins wherever
possible.
MIf you wish to finally dispose of the product, ask your local recycling centre
or specialist dealer for details about how to do this in accordance with the
applicable disposal regulations.
6Warranty
The statutory warranty period applies. If the product is defective, please contact the
manufacturer's branch in your country (see back page) or your retailer.
For repair and warranty processing, please include the following documents when
you send in the device:
•A copy of the receipt with purchasing date
•A reason for the claim or description of the fault
7 Technical data
CK155
Connection voltage: 12 V g
Capacity: 125 m3/h
Power consumption: 30 W
Power consumption lighting: 4 W (2x 2 W)
Test mark:
DometicCK155_IOM__EMEA(en-de-fr-sv-fi)_.book Seite 8 Donnerstag, 23. Januar 2020 2:46 14

DE
CK155 Sicherheitshinweise
9
Bitte lesen Sie diese Anleitung vor Einbau und Inbetriebnahme sorgfältig
durch und bewahren Sie sie auf. Geben Sie sie im Falle einer Weitergabe
des Produktes an den Nutzer weiter.
Inhalt
1 Sicherheitshinweise . . . . . . . . . . . . . . . . . . . . . . . . . . . . . . . . . . . . . . . . . . . . .9
2 Bedienelemente . . . . . . . . . . . . . . . . . . . . . . . . . . . . . . . . . . . . . . . . . . . . . . . 11
3 Dunstabzugshaube montieren. . . . . . . . . . . . . . . . . . . . . . . . . . . . . . . . . . . . 11
4 Lüfterfilter reinigen . . . . . . . . . . . . . . . . . . . . . . . . . . . . . . . . . . . . . . . . . . . . .13
5 Entsorgung . . . . . . . . . . . . . . . . . . . . . . . . . . . . . . . . . . . . . . . . . . . . . . . . . . .13
6 Garantie. . . . . . . . . . . . . . . . . . . . . . . . . . . . . . . . . . . . . . . . . . . . . . . . . . . . . .13
7 Technische Daten . . . . . . . . . . . . . . . . . . . . . . . . . . . . . . . . . . . . . . . . . . . . . .14
1 Sicherheitshinweise
Beachten Sie die vom Fahrzeughersteller und vom Kfz-Handwerk vorge-
schriebenen Sicherheitshinweise und Auflagen!
Der Hersteller übernimmt in folgenden Fällen keine Haftung für Schäden:
• Montage- oder Anschlussfehler
• Beschädigungen am Produkt durch mechanische Einflüsse und falsche
Anschlussspannung
• Veränderungen am Produkt ohne ausdrückliche Genehmigung vom Hersteller
• Verwendung für andere als die in der Anleitung beschriebenen Zwecke
Beachten Sie folgende grundsätzliche Sicherheitsmaßnahmen beim Gebrauch von
elektrischen Geräten zum Schutz vor:
•elektrischem Schlag
•Brandgefahr
•Verletzungen
DometicCK155_IOM__EMEA(en-de-fr-sv-fi)_.book Seite 9 Donnerstag, 23. Januar 2020 2:46 14

DE
Sicherheitshinweise CK155
10
1.1 Umgang mit dem Gerät
!WARNUNG!
•Die Montage und Reparaturen der Dunstabzugshaube dürfen nur von
Fachkräften durchgeführt werden, die mit den verbundenen Gefah-
ren und den einschlägigen Vorschriften vertraut sind.
•Durch unsachgemäße Reparaturen können erhebliche Gefahren ent-
stehen. Wenden Sie sich im Reparaturfall an den Service-Stützpunkt in
Ihrem Land (Adressen auf der Rückseite).
•Personen (einschließlich Kinder), die aufgrund ihrer physischen, sen-
sorischen oder geistigen Fähigkeiten oder ihrer Unerfahrenheit oder
Unkenntnis nicht in der Lage sind, das Produkt sicher zu benutzen,
sollten dieses Produkt nicht ohne Aufsichtoder Anweisung durch eine
verantwortliche Person nutzen.
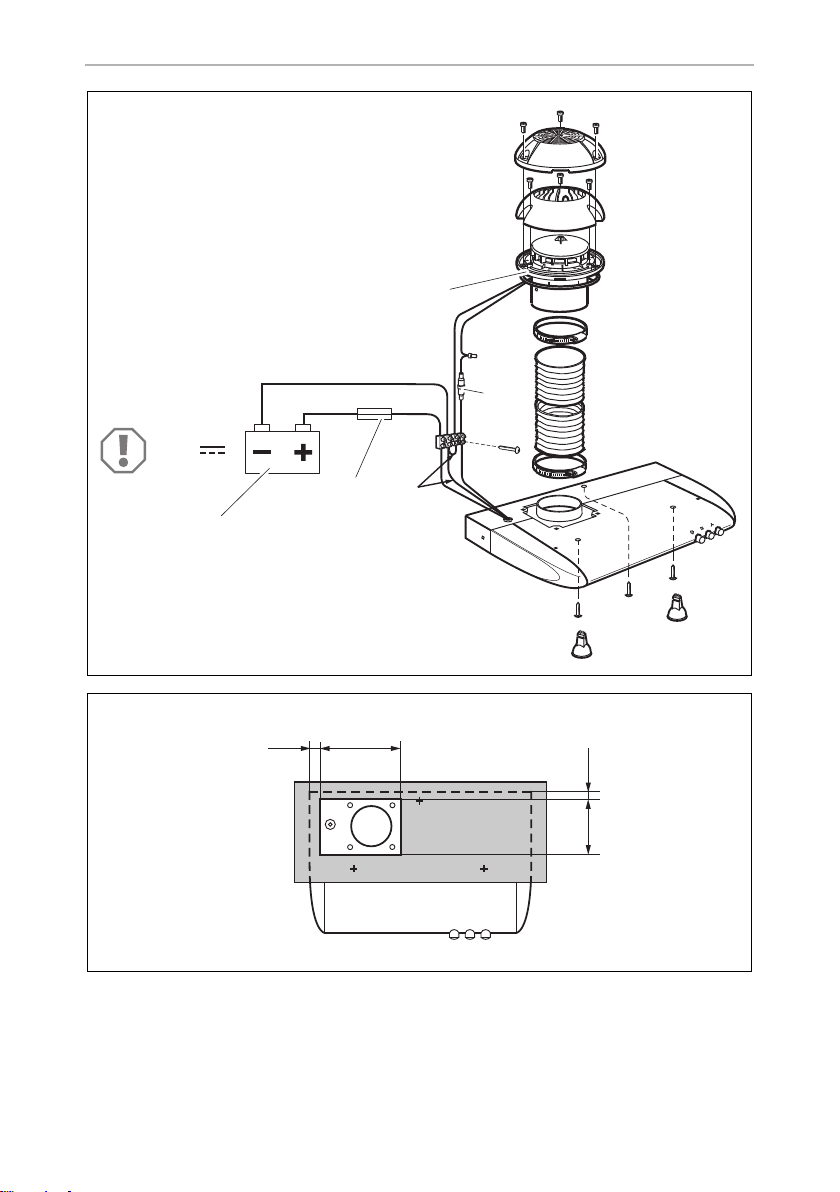
•Montagearbeiten und elektrische Verkabelung müssen von qualifi-
zierten Fachhandwerkern unter Einhaltung aller gültigen Vorschriften
und Normen durchgeführt werden.
•Achten Sie beim Schneiden oder Bohren in Wand oder Decke darauf,
dass keine elektrischen Leitungen oder nicht sichtbare Geräte beschä-
digt werden.
•Um das Brandrisiko zu reduzieren, dürfen nur Rohre der Klasse UL94-
HB oder höher verwendet werden.
•Der Abstand zwischen der Flamme des Gaskochfelds und der Dunst-
abzugshaube muss mindestens 50 cm betragen.
•Flambieren Sie niemals unter der Dunstabzugshaube.
!VORSICHT!
•Die Dunstabzugshaube muss so sicher installiert werden, dass sie
nicht herabfallen kann.
•Betreiben Sie die Dunstabzugshaubenur, wenn das Gehäuse und die
Leitungen unbeschädigt sind.
•Achten Sie darauf, dass brennbare Gegenstände nicht im Bereich des
Luftaustritts gelagert oder montiert sind. Der Abstand muss mindes-
tens 50 cm betragen.
•Greifen Sie nicht in den Lüftungsauslass und führen Sie keine Fremd-
gegenstande in das Gerät ein.
•Zugängliche Teile können sich während der Verwendung mit Kochge-
räten erhitzen.
DometicCK155_IOM__EMEA(en-de-fr-sv-fi)_.book Seite 10 Donnerstag, 23. Januar 2020 2:46 14

DE
CK155 Bedienelemente
11
2 Bedienelemente
3Dunstabzugshaubemontieren
3.1 Einbauort
Der Ventilator ist für den Einsatz in Wohnwagen, Wohnmobilen und Booten
bestimmt und ausgelegt, über einem Bereich platziert zu werden, der der Zuberei-
tung von Lebensmitteln dient. Vorzugsweise erfolgt der Einbau in einem bereits vor-
handen Oberschrank.
Der Abstand von der Flamme des Gaskochfelds zu der Unterkante der Dunstabzugs-
haube muss mindestens 50 cm betragen.
Die Ventilatorteile A-B-C (Abb. 1, Seite 3) sollten auf dem Dach auf einer mög-
lichst ebenen und waagerechten Fläche angebracht werden. Wenn der Ventilator
an einer geneigten Fläche abgebracht wird, sollte Teil Aso gedreht werden, dass
die drei Kondenswasserabläufe nach unten zeigen. Eine Neigung von bis zu 20° ist
zulässig, ohne dass die Ventilation bei ausgeschaltetem Motor reduziert ist.
Symbol Bezeichnung
Beleuchtung: Ein/Aus
Lüftermotor: Ein/Aus
Drehzahl: Halbe/volle Leistung
DometicCK155_IOM__EMEA(en-de-fr-sv-fi)_.book Seite 11 Donnerstag, 23. Januar 2020 2:46 14

DE
Dunstabzugshaube montieren CK155
12
3.2 Ventilator montieren
Legende
➤Fertigen Sie im Dach des Fahrzeugs einen Ausschnitt mit einem Durchmesser
von 105 mm an.
➤Setzen Sie den Ventilatorteil Ain die Öffnung ein und markieren Sie die sechs
Schraubenlöcher.
➤Entnehmen Sie Teil Aund tragen Sie einen dünnen Ring aus einem dauerplasti-
schen Dichtstoff um jede Öffnung auf.
➤Setzen Sie den Gummiring in die Nut unterhalb von Teil A ein. Es ist wichtig, dass
der untere Teil fest angedrückt ist, sodass die Gummidichtung engmit dem Dach
abschließt.
➤Befestigen Sie die Haube Bin dem unteren Teil A.
➤Befestigen Sie den oberen Teil Cin dem unteren Teil A.
➤Fertigen Sie einen Ausschnitt in der Unterseite des Küchenschranks (Abb. 2,
Seite 3).
➤Entfernen Sie die Leuchten, um an die Löcher für die Befestigungsschrauben zu
gelangen.
➤Befestigen Sie die Ventilatorhaube Dmit Schrauben.
➤Bringen Sie den Schlauch an dem Lüfter und der Haube an.
➤Fixieren Sie den Schlauch mit den Schlauchklemmen.
➤Schließen Sie den Lüfter entsprechend der Abbildung an die Batterie an.
Nr. in Abb. 1,
Seite 3 Bezeichnung
1Lüfter
2, 3 Sicherungshalter mit Sicherung 4 AT (5 x 20 mm)
4 Batterie (12 Vg)
bl Schwarz
rd Rot
wt Weiß
DometicCK155_IOM__EMEA(en-de-fr-sv-fi)_.book Seite 12 Donnerstag, 23. Januar 2020 2:46 14

DE
CK155 Lüfterfilter reinigen
13
4 Lüfterfilter reinigen
I
➤Entnehmen Sie den Filter und reinigen Sie den Filter mit warmem Wasser und
synthetischem Reinigungsmittel (z. B. Spülmittel).
5Entsorgung
➤Geben Sie das Verpackungsmaterial möglichst in den entsprechenden
Recycling-Müll.
MWenn Sie das Produkt endgültig außer Betrieb nehmen, informieren Sie
sich bitte beim nächsten Recyclingcenter oder bei Ihrem Fachhändler
über die zutreffenden Entsorgungsvorschriften.
6 Garantie
Es gilt die gesetzliche Gewährleistungsfrist. Sollte das Produkt defekt sein, wenden
Sie sich bitte an die Niederlassung des Herstellers in Ihrem Land (siehe Rückseite)
oder an Ihren Fachhändler.
Zur Reparatur- bzw. Gewährleistungsbearbeitung müssen Sie folgende Unterlagen
mitschicken:
• eine Kopie der Rechnung mit Kaufdatum,
• einen Reklamationsgrund oder eine Fehlerbeschreibung.
HINWEIS
Der Filter der Dunstabzugshaube muss regelmäßig gereinigt werden,
da sich dort Fett sammelt. Wie oft eine Reinigung nötig ist, hängt davon
ab, wie oft gekocht und wie oft die Dunstabzugshaube eingeschaltet
wird. Reinigen Sie den Filter nicht erst, wenn die Leistung der Dunstab-
zugshaube merklich nachlässt.
DometicCK155_IOM__EMEA(en-de-fr-sv-fi)_.book Seite 13 Donnerstag, 23. Januar 2020 2:46 14

DE
Technische Daten CK155
14
7 Technische Daten
CK155
Anschlussspannung: 12 V g
Inhalt: 125 m3/h
Leistungsaufnahme: 30 W
Leistungsaufnahme Beleuchtung: 4 W (2 x 2 W)
Prüfzeichen:
DometicCK155_IOM__EMEA(en-de-fr-sv-fi)_.book Seite 14 Donnerstag, 23. Januar 2020 2:46 14

FR
CK155 Consignes de sécurité
15
Veuillez lire attentivement cette notice avant le montage et la mise en
service. Veuillez ensuite la conserver. En cas de passer le produit, veuillez
le transmettre au nouvel acquéreur.
Sommaire
1 Consignes de sécurité . . . . . . . . . . . . . . . . . . . . . . . . . . . . . . . . . . . . . . . . . .15
2 Éléments de commande. . . . . . . . . . . . . . . . . . . . . . . . . . . . . . . . . . . . . . . . .17
3 Montage de la hotte aspirante . . . . . . . . . . . . . . . . . . . . . . . . . . . . . . . . . . . .17
4 Nettoyage du filtre du ventilateur. . . . . . . . . . . . . . . . . . . . . . . . . . . . . . . . . .19
5 Retraitement . . . . . . . . . . . . . . . . . . . . . . . . . . . . . . . . . . . . . . . . . . . . . . . . . .19
6 Garantie. . . . . . . . . . . . . . . . . . . . . . . . . . . . . . . . . . . . . . . . . . . . . . . . . . . . . .19
7 Caractéristiques techniques. . . . . . . . . . . . . . . . . . . . . . . . . . . . . . . . . . . . . 20
1 Consignes de sécurité
Respectez les consignes de sécurité et autres prescriptions imposées par
le constructeur du véhicule et par les professionnels de l’automobile.
Le fabricant décline toute responsabilité pour des dommages dans les cas suivants :
• des défauts de montage ou de raccordement
• des sollicitations mécaniques et une tension de raccordement incorrecte ayant
endommagé le matériel
• des modifications apportées au produit sans autorisation explicite de la part du
fabricant
• une utilisation différente de celle décrite dans la notice
Lors de l’utilisation d’appareils électriques, les consignes générales de sécurité sui-
vantes doivent être respectées afin d’éviter :
•une décharge électrique,
•un incendie,
•des blessures.
DometicCK155_IOM__EMEA(en-de-fr-sv-fi)_.book Seite 15 Donnerstag, 23. Januar 2020 2:46 14

FR
Consignes de sécurité CK155
16
1.1 Précautions d’usage
!AVERTISSEMENT !
•Le montage et les réparations de la hotte aspirante doivent être effec-
tués par un personnel qualifié et parfaitement informé des dangers et
règlements spécifiques à ces manipulations.
•Toute réparation mal effectuée risquerait d’entraîner de graves dan-
gers. Si des réparations sont nécessaires, adressez-vous au service
après-vente dans votre pays (adresses au dos de la notice).
•Les personnes (y compris les enfants) qui ne sont pas en mesure d’uti-
liser l’appareil en toute sécurité — que ce soit en raison de déficiences
physiques, sensorielles ou mentales ou bien par manque d’expé-
rience ou de connaissances — ne sont pas autorisées à le faire, sauf si
une personne garante de leur sécurité les surveille ou leur fournit des
explications sur son utilisation.
•Les travaux de montage et le câblage électrique doivent être effectués
par des artisans qualifiés, dans le respect de toutes les directives et
normes en vigueur.
•Lors de la découpe ou du perçage dans les murs ou les plafonds, veil-
lez à ce qu’aucun câble ou appareil non visible ne soit endommagé.
•Afin de réduire le risque d’incendie, seuls des tuyaux de la catégorie
UL94-HB ou supérieures doivent être utilisés.
•La distance entre la flamme d’une table de cuisson gaz et la hotte doit
être d’au moins 50 cm.
•Ne faites rien flamber sous la hotte aspirante.
!ATTENTION !
•La hotte doit être montée de manière à ce qu’elle ne puisse pas tom-
ber.
•Ne faites fonctionner la hotte que si le boîtier et les câbles sont intacts.
•Veillez à ce qu’aucun objet inflammable ne soit entreposé ni monté
dans la zone de sortie de l’air. Il convient de maintenir une distance de
50 cm minimum.
•Ne glissez pas les doigts dans la sortie d’air et n’introduisez aucun
objet étranger à l’intérieur de l’appareil.
•Les parties accessibles peuvent devenir chaudes lorsqu’elles sont uti-
lisées avec des appareils de cuisson.
DometicCK155_IOM__EMEA(en-de-fr-sv-fi)_.book Seite 16 Donnerstag, 23. Januar 2020 2:46 14

FR
CK155 Éléments de commande
17
2 Éléments de commande
3 Montage de la hotte aspirante
3.1 Emplacement
Le ventilateur est destiné à être utilisé dans les caravanes, les camping-cars et les
bateaux. Il est conçu pour être placé au-dessus de la zone de préparation des ali-
ments, de préférence intégré dans une armoire murale existante.
La distance entre la flamme du réchaud à gaz et le bord inférieur de la hotte ne doit
pas être inférieure à 50 cm.
La partie du ventilateur A-B-C (fig. 1, page 3) doit être placée dans le toit, sur une
surface aussi plane et horizontale que possible. Si le ventilateur est placé sur une sur-
face inclinée, la partie Adoit être tournée de manière à ce que l’une des trois ouver-
tures d’écoulement soit orientée vers le bas. Une inclinaison atteignant jusqu’à 20°
est acceptable sans réduire la ventilation lorsque le moteur n’est pas en marche.
Icône Description
Éclairage : marche/arrêt
Moteur du ventilateur : marche/arrêt
Vitesse : demi/pleine
DometicCK155_IOM__EMEA(en-de-fr-sv-fi)_.book Seite 17 Donnerstag, 23. Januar 2020 2:46 14

FR
Montage de la hotte aspirante CK155
18
3.2 Montage du ventilateur
Clé
➤Pratiquez une découpe d’un diamètre de 105 mm dans le toit du véhicule.
➤Placez la partie Adu ventilateur dans le trou et marquez les six trous de vis.
➤Retirez la partie Aet appliquez une fine bague de produit d’étanchéité à plasti-
cité permanente autour de chaque trou.
➤Placez la bague en caoutchouc dans la rainure sous la partie A. Il est important
que la partie inférieure soit bien serrée afin que le joint en caoutchouc s’adapte
bien au toit.
➤Fixez le capot Bdans la partie inférieure A.
➤Fixez la partie supérieure Bdans la partie inférieure A.
➤Faites un trou dans le fond de l’armoire (fig. 2, page 3).
➤Pour accéder aux trous des vis de montage, retirez les lampes.
➤Fixez le capot du ventilateur Davec les vis.
➤Fixez le tuyau au ventilateur et au capot.
➤Serrez le tuyau avec les colliers de serrage.
➤Connectez le ventilateur à la batterie comme indiqué sur la figure.
N° sur la
fig. 1, page 3 Description
1 Ventilateur
2, 3 Porte-fusible avec fusible 4 AT (5 x 20 mm)
4 Batterie (12 Vg)
bl Noir
rd Rouge
wt Blanc
DometicCK155_IOM__EMEA(en-de-fr-sv-fi)_.book Seite 18 Donnerstag, 23. Januar 2020 2:46 14

FR
CK155 Nettoyage du filtre du ventilateur
19
4 Nettoyage du filtre du ventilateur
I
➤Retirez le filtre et nettoyez-le à l’eau chaude et au détergent synthétique (p. ex.
produit lave-vaisselle).
5 Retraitement
➤Jetez les emballages dans les conteneurs de déchets recyclables prévus à cet
effet.
MLorsque vous mettrez votre produit définitivement hors service, informez-
vous auprès du centre de recyclage le plus proche ou auprès de votre
revendeur spécialisé sur les prescriptions relatives au retraitement des
déchets.
6 Garantie
Le délai légal de garantie s'applique. Si le produit s'avérait défectueux, veuillez vous
adresser à la filiale du fabricant située dans votre pays (voir la dernière page) ou à
votre revendeur spécialisé.
Veuillez y joindre les documents suivants pour la gestion des réparations et de la
garantie :
• une copie de la facture avec la date d'achat,
• le motif de la réclamation ou une description du dysfonctionnement.
REMARQUE
Le filtre de la hotte aspirante doit être nettoyé régulièrement, car de la
graisse s’y accumule. La fréquence de nettoyage dépend de la fré-
quence à laquelle vous cuisinez et utilisez la hotte aspirante. N’attendez
pas que la puissance de la hotte aspirante soit sensiblement réduite
pour nettoyer le filtre.
DometicCK155_IOM__EMEA(en-de-fr-sv-fi)_.book Seite 19 Donnerstag, 23. Januar 2020 2:46 14

FR
Caractéristiques techniques CK155
20
7 Caractéristiques techniques
CK155
Tension de raccordement : 12 Vg
Capacité : 125 m3/h
Puissance absorbée : 30 W
Consommation de courant
éclairage :
4W(2x2W)
Conformité :
DometicCK155_IOM__EMEA(en-de-fr-sv-fi)_.book Seite 20 Donnerstag, 23. Januar 2020 2:46 14
Other manuals for CK 155
1
Table of contents
Languages:
Other Dometic Ventilation Hood manuals

Dometic
Dometic CK2000 User manual

Dometic
Dometic CK400 User manual

Dometic
Dometic CK Series User manual

Dometic
Dometic CK500 User manual

Dometic
Dometic 9107300002 User manual

Dometic
Dometic CK600 User manual

Dometic
Dometic CK2000 User manual

Dometic
Dometic CK400 User manual

Dometic
Dometic CK150 User manual

Dometic
Dometic GY11 User manual
Popular Ventilation Hood manuals by other brands

Gorenje
Gorenje S3 IHGC963S4X manual

KOBE
KOBE ISX2136SQB-1 Installation instructions and operation manual

U.S. Products
U.S. Products ADVANTAGE-100H Information & operating instructions

Kuppersberg
Kuppersberg DUDL 4 LX Technical Passport

Framtid
Framtid HW280 manual

Thermador
Thermador HGEW 36 FS installation manual