Dometic 9103303095 User manual

CK150
Extractor hood
Installation and Operating Manual. . . . . . . . 7
Dunstabzugshaube
Montage- und Bedienungsanleitung . . . . . 15
Hotte d'aspiration
Instructions de montage
et de service . . . . . . . . . . . . . . . . . . . . . . . . .24
Extractor de humos
Instrucciones de montaje y de uso . . . . . . .33
Exaustor
Instruções de montagem e manual de
instruções . . . . . . . . . . . . . . . . . . . . . . . . . . .42
Cappa aspirante
Istruzioni di montaggio e d’uso . . . . . . . . .50
Afzuigkap
Montagehandleiding en
gebruiksaanwijzing . . . . . . . . . . . . . . . . . . .59
Emhætte
Monterings- og betjeningsvejledning . . . .68
Spisfläkt
Monterings- och bruksanvisning . . . . . . . .76
Avtrekkshette
Monterings- og bruksanvisning . . . . . . . . .85
Liesituuletin
Asennus- ja käyttöohje . . . . . . . . . . . . . . . . 93
Отводящая вытяжка
Инструкция по монтажу и эксплуатации 102
Okap kuchenny
Instrukcja montażu i obsługi. . . . . . . . . . . .111
Odsávač pár
Návod na montáž a uvedenie
do prevádzky. . . . . . . . . . . . . . . . . . . . . . . 119
Odsavač par
Návod k montáži a obsluze . . . . . . . . . . . 127
Páraelszívó
Szerelési és használati útmutató . . . . . . . 135
EN
DE
FR
ES
PT
IT
NL
DA
SV
NO
FI
RU
PL
SK
CS
HU
COOKING
RANGE HOODS
DometicCK150_IOM__EMEA_.book Seite 1 Freitag, 20. Dezember 2019 12:01 12

DometicCK150_IOM__EMEA_.book Seite 2 Freitag, 20. Dezember 2019 12:01 12

CK150
3
2
3
4
7
6
8
1
9
5
10
11
12
13
14
1
Max 20 W
1 2 3
4
2
DometicCK150_IOM__EMEA_.book Seite 3 Freitag, 20. Dezember 2019 12:01 12

CK150
4
105 mm
3
381 mm
142 mm
4
4
3
2
1
5
DometicCK150_IOM__EMEA_.book Seite 4 Freitag, 20. Dezember 2019 12:01 12

CK150
5
1
2
3
5
4
6
DometicCK150_IOM__EMEA_.book Seite 5 Freitag, 20. Dezember 2019 12:01 12

CK150
6
12 V
ws
sw
sw
rt
2
3
1
4
ws
rt
7
DometicCK150_IOM__EMEA_.book Seite 6 Freitag, 20. Dezember 2019 12:01 12

EN
CK150
7
Please read this instruction manual carefully before installation and first
use, and store it in a safe place. If you pass on the product to another
person, hand over this instruction manual along with it.
Contents
1 Explanation of symbols. . . . . . . . . . . . . . . . . . . . . . . . . . . . . . . . . . . . . . . . . . .8
2 Safety instructions . . . . . . . . . . . . . . . . . . . . . . . . . . . . . . . . . . . . . . . . . . . . . . .8
3 Scope of delivery . . . . . . . . . . . . . . . . . . . . . . . . . . . . . . . . . . . . . . . . . . . . . .10
4 Intended use . . . . . . . . . . . . . . . . . . . . . . . . . . . . . . . . . . . . . . . . . . . . . . . . . .10
5 Technical description . . . . . . . . . . . . . . . . . . . . . . . . . . . . . . . . . . . . . . . . . . .10
6 Mounting the extractor hood. . . . . . . . . . . . . . . . . . . . . . . . . . . . . . . . . . . . . 11
7 Using the extractor hood . . . . . . . . . . . . . . . . . . . . . . . . . . . . . . . . . . . . . . . .13
8 Cleaning . . . . . . . . . . . . . . . . . . . . . . . . . . . . . . . . . . . . . . . . . . . . . . . . . . . . .13
9 Disposal . . . . . . . . . . . . . . . . . . . . . . . . . . . . . . . . . . . . . . . . . . . . . . . . . . . . . .14
10 Warranty . . . . . . . . . . . . . . . . . . . . . . . . . . . . . . . . . . . . . . . . . . . . . . . . . . . . .14
11 Technical data . . . . . . . . . . . . . . . . . . . . . . . . . . . . . . . . . . . . . . . . . . . . . . . . .14
DometicCK150_IOM__EMEA_.book Seite 7 Freitag, 20. Dezember 2019 12:01 12

EN
Explanation of symbols CK150
8
1 Explanation of symbols
!
!
A
I
2 Safety instructions
Pleaseobservetheprescribedsafetyinstructions and stipulations from the
vehicle manufacturer and service workshops.
The manufacturer accepts no liability for damage in the following cases:
•Faulty assembly or connection
•Damage to the product resulting from mechanical influences and incorrect
connection voltage
•Alterations to the product without express permission from the manufacturer
•Use for purposes other than those described in the operating manual
Note the following basic safety information when using electrical devices to protect
against:
•Electric shock
•Fire hazards
•Injury
WARNING!
Safety instruction: Indicates a hazardous situation that, if not avoided,
could result in death or serious injury.
CAUTION!
Safety instruction: Indicates a hazardous situation that, if not avoided,
could result in minor or moderate injury.
NOTICE!
Indicates a situation that, if not avoided, can result in property damage.
NOTE
Supplementary information for operating the product.
DometicCK150_IOM__EMEA_.book Seite 8 Freitag, 20. Dezember 2019 12:01 12

EN
CK150 Safety instructions
9
2.1 Handling the device
!WARNING!
•Installation and repair of the extractor hood may only be carried out by
qualified personnel who are familiar with the risks involved and the
relevant regulations.
•Inadequate repairs may cause serious hazards. For repair service,
please contact the service centre in your country (addresses on the
back page).
•People (including children) whose physical, sensory or mental
capacities or whose lack of experience or knowledge prevent them
from using this product safely should not use it without the supervision
or instruction of a responsible person.
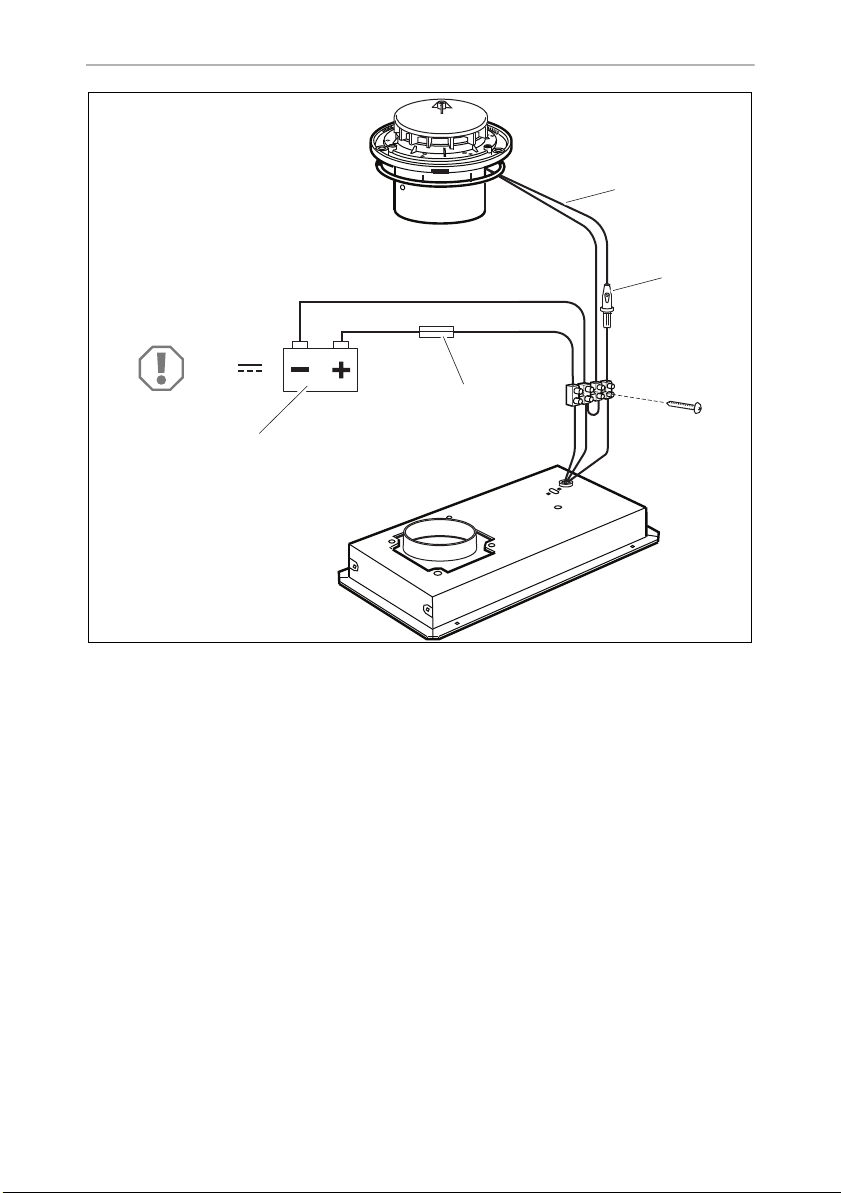
•Installation work and electrical wiring must be performed by skilled
technicians in compliance with all applicable regulations and
standards.
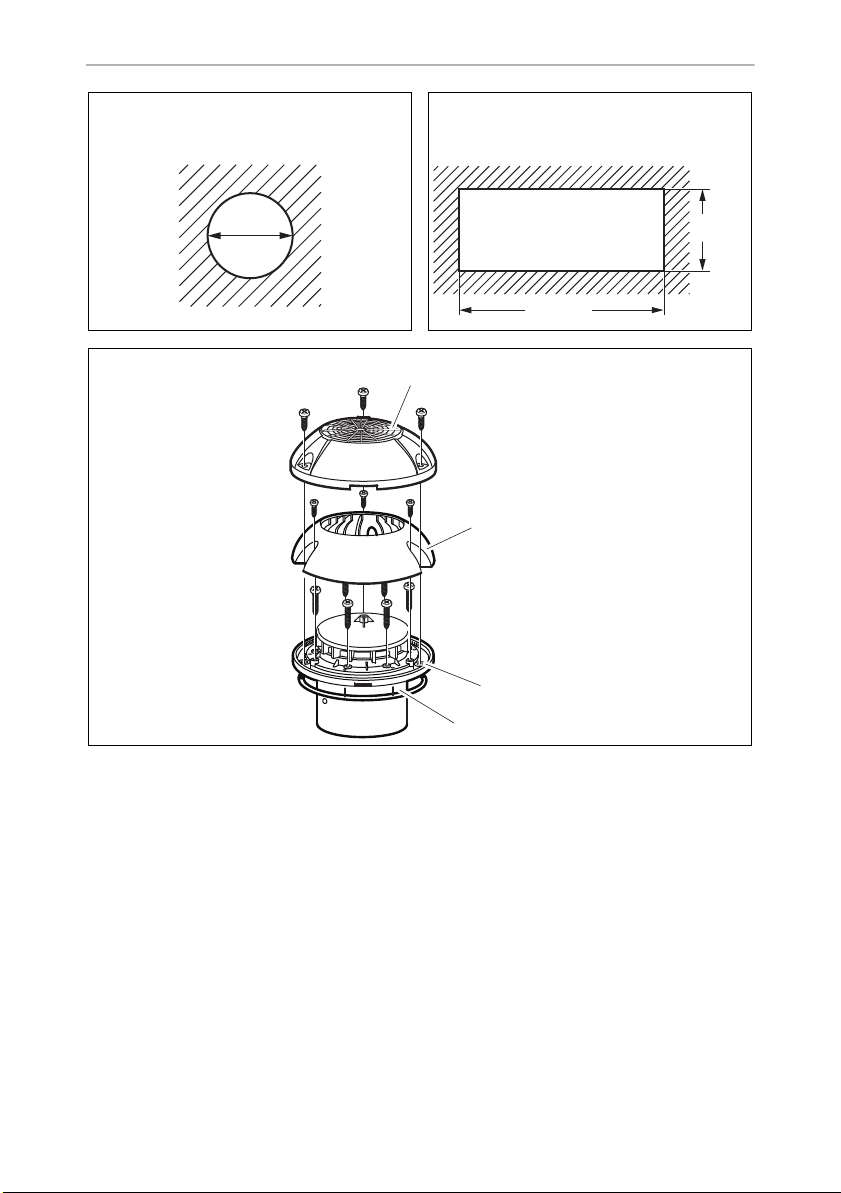
•When cutting or drilling into walls or ceilings, make sure that no
electrical cables or hidden devices are damaged.
•To reduce the risk of fire, use only pipes of the UL94-HB class or
higher.
•The distance between the gas hob flame and the extractor hood must
be at least 50 cm.
!CAUTION!
•The extractor hood must be installed securely so that it cannot fall
down.
•Only operate the extractor hood if you are certain that the housing and
the cables are not damaged.
•Make sure no combustible objects are stored or installed near the air
outlet. A distance of at least 50 cm must be maintained.
•Do not reach into the air outlet or insert any foreign objects into the
device.
DometicCK150_IOM__EMEA_.book Seite 9 Freitag, 20. Dezember 2019 12:01 12

EN
Scope of delivery CK150
10
3Scopeofdelivery
4 Intended use
The extractor hood CK150 is designed for installation in caravans, motorhomes and
boats.
5 Technical description
The extractor hood CK150 removes odours and steam that arises during cooking.
The device is equipped with a removable and washable filter, a built-in lamp and a
fan. It is connected via a flexible pipeline with the interior area and can be mounted
on the roof of the motorhome due to its weather-resistant cover cap.
No. in
fig. 1,
page 3
Quantity Description
1 1 Extractor fan
2 1 Cover cap
3 1 Roof hood
41Fan
5 1 Rubber seal
6 1 Hose clip
7 1 Pipeline
8 1 Hose clip
9 1 Filter
10 6 Bolts, 4.2 x 25
11 3 Bolts, 4.2 x 13
12 3 Bolts, 3.5 x 9.5
13 4 Bolts, 3.5 x 13
14 1 Bolt, 3.5 x 25
DometicCK150_IOM__EMEA_.book Seite 10 Freitag, 20. Dezember 2019 12:01 12

EN
CK150 Mounting the extractor hood
11
5.1 Control elements
6Mountingtheextractorhood
Note on installation location
The extractor hood should preferably be mounted above the cooking zone and built
into a suspended cabinet if possible. The distance between the gas hob flame and
the extractor hood must be at least 50 cm.
The fan should be mounted on the roof on a level surface. When mounted on a
sloping surface, the roof hood must be rotated so that one of the three water
drainage holes is directed toward the incline. A tilt angle up to 20° will not affect the
performance of the fan when the motor is not running.
6.1 Mounting the fan
➤Select an appropriate installation location for the fan on the roof.
➤Draw the location and size of the opening of 105 mm diameter (fig. 3, page 4).
➤Pre-drill and cut out the hole on the roof carefully with a keyhole saw or similar
tool.
➤Place the fan on the opening and mark the six screw holes.
➤Apply a thin ring of a permanently elastic sealing material around each hole.
➤Put the rubber seal (fig. 54, page 4) into the groove on the underside of the
fan.
No. in
fig. 2,
page 3
Description
1 Filter
2Fan On/Off switch
3Light On/Off switch
4 Lamp
DometicCK150_IOM__EMEA_.book Seite 11 Freitag, 20. Dezember 2019 12:01 12

EN
Mounting the extractor hood CK150
12
I
➤Attach the fan (fig. 53, page 4) with the six included bolts (4.2 x 25).
➤Attach the roof hood (fig. 52, page 4) with the three included bolts (3.5 x 9.5).
➤Attach the cover cap (fig. 51, page 4) with the three included bolts (4.2 x 13).
6.2 Mounting the extractor hood
!
➤Choose a suitable installation location in the interior for the extractor hood.
➤Draw the location and size of the section of 381 x 142 mm on the bottom of the
suspended cabinet (fig. 4, page 4).
➤Pre-drill and cut out the section carefully with a keyhole saw or similar tool.
➤Insert the extractor hood from below into the cabinet and secure it with the four
included bolts (3.5 x 13) (fig. 6, page 5).
➤Attach the hose (fig. 63, page 4) to the extractor hood (fig. 65, page 4) and
the fan (fig. 61, page 4) with the hose clips (fig. 62 and 4, page 4).
➤Insert the filter (fig. 21, page 3) into the extractor hood.
6.3 Connecting the extractor hood electrically
➤Connect the fan to the battery; see fig. 7, page 6.
Key
NOTE
Pull the fan on tightly enough that the rubber seal is seamlessly in contact
with the roof.
WARNING!
•Attach the extractor hood preferably over the cooking zone and
install it in a a suspended cabinet.
•The distance between the gas hob flame and the extractor hood
must be at least 50 cm.
No. in
fig. 7,
page 6
Description
1Fan
2, 3 Fuse holder with fuse 4 A T (5 x 20 mm)
DometicCK150_IOM__EMEA_.book Seite 12 Freitag, 20. Dezember 2019 12:01 12

EN
CK150 Using the extractor hood
13
7 Using the extractor hood
Switching the extractor hood on and off
➤Turn the extractor hood on and off with switch “ ” (fig. 22, page 3).
Switching the light on and off
➤Turn the light on and off with switch “ ” (fig. 23, page 3).
8Cleaning
I
A
➤Occasionally clean the product with a damp cloth.
➤Remove the filter and clean it with warm water and a synthetic detergent (such as
washing-up liquid).
4 Battery (12 Vg)
sw Black
ws White
rt Red
NOTE
The filter of the extractor hood must be cleaned regularly, as grease
collects there. How often cleaning is necessary depends on how often
you cook and how often the extractor hood is switched on. Do not wait
for the performance of the extractor hood to noticeably decline before
you clean the filter.
NOTICE! Damage hazard
Do not use sharp or hard objects or cleaning agents for cleaning as these
may damage the product.
No. in
fig. 7,
page 6
Description
DometicCK150_IOM__EMEA_.book Seite 13 Freitag, 20. Dezember 2019 12:01 12

EN
Disposal CK150
14
9Disposal
➤Place the packaging material in the appropriate recycling waste bins wherever
possible.
MIf you wish to finally dispose of the product, ask your local recycling centre
or specialist dealer for details about how to do this in accordance with the
applicable disposal regulations.
10 Warranty
The statutory warranty period applies. If the product is defective, please contact the
manufacturer's branch in your country (see back page) or your retailer.
For repair and warranty processing, please include the following documents when
you send in the device:
•A copy of the receipt with purchasing date
•A reason for the claim or description of the fault
11 Technical data
CK150
Reference number: 9103303095
Connection voltage: 12 V g
Capacity: 115 m3/h
Power consumption: 30 W
Power consumption lighting: 5 W
Dimensions (W x H x D): 400 x 45 x 165 mm
Weight: 1.9 kg
Test mark:
DometicCK150_IOM__EMEA_.book Seite 14 Freitag, 20. Dezember 2019 12:01 12

DE
CK150
15
Bitte lesen Sie diese Anleitung vor Einbau und Inbetriebnahme sorgfältig
durch und bewahren Sie sie auf. Geben Sie sie im Falle einer Weitergabe
des Produktes an den Nutzer weiter.
Inhalt
1 Erklärung der Symbole . . . . . . . . . . . . . . . . . . . . . . . . . . . . . . . . . . . . . . . . . .16
2 Sicherheitshinweise . . . . . . . . . . . . . . . . . . . . . . . . . . . . . . . . . . . . . . . . . . . .16
3 Lieferumfang . . . . . . . . . . . . . . . . . . . . . . . . . . . . . . . . . . . . . . . . . . . . . . . . . .18
4 Bestimmungsgemäßer Gebrauch . . . . . . . . . . . . . . . . . . . . . . . . . . . . . . . . .18
5 Technische Beschreibung . . . . . . . . . . . . . . . . . . . . . . . . . . . . . . . . . . . . . . .19
6 Dunstabzugshaube montieren. . . . . . . . . . . . . . . . . . . . . . . . . . . . . . . . . . . .19
7 Dunstabzugshaube verwenden . . . . . . . . . . . . . . . . . . . . . . . . . . . . . . . . . . .21
8 Reinigung . . . . . . . . . . . . . . . . . . . . . . . . . . . . . . . . . . . . . . . . . . . . . . . . . . . 22
9 Entsorgung . . . . . . . . . . . . . . . . . . . . . . . . . . . . . . . . . . . . . . . . . . . . . . . . . . 22
10 Gewährleistung. . . . . . . . . . . . . . . . . . . . . . . . . . . . . . . . . . . . . . . . . . . . . . . 22
11 Technische Daten . . . . . . . . . . . . . . . . . . . . . . . . . . . . . . . . . . . . . . . . . . . . . 23
DometicCK150_IOM__EMEA_.book Seite 15 Freitag, 20. Dezember 2019 12:01 12

DE
Erklärung der Symbole CK150
16
1 Erklärung der Symbole
!
!
A
I
2 Sicherheitshinweise
Beachten Sie die vom Fahrzeughersteller und vom Kfz-Handwerk
vorgeschriebenen Sicherheitshinweise und Auflagen!
Der Hersteller übernimmt in folgenden Fällen keine Haftung für Schäden:
•Montage- oder Anschlussfehler
•Beschädigungen am Produkt durch mechanische Einflüsse und falsche
Anschlussspannung
•Veränderungen am Produkt ohne ausdrückliche Genehmigung vom Hersteller
•Verwendung für andere als die in der Anleitung beschriebenen Zwecke
Beachten Sie folgende grundsätzliche Sicherheitsmaßnahmen beim Gebrauch von
elektrischen Geräten zum Schutz vor:
•elektrischem Schlag
•Brandgefahr
•Verletzungen
WARNUNG!
Sicherheitshinweis auf eine Gefahrensituation, die zum Tod oder zu
schwerer Verletzung führen kann, wenn sie nicht vermieden wird.
VORSICHT!
Sicherheitshinweis auf eine Gefahrensituation, die zu einer leichten
oder mittelschweren Verletzung führen kann, wenn sie nicht vermieden
wird.
ACHTUNG!
Hinweis auf eine Situation, die zu Sachschäden führen kann, wenn sie
nicht vermieden wird.
HINWEIS
Ergänzende Informationen zur Bedienung des Produktes.
DometicCK150_IOM__EMEA_.book Seite 16 Freitag, 20. Dezember 2019 12:01 12

DE
CK150 Sicherheitshinweise
17
2.1 Umgang mit dem Gerät
!WARNUNG!
•Die Montage und Reparaturen der Dunstabzugshaube dürfen nur von
Fachkräften durchgeführt werden, die mit den verbundenen Gefah-
ren bzw. den einschlägigen Vorschriften vertraut sind.
•Durch unsachgemäße Reparaturen können erhebliche Gefahren ent-
stehen. Wenden Sie sich im Reparaturfall an den Service-Stützpunkt in
Ihrem Land (Adressen auf der Rückseite).
•Personen (einschließlich Kinder), die aufgrund ihrer physischen, sen-
sorischen oder geistigen Fähigkeiten oder ihrer Unerfahrenheit oder
Unkenntnis nicht in der Lage sind, das Produkt sicher zu benutzen,
sollten dieses Produkt nicht ohne Aufsichtoder Anweisung durch eine
verantwortliche Person nutzen.
•Montagearbeiten und elektrische Verkabelung müssen von qualifi-
zierten Fachhandwerkern unter Einhaltung aller gültigen Vorschriften
und Normen durchgeführt werden.
•Achten Sie beim Schneiden oder Bohren in Wand oder Decke darauf,
dass keine elektrischen Leitungen oder nicht sichtbare Geräte beschä-
digt werden.
•Um das Brandrisiko zu reduzieren, dürfen nur Rohre der Klasse UL94-
HB oder höher verwendet werden.
•Der Abstand zwischen Gaskocherflamme und Dunstabzugshaube
muss mindestens 50 cm betragen.
!VORSICHT!
•Die Dunstabzugshaube muss so sicher installiert werden, dass diese
nicht herabfallen kann.
•Betreiben Sie die Dunstabzugshaubenur, wenn das Gehäuse und die
Leitungen unbeschädigt sind.
•Achten Sie darauf, dass brennbare Gegenstände nicht im Bereich des
Luftaustritts gelagert bzw. montiert sind. Der Abstand muss mindes-
tens 50 cm betragen.
•Greifen Sie nicht in den Lüftungsauslass und führen Sie keine Fremd-
gegenstände in das Gerät ein.
DometicCK150_IOM__EMEA_.book Seite 17 Freitag, 20. Dezember 2019 12:01 12

DE
Lieferumfang CK150
18
3 Lieferumfang
4 Bestimmungsgemäßer Gebrauch
Die Dunstabzugshaube CK150 ist für den Einbau in Wohnwagen, Wohnmobilen
und Booten vorgesehen.
Pos. in
Abb. 1,
Seite 3
Menge Beschreibung
1 1 Dunstabzugshaube
2 1 Abdeckkappe
3 1 Dachhaube
41Lüfter
5 1 Gummidichtung
6 1 Schlauchschelle
7 1 Rohrleitung
8 1 Schlauchschelle
9 1 Filter
10 6 Schrauben 4,2 x 25
11 3 Schrauben 4,2 x 13
12 3 Schrauben 3,5 x 9,5
13 4 Schrauben 3,5 x 13
14 1 Schraube 3,5 x 25
DometicCK150_IOM__EMEA_.book Seite 18 Freitag, 20. Dezember 2019 12:01 12

DE
CK150 Technische Beschreibung
19
5 Technische Beschreibung
Die Dunstabzugshaube CK150 entfernt beim Kochen entstehende Gerüche und
Dampf. Das Gerät ist ausgestattet mit einem abnehm- und waschbaren Filter, einem
eingebauten Leuchtmittel und einem Lüfter. Er ist über eine biegsame Rohrleitung
mit dem Innenbereich verbunden und kann dank der witterungsbeständigen
Abdeckkappe auf dem Dach des Wohnmobils montiert werden.
5.1 Bedienelemente
6Dunstabzugshaubemontieren
Hinweise zum Montageort
Die Dunstabzugshaube soll vorzugsweise über der Kochstelle angebracht und nach
Möglichkeit in einen Hängeschrank eingebaut werden. Der Abstand zwischen
Gaskocherflamme und Dunstabzugshaube muss mindestens 50 cm betragen.
Der Lüfter soll auf dem Dach auf möglichst ebener Fläche montiert werden. Bei
Anbringen auf schrägem Untergrund muss die Dachhaube so gedreht werden, dass
eine der drei Wasserablauföffnungen in Richtung des Gefälles gerichtet ist. Ein
Neigungswinkel bis zu 20° beeinträchtigt die Leistung des Lüfters bei stillstehendem
Motor nicht.
Pos. in
Abb. 2,
Seite 3
Beschreibung
1 Filter
2Schalter Lüfter Ein/Aus
3Schalter Licht Ein/Aus
4 Leuchtmittel
DometicCK150_IOM__EMEA_.book Seite 19 Freitag, 20. Dezember 2019 12:01 12

DE
Dunstabzugshaube montieren CK150
20
6.1 Lüfter montieren
➤Wählen Sie auf dem Dach einen geeigneten Montageort für den Lüfter.
➤Zeichnen Sie die Lage und Größe der Öffnung von 105 mm Durchmesser vor
(Abb. 3, Seite 4).
➤Bohren Sie vor und schneiden Sie die Öffnung auf dem Dach sorgfältig mit einer
Stichsäge o. ä. aus.
➤Legen Sie den Lüfter auf die Öffnung und markieren Sie die sechs Schrauben-
löcher.
➤Tragen Sie einen dünnen Ring aus einem dauerelastischen Abdichtungsmaterial
um jedes Loch auf.
➤Setzen Sie die Gummidichtung (Abb. 54, Seite 4) in die Rille auf die Unterseite
des Lüfters ein.
I
➤Befestigen Sie den Lüfter (Abb. 53, Seite 4) mit den sechs mitgelieferten
Schrauben (4,2 x 25).
➤Befestigen Sie die Dachhaube (Abb. 52, Seite 4) mit den drei mitgelieferten
Schrauben (3,5 x 9,5).
➤Befestigen Sie die Abdeckkappe (Abb. 51, Seite 4) mit den drei mitgelieferten
Schrauben (4,2 x 13).
6.2 Dunstabzugshaube montieren
!
➤Wählen Sie im Innenraum einen geeigneten Montageort für die Dunstabzugs-
haube.
➤Zeichnen Sie die Lage und Größe des Ausschnitts von 381 x 142 mm im Boden
des Hängeschrankes vor (Abb. 4, Seite 4).
HINWEIS
Ziehen Sie den Lüfter so fest an, dass die Gummidichtung nahtlos am
Dach anliegt.
WARNUNG!
•Bringen Sie die Dunstabzugshaube vorzugsweise über der Koch-
stelle an und bauen Sie sie in einen Hängeschrank ein.
•Der Abstand zwischen Gaskocherflamme und Dunstabzugshaube
muss mindestens 50 cm betragen.
DometicCK150_IOM__EMEA_.book Seite 20 Freitag, 20. Dezember 2019 12:01 12
This manual suits for next models
3
Table of contents
Languages:
Other Dometic Ventilation Hood manuals

Dometic
Dometic CK2000 User manual

Dometic
Dometic GY11 User manual

Dometic
Dometic CK500 User manual

Dometic
Dometic CK2000 User manual

Dometic
Dometic CK150 User manual

Dometic
Dometic 9107300002 User manual

Dometic
Dometic CK2000 User manual

Dometic
Dometic CK600 User manual

Dometic
Dometic CK400 User manual

Dometic
Dometic GY20 User manual
Popular Ventilation Hood manuals by other brands

Elin
Elin EBD1360W User instructions

Pelgrim
Pelgrim GWA721KOR Instructions for use

KOBE
KOBE INX2730SQB-700-1Brillia Series Installation instructions and operation manual

D'KOCINA
D'KOCINA BCIAISB53 instruction manual

Gaggenau
Gaggenau AH360120 Operating and assembly instructions

IFB
IFB Olimpia User instructions