Montageanleitung Mounting instructions Rev. 01 13.08.2021
Voraussetzungen für die Montage Requirements for assembly
Voraussetzung für die Montage ist eine gewisse technische
Erfahrung. Falls Sie unsicher sind, wie die Montage
durchzuführen ist, überlassen Sie diese einer Motorrad-
Fachwerkstatt. Eine unsachgemäße Montage kann zu
Schäden am Produkt und Fahrzeug, zum Verlust von Teilen
und/oder zur Gefährdung des Fahrers und/oder anderer
Verkehrsteilnehmer führen.
DONNER-TECH übernimmt keine Haftung für Schäden, die
durch unsachgemäße Montage hervorgerufen wurden.
Alle Schrauben und sonstige Befestigungselemente sollten
zunächst nur locker eingeschraubt werden, um eine
Verspannung der Bauteile zu vermeiden. Nachdem alle Teile
angebracht und ausgerichtet wurden, können die Schrauben
in angegebener Reihenfolge bis auf das empfohlene
Drehmoment angezogen werden.
Verwenden Sie nur hochwertiges Werkzeug, um die
Schraubenantriebe nicht zu beschädigen.
Bei langfristiger Montage wird empfohlen, Schrauben mit
mittelfester Schraubensicherung zu sichern. Das verhindert
ein Lösen von Schraubverbindungen durch beim Fahren
auftretende Vibrationen.
A certain amount of technical experience is required for installation. If
you are unsure how to carry out the assembly, leave this to a
specialist motorcycle workshop. Improper assembly can lead to
damage to the product and vehicle, to the loss of parts and / or to
endangering the driver and / or other road users.
DONNER-TECH accepts no liability for damage caused by improper
assembly.
All screws and other fastening elements should initially only be
screwed in loosely in order to avoid tensioning the components. After
all parts have been attached and aligned, the screws can be
tightened in the specified order to the recommended torque.
Use only high-quality tools to avoid damaging the screw drives.
For long-term assembly, it is recommended to secure screws with
medium-strength screw locking. This prevents loosening of screw
connections due to vibrations occurring while driving.
Benötigtes Werkzeug Required tools
- 5mm Inbusschlüssel
- Schraubensicherung mittelfest
- 5mm allen key
- medium strength screw locking
Funktionskontrolle Function check
Überprüfen Sie nach der Montage und vor Fahrtbeginn, dass
alle zuvor gelösten Teile wieder ordnungsgemäß montiert -
und gelöste Verbindungen wieder hergestellt wurden.
Stellen Sie sicher, dass alle Fahrzeugfunktionen gegeben
sind und keine Schläuche, Kabel oder Leitungen geklemmt
werden oder scheuern.
Überprüfen Sie nach den ersten 50 gefahrenen Kilometern,
den korrekten und festen Sitz aller Teile und
Befestigungselemente und ziehen Sie gelöste
Schraubverbindungen bei Bedarf nach.
Führen Sie die Funktionskontrolle regalmäßig durch,
insbesondere vor längeren Reisen.
After installation and before starting your journey, check that all
previously loosened parts have been properly reassembled - and that
loosened connections have been re-established.
Make sure that all vehicle functions are in place and that no hoses,
cables or lines are jammed or chafed.
After the first 50 kilometers, check that all parts and fasteners are
correctly and securely seated and tighten any loosened screw
connections if necessary.
Carry out the functional check on a regular, especially before longer
trips.
Empfohlene Anziehdrehmomente (Regelgewinde) Recommended tightening torques (standard thread)
M3 M4 M5 M6 M8 M10 M12
Stahl / steel 8.8 1,3 Nm 3 Nm 6 Nm 10 Nm 23 Nm 46 Nm 79 Nm
A2-70 stainless 1,3 Nm 2,5 Nm 5 Nm 8,5 Nm 20 Nm 40 Nm 70 Nm
Donner GmbH Tel: 07181/9695020
Gottlob-Bauknecht-Str. 4 info@donner-tech.de
D - 73614 Schorndorf www.donner-tech.de
Germany
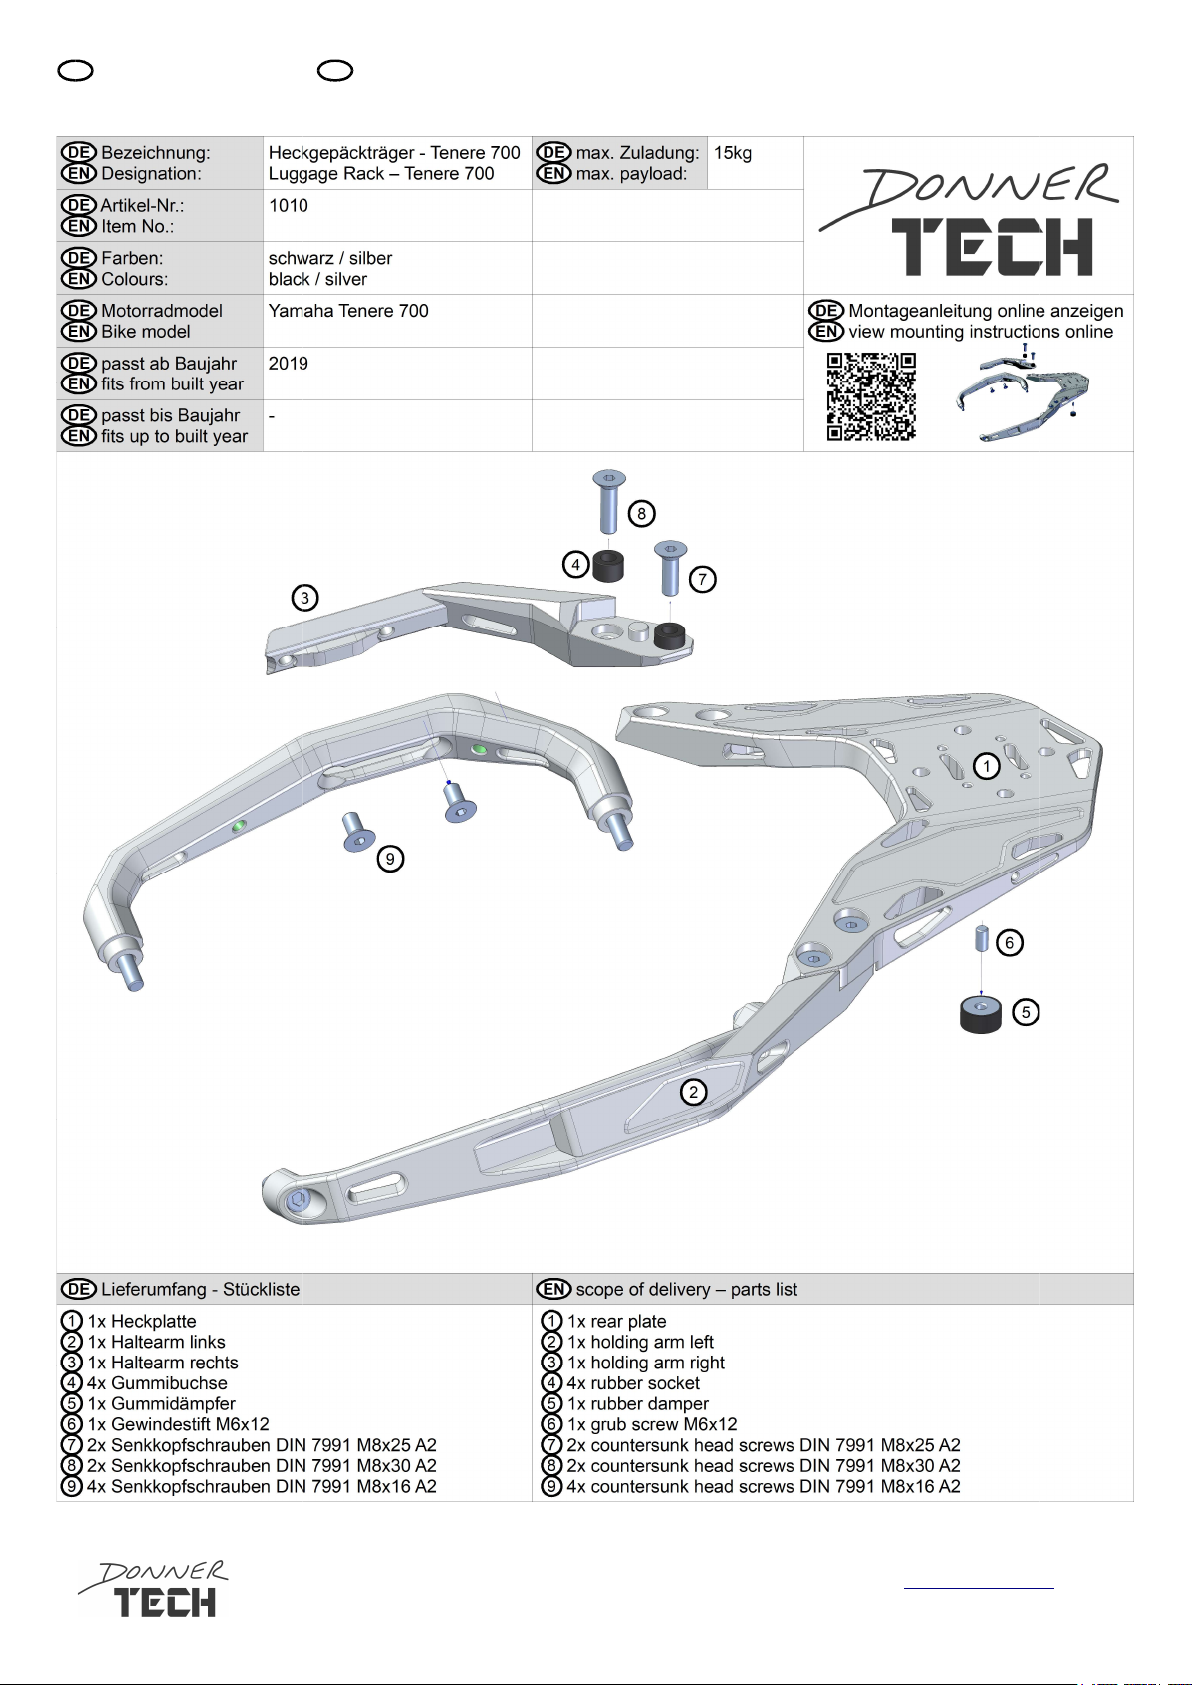
DE EN
DE EN
DE EN
DE EN
DE EN