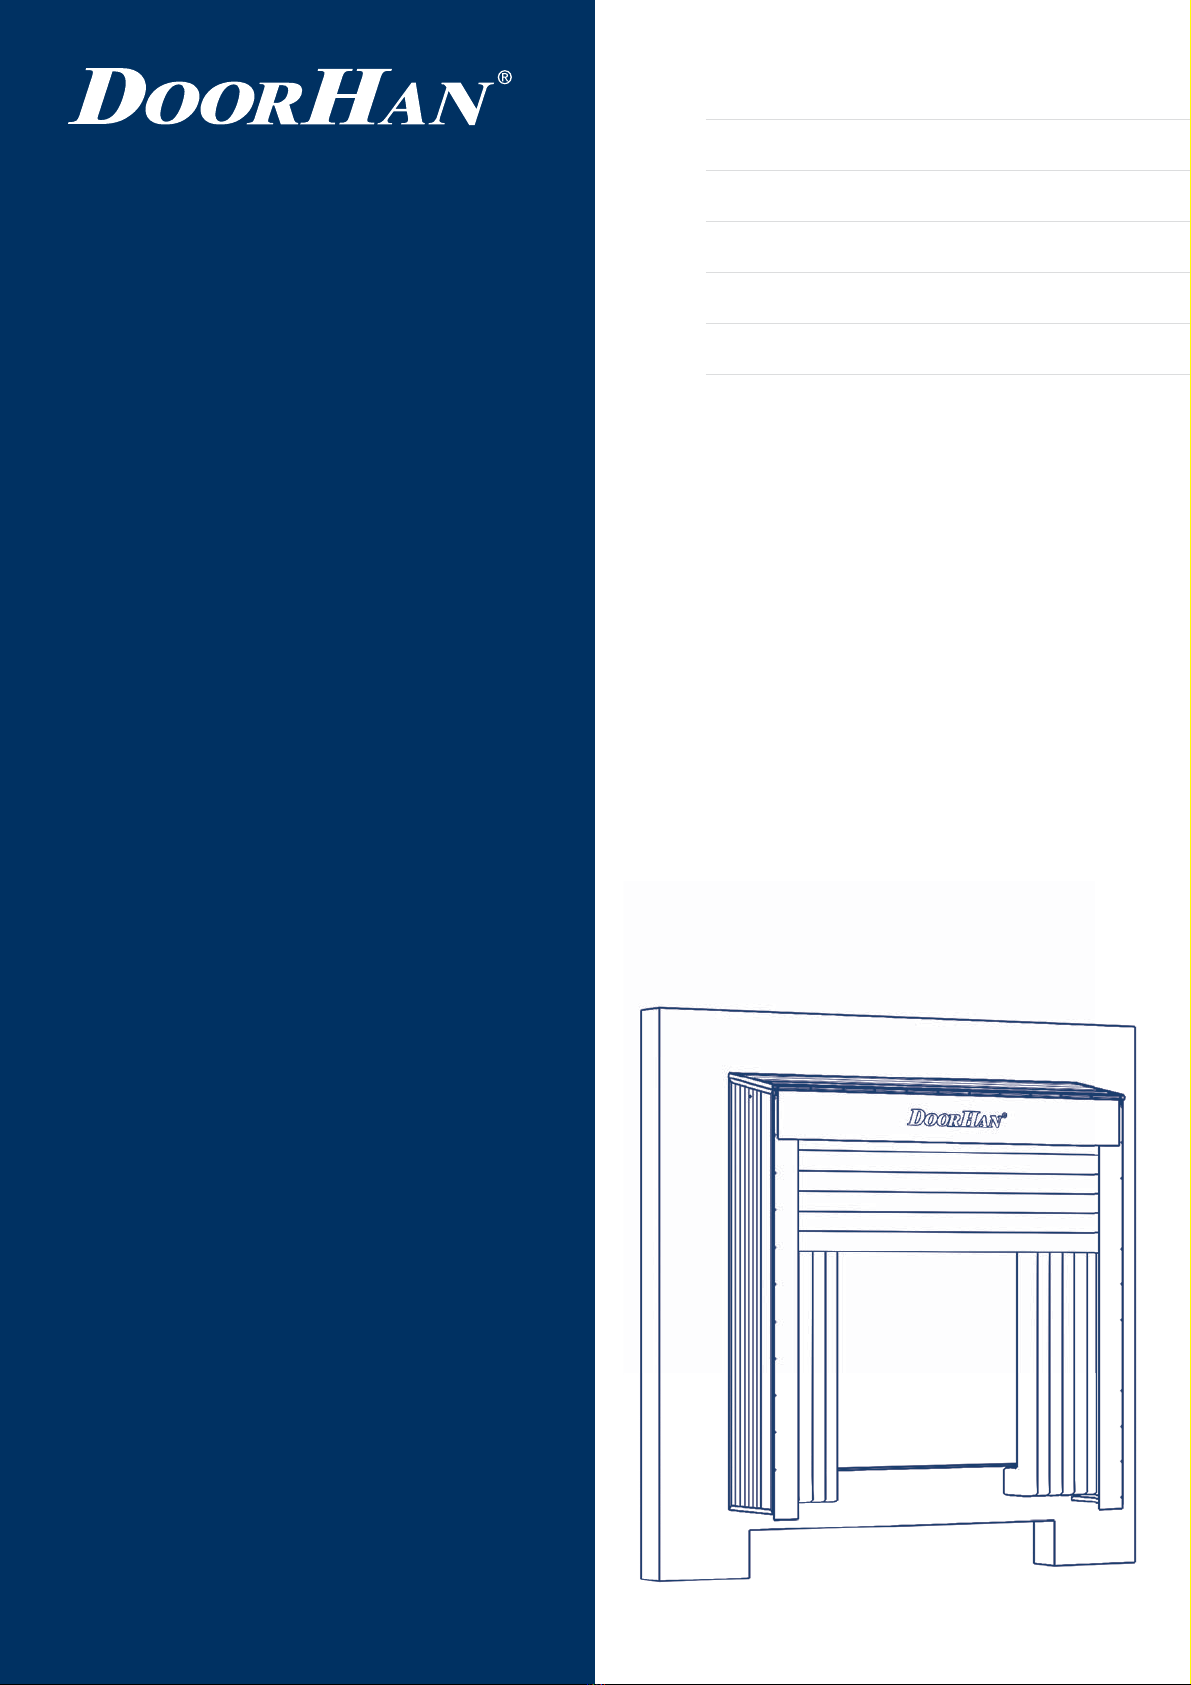
DoorHan DSHINF Series User manual

1
© DoorHan, 08.2020
Operation and Installation Instructions
Inflatable
dock shelter of
DSHINF series
General Information 2
Design 2
Safety Rules 3
Installation 4
Operation 20
Appendix 21

2
Dock shelters are designed to ensure tight sealing between loading dock and vehicle bed.
1. GENERAL INFORMATION
Fig. 1
GENERAL INFORMATION
1. Top air bag
2. Side air bag (left/right)
3. Front storage curtain
4. Left/right frame
5. Counterweight
6. Blower
7. Dock shelter roof
2. DESIGN
Table 1. Specifications
Parameter Value
Air bags control system
Three phase power supply 380–415 V / 50–60 Hz
205–250 V / 50–60 Hz
Power consumption 0,55 kW
Control unit external
Control unit protection class IP54
Inflation time 40 sec
Operating temperature -35…+70 °С
1
2
3
4
5
67

3
SAFETY RULES
3. SAFETY RULES
3.1. SAFETY RULES WHEN WORKING AT HEIGHT
Work at height is work in any place located at height of
1,3 m from the ground level and carried out from ladders,
scaffolds, platforms and other devices. The state of health
of the personnel working at height shall meet the medical
requirements established for these works.
When working at height always use a safety belt. If it’s
impossible to secure the belt to a building structure than
use a safety rope instead. In such a case two installers
should carry out all the works. Never use safety belts with
metal chain slings while working around energized wiring
and equipment!
Tools and fittings should be properly secured to prevent
their falling while working above energized electrical in-
stallations. To pass tools and fittings upwards an installer
standing on the ground should hold a rope with tied in-
struments to prevent its swinging and approaching to en-
ergized electrical installations.
3.2. SAFETY RULES WHEN WORKING FROM LADDERS AND STEPLADDERS
Straight ladders and stepladders should be properly se-
cured to prevent their lateral movement and overturn. Sta-
bilize the base of the ladder using sharp-tipped feet for
the ground surface and anti-slip safety shoes for smooth
surfaces like metal, tile or concrete.
IT IS PROHIBITED TO:
work from the rung located less than one meter from the ladder top;
use power tools when working from a ladder;
work from the two top rungs of a stepladder which has no safety hand rails or ladder stop;
be on the steps of a ladders or stepladder for more than one person;
stand under the ladder which is used for work;
leave tools or materials on top of any ladder.
3.3. SAFETY RULES WHEN OPERATING POWER TOOLS
Only qualified and specially trained personnel acquainted
with electrical safety instructions can operate power tools.
It is recommended to use power tools operating at volt-
age not exceeding 380/220 V. Choose power tool taking
into consideration electric shock hazard of the premise.
Ground metal housing of electric tool operating at voltages
above 42 V AC and above 110 V DC when working in haz-
ardous areas and outdoor installations. Tool connection
plug should have a ground contact. Plug power tools only
in the grounded power supply network. When using exten-
sion cords make sure they have grounded plugs and sock-
ets. Always wear protective rubber gloves or rubber bot-
tom shoes or sneakers when using electric instruments.
Protective devices must be tested in accordance with the
procedure established by law.
Prior to operation:
ensure all the components are in place and properly
secured;
check for worn out cable (wire), its protective tube and
plug; damaged insulating parts of the housing, handle
and brush holder covers; absent or damaged protective
casings;
make sure ground circuit between the housing and the
ground contact of the plug is whole;
ensure the main switch works properly;
check operation of power tools at idle.
Use only properly functioning, checked and sealed tools.
Never bend or twist electric cables or position any trailing
wires where different structures and materials are stored
or vehicles move. When working in rainy weather (snow-
fall) protect with canopies the area where cables are laid
or power tools are used.
IT IS PROHIBITED TO:
hold the instrument by its cord;
remove chips or sawdust from the cutting tool and replace the cutting tool until it stops completely. Use corre-
sponding instruments to fasten the replaceable tool;
plug the power tool in a circuit with characteristics which do not correspond to the specified in data sheet;
move an electric tool with operating motor from one working place to another;
leave unattended a plugged-in or operating electric instrument;
leave electric instrument unattended to prevent its unauthorized use.

4
Fig. 10. Safety glasses Fig. 11. Hard hat Fig. 12. Gloves
Fig. 7. Wrench set Fig. 8. Drill screwdriver Fig. 9. Stepladder
3.4. SAFETY RULES FOR ELECTRICAL INSTALLATION WORK
Carry out electrical installation works in accordance with «Safety rules for electrical installations» and «Safety regulations
for the operation of consumer electrical installations».
Fig. 4. Drill bit set Fig. 5. Screwdriver set Fig. 6. Hex bits set
Fig. 1. Water level Fig. 2. Measuring tape Fig. 3. Pensil
4.2. TOOLS
4. INSTALLATION
4.1. GENERAL RULES
Installation of dock shelter is restricted to authorized per-
sonnel trained at DoorHan training center and having a
corresponding certificate. Use of appropriate mounting
tools is strictly required. The manufacturer does not di-
rectly control installation, operation and maintenance of
the product and can not be held responsible for instal-
lation safety and quality. It is the mounting organization
which is held responsible for quality of installation.
The contents of this manual can not be the basis for any
kind of claim to DoorHan. The manufacturer reserves the
right to make any changes to the product construction,
structure, components and accessories without notice.
Should any questions arise during product operation
please refer to DoorHan dealer. Its address and phone
number is provided in the sales contract.
INSTALLATION

5
Fig. 1 Fig. 2 Fig. 3 Fig. 4
Fig. 5 Fig. 6 Fig. 7
Fig. 10
Fig. 8
Fig. 11
Fig. 9 Fig. 12
4.3. PACKAGE INVENTORY
INSTALLATION
2 pcs.
2 pcs 2 pcs
Fig. 14 Fig. 15Fig. 13
Fig. 18Fig. 17
Fig. 16
Fig. 19
А B C
E
DF
L 250 mm
∅110 mm
6,3 ×25 mm6,3 ×38 mm 8 ×7 mm
6,3 ×25 mm
∅6 mm

6
INSTALLATION
Fig. 1.2 Fig. 1.3
Fig. 1. Prepare side frames
View 1
100 mm
500 mm
Fig. 1.1. View 1
125 mm
∅ 7 mm
50 mm
4.4. INSTALLATION
А

7
INSTALLATION
Fig. 2
View 2
Fig. 2.1. View 2
105 mm
Fig. 2.2
А

8
Fig. 3. Fasten side frames to building wall
Fig. 3.1. View 1 Fig. 3.2. View 2
200 mm
View 1
View 2
INSTALLATION

9
INSTALLATION
Fig. 4.3. View 2
Fig. 4.1. View 1
Fig. 4
Fig. 4.4
Fig. 4.2
100 mm
300 mm
View 1
View 2
А
А

1
0
INSTALLATION
Fig. 5
Fig. 5.2
Fig. 5.3
Fig. 5.1
АА
А

11
INSTALLATION
Fig. 6. Install top air bag
Fig. 6.1 Fig. 6.2
А
А

1
2
Fig. 7. Install guide rod
Fig. 7.1
Fig. 7.2 Fig. 7.3
INSTALLATION

13
INSTALLATION
Fig. 8
Fig. 9 Fig. 10
400 mm
155 mm
90°
820 mm
А
А

14
Fig. 13. Install counterweight
Fig. 13.1. View 1 Fig. 13.2. View 2
View 2
View 1
B
INSTALLATION
Fig. 12Fig. 11
F
Before attaching the counterweight cable to the shaft, turn
the shaft until the top air bag rises all the way up.

15
INSTALLATION
Fig. 14. Connect air transfer tubes
Fig. 14.1 Fig. 14.2
B

1
6
INSTALLATION
Fig. 15 Fig. 15.1
Fig. 15.2
Fig. 15.4
Fig. 15.3
Fig. 15.5
E
D
DD

17
Fig. 16
Fig. 16.1 Fig. 16.2
INSTALLATION
B
B

1
8
Fig. 17
Fig. 17.1 Fig. 17.2
INSTALLATION
B
B

19
Fig. 18
Fig. 20
Fig. 19
Fig. 21
INSTALLATION
4,2 u32 mm
C

20
5. OPERATION
Precautions:
Only qualified personnel acquainted with the design
and construction of the shelter should handle it.
Prior to operation carefully inspect the dock shelter.
Never use it in case any damage is found.
Principle of operation:
Trailers back into the shelter during loading/unloading
operations while top and side air bags create a tight
seal against the truck top and rear body.
WARNING!
To prevent dock shelter damage truck size should correspond to shelter type and dimensions.
1. Position the trailer in the middle of the dock shelter.
2. Back the trailer slowly till it contacts with dock bumpers.
3. Make sure the truck is stationary, the handbrake is put
on, the wheels are choked.
4. Inflate dock shelter:
– switch the blower on by pressing a push-button on
the control unit;
– if the blower motor is operated with the dock leveler
control unit then press a corresponding dock shelter
button on the unit;
– after the blower is operated, top and side air bags
are inflated.
5. Deflate dock shelter.
– switch the blower off by pressing a push-button on
the control unit;
– if the blower motor is operated with the dock leveler
control unit then press a corresponding dock shelter
button on the unit;
– wait the air bags to deflate, retract, and store behind
storage curtains;
– the trailer may depart now.
OPERATION
WARNING!
The blower should be on during whole loading/unloading cycle!
The trailer should exit the loading dock only after air bags are completely deflated and stored!
Table of contents
Other DoorHan Door Opening System manuals
Popular Door Opening System manuals by other brands

SECO-LARM
SECO-LARM Enforcer Access SD-962AR-36A manual

Stanley
Stanley Dura-Glide 2000AG Series Installation Instructions, Quick Reference Guide

Detex
Detex AO19-1 manual

hager
hager 5200 Series installation instructions

Overhead door
Overhead door STANLEY quick start guide

Lukas
Lukas HT 90 operating instructions