Doran Scales DS6150 User manual


Section 1. Unpacking and Installation.....................................................1
Introduction ..................................................................................................................1
Unpacking....................................................................................................................1
Cautions and Warnings................................................................................................1
Care & Cleaning...........................................................................................................1
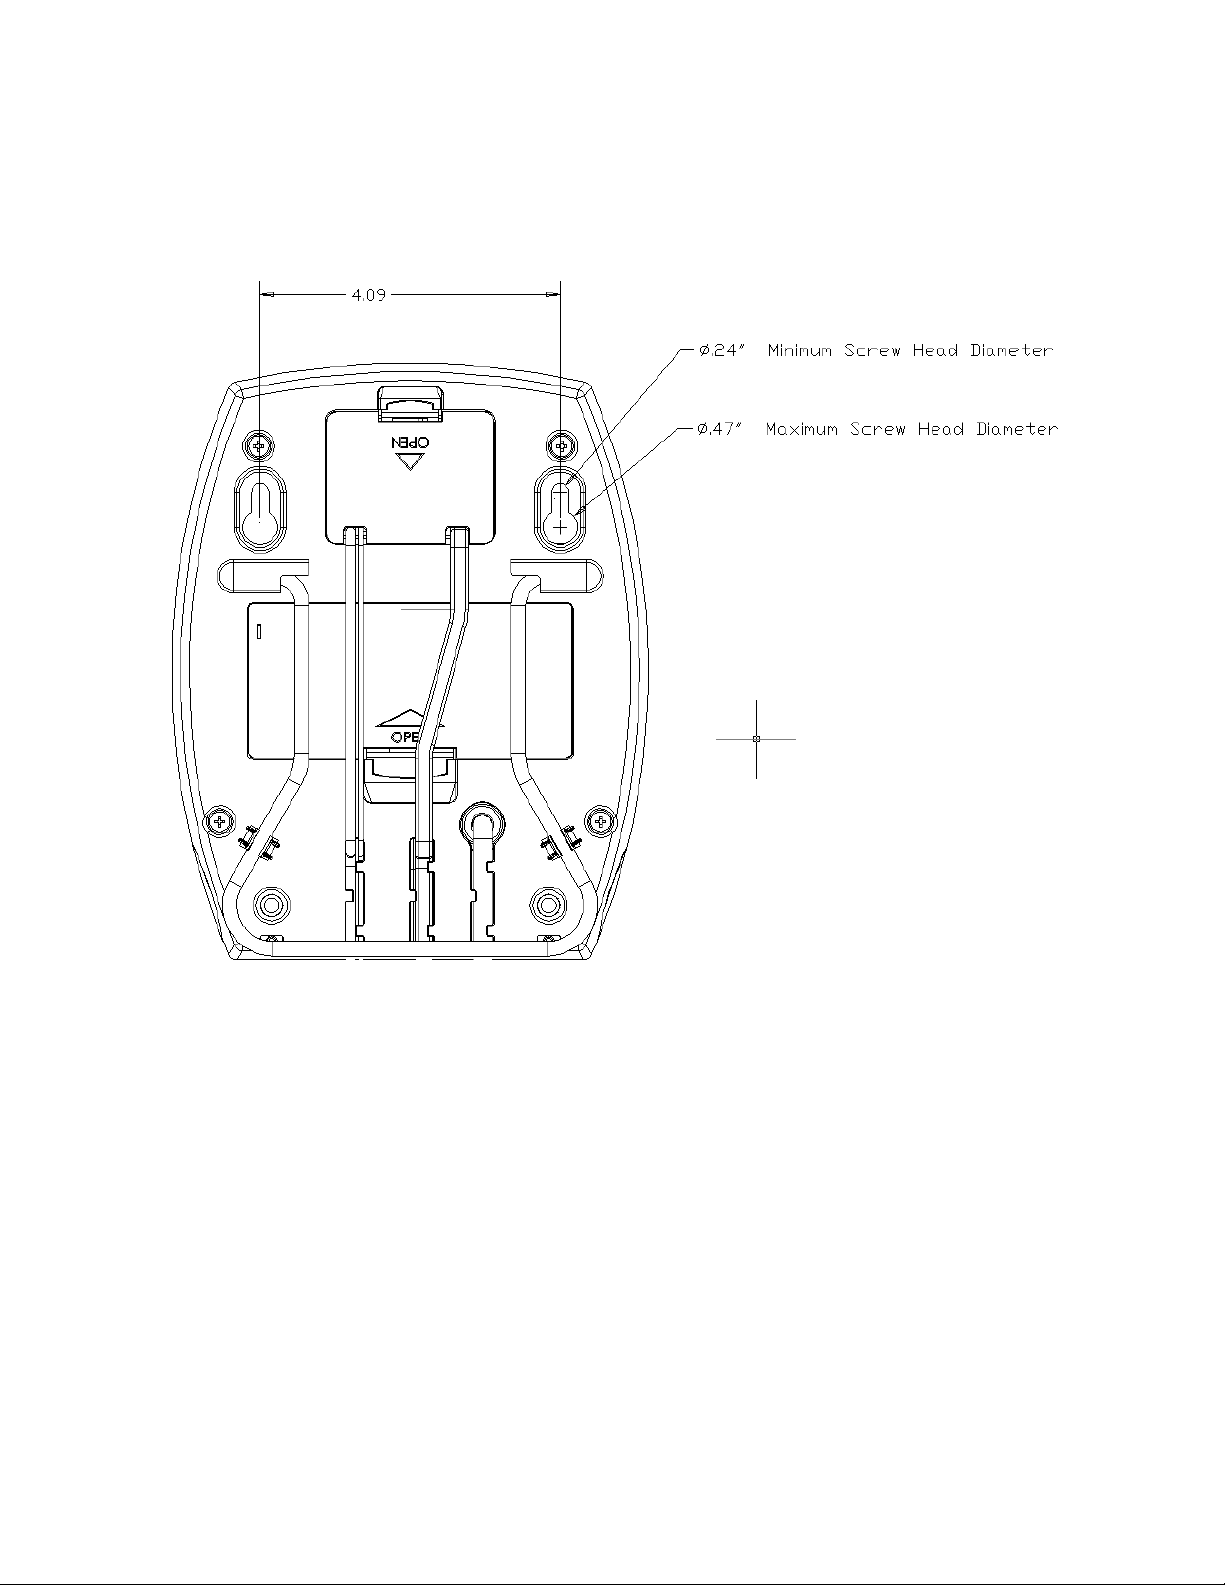
Wall Mounting ..............................................................................................................2
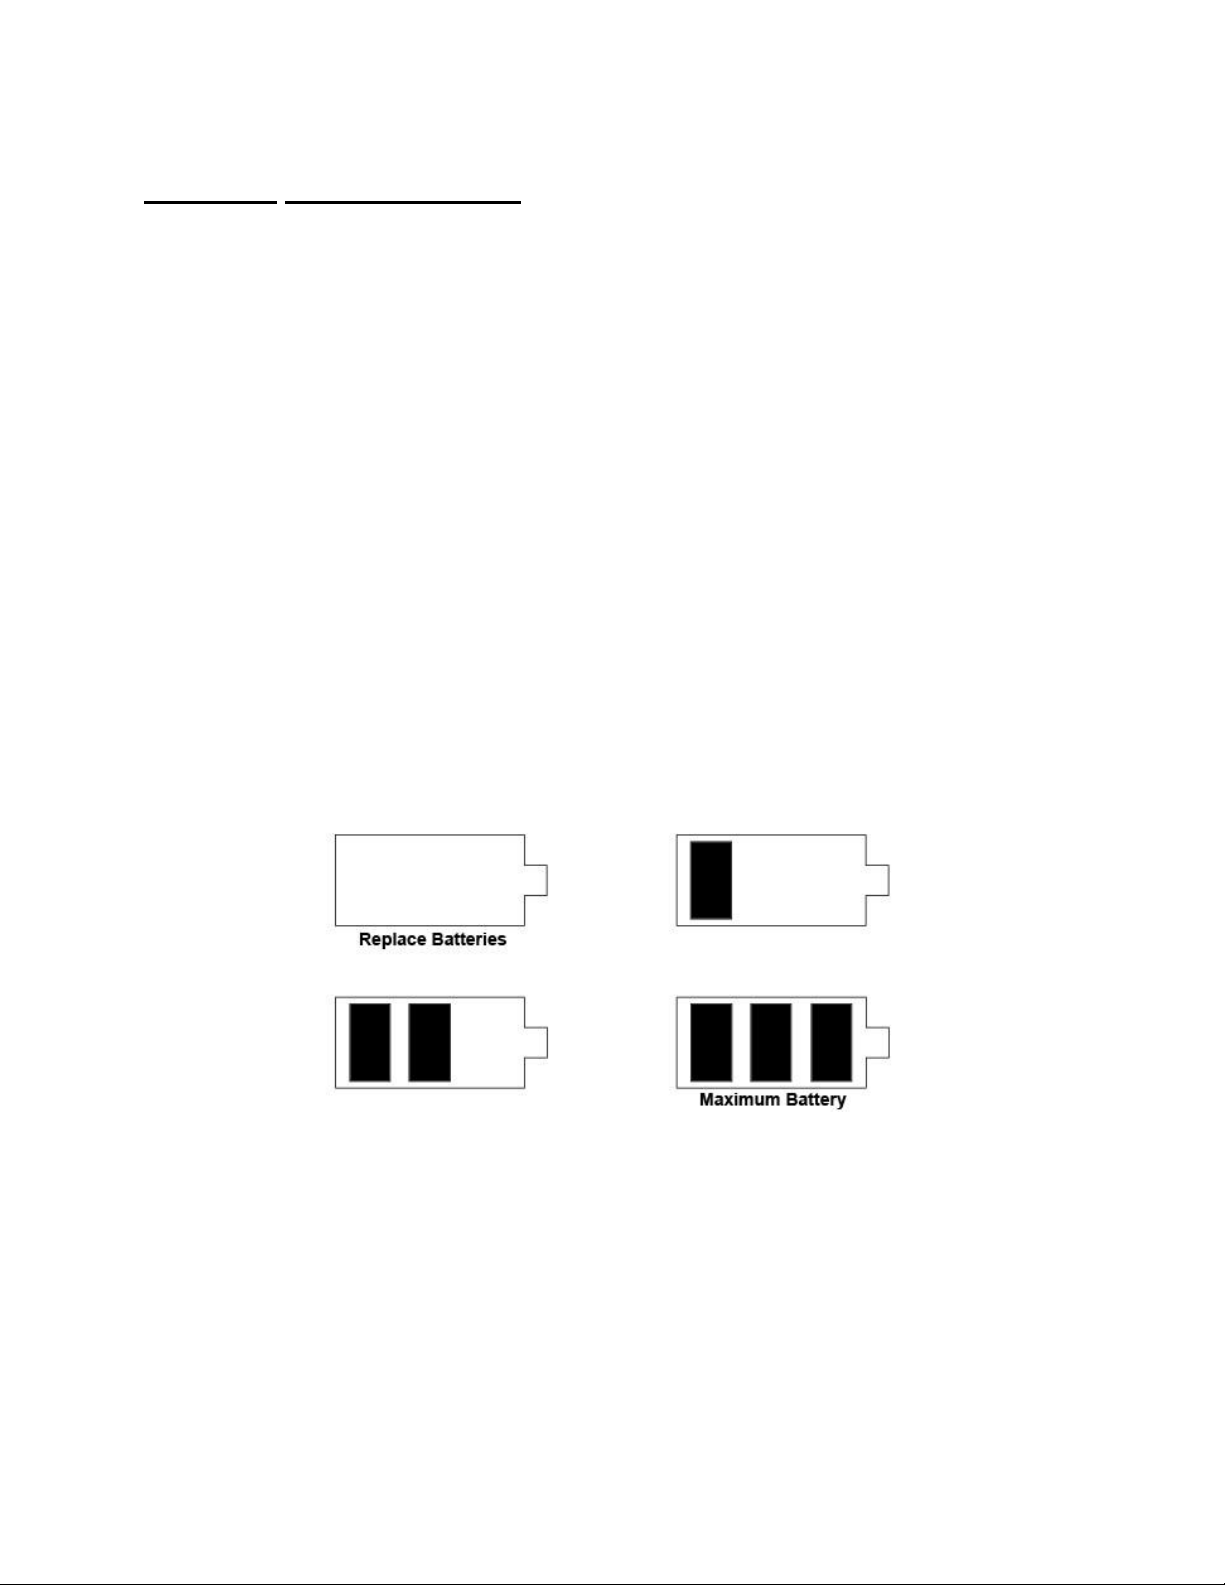
Section 2. Battery Operation....................................................................3
Section 3. Scale Operation......................................................................5
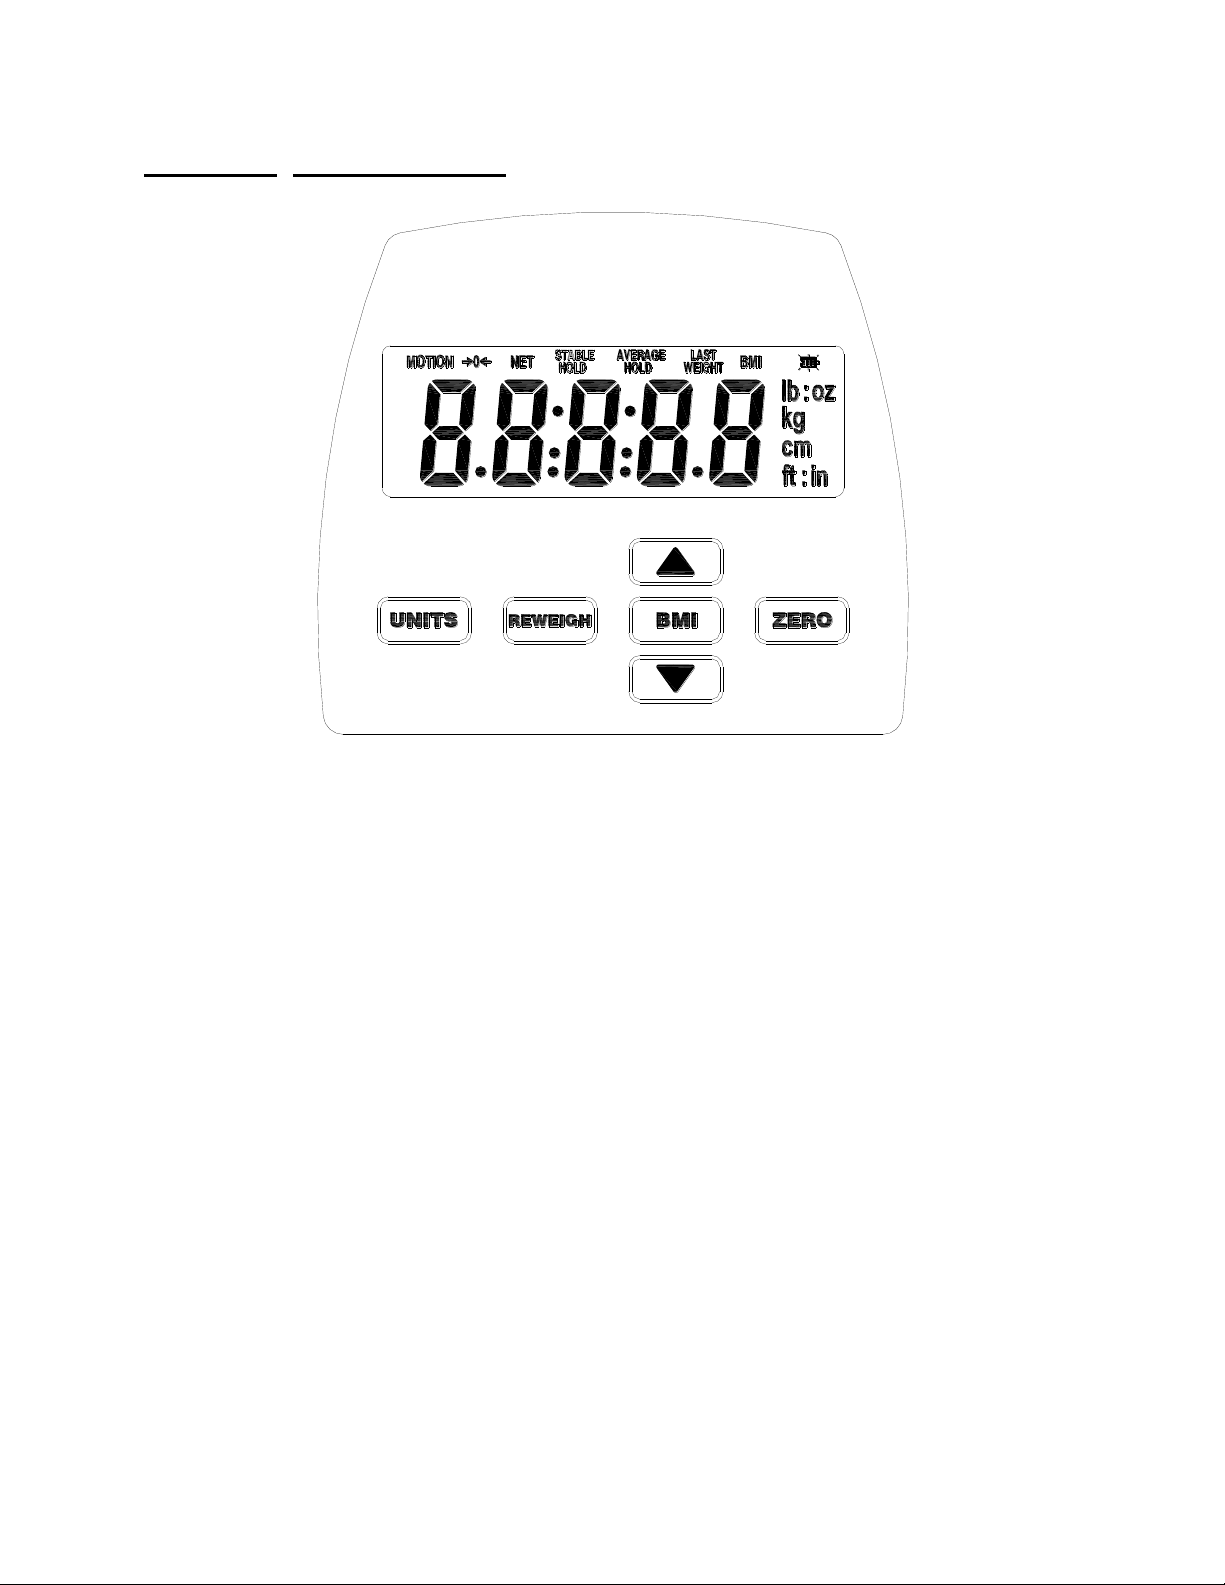
Display Pushbuttons ....................................................................................................5
Display Annunciators....................................................................................................6
Weighing a Patient.......................................................................................................8
Zero Operation.............................................................................................................8
BMI Operation..............................................................................................................8
Reweigh Operation.......................................................................................................8
Section 4. Scale Calibration....................................................................9
Entering and Exiting Setup Mode.................................................................................9
Two Point Calibration Procedure..................................................................................9
Multiple Point Calibration Procedure..........................................................................10
Calibration Troubleshooting .......................................................................................11
Section 5. Parameter Setup ..................................................................12
Entering and Exiting Setup Mode...............................................................................12
Calibration Mode Entry...............................................................................................12
Reset All Parameters to Default Settings...................................................................13
Automatic Shutoff Timer.............................................................................................13
Average Aperture.......................................................................................................14
Data Output................................................................................................................14
EMR Format...............................................................................................................14
Configure Output........................................................................................................14
LB Units Enable / Disable ..........................................................................................15
KG Units Enable / Disable..........................................................................................15
OZ Units Enable / Disable..........................................................................................15
LB:OZ Units Enable / Disable.....................................................................................15
Inches Units Enable / Disable ....................................................................................15
Centimeters Units Enable / Disable............................................................................15
Button Press Beep.....................................................................................................16
Stable or Average Hold Weight Beep ........................................................................16
Battery Voltage Level.................................................................................................16
Raw Counts................................................................................................................16
Section 6. Data Communications .........................................................17
RS-232 Communications Port....................................................................................17
USB Communications Port ........................................................................................17
Section 7. Specifications........................................................................21
Section 8. Troubleshooting...................................................................22
General Problem Resolution......................................................................................22

Section 1. Unpacking and Installation
Introduction
Thank you for purchasing a Doran scale. This product has been designed with
the highest level of technology. We are dedicated to delivering a superior
product that will provide many years of trouble free service.
As an ISO9001 registered company, Doran Scales is dedicated to delivering
products built with strict compliance to our high quality standards. If you have
any questions regarding your scale, please contact Doran Scales, Inc.
Unpacking
Carefully remove the scale from the shipping carton. If you notice any shipping
damage, notify the shipper immediately. Be sure to retain all shipping materials
in case the scale must be shipped elsewhere.
Cautions and Warnings
Normal care should be taken when handling and using this product. Improper
handling or abuse can damage the scale and result in costly repairs that may not
be covered by the warranty. Please observe the following precautions to insure
years of trouble free service from your new scale.
Do not use sharp objects to press any of the buttons.
Do not pick up the scale by the indicator or cables.
Do not use the scale if it is damaged in any way.
Do not leave patients unattended on the scale.
Do not exceed the scale capacity.
Do not drop the scale.
Do not drop objects on the scale.
When transporting, do not hit other objects, walls or doorframes with the
scale.
Care & Cleaning
With reasonable care, this product will last for many years. Here are some tips
to care for your scale. Failure to comply with these guidelines may void the
warranty.
Hand clean the scale platform and indicator with a moist cloth.
Only clean with a mild detergent.
Do not get water inside the indicator or platform.
Do not use strong solvents or abrasive cleaners as this can damage the
touch panel or other plastic parts.
Do not immerse.
Examine the scale periodically for damage and wear and tear before use.
Remove batteries during long periods of non-use.

2
Wall Mounting
If mounting the indicator to a wall, refer to the following diagram. Place two
screws 4.09” apart, 65” above the floor. The screw heads should be
approximately 0.33” in diameter.

3
Section 2. Battery Operation
Battery Installation
The indicator can be powered by a set of six AA alkaline batteries. These
batteries can perform over 25,000 weighments of typical use with the standard
Automatic Shutoff Timer settings.
The battery compartment is located on the backside of the indicator. Press the
locking tab to release battery compartment cover. Completely remove all the
batteries from the indicator and install the new set of batteries. Be sure the
batteries are oriented properly. Reinstall the battery compartment cover to
complete the battery installation.
Battery Indicator
The battery indicator displays the remaining battery life available. A low battery
status is also indicated by two beeps when a weight is held (If Parameter BH is set
to on.) This indicator will not be displayed if the scale is powered by its wall
transformer.

4

5
Section 3. Scale Operation
Fig. 3 Front Panel
Display Pushbuttons
The Model DS6150 controls consist of UNITS, ZERO, REWEIGH, ▲, ▼, and
BMI buttons. The display is used to provide weight indications and operator
messages indicating scale operation.
Power On/Off
Press the ZERO button to turn on the indicator. Press and hold the ZERO button
for 3 seconds to turn off the indicator. The indicator has an adjustable Automatic
Shutoff Timer that will turn off the indicator when not in use.
Zero When the ZERO button is pressed, the scale will reset to zero weight. This
feature can be used to zero out any weight not desired to be part of the patient
weight. The current BMI entry will be changed back to a 0.0 value.
UnitsPress the UNITS button to toggle between lb and kg weighing units. The current
unit will be displayed to the right of the weight digits. NOTE: The UNITS button

6
can be locked or unlocked by pressing and holding UNITS for 5 seconds. An “
L
on
“message is displayed when button is locked and “
L off
“ when unlocked.
Reweigh
To reinitiate the weighing process, press REWEIGH. This will allow a new
measurement to be taken without the patient having to leave the platform.
BMI With the held weight being displayed, press the BMI button to enter the height of
the patient. Adjust the value by using the ▲or ▼buttons. NOTE: Select the
Height units by pressing the UNITS button to toggle between the height in inches
or centimeters. The scale will exit this mode if no buttons are pressed within 30
seconds.
Display Annunciators
The display annunciators will indicate the scale status.
Motion
When the scale senses motion, MOTION will be indicated. Once motion ceases,
a stable reading will be displayed.
Stable Hold
Indicates a stable weight has been achieved and held on the display. This
indicates an accurate weight has been achieved. Note: Weights below 4.5
pounds will not be held.
Average Hold
Indicates that the weight held on the display is a result of averaging several
weights due to excessive motion on the scale. Note: Weights below 4.5 pounds
will not be held. The Average Hold weight may be slightly less accurate than a
Stable Hold weight.
Displaying an Average Hold weight instead of a Stable Hold weight will speed the
weighment process for patients that are not able to remain still. The Average
Hold weight will differ from the patient’s actual weight based upon the severity of
the motion caused by the patient while on the scale. Although this weight may be
less accurate than a Stable Hold weight, the deviation from the patient’s actual
weight will be minimal.
The time required for the Average Hold to engage is based upon the Average
Aperture parameter. See the Parameter Setup section for configuration
instructions.

7
Battery Indicator
The battery indicator displays the remaining battery life. See the battery operation
section for detailed information. NOTE: The battery Indicator will be disabled
when using an external power supply.
Software Number and Revision display
Pressing and holding the REWEIGH button for 3 seconds will perform a display
test. The software number, “Su179”, and the revision, “r 3.2” (or higher), are
displayed first. After displaying the revision, the scale enters a “switch test” mode
where the keys can be pressed to verify their operation. If no keys are pressed
for 10 seconds, the scale will perform a display test and return to its normal mode
of operation.

8
Weighing a Patient
1. Turn on the indicator by pressing the ZERO button.
2. The indicator will perform a startup zero.
3. The indicator will momentarily display dashes, “-----”, followed by 0.0.
4. Patient stands on the scale platform.
5. The display will scroll dashes until the patient’s weight is captured.
6. The indicator will beep (if enabled) and then hold the weight on the display
until the scale turns off.
Zero Operation
1. Place item to be zeroed on the scale platform.
2. Press ZERO. The scale will display a zero weight. If the item is removed, the
stable negative weight will automatically be zeroed after 3 seconds.
BMI Operation
1. With the held weight displayed, press the BMI button to enter the height value.
Height entry starts at 5: 6.0 or 168.0, representing 5 foot 6 inches or 168
centimeters. NOTE: Height units can be changed by pressing the UNITS
button.
2. Press the ▲button to increase or the ▼button to decrease the value. When
the correct value is displayed, press the BMI button to enter the value and exit.
NOTE: A menu timer will exit out of this entry mode if no buttons are pressed
within a 30 second time period.
Reweigh Operation
1. With the patient standing on the scale platform, press REWEIGH to reinitiate
the weighing process.
2. The display will scroll dashes until the patient’s weight is captured.
3. The indicator will beep (if enabled) and hold the weight on the display until the
scale turns off.

9
Section 4. Scale Calibration
Entering and Exiting Setup Mode
To enter setup mode from the front panel, press and hold REWEIGH and ZERO
together. Release both buttons when the display reads CAL n.
To exit the calibration mode and save the changes, press REWEIGH or press
BMI to scroll to the end of the menu. The scale will then return to a normal
weighing operation.
Two calibration procedures are offered.
The Two Point calibration will calibrate the scale using only one weight
that can be user defined. This calibration procedure is effective and can
be used in the field with a test weight, or by using your own body weight.
The Multiple Point calibration procedure requires four separate test
weights. This procedure offers the greatest accuracy and is intended for
factory or field calibration by a scale technician.
The Two Point calibration will calibrate the scale using only one weight that can be user
defined. This calibration procedure is effective and can be used in the field with a test
weight, or by using your own body weight.
Two Point Calibration Procedure
1. When the setup mode is entered the display reads CAL n.
2. Press the ▲ button to change the display to CAL y.
3. Press BMI.
4. The display reads CAP,then the current Capacity value in lb or kg.
5. Press the ▲or ▼arrow to select a capacity. Press the UNITS button to toggle
between lb or kg units.
6. Press BMI to save current capacity and advance to the zero point calibration.
7. The display will now show CAL 0.
8. Remove all weight from the scale platform.
NOTE: During calibration be sure vibration and air currents are not present.
9. Press BMI to perform a zero point calibration. The display will count down to
zero. The counter will reset if too much motion (Er nn) is detected.
10.The scale will display 500.0. Representing an 500 lb span point calibration.
11.If necessary, press UNITS to calibrate in kilograms.
12.If desired, change the calibration weight by using the up or down arrow button
to scroll the weight value.
NOTE: The span weight value can be changed to any weight between 1% and
100% of capacity. For maximum accuracy, use a 40% of capacity weight or
more.
13.After the span weight has been entered, place the calibration weight on the
platform.

10
14.Press BMI to accept the span weight value. The display will count down to zero
and return to the weigh mode.
Multiple Point Calibration Procedure
1. When the setup mode is entered the display reads CAL n.
2. Press the ▲arrow button to change the display to CAL y.
3. Press BMI.
4. The display reads CAP,then the current capacity value in lb or kg.
5. Press the ▲or ▼arrow to select a capacity from a table, example 500 lb (230
kg). Press the UNITS button to toggle between lb or kg capacity units.
6. Press BMI to save current capacity and advance to the zero point calibration.
7. The display reads CAL 0.
8. Remove all weight from the scale platform.
NOTE: During calibration be sure vibration and air currents are not present.
9. Press BMI to perform a zero point calibration. The display will count down to
zero. The counter will reset if too much motion (Er nn) is detected.
10.The scale will display 500.0. Representing a 500 lb span point calibration.
11.Press Zero button, to enter multipoint calibration
12.The scale will display 100 lb (45 kg)
13.Place 100 lb (45 kg) onto the scale.
14.Press BMI. The display will count down to zero.
15.The scale will display 200 lb (90 kg)
16.Place 200 lb (90 kg) onto the scale.
17.Press BMI. The display will count down to zero.
18.The scale will display 300 lb (135 kg)
19.Place 300 lb (135 kg) onto the scale.
20.Press BMI. The display will count down to zero.
21.The scale will display 400 lb (180 kg)
22.Place 400 lb (180 kg) onto the scale.
23.Press BMI.
24.The display will count down to zero and return to the weigh mode.

11
Calibration Troubleshooting
If gruL or groL appears on the display, the calibration zero is out of range.
Check connections between the indicator and base. Press BMI to perform the
zero calibration again. If this error persists, consult the raw counts table.
If ErSp appears on the display, the span calibration is out of range. Place the
proper weight on the platform and press BMI to perform the span calibration
again. If this error persists, consult the raw counts table.
If Erng appears on the display, the span calibration has detected a negative
range. If this error persists, consult the raw counts table.
The following table shows the acceptable Raw Counts for no load and full load.
Raw Counts can be viewed through the last setup parameter. Refer to Section
5, Parameter Setup, for more information regarding parameter viewing.
If the scale’s raw counts are not within the ranges specified in the following table,
contact Doran’s Technical Assistance department at 800-264-4107.
Calibration Requirements in Raw Counts
Minimum
Maximum
Zero Calibration Point
-2000
20000
Required Calibration Span
(100% of Capacity Scale Cal Point –Zero Cal Point)
6000
30000
Required Calibration Span
(5% of Capacity Cal Point –Zero Cal Point)
300
1500

12
Section 5. Parameter Setup
The indicator has many adjustable parameters which control the scale’s operation. The
parameter settings shown in bold are the default settings.
Entering and Exiting Setup Mode
To enter setup mode from the front panel, press and hold REWEIGH and ZERO
for 5 seconds. Release both buttons when the display reads CAL n.
To exit the setup mode and save changes, press REWEIGH or BMI to scroll to
the end of parameter menu. Note: If no buttons are pressed within 30 seconds,
the scale will automatically exit the setup mode.
Setup Mode Navigation
1. Press BMI to scroll forward to the next parameter.
2. Press ▲ or ▼ buttons to change the current parameter setting.
3. Press Reweigh to save any changes and exit setup mode.
Calibration Mode Entry
Cal
Enter Calibration Mode (60 second timer)
N
Do not enter calibration
y
Enter Calibration
(see Scale Calibration section)
Cap
Capacity (60 second timer)
Use the UNITS button to toggle
between lb or kg capacities.
45(lb) 20(kg)
45 x 0.02 lb or 20 x 0.01 kg
50(lb) 25(kg)
50 x 0.02 lb or 25 x 0.01 kg
100(lb) 45(kg)
100 x 0.05 lb or 45 x 0.02 kg
500(lb) 230(kg)
500 x 0.2 lb or 230 x 0.1 kg
550(lb) 250(kg)
550 x 0.2 lb or 250 x 0.1 kg
600(lb) 270(kg)
600 x 0.2 lb or 270 x 0.1 kg
800(lb) 360(kg)
800 x 0.2 lb or 360 x 0.1 kg (default)
1000(lb) 450(kg)
1000 x 0.5 lb or 450 x 0.2 kg

13
CAL
Zero Calibration Point
0
NOTE: This parameter is only visible when
in the calibration mode. Press UNITS
button to toggle between lb and kg units
45.00
Span Calibration Point
1-500.0(lb)
1-230.0(kg)
Span calibration weight setting:
NOTE: This parameter is only visible after a
zero calibration is performed.
Reset All Parameters to Default Settings
rSt
Default parameters
n
No. Parameters are not defaulted.
y
Yes. Set all parameters to the factory
default values when BMI is pressed.
Calibration data is preserved.
Automatic Shutoff Timer
ao
Automatic shutoff timer. The timer
controls the period of time the scale
stays on after non-use.
10
10 seconds
30
30 Seconds
60
1 minute
120
2 minutes (Default)
300
5 minutes
600
10 minutes
900
15 minutes
oF
Automatic shutoff timer disabled.

14
Average Aperture
Aa
Determines the amount of motion allowed
to hold a stable weight. A slower setting
will result in more accurate weights but will
require a longer time to achieve a stable
weight. A faster setting will achieve a
stable weight faster but may be less
accurate.
4
Fastest Setting
8
Default Setting
16
Slowest Setting
Data Output
d.o.
Controls when information is
transmitted from the scale though the
RS232 serial port and or USB port.
t.d
EMR is transmitted when a request
command is received through the RS-232
or USB port.
A.5
Transmits an EMR string after the
STABLE HOLD or AVERAGE HOLD
weight is displayed. (default)
A.b
Transmits an EMR string after the Height
has been entered
C.P
Continuously transmits an EMR string 3.75
times a second.
EMR Format
For.
Format Protocol of transmitted and
received data from the serial port
IV
IQvitals format. (9600,7,ODD,2)
UU
Welch Allyn Spot format. (2400,7,EVEN,1)
f0
Doran data format. F0 (9600,8,NO,1)
f1
Doran data format. F1 (9600,8,NO,1)
Fd
Doran data format. Fd (9600,8,NO,1)
FH
Doran data format. FH (2400,8,NO,2)
Configure Output
Conf
Configure Serial Output
(For future use)
Not detected (default)
r
Detected

15
LB Units Enable / Disable
lb units Enable/Disable
on
lb weighing units active (default)
of
lb weighing units disabled
KG Units Enable / Disable
kg units Enable/Disable
on
kg weighing units active (default)
of
kg weighing units disabled
OZ Units Enable / Disable
oz units Enable/Disable
(Capacities < 100 lb / 45 kg only)
on
oz weighing units active
of
oz weighing units disabled (default)
LB:OZ Units Enable / Disable
lb:oz units Enable/Disable
on
lb:oz weighing units active
of
lb:oz weighing units disabled (default)
Inches Units Enable / Disable
Inches Height units Enable/Disable
0.1
0.1” increment for BMI entry
0.5
0.5” increment for BMI entry (default)
1.0
1.0” increment for BMI entry
of
inches height units disabled
Centimeters Units Enable / Disable
Centimeters Height units Enable/Disable
0.1
0.1 cm increment for BMI entry
0.5
0.5 cm increment for BMI entry
1.0
1.0 cm increment for BMI entry (default)
of
cm height units disabled

16
Button Press Beep
Bb
Enables/Disables indicator beep when
buttons are pressed
y
Beep enabled
n
Beep disabled (default)
Stable or Average Hold Weight Beep
bH
Enables/Disables beep when a stable or
average hold weight is achieved
n
Beep disabled.
y
Beep enabled. (default)
Battery Voltage Level
DC
Displays current battery voltage (DC)
Battery Bar Indications:
Empty Battery Symbol 5.1 –5.9 V
One Bar 6.0 –6.9 V
Two Bars 7.0 –7.9 V
Three Bars 8.0 –9.0 V
No Battery Indication 9.1 V and above
Raw Counts
xxxxx
Raw counts from A/D converter
View these numbers if calibration is
unsuccessful. Refer to Section 4 for
interpretation of these numbers.
Press BMI or Reweigh to exit setup mode.

17
Section 6. Data Communications
RS-232 Communications Port
The indicator is equipped with an RS-232 communications port. The RS-232
connection is located on the back of the indicator behind the top access cover.
An optional RS-232 cable is available. Insert the phone style connector into the
receptacle on the indicator housing and connect the 9-pin connector to your
computer or printer.
Note: This option may reduce battery life.
Basic understanding of RS-232 data communications is needed when setting up
the indicator to communicate with a printer or PC. When setting up an RS-232
communications system, there are two concerns which affect the configuration of
that system. These are:
Baud Rate
Data Bits and Parity
The baud rate determines how fast the data is sent from the scale. The sending
and receiving units must be set to the same baud settings. Refer to the For.
parameter for details.
The indicator’s data bits, parity and stop bits are set when configuring the For.
parameter. The receiving units must match the scale setting for proper
communication.
USB Communications Port
The indicator is equipped with a USB communications port. The USB
connection is located on the back of the indicator behind the top access cover.
An optional USB cable is available. Follow the instructions included with the
option to install all necessary drivers.
Once the USB drivers are installed on your PC, insert the USB connector into the
receptacle on the indicator and connect the other end of the cable to your
computer.
Table of contents
Other Doran Scales Scale manuals

Doran Scales
Doran Scales DS5100 User manual

Doran Scales
Doran Scales DS4100 User manual

Doran Scales
Doran Scales 2200CW Series User manual

Doran Scales
Doran Scales DS4050 User manual

Doran Scales
Doran Scales DS7100 User manual

Doran Scales
Doran Scales 4300M User manual

Doran Scales
Doran Scales DS6100 User manual

Doran Scales
Doran Scales DS9100 User manual

Doran Scales
Doran Scales DS600 User manual

Doran Scales
Doran Scales 4300 User manual