Doro 750x User manual

doro 750x

9
6
8
2
1
47
3
5

English
1. Scroll button
2. Left menu button/Back/Internal call
3. Line/Speaker button
4. *and ringer off/on
5. Recall button (PBX features)
6. Message button
7. #and keyguard
8. End call button and on/off
9. Right menu key
1. Bläddringsknapp
2. Vänster menyknapp/Bakåt/Intern-
samtal
3. Linjeknapp/Högtalartelefon
4. *och ringsignal av/på
5. R-knapp
6. Meddelandeknapp
7. #och knapplås
8. Nedkopplingsknapp och av/på
9. Höger menyknapp/OK
Svenska
Doro Model: S002CV0600030
UK only: S002CB0600030
AAA
1.2V 6VDC
500mAh 300mA
Ni-MH ø 3,5
EN Use only original battery and original power adapter.
SE Använd endast originalbatterier och original adapter.
NO Bruk bare originalbatterier/omformere.
DK Anvend kun originale batterier/netadapter
FI Käytä vain suositeltuja akkuja/latauslaitteita.
FR Utilisez uniquement des batteries/l’adaptateur d’origine.
NL Gebruik alleen originele batterijen/oplader.
2 x

1. Bladretast
2. Venstre menutast/tilbage/intern
samtale
3. Linjetast/Højttalertelefon
4. *og ringesignal til/fra
5. R-tast
6. Meddelelsetast
7. #og tastaturlås
8. Afbrydertast og til/fra
9. Højre menutast/OK
Dansk
1. Selauspainike
2. Vasen valikkopainike / taaksepäin /
sisäpuhelu
3. Soittopainike/Kaiutinpuhelin
4. *ja soittoäänen mykistäminen tai
ottaminen käyttöön
5. R-painike
6. Viestipainike
7. #ja näppäinlukko
8. Virtapainike ja puhelun katkaisu-
painike
9. Oikea valikkopainike / OK
Suomi
1. Touche de navigation
2. Touche menu gauche / Retour /
Intercom
3. Touche de prise de ligne/
Mains-libres
4. *et Sonnerie Off/On
5. Touche R (fonctions PABX)
6. Touche Message
7. #et verrouillage du clavier
8. Touche de n d’appel et de marche/
arrêt
9. Touche menu droite/OK
Francais
1. Scroll-toets
2. Linker menutoets/OK
3. Lijn-/Luidsprekertoets
4. *en belsignaal uit/aan
5. Flash
6. Berichttoets
7. #en toetsvergrendeling
8. Ophangen en Uit/Aan
9. Rechter menutoets/OK
Nederlands
1. Blaknapp
2. Venstre menyknapp/tilbake/intern-
samtale
3. Linjeknapp/Høyttalertelefon
4. *og ringesignal av/på
5. R-knapp
6. Beskjedtast
7. #og tastelås
8. Nedkoblingstast og av/på
9. Høyre menyknapp/OK
Norsk

1
English
Installation
Connection
1. Connect mains adapter and phone cable to respective wall sockets.
IMPORTANT: Use the telephone line cord supplied, an existing line cord from a previous
phone may not be compatible. The mains socket outlet must be located near the equip-
ment and easily accessible.
2. To charge and power up your handset please pull the label from the bottom of the handset
to connect the batteries.
3. Charge the handset with the keypad facing outwards (for 24 hours the rst time).
Language
1. Press Menu.
2. Scroll to Settings with the scroll button ( /b). Press OK.
3. Scroll to HS settings. Press OK.
4. Scroll to Language. Press OK.
5. Scroll to desired setting (z/r). Press OK.
6. Press Lto return to standby mode.
Date/Time
1. Press Menu. Scroll to Settings. Press OK.
2. Scroll to Clock/Alarm. Press OK.
3. Scroll to Date/Time. Press OK.
4. Scroll to Enter Time. Press OK.
5. Enter time of day (HH:MM). Press OK.
6. Scroll to Enter Date. Press OK.
7. Enter date (DD/MM/YYYY). Press OK.
8. Press Lto return to standby mode.
Note!
The format of date/time can also be adjusted.
Installation....................... 1
Connection ........................1
Range................................2
Area of use ........................2
Battery ..............................2
Base unit indicators............3
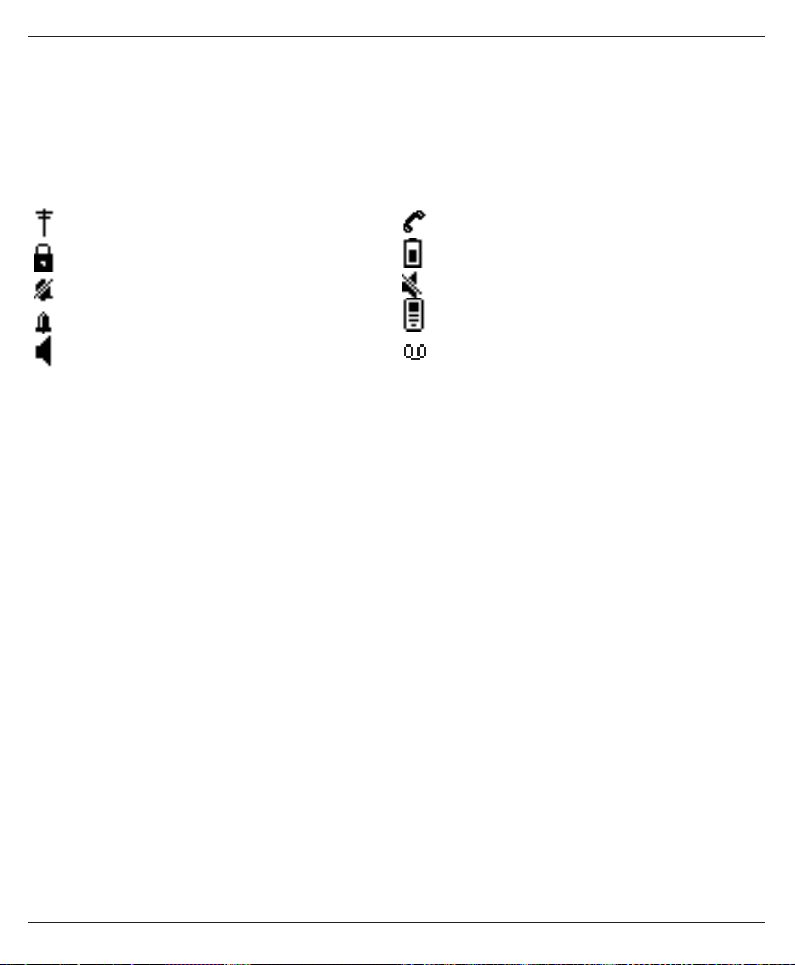
The display ........................3
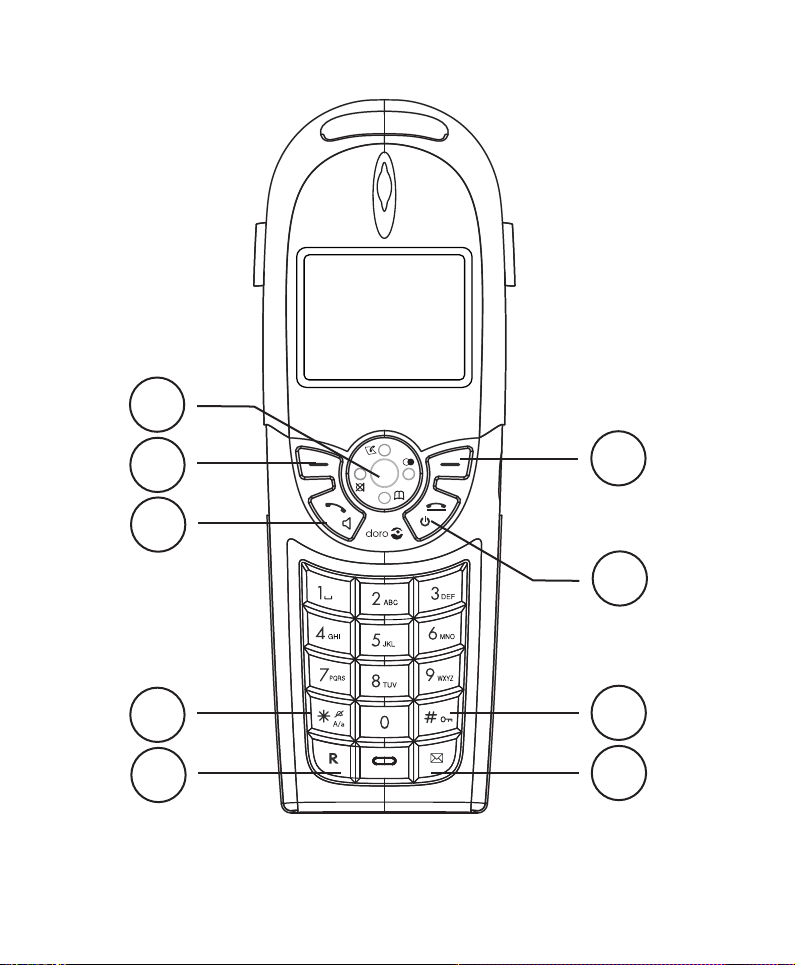
Operation......................... 4
Making a call......................4
Receiving a call ..................4
Temporary silent mode........4
Volume control ...................4
Turning On/Off ...................4
Redial................................4
Mute button.......................4
KeyGuard...........................4
Paging...............................4
Message button..................5
Phonebook.........................5
Shared phone book.............6
Incoming numbers/Caller ID 7
Settings........................... 8
Sound ...............................8
Clock/Alarm .......................8
HS settings ........................9
Settings - BS settings .........9
Expanded system (+1).......10
Troubleshooting.............. 11
Warranty and other
information .................... 12

2
English
Range
The telephone’s coverage will vary between 50 and 300 metres, depending on whether the
radio waves carrying the conversation are blocked by obstacles in their path.
Coverage can be improved by turning one’s head so that the handset is aligned with the base
unit. Sound quality declines as the limit is reached until the call is nally interrupted.
Area of use
This device is intended for the analogue telephone network lines in AT, BE, BG, CH, CY, CZ, DE,
DK, EE, ES, FI, FR, GB, GR, HU, IE, IS, IT, LV, LT, LU, MT, NL, NO, PL, PT, RO, SI, SK, SE.
The handset is intended for indoor and outdoor use. It is shock resistant and is protected
against water and dust (IP54), but it must not be immersed in uid, treated violently or
carelessly.
The base unit is intended for indoor use only.
If the handset is damp it should be wiped dry before it is charged!
If the batteries need to be changed, ensure the battery door is properly closed with screws
tightened to ensure water and dust resistance.
Battery
When the batteries are new and fully-charged (10 hours) they will last for approx. 100 hours’
standby time or approx. 10 hours’ call time. These times apply at normal room temperature.
Full battery capacity will not be reached until the batteries have been charged 4-5 times. It
is not possible to overcharge or damage the batteries by charging them for ”too long”. If the
batteries are completely discharged it can take up to 5 minutes’ charging before the display
lights up.
Warning!
Use only original type of batteries. The guarantee does not cover any damage caused by
using the wrong batteries. Risk of explosion if battery is replaced by an incorrect type.
Dispose of used batteries according to the instruction in your country.
Note!
When the battery is low or when there is too great a distance to the base unit the
telephone will be unable to connect to a line. Do not place the base unit close to other
electrical equipment, in direct sunlight or other strong heat sources! This is to minimize
the risk of any interference. It is normal for the device to become warm during charging
and this is not dangerous. The equipment will not work during power cuts, so a corded
telephone ought to be used as a back up.

3
English
Base unit indicators
]Steady light while charging.
qFlashes during ring and steady during calls.
The display
Icon Function
Shown when in range of base unit
Key lock activated.
Ring signal disconnected.
Alarm activated.
Speaker phone.
Icon Function
During calls.
Battery charge indicator.
Call Muted.
New number received.
Message indication*.
* Only functions in certain countries.
In order to save the batteries, the display is very dark on standby, press Lonce to illumi-
nate. During calls, use r.

4
English
Operation
Making a call
1. Enter the required number.
2. Press O, and the number will be dialled. Press Lto end the call.
Receiving a call
1. Wait for the handset to ring.
2. Press Oto answer. Press Lto end the call.
Please note!
To switch between handset/speaker press O. Please remember that in speaker mode,
it is only possible for one person at a time to talk.
This product does not usually ring on the rst signal to allow correct matching to the
phone book.
When the battery is low or when there is too great a distance to the base unit the telep-
hone will be unable to connect to a line.
Temporary silent mode
When someone calls, you can press Silent to turn off the handset ring signal.
Volume control
Adjust the volume during a call with the scroll button.
Turning On/Off
Press and hold the Lbutton for a few seconds to turn the handset off or on.
Conrm disconnection by pressing Yes.
Redial
Press rand scroll through the 20 most recently dialled numbers. Press O.
Mute button
The microphone can be switched on/off during a call using z.
KeyGuard
The KeyGuard is turned off/on by pressing and holding #.
Paging
The handset will ring when J(on the base unit) is pressed. The signal will stop automati-
cally after a while or if the Lbutton on the handset or the Jbutton on the base unit are
pressed.

5
English
Message button
Can be used when there is a new Caller ID.
If there is no new Caller ID, the shared phonebook will be displayed.
Press the button to access.
Phonebook
100 telephone numbers (max. 24 digits) with names (max. 15 letters) can be stored in the
handset’s phonebook.
If you subscribe to a caller ID service, the name allocated to the caller in the phonebook will
be shown for incoming calls.
You can also select different ring signals for different groups of numbers that are stored in
the phonebook.
Letters
Each number key has been allocated certain letters. The phonebook is arranged according to
the order of the buttons, which is not the same for all languages.
1................................. [Space]
*................................. Switch between upper/lower case letters ABC/abc/Abc
0(press & hold) ............ Pause in telephone number
Save name/number in handset
1. Press b.
2. Scroll to New Entry. Press OK.
3. Press equivalent digit key one or more times for desired name.
4. Scroll to Number. Enter the telephone number, including the area code.
5. Press OK twice to save or scroll to assign the position to a ring signal group.

6
English
Managing the phonebook
1. Press b.
2. Scroll among the entries. You can quick search the phonebook by pressing the correspon-
ding number key for the rst letter.
3. Press Oto make a call or press Option for the following choices:
• Call number see description above.
• Edit entry - revise information.
• View Entry to see stored information.
• Copy Entry/Copy all to duplicate positions on other handsets.
• Delete Entry/Delete All
• Capacity shows the number of free positions.
• Edit call Gp. to select a certain ring signal for certain groups of numbers.
• Speed Dial to assign a position to a certain button in order to make it easier to make a
call. To dial a speed dial number press and hold the equivalent 2-9button. First scroll
to the desired button, press OK, then scroll to the desired position in the phonebook.
Press OK.
Shared phone book
The phone book in the base unit is shared by all handsets and has 10 entries which only
need to be stored once however many handsets there are.
These entries will not match with caller identication.
1. Press Menu.
2. Scroll to Shared Phonebook. Press OK.
3. Scroll among the entries.
4. Press Oto dial or scroll to the entry that is to be replaced. Press Option.
5. Scroll to Edit entry. Press OK.
6. Enter name. Scroll to Number.
7. Enter the telephone number, including the area code. Press OK.

7
English
Incoming numbers/Caller ID
The display shows you who is calling and the 30 most recent incoming numbers. Missed calls
are indicated by in standby mode. If one and the same number calls in more than once it
will be saved as only one entry.
Please note!
This function requires a subscription from your service provider.
Retrieving and dialling
1. Press . Scroll to the required entry.
2. Press Oto make a call or press Option for misc. choices.
Symbols in the call list
Missed / new calls
Missed / old calls
Answered calls
Please note!
In order to remove the , each entry in the log must be read individually by pressing
Options at every new entry in the list or delete all calls.
Caller identication messages
Out Of Area No information received, e.g. an international call.
Withheld Number cannot be shown.
Caller ID settings
1. Press . Press Option.
2. Scroll to Settings. Press OK.
3. Scroll to required function, e.g. Call List Type. Press OK.
4. Scroll to desired setting. Press OK.
Call List Type Select whether the telephone will store missed or all incoming calls.
New call alert On: Missed calls are indicated by in standby mode.
Off: No indication.

8
English
Settings
Sound
1. Press Menu. Scroll to Sound. Press OK.
2. Scroll to desired function, e.g. Ringer. Press OK.
3. Scroll to desired function, e.g. Ringer volume.
4. Scroll to desired setting. Press OK.
Ringer The handset’s ring signal can be adjusted.
Tones Can be heard when pressing buttons/when charging starts, low battery,
conrmation or when out of range.
Clock/Alarm
1. Press Menu.
2. Scroll to Settings. Press OK.
3. Scroll to Clock/Alarm. Press OK.
4. Scroll to desired setting. Press OK.
Alarm The activated alarm is indicated with on standby. When the alarm goes
off, an audio signal is heard for 30 seconds. Use Stop to switch it off
permanently. The volume is determined by the set ringer level.
Date/Time Setting of date/time is described in the Connection chapter.

9
English
HS settings
1. Press Menu.
2. Scroll to Settings. Press OK.
3. Scroll to HS Settings. Press OK.
4. Scroll to required function e.g. Language. Press OK.
5. Scroll to desired setting. Press OK.
Direct call Enter PIN (0000). This function allows you to dial a predetermined
number by pressing any button (however not Option which allows you to
disconnect this function).
Select base Only used in systems with more than one base unit.
Display Setting the contrast and the text displayed in standby mode.
Language Language settings are explained in the Connection chapter.
Auto answer The handset answers incoming calls when it is lifted from the base unit.
Register HS To register a new handset, see separate description.
De-Register To deregister a handset from a base unit. System PIN is 0000 on delivery.
Handset reset Resetting the handset.
Settings - BS settings
Base PIN is 0000 on delivery.
1. Press Menu.
2. Scroll to Settings. Press OK.
3. Scroll to BS Settings. Press OK.
4. Scroll to desired function e.g. Exchange code. Press OK.
5. Scroll to desired setting. Press OK.
Ringer The base unit’s ring signals can be set at several different levels.
Flash Time Only for adaptation to international company switchboards. For most
countries, the setting is 100 ms.
System PIN You can change the PIN code (0000 on delivery).
Exchange code Enter the digit that obtains an external line and the telephone will insert a
pause automatically when a number starts with that digit.
Base Reset Reset base unit.

10
English
Expanded system (+1)
All handsets included in the package are already registered to the base unit. The handset
number used for internal calls is shown in the display on standby mode.
The base unit should be positioned centrally so that the coverage area is roughly equal for all
handsets. You can register up to 5 handsets to one base unit.
This model is GAP (Generic Access Prole) compatible, which means that the handset
and the base unit can both be used with most other GAP compatible units irrespective
of manufacturer. However the GAP protocol cannot guarantee that all functions may be
accessed.
Intercom / internal call
1. Press Int.
2. Scroll to selected handset. Press OK.
A tone will be heard if an external call comes in while an internal call is in progress. End the
internal call with Land then answer the external call with O.
Transferring calls/Conference between handsets
1. An external call is connected.
2. Initiate an internal call as described above.
3. Press Lto transfer the call or press Conf for conference.
Register a new handset
All new handsets that are to use the base unit must be registered.
1. Press Menu. Scroll to Settings. Press OK.
2. Scroll to HS Settings. Press OK.
3. Scroll to Register HS. Press OK.
4. Scroll to the desired base. Press OK.
5. Enter the base unit’s PIN code (0000 on delivery). Press OK.
6. Hold down the base unit’s search button Juntil a beep is heard.
7. If the registration is successful the handset will return to standby mode within one
minute.

11
English
Troubleshooting
Check that the telephone cord is undamaged and properly plugged in. Disconnect any addi-
tional equipment, extension cords and other phones. If the problem is resolved, the fault is
with some other equipment.
Test the equipment on a known working line (e.g. at a neighbour’s house). If the equipment
works there the fault is probably with your telephone line. Please report this to your network
operator.
No number shown when ringing
• This function requires a Caller ID subscription from your service provider.
• A switchboard cannot usually pass on incoming numbers.
Warning signal during call/Cannot connect
• The batteries may be running low (recharge the hand unit).
• The hand unit may be nearly out of range. Move closer to a base unit.
Telephone does not work
• Check that the adapter and telephone cord are connected to the base unit and to their
respective wall sockets.
• Check the charge status of the handset batteries.
• Try connecting another telephone, known to be in working order, to the line socket. If
that phone works then it is likely that this equipment is faulty.
If the telephone still does not work, contact the place of purchase for service. Don’t forget the
receipt or a copy of the invoice.

12
English
Warranty and other information
Specic Absorption Rate (SAR)
This device meets approved international safety requirements for exposure to radio waves.
This telephone measures 0,009 W/kg (measured over 10g tissue).
The max. limit according to WHO is 2W/kg (measured over 10g tissue).
Eco functionality
We have introduced the ECO FUNCTIONALITY label to help customers identify products
within our assortment having a lower impact on the enviornment.
Products carrying this label feature:
• Reduced power consumption in both operational and standby modes.
• Adaptive transmission power depending on range on base unit.
Declaration of conformity
Doro hereby declares that the Doro 750x product conform to the essential requirements and
other regulations contained in the directives 1999/5/EC (R&TTE), 2002/95/EC (ROHS). A
copy of the manufacturer’s declaration is available at www.doro.com/dofc
Guarantee
This product is guaranteed for a period of 12 months from the date of purchase. If you expe-
rience any problems please contact the place of purchase. Proof of purchase is required for
any service or support needed during the guarantee period.
This guarantee will not apply to a fault caused by an accident or a similar incident or
damage, liquid ingress, negligence, abnormal usage, non-maintenance or any other circums-
tances on the user’s part. Furthermore, this guarantee will not apply to any fault caused by a
thunderstorm or any other voltage uctuations.
As a matter of precaution, we recommend disconnecting the device during a thunderstorm.
Batteries are consumables and are not included in any guarantee. This guarantee does not
apply if other batteries than DORO original batteries have been used.

1
Svenska
Installation
Inkoppling
1. Anslut nätadaptern och telesladden till uttagen i väggen.
2. Drag bort plastremsan som sticker ut från batterifacket på handenheten.
3. Ladda handenheten med knappsatsen utåt (24 timmar första gången).
4. Ställ in språk/datum enligt beskrivningen nedan.
Språk
1. Tryck Meny/Menu.
2. Bläddra fram Inställningar/Settings med ( /b). Tryck OK.
3. Bläddra fram Handenheten/HS settings. Tryck OK.
4. Bläddra fram Språk/Language. Tryck OK.
5. Bläddra fram önskad inställning (z/r). Tryck OK.
6. Tryck Lför att återgå till viloläge.
Datum/tid
1. Tryck Meny. Bläddra fram Inställningar. Tryck OK.
2. Bläddra fram Klocka/Alarm. Tryck OK.
3. Bläddra fram Datum/tid. Tryck OK.
4. Bläddra fram Ange tid. Tryck OK.
5. Ange tid (TT:MM). Tryck OK.
6. Bläddra fram Ange datum. Tryck OK.
7. Ange datum (DD/MM/ÅÅÅÅ). Tryck OK.
8. Tryck Lför att återgå till viloläge.
Installation.........................1
Inkoppling........................... 1
Räckvidd ............................ 2
Användningsområde............. 2
Batteri................................ 2
Basenhetens indikatorer ....... 3
Displayen............................ 3
Handhavande .....................4
Att ringa ............................. 4
Att svara............................. 4
Tillfällig stör ej .................... 4
Volymkontroll ...................... 4
Av-/påslagning..................... 4
Återuppringning................... 4
Sekretessknapp................... 4
Knapplås ............................ 4
Sökning .............................. 4
Knapp för meddelande......... 5
Telefonbok .......................... 5
Delad telefonbok ................. 6
Inkomna nummer/
nummerpresentation............ 7
Inställningar.......................8
Ljudsignaler ........................ 8
Klocka/Alarm....................... 8
Handenheten ...................... 9
System ............................... 9
Utökat system (+1...).......... 10
Felsökning .......................11
Om utrustningen inte fungerar
.........................................11
Garanti och tekniska data ..12

2
Svenska
Räckvidd
Telefonens räckvidd varierar vanligtvis mellan 50 och 300 meter beroende på om radiovå-
gorna som överför samtalet begränsas av hinder på vägen.
Räckvidden kan förbättras genom att vrida huvudet så att handenheten hamnar i basenhetens
riktning. Samtalskvaliteten blir sämre och sämre vid räckviddsgränsen innan samtalet bryts.
Användningsområde
Utrustningen är avsedd att användas i analoga telefonnät i AT, BE, BG, CH, CY, CZ, DE, DK, EE, ES, FI,
FR, GB, GR, HU, IE, IS, IT, LV, LT, LU, MT, NL, NO, PL, PT, RO, SI, SK, SE.
Handenheten är gjord för användning inomhus och utomhus och är stöttålig, stänksäker och dammskyd-
dad (IP54), men tål inte att helt sänkas ner i vätska, åverkan eller annan ovarsam hantering.
Basenheten är endast för inomhusbruk.
Om handenheten är fuktig skall den torkas torr innan den sätts på laddning!
Vid eventuellt batteribyte måste batteriluckan skruvas fast ordentligt.
Batteri
Nya batterier som blivit fullt uppladdade (10 tim) räcker till cirka 100 timmars vilotid eller
cirka 10 timmars samtalstid. Tiderna förutsätter normal rumstemperatur. Full batterikapacitet
uppnås först efter det att batterierna laddats upp 4-5 gånger. Batterierna kan inte bli överlad-
dade eller ta skada av att ligga ”för länge” på laddning.
Om batterierna är helt tomma kan upp till 5 minuters laddning krävas innan displayen tänds.
Varning!
Använd endast originalbatterier. Garantin täcker ej skador uppkomna av felaktiga bat-
terier. Risk för explosion, om batteriet byts till en felaktig modell. Återvinn använda
batterier enligt lokala anvisningar.
Observera!
Uttaget för strömadaptern måste nnas nära utrustningen och vara lättillgängligt.
Vid låga batterier eller vid för långt avstånd till basenheten kan telefonen inte koppla
upp linjen. Placera inte basenheten vid annan elektrisk utrustning, direkt solljus eller
annan stark värme! Detta för att minska risken för eventuella störningar. Det är normalt
att apparaten blir varm under laddningen och helt ofarligt. Under strömavbrott fungerar
ej utrustningen, därför bör även en vanlig telefon användas som komplement.

3
Svenska
Basenhetens indikatorer
] Lyser fast under laddning.
qLyser fast under samtal & blinkar när det ringer.
Displayen
Ikon Funktion
Visas innanför räckvidden.
Knapplås aktiverat.
Ringsignal avstängd.
Alarm aktiverat.
Högtalartelefon.
Ikon Funktion
Under samtal.
Batteriernas laddningsstatus.
Sekretess PÅ.
Nytt mottaget nummer.
Meddelande väntar Indikering*.
*Fungerar endast i vissa länder.
För att spara på batterierna är displayen väldigt mörk i viloläge, tryck en gång på Lför att
tända den. Under samtal används r.

4
Svenska
Handhavande
Att ringa
1. Tryck önskat telefonnummer.
2. Tryck O, numret rings upp. Tryck Lför att avsluta samtalet.
Att svara
1. Invänta ringsignal i handenheten.
2. Tryck Oför att svara. Tryck Lför att avsluta samtalet.
Observera!
För att växla mellan handenhet/högtalare, tryck O. Tänk på att det i högtalarläge inte
går att “prata i mun” på varandra utan endast en åt gången kan tala.
Denna produkt ringer oftast inte på första signalen för att invänta matchning mot tele-
fonboken. Vid låga batterier eller vid för långt avstånd till basenheten kan telefonen inte
koppla upp linjen.
Tillfällig stör ej
Vid inkommande samtal, tryck Tyst för att tillfälligt stänga av ringsignalen i handenheten.
Volymkontroll
Ljudstyrkan justeras under samtal med bläddringsknappen.
Av-/påslagning
Slå av/på handenheten genom att hålla Lintryckt i några sekunder.
Bekräfta avstängningen genom att trycka Ja.
Återuppringning
Tryck roch bläddra bland de 20 senast slagna numren. Tryck O för att ringa upp, eller
tryck Alt för att radera, lagra i telefonboken etc
Sekretessknapp
Mikrofonen kan kopplas av/på under samtal med z.
Knapplås
Knapplåset kopplas av/på genom att hålla #nedtryckt.
Sökning
Genom att trycka J (basen), ringer handenheten. Signalen upphör automatiskt efter en
stund eller om L trycks på handenheten, alternativt Jpå basenheten.
This manual suits for next models
2
Table of contents
Languages:
Other Doro Cell Phone manuals