Doro PhoneEasy 509 User manual

English
Doro PhoneEasy®509

5
11
7
8
1
9
4
6
10
18
20
19
17
2
3
12
13
14
15
16
21
The items supplied with your phone might vary depending on the soft-
ware and accessories available in your region or offered by your service
provider. You can obtain additional accessories from your local Doro deal-
er. The supplied accessories provide the best performance with your
phone.
English
1. Earpiece
2. Charging socket
3. Headset socket
4. Left selection button
5. Call button
6. Top 10
7. Torch shortcut
8. Voicemail
9. Keypad lock
10. Silent/Input method
11. Microphone
12. Camera shortcut
13. Message shortcut
14. End call/Power on/off
15. Right selection button
16. Arrow buttons
17. Torch
18. Camera
19. Loudspeaker
20. Assistance button
21. Lanyard hold (lanyard is not
included)

English
Contents
Congratulations on your purchase ............................................................... 1
Get started..................................................................................................... 1
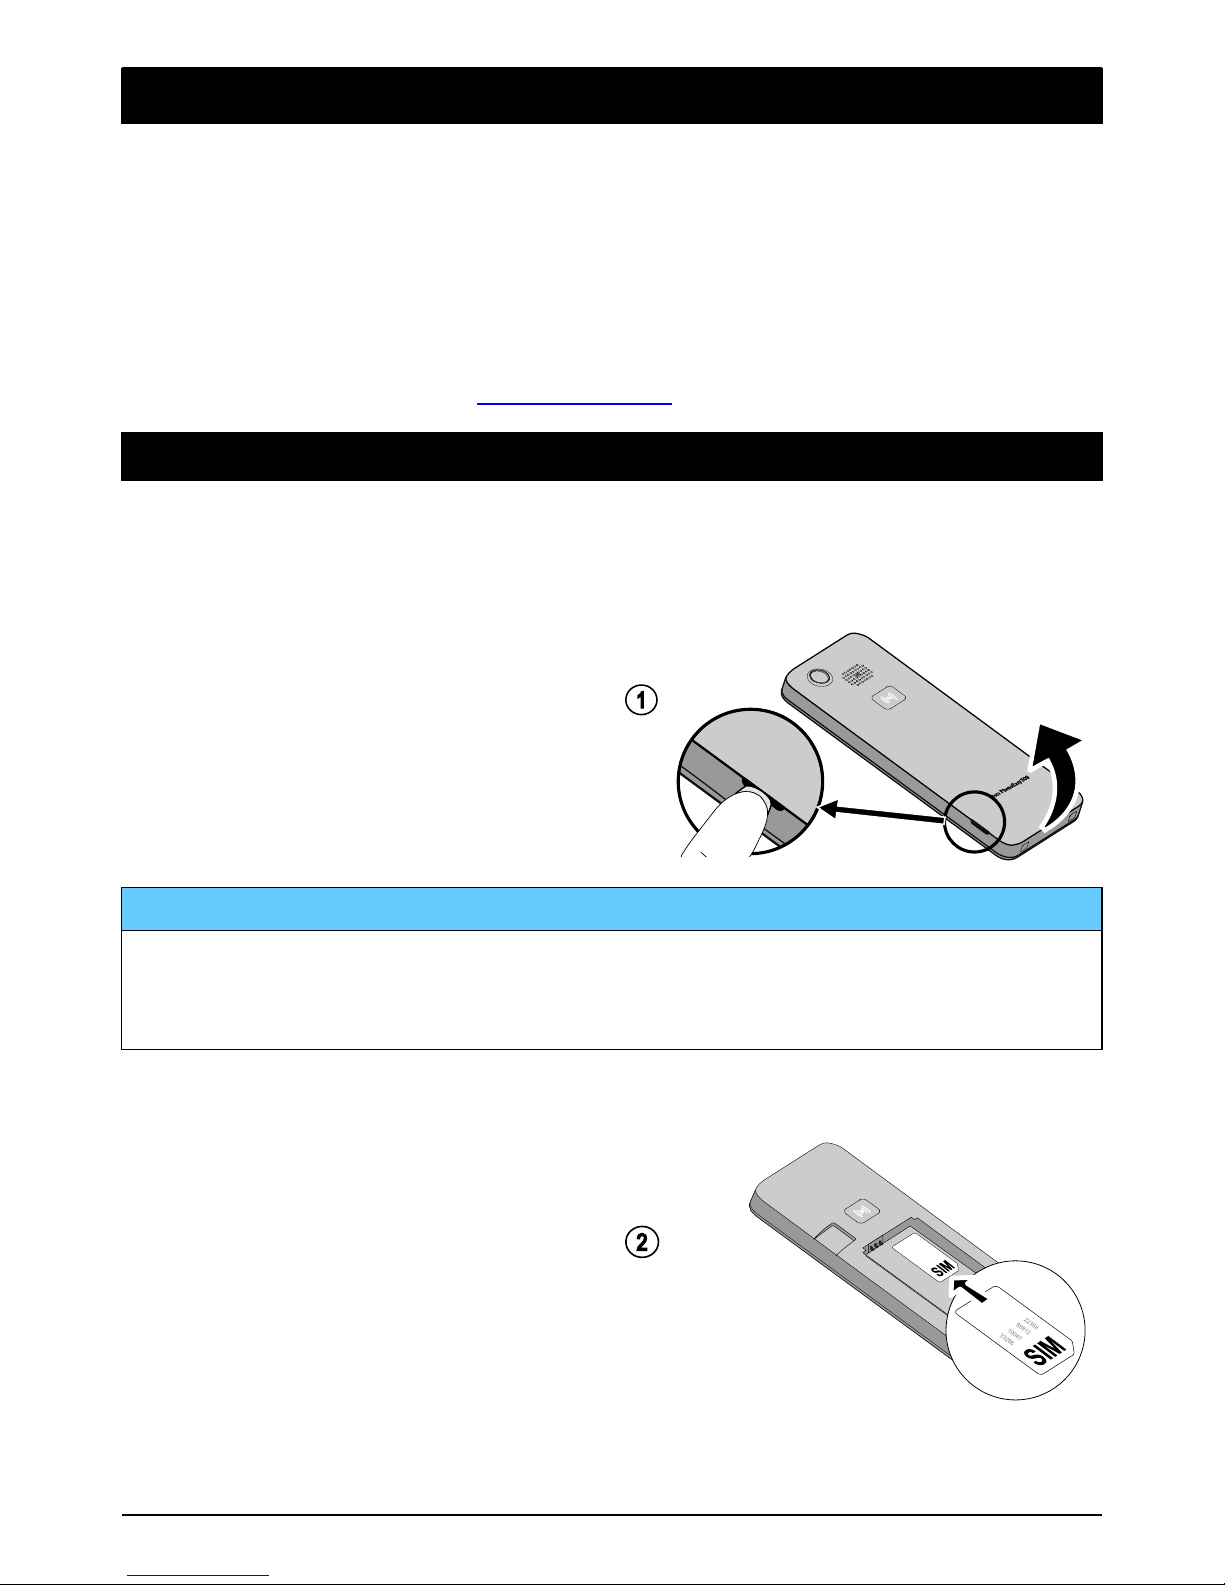
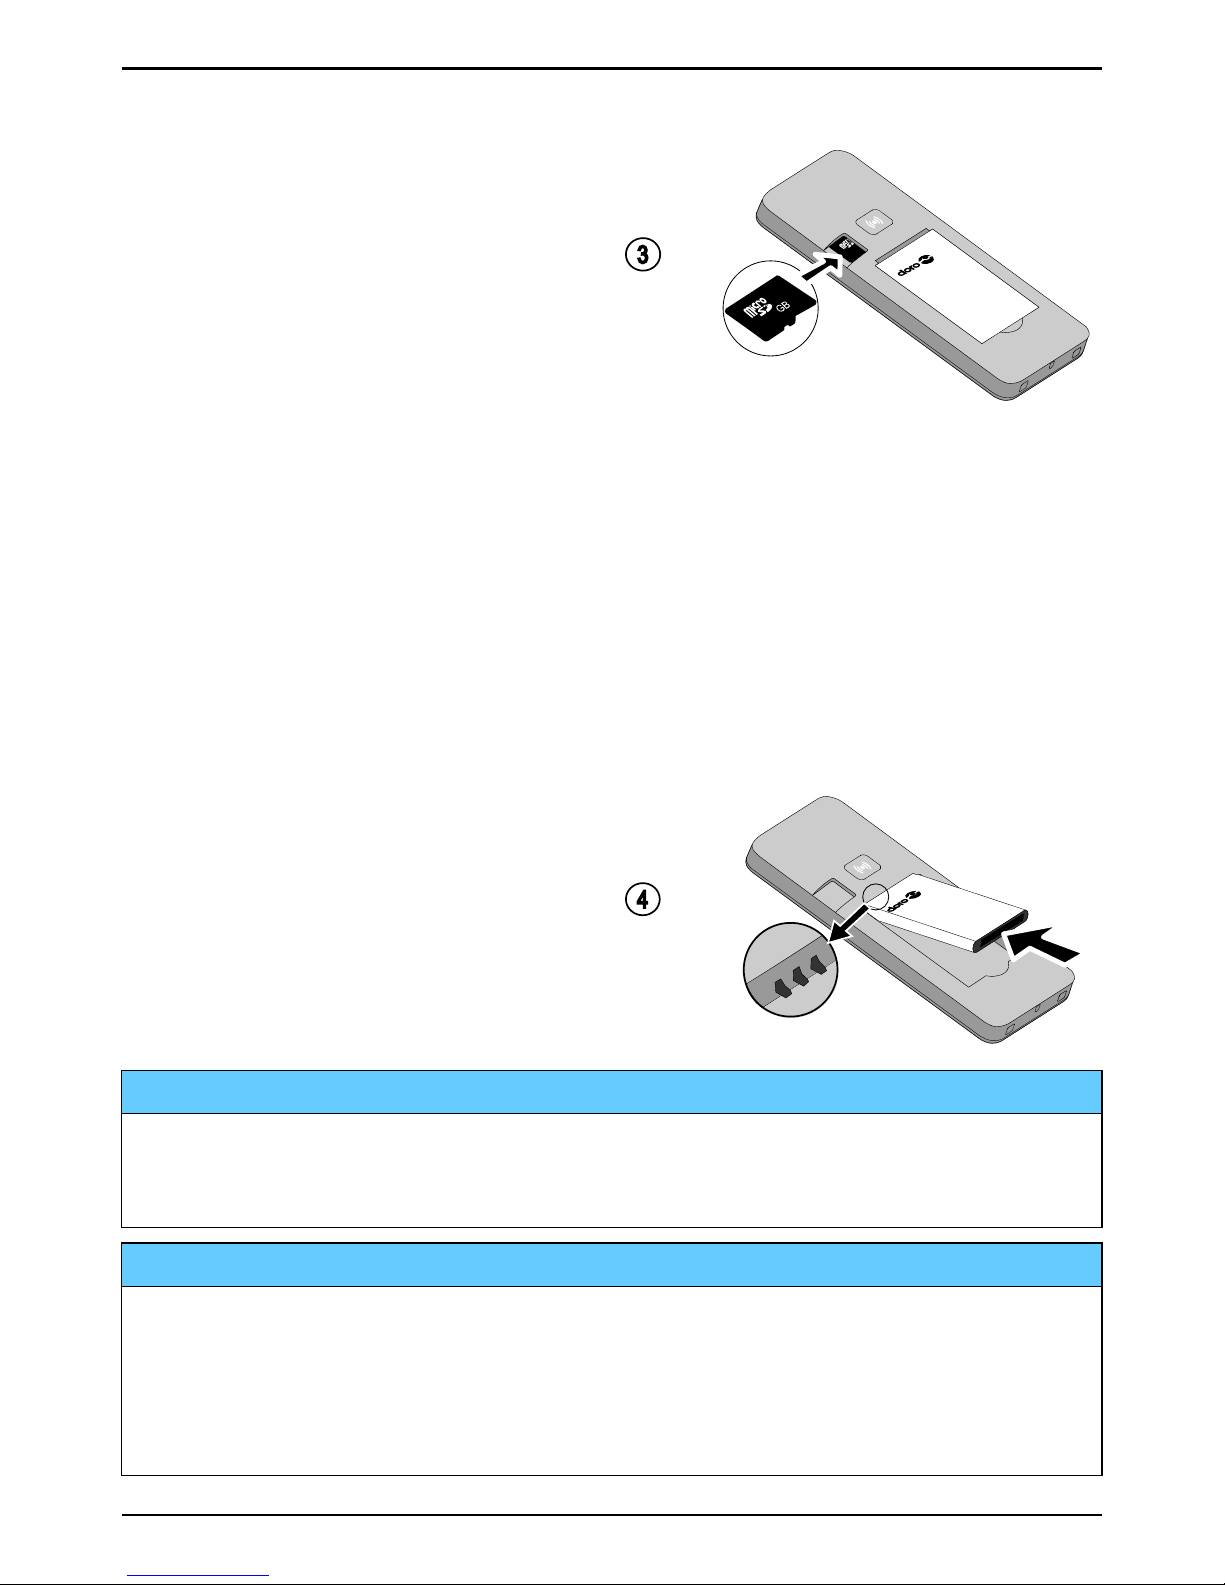
Insert SIM card, memory card and battery.......................................... 1
Charge the phone.................................................................................. 3
Get to know your phone................................................................................ 4
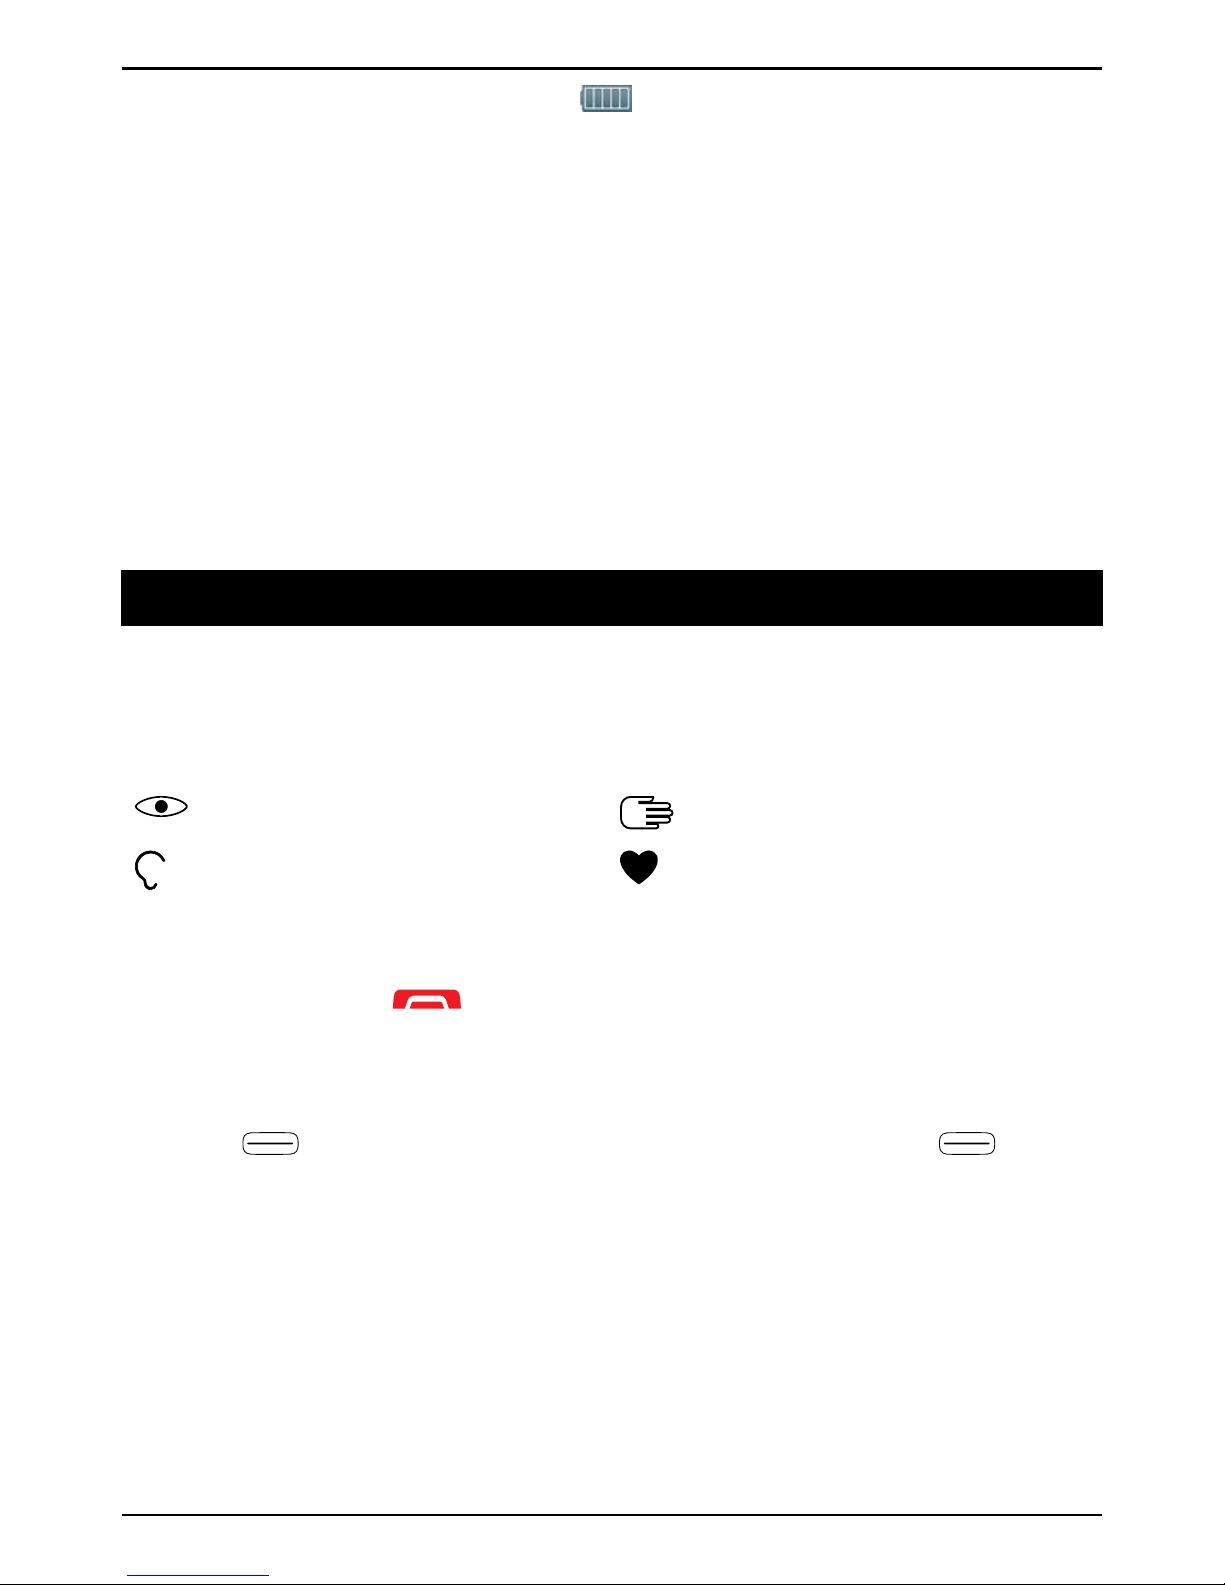
Assistive functions................................................................................. 4
Turn the phone on and off .................................................................... 4
Start-up wizard ...................................................................................... 5
Navigate the phone
....................................................................... 5
Enter text ........................................................................................ 6
Hearing aid compatible......................................................................... 7
Phone settings....................................................................................... 8
Calls..............................................................................................................10
Make a call...........................................................................................10
Call from the phonebook ....................................................................10
Receive a call.......................................................................................10
Volume control.....................................................................................10
Call options ..........................................................................................11
Speed dial ....................................................................................12
SOS calls ..............................................................................................12
Call log..................................................................................................12
Call settings .........................................................................................13
Phonebook...................................................................................................16
Add contact..........................................................................................16
Manage phonebook contacts............................................................. 17
Phonebook settings ............................................................................18
ICE (In Case of Emergency) ...........................................................19
Assistance button ..................................................................................20
Make an assistance call .....................................................................20
Activation .............................................................................................21
Number list ..........................................................................................21
Activate text messages (SMS) ............................................................22
Assistance settings .............................................................................22
Messages.....................................................................................................23
Create and send text message (SMS) ...............................................23

English
Create and send picture message (MMS).........................................23
Create and send voice message ........................................................24
Inbox, Outbox and Sent.......................................................................25
Message settings ................................................................................25
Camera.........................................................................................................30
Camera (take photos) .........................................................................30
Camera settings ..................................................................................30
Connectivity .................................................................................................31
Bluetooth®............................................................................................31
Network setup .....................................................................................32
Connect the phone to a computer .....................................................33
File manager........................................................................................34
Sound & Display ..........................................................................................34
Audio setup
.....................................................................................35
Tone setup (ringtone) ..........................................................................35
Ringtone volume .............................................................................35
Silent ....................................................................................................35
Alert type..............................................................................................36
Extra tone.............................................................................................36
Main menu...........................................................................................36
Wallpaper.............................................................................................36
Text size ........................................................................................36
Idle display...........................................................................................37
Themes .........................................................................................37
LCD backlight.......................................................................................37
Brightness ....................................................................................37
Additional functions ....................................................................................38
FM radio...............................................................................................38
Torch.....................................................................................................39
Calculator.............................................................................................40
Games..................................................................................................40
Alarm....................................................................................................40
Organiser.............................................................................................. 41
Status...................................................................................................42
Display status symbols .......................................................................42
Display main symbols .........................................................................43
Reset settings......................................................................................44
Remote configuration..........................................................................44

English
Troubleshooting........................................................................................... 47
Safety instructions.......................................................................................49
Network services and costs................................................................50
Operating environment .......................................................................50
Medical units .......................................................................................50
Areas with explosion risk ....................................................................50
Li-ion battery ........................................................................................ 51
Protect your hearing............................................................................51
Emergency calls................................................................................... 51
Vehicles................................................................................................52
Care and maintenance ...............................................................................52
Warranty.......................................................................................................52
Copyright and other notices........................................................................53
Content copyright ................................................................................54
Specifications ..............................................................................................54
Hearing aid ..........................................................................................54
Specific Absorption Rate (SAR) ..........................................................54
Declaration of Conformity...................................................................54

English
Congratulations on your purchase
Doro PhoneEasy®509 is a good-looking phone bringing you widely
spaced, convex keys, predictive text, direct memories and an SMS button
for easy dialling and texting. A crisp colour display and enhanced sound
simplify usage even more. Other practical features include a torch, re-
minders, wake-up alarm, vibrating ringer and one-touch assistance dial-
ling with SMS alerts. For more information about accessories or other
Doro products please visit www.doro.com.
Get started
Insert SIM card, memory card and battery
(1) Remove the battery cover
1
IMPORTANT!
Be careful not to damage your fingernails when you remove the battery
cover. Do not bend or twist the battery cover excessively as it may be
damaged.
(2) Insert the SIM card (required)
Remove the battery if it is already in-
stalled. Locate the SIM card holder
shaped like a SIM card, and gently
slide the card in the holder. See the
label right next to the holder for
guidance on how to insert the card.
S
I
M
SIM
3
3
2
86
1
0
0
47
8
6
8
12
22
3
5
8
2
1

English
(3) Insert the SD card (optional)
Locate the SD card holder (shaped
like a SD card) next to the battery,
and gently slide the card in the hold-
er. The device works with or without
a SD card installed.
GB
3
Note! You can easily insert the SD card whether the device is on or off.
Note! Since the SIM card holder is located beneath the battery you need
to turn off the phone to insert or remove the SIM card.
Tip: Take care not to scratch or bend the contacts on the memory or SIM
card when inserting them into the card holders.
(4) Replace the battery cover
Insert the battery by sliding it into
the battery compartment with the
contacts facing downwards to the
left. Replace the battery cover.
4
IMPORTANT!
This device accepts mini SIM or 2FF SIM card. Use of incompatible SIM
cards may damage the card or the device, and may corrupt data stored
on the card.
IMPORTANT!
Use only compatible memory cards with this device. Compatible card
type: microSD, microSDHC.
Incompatible cards may damage the card itself, the device and corrupt
any data stored on the card. Depending on the market some phones
may have a pre-installed memory card.
2

English
Charge the phone
CAUTION
Only use batteries, chargers and accessories that have been approved
for use with this particular model. Connecting other accessories may
be dangerous and may invalidate the phone's type approval and
guarantee.
AB
When the battery is running low, is displayed and a warning signal is
heard.
1. Connect the mains adapter to a wall socket and to the charging
socket y(A) or place the device in the cradle (B). Alternatively
connect the cable to the charging socket yon the phone and to
a USB port on a computer.
The battery charge indicator is animated while charging. It takes ap-
proximately 3 hours to fully charge the battery. When the charger is
connected to the phone, is displayed briefly, and when it is
disconnected.
3

English
2. When charging is completed,
is displayed on the screen.
If the phone is turned off when the charger is connected to the
phone only the battery charge indicator will be shown on the display.
Note! To save power the LCD backlight goes off after a while. Press any
button to illuminate the display. Full battery capacity will not be reached
until the battery has been charged 3–4 times. Batteries degrade over
time, which means that call time and standby time will normally
decrease with regular use.
Save energy
When you have fully charged the battery and disconnected the charger
from the device, unplug the charger from the wall socket.
Get to know your phone
Assistive functions
Use the symbols below to guide you through supporting sections in the
manual.
Seeing Handling
Hearing Safety
Turn the phone on and off
1. Press and hold
on the phone to turn it on or off. Confirm with
Yes to power off.
2. If the SIM card is valid but protected with a PIN code (Personal Iden-
tification Number), PIN is displayed. Enter the PIN code and press
OK (upper left corner of keypad). Delete with Clear ( upper
right corner of keypad).
Note! If PIN and PUK codes were not provided with your SIM card, please
contact your service provider.
Tip: It is recommended to remove the protective plastic film from the
display to enhance the visibility.
4

English
Attempts: #shows the number of PIN attempts left. When no more at-
tempts remain, PIN blocked is displayed. The SIM card must then be un-
locked with the PUK code (Personal Unblocking Key).
1. Enter the PUK code and confirm with OK.
2. Enter a new PIN code and confirm with OK.
3. Re-enter new PIN code and confirm with OK.
Start-up wizard
When starting the phone for the first time, you can use the Start-up wiz-
ard to set some basic settings.
•Press Yes to change or No if you do not want to change.
The default language is determined by the SIM card. See Phone settings,
p.8 on how to change language, time and date.
Tip: You can run the start-up wizard later if you want. From standby
mode, press Menu
Settings General Start-up wizard.
Navigate the phone
Standby (idle mode)
When the phone is ready to use, and you have not keyed in any charac-
ters, the phone is in standby.
•Press
to return to standby mode.
•Press left selection button to access the phone Menu or right
selection button Name to access your saved contacts in the
phonebook.
Tip: You can always press to return to standby.
Scroll
•Use the arrow buttons
/ to scroll in menus.
Step-by-step instructions
The arrow (
) indicates next action in step-by-step instructions. To con-
firm an action, press OK. To select an item, scroll or highlight the item us-
ing / and then press OK.
Example:
•Press Menu Phonebook -New contact- Add.
5

English
To perform the example on your Doro PhoneEasy®509 you should do the
following:
1. Press Menu, scroll to Phonebook and press OK.
2. Select -New contact- and press Add.
Enter text
Enter text manually
Select character
•Press a numerical key repeatedly until the desired character is
shown. Wait a few seconds before entering the next character.
Special characters/smileys
1. Press *for a list of special characters.
2. Select the desired character with
/ and press OK to confirm.
Move the cursor within text
•Use / to move the cursor within the text.
Upper case, lower case and numerals
•Press #to choose between upper case, lower case and numerals.
See Input mode, p.7.
Change writing language
1. Press and hold #for a list of available languages.
2. Select language with / and press OK to confirm.
Enter text with predictive text
In some languages you can use the Smart ABC (eZiType™) input method
which uses a dictionary to suggest words.
•Press each key once, even if the displayed character is not the one
you want. The dictionary will suggest words based on the keys you
have pressed.
Example
1. Press 3,7,3,3to write the word “Fred”. Complete the word be-
fore looking at the suggestions.
2. Use
/ to view the suggested words.
3. Press Select and continue with the next word.
6

English
Alternatively, press 0to continue with the next word.
4. If none of the suggested words are correct, use manual input mode.
Note! See Predictive text, p.25 for more information.
Input mode
•Press #to change input mode. The icon on the top left of the dis-
play indicates the input mode.
Abc Sentence case with predictive text
ABC UPPER CASE with predictive text
abc lower case with predictive text
Abc Sentence case
ABC UPPER CASE
abc lower case
123 Numerals
Hearing aid compatible
This telephone is hearing aid compatible. Hearing-aid compatibility is not
a guarantee that a specific hearing aid will work with a specific telephone.
Mobile telephones contain radio transmitters that may interfere with
hearing aid performance. This phone has been tested for use with hear-
ing aids, for some of the wireless technologies that it uses, but there may
be some newer wireless technologies that have not been tested yet for
use with hearing aids. To ensure that a specific hearing aid works well
with this telephone, test them together before making a purchase.
The standard for hearing aid compatibility contains two types of ratings:
•M: To use your hearing aid in this mode, make sure that your hearing
aid is set to "M-mode" or acoustic coupling mode, and position the
telephones receiver near the hearing aid’s built-in microphone. For
the best results, try using the telephone in different positions rela-
tive to your hearing aid—for example, placing the receiver slightly
above the ear may result in better performance for hearing aids with
microphones positioned behind the ear.
•T: To use your hearing aid in this mode, make sure that your hearing
aid is set to "T-mode" or telecoil coupling mode (not all hearing aids
have this mode). For the best results, try using the telephone in dif-
ferent positions relative to your hearing aid—for example, placing the
7

English
receiver slightly below or in front of the ear may result in better
performance.
See also Audio setup
, p.35 on how you can adjust the telephones
audio settings.
Phone settings
Time & date
Set the time and date
1. Press Menu
Settings General Time & date:
•Set time to enter the time (HH:MM).
•Set date to enter the date (DD/MM/YYYY).
2. Press OK to confirm.
Tip: You can also set the phone to automatically update the time and
date according to the current time zone. In Time & date select Auto time
On. Automatic update of date and time does not change the time you
have set for the alarm clock or the calendar. They are in local time.
Updating may cause some alarms you have set to expire depending on
network support and subscription.
Set the time and date format
1. Press Menu Settings General Time & date Set
format:
•Time format 12 hours or 24 hours.
•Date format and select the desired date format.
2. Press OK to confirm.
Language
The default language for the phone menus, messages, etc. is determined
by the SIM card. You can change this to any other language supported by
the phone.
1. Press Menu
Settings General Language.
2. Use / to select a language.
3. Press OK to confirm.
Block function
1. Press Menu
Settings General Block function.
8

English
2. Select each function you want to disable and press Off.
3. Press Done to confirm.
PIN code options
1. Press Menu
Settings Security SIM lock:
•On to activate the PIN code. You need to enter the PIN code
every time the phone is started.
•Off to deactivate the PIN code.
IMPORTANT!
If enabling Off-mode and the SIM card is lost or stolen, it is
unprotected.
•Automatic to start the phone without the PIN code. The phone
remembers it automatically, but if the SIM card is moved to an-
other phone (lost or stolen) the PIN code needs to be entered
when the phone is started.
2. Press OK to confirm.
Change PIN code
1. Press Menu Settings Security Passwords PIN.
2. Enter current PIN code and press OK.
3. Enter new PIN and press OK. Repeat to confirm.
Keypad lock
You can lock the keypad to prevent the keys being accidentally pressed,
for example, when your phone is in your handbag.
Incoming calls can be answered by pressing
even if the keypad is
locked. During the call, the keypad is unlocked. When the call is ended or
rejected, the keypad is locked again.
•Press and hold *to lock/unlock the keypad.
Note! The main local emergency number can be dialled without
unlocking the keypad.
Activate
1. Press Menu Settings Security Keypad lock:
•Auto keylock to select the time delay for automatic keypad
locking.
9

English
•Unlock mode to select Single key to unlock the keypad with *
or Dual key to lock/unlock with right selection button (Name/
Unlock) and *.
2. Press OK to confirm.
Calls
Make a call
1. Enter the phone number including the area code. Delete with Clear.
2. Press
to make a call. Press Abort to cancel the call.
3. Press to end the call.
Tip: For international calls, always use +before the country code for best
operation. Press *twice for the international prefix +.
Call from the phonebook
1. Press Name to open the phonebook.
2. Use
/ to scroll through the phonebook, or quick search by
pressing the key corresponding to the first letter of the entry, see En-
ter text , p.6.
3. Press Options Call to dial the selected entry. If needed, select
the number.
Alternatively, press to dial.
4. Press Abort or to cancel the call.
Receive a call
1. Press
to answer, or press Silent to switch off the ringsignal
and then Reject to reject the call (busy signal).
Alternatively, press to reject the call directly.
2. Press to end the call.
Volume control
Use
/ to adjust the sound volume during a call. The volume level is
indicated on the display. If you use a hearing aid or have hearing difficul-
ties when using the telephone in a noisy environment, you can customise
the phone's audio settings, see Audio setup , p.35.
10

English
Silent
Silent is a fixed profile with Keypad tone, Message tone and Ringtone dis-
abled, while Vibration, Tasks, Daily reminder and Alarm are unchanged.
•Press and hold shortcut button #to activate/deactivate silent
mode.
Headset
When a headset is connected, the internal microphone in the phone is
automatically disconnected. If available, use the answer key on the head-
set to answer and end calls.
CAUTION
Using a headset at high volume may damage your hearing. Adjust the
volume level carefully when using a headset.
Call options
During a call the selection buttons1(
) give access to additional
functions.
Options (left selection button)
•Hold/Retrieve to hold/retrieve the current call.
•End single call to end the current call (same as
).
•New call to call another number (Conference).
•Phonebook to search the phonebook.
•Messages to write or read text messages.
•Mute to disable the microphone.
SPK on (right selection button)
The loudspeaker allows you to speak without holding the phone closely
to the ear.
1. Press SPK on to activate. Speak clearly into the phone microphone
at a maximum distance of 1 m. Use
/ to adjust the loud-
speaker volume.
2. Press SPK off to return to normal mode.
11
1. Selection buttons have multiple functions. The current function is shown
above the selection button on the display.

English
Note! Loud background noises (music, etc.) may interfere with the sound
quality.
Speed dial
Use 0and 2–9to speed dial an entry from standby.
•Press and hold the corresponding key.
Add speed dial numbers
1. Press Menu Settings Phonebook Speed dial.
2. Select 0Add and select an entry from the phonebook.
3. Press OK to confirm.
4. Repeat to add speed dial entries for buttons 2–9.
Tip: To edit or delete an existing entry, select it and press Options
Edit or Delete.
SOS calls
As long as the phone is switched on, it is always possible to place an SOS
call by entering the main local emergency number for your present loca-
tion followed by
.
Some networks accept calls to emergency numbers without a valid SIM
card. Contact your service provider for more information.
Call log
Received, missed and made calls are saved in a combined
call log.
20 calls of each type can be stored in the log. For multiple calls related to
the same number, only the most recent call is saved.
1. Press .
Alternatively, press Menu Call log.
2. Use / to select:
Received call
Dialled call
Missed call
3. Press
to call, or Options:
•Call to call the contact.
•View to show details for the selected call.
12

English
•Send SMS to send a text message.
•Send MMS to send a picture message.
•Delete to delete the call.
•Delete all to delete all calls in the call log.
•Save to save the number in the phonebook
Create new cre-
ate new contact, or Update update existing contact.
Call settings
Call time
During a call, the duration of the call is shown. You can check the dura-
tion of your calls.
1. Press Menu
Settings Calls Call time:
•Last call to show the elapsed time of the most recent call.
•Outgoing calls to show the elapsed time of all made calls.
•Received calls to show the elapsed time of all received calls.
•Reset all Yes to reset all.
2. Press OK to confirm.
Voice mail
If your subscription includes an answering service, callers can leave a
voice mail message when you cannot answer a call. Voice mail is a net-
work service and you may need to subscribe to it first. For more informa-
tion and for the voice mail number, contact your service provider.
1. Press Menu
Settings Phonebook Voice mail.
2. Select Empty Add:
•Phonebook to add a contact from the phonebook. Press OK to
confirm.
•Manual and enter name and number. When done, press Save.
To edit or delete an existing entry, select it and press Options Edit/
Delete.
Call voice mail
•Press and hold shortcut button 1.
13

English
Tip: If activated reminder in the messages settings, a reminder signal will
be heard after 10 minutes if not listening to new voice mail messages,
see Reminder
, p.29.
Top 10
Set an entry as one of the first
10 contacts listed in the phonebook.
1. Press the shortcut button ,
or press Menu Settings Phonebook Top 10.
2. Select one of the empty entries and press Add.
3. Use / to scroll through the phonebook, or quick search by
pressing the key corresponding to the first letter of the entry.
4. Press OK to save the selected entry, or press Back to discard
changes.
To edit or delete an existing entry, select Options Edit or Delete.
Tip: You can also add an entry from the phonebook. Select the
contact and press Options Top 10.
Call waiting
You can handle more than one call at a time, put the current call on hold
and answer the incoming call. When activated, an alert tone is heard if
there is an incoming call while talking.
•During a call, press Options
Answer.
Activate call waiting
1. Press Menu Settings Calls Call setup.
2. Select Call waiting Activate.
3. Press OK to confirm.
Tip: Repeat and select Deactivate to disable call waiting, or Query status
to display if call waiting is active or not.
Answer mode
1. Press Menu
Settings Calls Answer mode.
2. Select Any key On to be able to answer incoming calls by press-
ing any button (exemption ).
14

English
3. Press OK to confirm.
Call divert
You can divert calls to an answering service or to another phone number.
Set up which calls should be diverted. Select a condition and press OK,
then select Activate,Deactivate or Query status for each.
1. Press Menu
Settings Calls Call setup Call divert:
•Voice calls to divert all voice calls.
•Unreachable to divert incoming calls if the phone is turned off
or out of range.
•No reply to divert incoming calls if unanswered.
•If busy to divert incoming calls if the line is busy.
•Cancel diverts to cancel all call divert settings.
2. Press OK to confirm.
Caller ID
Display or hide your phone number on the recipient's phone when you
call.
1. Press Menu
Settings Calls Call setup Caller ID:
•Set by network to use default setting by the network.
•Hide ID to never show your number.
•Send ID to always show your number.
2. Press OK to confirm.
Call barring
Your phone can be restricted to disallow certain types of calls.
Note! A password is needed to apply call barring. Contact your service
provider to get the password.
1. Press Menu
Settings Calls Call setup Call barring.
2. Select Outgoing calls:
•All calls to answer incoming calls but not calling.
•Internat.calls to block calls to international numbers.
•Int. except home to block international calls except to the coun-
try associated with the SIM card.
3. Press OK to confirm.
15
Other manuals for PhoneEasy 509
1
Table of contents
Other Doro Cell Phone manuals

Doro
Doro 1361 User manual

Doro
Doro PhoneEasy 740 User manual

Doro
Doro PhoneEasy 508 User manual

Doro
Doro PhoneEasy 341gsm User manual

Doro
Doro 6880 User manual

Doro
Doro PhoneEasy 341gsm User manual

Doro
Doro 8031 User manual

Doro
Doro 5861 User manual

Doro
Doro Move Easy 316 AHS User manual

Doro
Doro PHONEEASY 612 User manual