Dräger Life Preserver User manual

de Gebrauchsanweisung
Seite 2
en Instructions for Use
Page 12
Dräger Life Preserver

Inhaltsverzeichnis
2
Zu Ihrer Sicherheit . . . . . . . . . . . . . . . . . . . . . . . . . . . . . . . . .3
Was ist was . . . . . . . . . . . . . . . . . . . . . . . . . . . . . . . . . . . . . . .3
Verwendungszweck . . . . . . . . . . . . . . . . . . . . . . . . . . . . . . . .4
Beschreibung. . . . . . . . . . . . . . . . . . . . . . . . . . . . . . . . . . . . . . . . . . . . 4
Betrieb . . . . . . . . . . . . . . . . . . . . . . . . . . . . . . . . . . . . . . . . . . .5
Konfigurationen . . . . . . . . . . . . . . . . . . . . . . . . . . . . . . . . . . . . . . . . . . 5
Prüfung vor dem Tauchen . . . . . . . . . . . . . . . . . . . . . . . . . . . . . . . . . 6
Anlegen. . . . . . . . . . . . . . . . . . . . . . . . . . . . . . . . . . . . . . . . . . . . . . . . . 6
Prüfung durch den Tauchpartner . . . . . . . . . . . . . . . . . . . . . . . . . . . 6
Gebrauch während des Tauchens . . . . . . . . . . . . . . . . . . . . . . . . . . 7
Umschalten von SCUBA auf LAR unter Wasser. . . . . . . . . . . . . . . 7
Notaufstieg . . . . . . . . . . . . . . . . . . . . . . . . . . . . . . . . . . . . . . . . . . . . . . 8
Nach dem Tauchen . . . . . . . . . . . . . . . . . . . . . . . . . . . . . . . . . . . . . . . 8
Instandhaltung und Wartung . . . . . . . . . . . . . . . . . . . . . . . . .8
Instandhaltungen . . . . . . . . . . . . . . . . . . . . . . . . . . . . . . . . . . . . . . . . . 8
Inspektion und Reinigung. . . . . . . . . . . . . . . . . . . . . . . . . . . . . . . . . . 9
Flaschen füllen . . . . . . . . . . . . . . . . . . . . . . . . . . . . . . . . . . . . . . . . . . . 9
Funktions- und Dichtprüfung . . . . . . . . . . . . . . . . . . . . . . . . . . . . . . . 9
CO2-Patronen wiegen. . . . . . . . . . . . . . . . . . . . . . . . . . . . . . . . . . . . . 9
Fehlersuche . . . . . . . . . . . . . . . . . . . . . . . . . . . . . . . . . . . . 10
Technische Daten . . . . . . . . . . . . . . . . . . . . . . . . . . . . . . . . 10
Bestell-Liste. . . . . . . . . . . . . . . . . . . . . . . . . . . . . . . . . . . . . 11

Zu Ihrer Sicherheit
Was ist was
3
Zu Ihrer Sicherheit
Gebrauchsanweisung beachten
Jede Handhabung an dem Gerät setzt die genaue Kenntnis
und Beachtung dieser Gebrauchsanweisung voraus.
Das Gerät ist nur für die beschriebene Verwendung bestimmt.
Instandhaltung
Das Gerät muss regelmäßig Inspektionen und Wartungen
durch Fachleute unterzogen werden.
Instandsetzungen am Gerät nur durch Fachleute vornehmen
lassen.
Wir empfehlen, einen Service-Vertrag mit Dräger Safety abzu-
schließen und alle Instandsetzungen durch Dräger Safety
durchführen zu lassen.
Bei Instandhaltung nur Original-Dräger-Teile verwenden.
Kapitel "Instandhaltungsintervalle" beachten.
Zubehör
Nur das in der Bestell-Liste aufgeführte Zubehör verwenden.
Was ist was
Vorderseite
Rückseite
1Außenhülle
2Tarierblase in Außenhülle
3Mundstückventil
4Aufnahmetaschen für Druckluftflaschen oder CO2Patro-
nen und Pressgasstutzen zur Montage von Flaschenan-
schlüssen oder CO2Inflatoren
5Überdruckventil
1Rückenbegurtung
2Schieber
3Schnellverschlussschnalle
4Hüftbegurtung mit Gleiter
00221305.eps
1
2
3
4
4
5
1
2
3
4
00321305.eps

Verwendungszweck
4
Druckluftflaschenanschluss
CO2Inflatorsystem
1Hochdruck O-Ring
2Stutzen
3Handrad G5/8
4Dichtring
1Verschlussmutter
2obere Dichtung
3CO2Detonator
4untere Dichtung
5Sicherungsclip für manuelle Auslösung
6CO2-Austauschpatrone
1
2
3
4
3
6
1
5
3
2
1
4
00521305.eps
Verwendungszweck
Die Dräger Life Preserver Rettungsweste wird zusammen mit
Regenerationstauchgeräten der Gerätefamilie LAR verwendet.
Die Dräger Life Preserver Rettungsweste ist eine Weste mit
angesetztem Kragen, mit Hüft- und Beingurten zur Verwen-
dung in den folgenden Situationen:
— Schwimmhilfe an der Wasseroberfläche
— Rettungs-Fluchtgerät
— Tarierweste
Die Dräger Life Preserver Rettungsweste kann entweder über
Hochdruck-Luftflaschen oder CO
2
Patronen (beides Zubehör)
gefüllt werden. Hierfür stehen an der Weste zwei Pressgasstutzen
zur Verfügung. Die amagnetische Version der Weste kann bei Ver-
wendung mit einem Regenerationstauchgerät auch mit der Nieder-
druckluft vom Lungenautomaten gefüllt werden ("Power Inflation").
Beschreibung
Die Basisteile der Dräger Life Preserver Rettungsweste sind
Tarierblase mit Außenhülle, Hüft-, Rücken- und Beingurte, zwei
Luftflaschen mit Befestigungsadapter (oder zwei CO2Inflato-
ren mit CO2Patronen), Mundaufblassystem und Überdruck-
ventil.
Die Tarierblase wird teilweise zusammengefaltet und mit
Druckknöpfen an der Außenhülle innen befestigt. Während
des Tauchens bleibt die Tarierblase zusammengefaltet. Im Not-
fall, beim Füllen der Blase, werden die Druckknöpfe durch den
Gasdruck in der Luftkammer geöffnet und die Weste wird voll-
ständig aufgeblasen.
Die Tarierblase enthält zwei mit Ultraschall an die Luftkammer
geschweißte Messingstutzen und erlaubt die Verwendung
eines doppelten CO2Patronensystems oder über Adapter die
Verwendung von zwei Aluminium-Flaschen mit Ventil. Das
Standard-Luftsystem enthält TÜV-geprüfte Flaschen. Jede Fla-
sche liefert ca. 0,4 Liter (Wasserinhalt) Luft und hat einen
Betriebsdruck von 200 bar.
Die Dräger Life Preserver Rettungsweste kann auch über ein
Mundstück und ein handbedienbares Ventil aufgeblasen wer-
den. Luft kann durch Handbetrieb des Ventils und durch Hal-
ten des Mundstücks über den Kopf abgelassen werden. Ein
Überdruckventil hält das sich in der Dräger Life Preserver Ret-
tungsweste ausbreitende Gas auf einem Druck von ca. 0,120
bis 0,190 bar (1.7 bis 2.8 psi) über Umgebungsdruck.
Die Standard-Begurtung der Dräger Life Preserver Rettungswe-
ste besteht aus einem Hüftgurt mit ca. 50 mm (2 inch) Gurtband-
breite, einem Rückengurt mit ca. 50 mm (2 inch) Gurtbandbreite
und zwei Beingurten mit ca. 25 mm (1 inch) breitem Gurtband.
Mögliche Konfigurationen der Dräger Life Preserver Rettungs-
weste und Gasversorgungsoptionen für die jeweilige Tauchauf-
gabe siehe “Konfigurationen” auf Seite 5. Ein Schild oder
Stempelung auf der Außenhülle zeigt die Seriennummer der
Dräger Life Preserver Rettungsweste.

Betrieb
5
Betrieb
Die folgenden Kapitel enthalten Informationen zum Gebrauch
der Dräger Life Preserver Rettungsweste sowie Überprüfun-
gen vor und nach dem Tauchgang. Im Absatz Konfiguration
auf dieser Seite erhalten Taucher Informationen über die benö-
tigte Konfiguration der Dräger Life Preserver Rettungsweste
für das entsprechende Tauchgerät, Tiefe und Betriebsbedin-
gungen.
Konfigurationen
Kompatibilität mit Tauchgerät:
Dräger Life Preserver Rettungsweste in waagerechter Spalte
mit Tauchgerät in senkrechter Reihe kombinieren, um je nach
Tauchgerät und Tiefenanforderungen die geeignete Kombina-
tion zu bestimmen.
Bezeichnung Life Preserver Shadow Life Preserver Shadow CO2Life Preserver
Shadow lowmag
Höhe1
Breite1
Gewicht1
1 alle Angaben sind ungefähre Angaben
660 mm (26 inches)
254 mm (10 inches) pro Seite
4 kg (8,8 lbs)
660 mm (26 inches)
254 mm (10 inches) pro Seite
3 kg (6,6 lbs)
660 mm (26 inches)
254 mm (10 inches) pro Seite
4 kg (8,8 lbs)
Gasquellen Mundaufblasventil
und bis zu 2 x 0,4 Liter/200 bar
Luftflaschen
Mundaufblasventil und bis zu
2 x CO2Inflatoren mit Patronen
Mundaufblasventil, Power Infla-
tion und bis zu 2 x 0,4 Liter/
200 bar Luftflaschen
LAR V
LAR VI
LAR VII (O2-Betrieb)
bis 10 msw Flaschendruck von
mindstens 200 bar (2900 psi)
bis 10 msw mindestens 2 x 32
Gramm CO2
bis 10 msw Flaschendruck von
mindestens 200 bar (2900 psi)
SCUBA bis 54 msw mit Power Inflation
und mindestens 200 bar (2900
psi) Flaschendruck
bis 54 msw mit Power Inflation
und mit mindestens 2 x 32
Gramm CO2Patronen
bis 54 msw mit Power Inflation
und mindestens 200 bar (2900
psi) Flaschendruck
LAR VII
(Mischgasbetrieb)
bis 24 msw mindestens 200
bar (2900 psi) Flaschendruck
bis 24 msw mit 2 x 32 Gramm
CO2Patronen
bis 24 msw mindestens 200
bar (2900 psi) Flaschendruck

Betrieb
6
Prüfung vor dem Tauchen
Vor jedem Tauchgang muss die Dräger Life Preserver Ret-
tungsweste auf ordnungsgemäßen Zustand und die Betriebs-
bedingungen überprüft werden. Der Taucher muß sich mit
allen Teilen und Funktionen der Dräger Life Preserver Ret-
tungsweste vertraut machen, um eine sachgemäße Handha-
bung sicherzustellen.
●Sichtprüfung der Tarierblase und Nähte auf Abnutzung
oder Beschädigung durchführen. Gurte und Gurtteile auf
Beschädigung, lose Stiche und fehlende oder beschädigte
Kunststoffteile überprüfen.
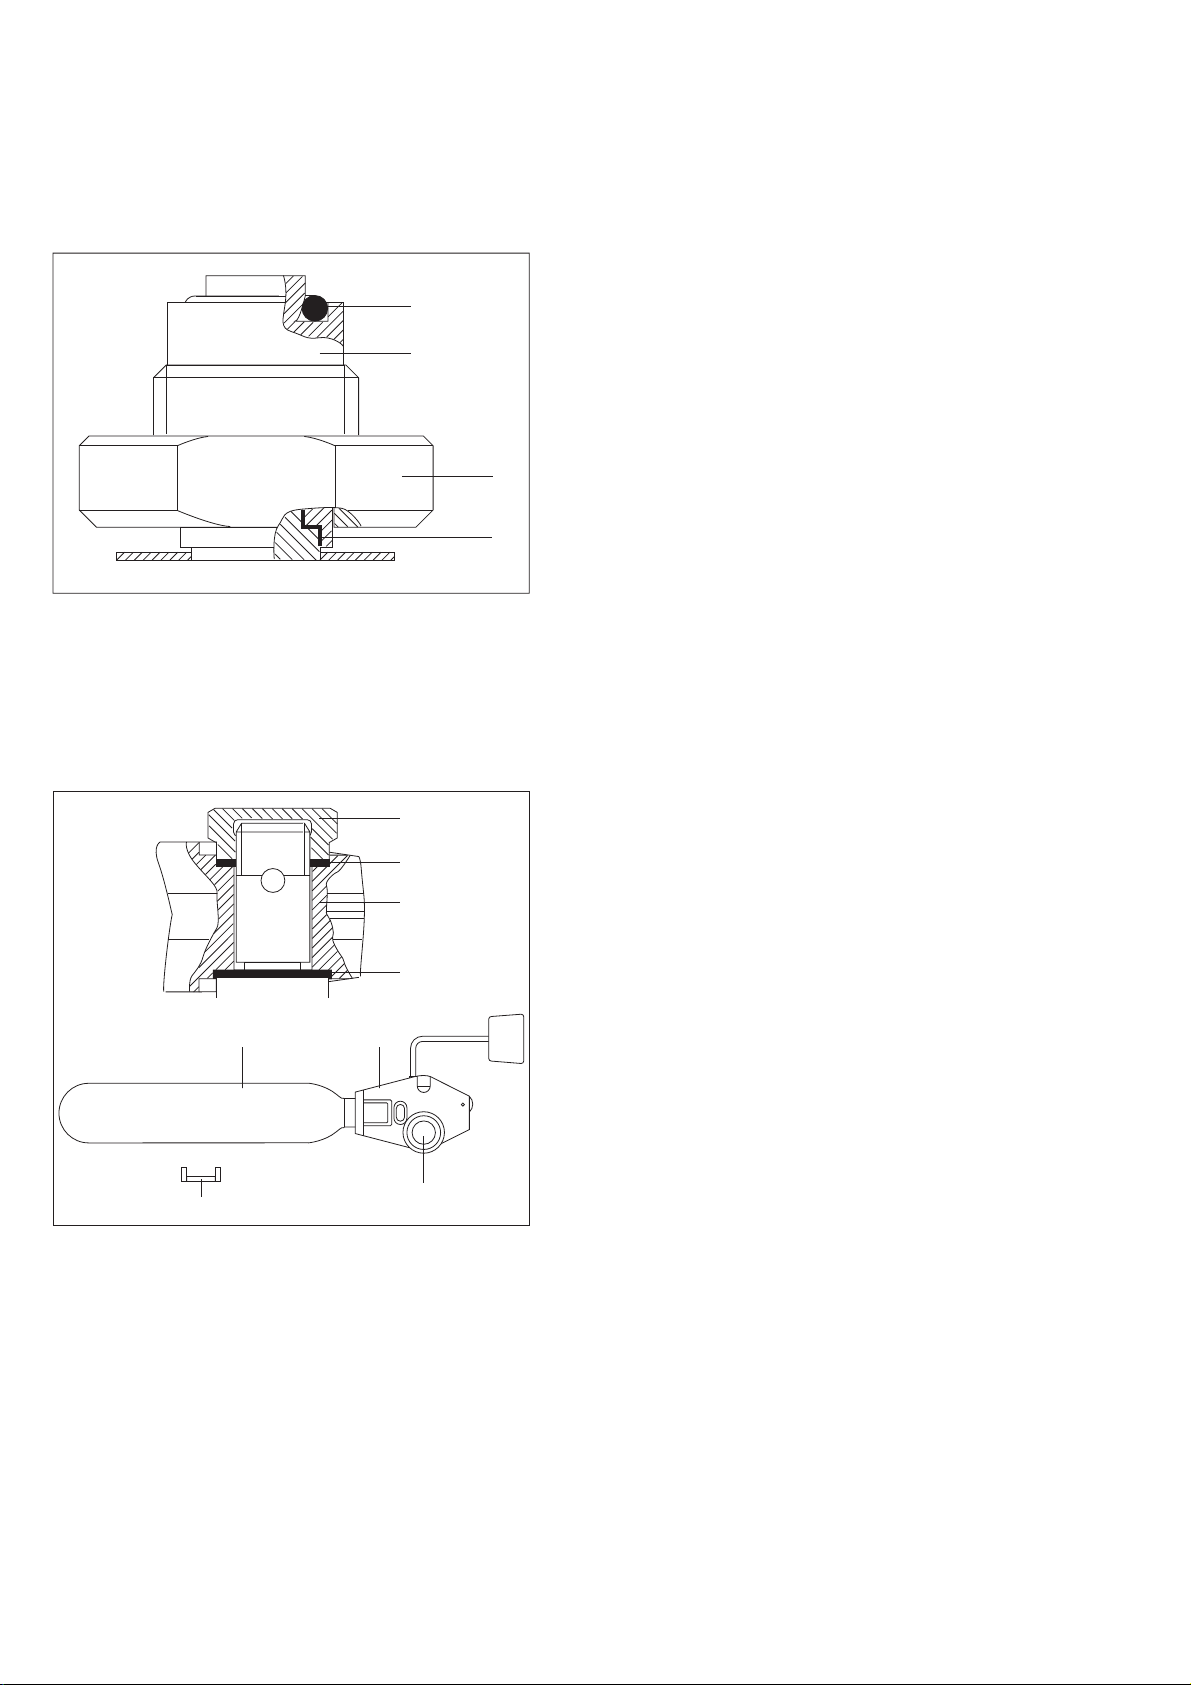
●Sichtprüfung an Flasche/Ventil, Überdruckventil und Mund-
aufblassystem auf Beschädigungen oder lose Verschlüsse
überprüfen. Sicherstellen, dass Luftflaschen gefüllt sind.
Der maximale Betriebsdruck beträgt 200 bar.
●Vor dem Anschluss der Flaschen sicherstellen, dass
O-Ringe vorhanden sind. Luftflaschen in dafür vorgese-
hene Taschen einsetzen und mit Klettverschluss schließen;
Handräder der Adapter auf Flaschenventil aufschrauben
und befestigen.
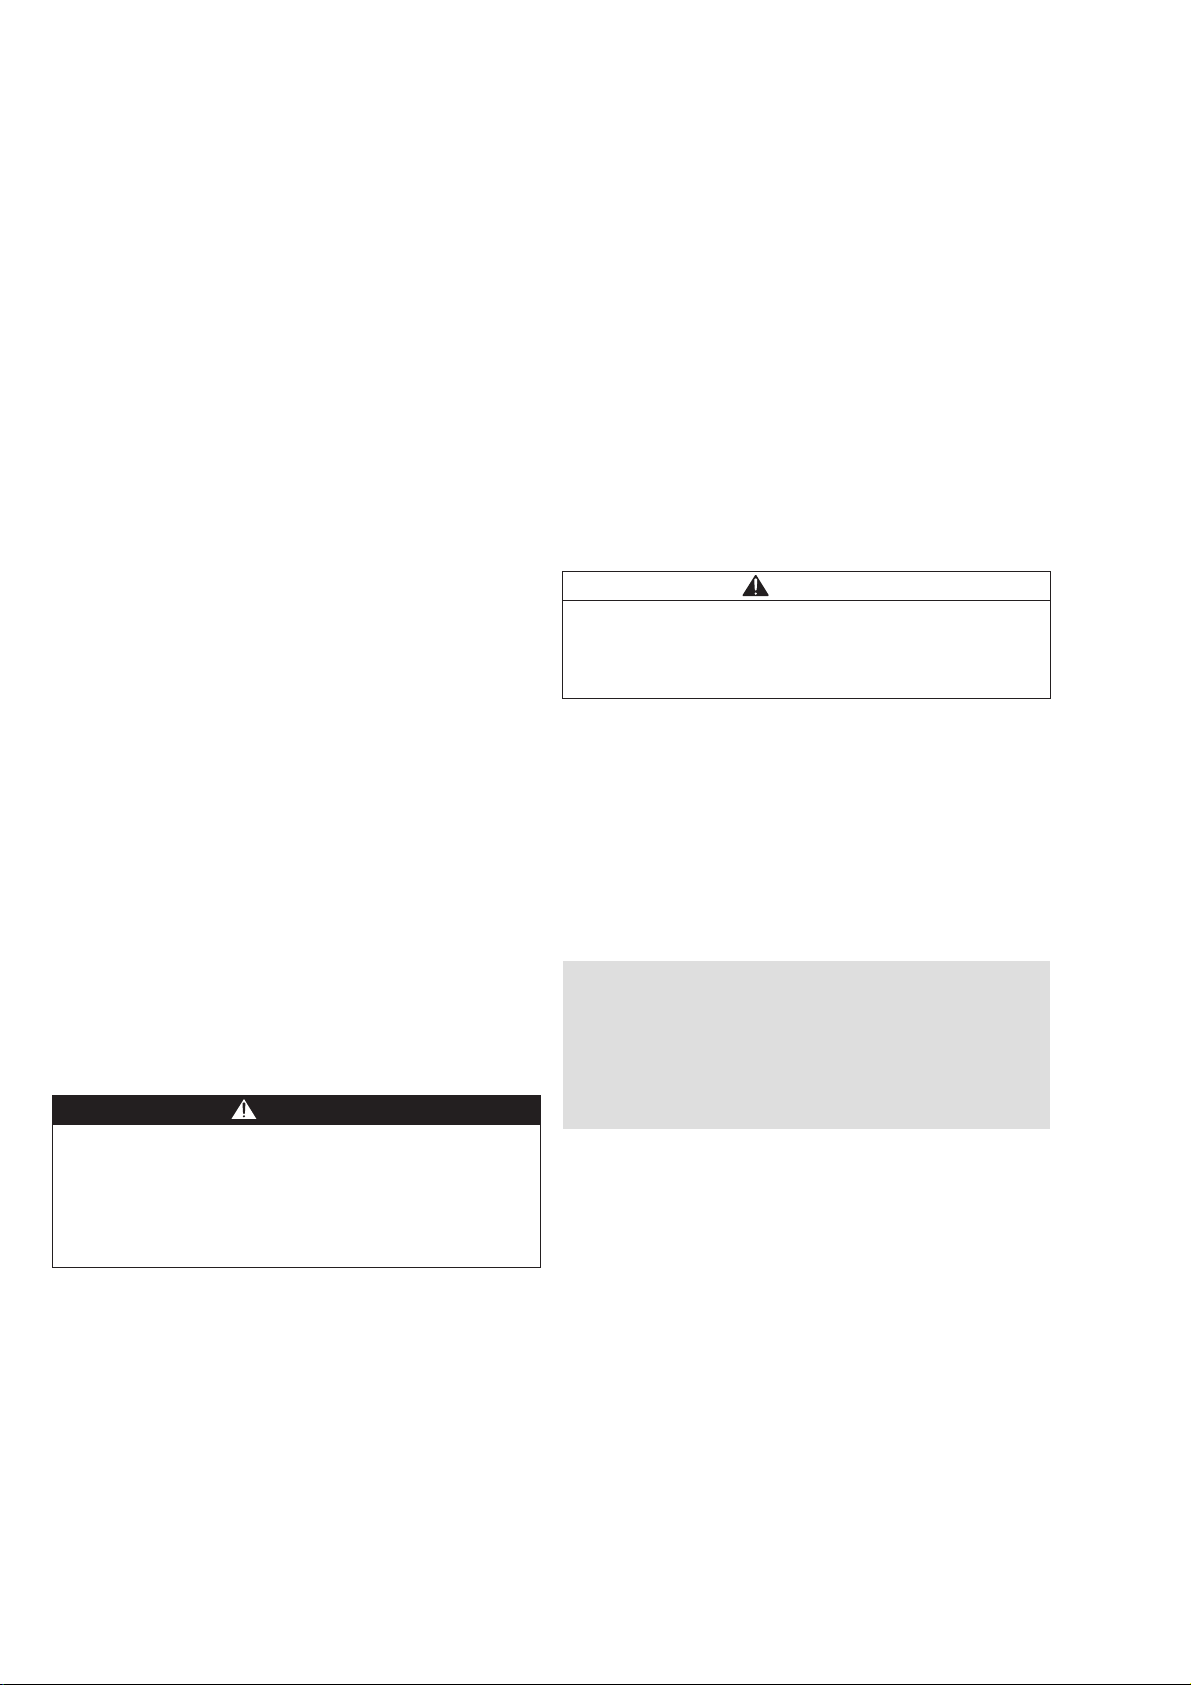
●Wenn die Weste mit CO2Inflatoren ausgestattet ist, Zug-
hebel in aufrechte, geschlossene Position bringen. Sicher-
stellen, dass die CO2Patronen unbeschädigt und
sachgemäß gefüllt sind; Gewinde der Patronen leicht ein-
fetten und gefüllte CO2Patronen fest in die Inflatoren ein-
setzen. Tasche schließen und mit Klettverschlüssen auf der
Westenoberseite sichern.
●Dräger Life Preserver Rettungsweste über Mundaufblassy-
stem voll aufblasen. Auf Leckagen überprüfen. Funktion
des Überdruckventils durch Zusammenpressen der
Dräger Life Preserver Rettungsweste überprüfen.
●Dräger Life Preserver Rettungsweste durch Drücken des
Ventils am Mundaufblassystem entleeren. Herausstehende
Teile der Tarierblase in die Außenhülle falten. Dazu Teile
der Tarierblase in die Außenhülle schieben, bis sich die
Kunststoffdruckknöpfe schließen lassen.
WARNUNG
Gefahr des Ertrinkens. Nachdem die Prüfung vor dem Tauch-
gang abgeschlossen ist, Dräger Life Preserver Rettungswe-
ste dort plazieren, wo sie nicht durch andere Ausrüstungsge-
genstände beschädigt werden kann. Weste nie als Puffer
oder Kissen für andere Geräte verwenden. Beschädigung
der Dräger Life Preserver Rettungsweste möglich.
Anlegen
Die Dräger Life Preserver Rettungsweste wird in nicht aufge-
blasenem Zustand wie eine Weste getragen. Die Weste wird
durch Hüft- und Beingurte in der Gebrauchsposition gehalten.
●Schnellauslösung auf der rechten Seite des Hüftgurtes und
die Schnalle an der Vorderseite der Weste öffnen. Weste
anlegen, dazu den Kopf zwischen die beiden Seitenkam-
mern stecken. Die "Flügel" der Tarierblase zeigen zur Vor-
derseite des Körpers. Schnalle schließen und Hüftgurt so
einstellen, dass er bequem aber fest anliegt.
●Die Beingurte über den Rücken führen und durch die
Beine nach vorne und nach oben ziehen. Jeden Beingurt
mit den Schnellverschlüssen am Hüftgurt befestigen; Gurte
so einstellen, dass sie bequem aber fest anliegen.
Der Mundstückinflator (nur amagnetische Life Preserver Ver-
sion) ist mit einem Power Inflation System ausgestattet, Mittel-
druckschlauch an einen Mitteldruckausgang (3/8 - 24 UNF)
des Druckminderers anschließen. Mitteldruckschlauch über
die Schnellauslösung an den Mitteldruck-anschluß des Mund-
stückinflators anschließen.
●Nach dem Anlegen der Dräger Life Preserver Rettungs-
weste den Gewichtsgürtel anlegen, so dass der Gewichts-
gürtel mit der rechten Hand gelöst werden kann und nicht
von den Gurten behindert wird.
Prüfung durch den Tauchpartner
Vor dem Tauchgang muss der Tauchpartner sicherstellen
dass:
— Die Dräger Life Preserver Rettungsweste vorschriftsmäßig
angelegt und eingestellt wurde und das Atmen aus einem
vor der Brust getragenen Regenerationstauchgerät nicht
behindert wird.
— Die Tarierblase nicht gefüllt ist und alle Klemmverschlüsse,
Flaschenanschlüsse und CO2Patronen gesichert sind.
— Die Tarierblase vollständig entleert ist.
— Die Auslösevorrichtung für den Gewichtsgürtel erreichbar
ist und zu nicht durch die übrigen Gurte blockiert wird.
— Der Mitteldruckschlauch an den Mundstückinflator ange-
schlossen ist und bei Verwendung mit einem offenen
Tauchgerät (SCUBA) die Weste mit Gas versorgt.
VORSICHT
Verletzungsgefahr. Gurte so einstellen, dass die Atmung aus
dem Tauchgerät nicht behindert wird. Gurte müssen dicht
anliegen, damit die bestmögliche Schwimmlage sicherge-
stellt wird.
Bei Verwendung mit Regenerationstauchgeräten der Geräte-
familie LAR muß der vordere Gurt vollständig durch den
Schnellauslöseverschluß gezogen und geöffnet werden,
damit das Regenerationstauchgerät um den Hals gehängt
werden kann. Die vordere Schnalle der
Dräger Life Preserver Rettungsweste wird dann über dem
Regenerationstauchgerät geschlossen.

Betrieb
7
Gebrauch während des Tauchens
Die Weste kann als Schwimmhilfe an der Oberfläche, als Ret-
tungsfluchtgerät und als Tarierweste verwendet werden.
Aufblasen über das Mundstückventil
●Die Dräger Life Preserver Rettungsweste kann über das
Mundstückventil aufgeblasen werden während der Knopf
am Ende des Aufblassystems durch den Mund eingedrückt
wird. Mundstückventil loslassen, um Luft in der Weste zu
halten.
Füllen über Luftflaschen
●Die Dräger Life Preserver Rettungsweste durch Aufdrehen
der Druckluftflaschen entgegen dem Uhrzeigersinn aufbla-
sen. Luftventil langsam und vorsichtig öffnen, um zu vermei-
den, dass zuviel Luft zu schnell in die Rettungsweste
strömt.
Wenn die Tarierblase gefüllt ist, durch das Überdruckventil
einen Überdruck zwischen ca. 0,120 bar bis 0,190 bar (1.7
und 2.8 psi) einstellen.
"Power" Inflation
●Bei Verwendung mit einem offenen Tauchgerät zusätzli-
chen Mitteldruckschlauch des Tauchgeräts über den
Schnellanschluß an das Inflatorsystem anschließen. Durch
Drücken des Inflatorknopfes seitlich am Inflatorkopf die
Dräger Life Preserver Rettungsweste mit Druckgas aus
dem Tauchgerät füllen.
●Um die Weste über die CO2Patronen aufzublasen, die
Abzugsleine der CO2Inflatoren ruckartig nach unten zie-
hen.
Entlüften der Dräger Life Preserver Rettungsweste
●Die Rettungsweste kann über das Mundstückventil, den
Spülknopf am Power Inflator oder über Ziehen an der Kor-
del des Überdruckventils entlüftet werden.
Mundstück von Sand oder Salzwasser befreien. Dazu kurz
vor Eindrücken des Knopfes hineinblasen.
WARNUNG
Gefahr des unkontrollierten schnellen Aufsteigens.
Bei Verwendung der Weste als Tarierweste und bei Füllen
der Weste wie oben beschrieben Luft vorsichtig zuführen,
um den Auftrieb besser kontrollieren zu können.
WARNUNG
Nach Aktivierung entleeren sich die CO2Patronen vollstän-
dig in die Blase der Tarierweste. Dieser Vorgang kann nicht
gestoppt werden.
Schwimmen an der Wasseroberfläche
●Dräger Life Preserver Rettungsweste langsam über das
Mundstück (oder den Power Inflator bei Verwendung eines
offenen Tauchgerätes) aufblasen, bis eine bequeme
Schwimmhaltung erreicht wird.
●Beim Schwimmen an der Wasseroberfläche mit einem
Regenerationstauchgerät, den Atembeutel des Regenerati-
onstauchgerätes auf mindestens das halbe Volumen füllen,
dann die Dräger Life Preserver Rettungsweste langsam
aufblasen, bis eine bequeme Haltung erreicht wird; dies
führt zu einer bequemen Schwimmhaltung, ohne dass die
Druckknöpfe geöffnet werden.
Abhängig vom Auftrieb des Tauchers und der verwendeten
Ausrüstung ist es oftmals möglich, die Weste teilweise aufzu-
blasen, ohne das sich die Druckknöpfe öffnen, um einen ent-
sprechenden Auftrieb zu erreichen.
Umschalten von SCUBA auf LAR unter Wasser
●Beim Umschalten von einem offenen Tauchsystem
(SCUBA) auf ein Regenerationstauchgerät, Vordergurt der
Dräger Life Preserver Rettungsweste ganz aufziehen und
vordere Schnalle öffnen. Zweite Stufe (Lungenautomat)
des Tauchgerätes (SCUBA) kurz entfernen und Kopf durch
die obere Bänderung des Regenerationstauchgerätes
stecken. Sicherstellen, dass das Gehäuse des Regenerati-
onstauchgerätes zwischen den beiden unteren Kammern
der Rettungsweste plaziert wird (NICHT auf den Kammern)
und vordere Schnalle schließen.
●Spülung mittels LAR nach Gebrauchsanweisung durchfüh-
ren und beginnen, aus dem LAR zu atmen.
●Beim Umschalten vom SCUBA zum Regenerationstauch-
gerät Schnelllöseschnalle am unteren Gurt des LAR öff-
nen, Gurt um die Vorderseite des LAR oder des Gehäuses
des LAR herumführen und die Schnelllöseschnalle wieder
schließen.
●Regenerationstauchgerät ablegen, Flaschenventil des LAR
schließen und Mundstück entfernen. Aus dem Lungenauto-
maten des SCUBA atmen. Vorderen Gurt der
Dräger Life Preserver Rettungsweste und Nackengurt des
LAR öffnen. LAR entfernen und Vordergurt der
Dräger Life Preserver Rettungsweste wieder schließen.
Gurt auf kürzeste Länge einstellen.

Instandhaltung und Wartung
8
Notaufstieg
Die Dräger Life Preserver Rettungsweste ermöglicht sehr
rasche Aufstiege. Während des Tauchertrainings müssen
sachgemäße Aufstiegsverfahren trainiert werden, um Embo-
lien und/oder Dekompressionsunfälle zu verhindern.
— Notaufstiegsverfahren für Regenerationstauchgeräte wer-
den in den Ausbildungsanweisungen z. B. der Marine
beschrieben.
Nach dem Tauchen
●Sicherstellen, dass die Flaschenventile geschlossen sind.
Beingurte öffnen, danach Hüftgurt öffnen und
Dräger Life Preserver Rettungsweste über den Kopf zie-
hen.
●Wasser vollständig aus der Weste herausdrücken und
Weste teilweise aufblasen. Weste zu einem Drittel über
das Mundstück mit frischem Wasser füllen und innen aus-
spülen. Weste nach unten halten und Wasser durch Mund-
aufblassystem herauslaufen lassen. Das ganze System in
klarem frischem Wasser spülen.
●Alle metallenen und beweglichen Teile mit frischem Was-
ser spülen, trocknen lassen und auf Beschädigungen prü-
fen.
●Luftflaschen von der Dräger Life Preserver Rettungsweste
entfernen und füllen. Beschädigte oder benutzte CO2
Patronen entfernen und durch neue ersetzen.
Dräger Life Preserver Rettungsweste an einem kühlen trok-
kenen Ort lagern, nicht unter anderer Ausrüstung lagern.
Abhängig von den Umständen, die einen Notaufstieg erfor-
dern und den Bedingungen, denen sich der Taucher gegen-
übersieht (zum Beispiel: Tiefe, Wasser im Tauchgerät, usw.),
wird empfohlen, im Notfall nur die Füllquelle auf der rechten
Seite zu aktivieren. Wenn der entsprechende positive Auf-
trieb erreicht wird, kann die linke Füllquelle bei Bedarf als
Reserve dienen. Falls mehr Gas benötigt wird, um einen
positiven Auftrieb zu erreichen, muss die Reserve auf der lin-
ken Seite aktiviert werden.
HINWEIS
Durch Eintauchen der Weste in warmes frisches Wasser
nach dem Tauchen werden Salz und Mineralienablagerun-
gen besser entfernt als durch das Spülen. Durch kurzzeitiges
Eintauchen der Weste in warmes Wasser werden die Abla-
gerungen im Inneren gelöst, die beim normalen Spülvorgang
nicht entfernt werden. Während des Spül- oder Eintauchvor-
gangs Wassertemperaturen über ca. 49 oC (120°F) vermei-
den. Beschädigung der Tarierblase möglich.
Nach dem Entfernen Luftflaschen in frischem Wasser spülen
und das Ventil kurzzeitig öffnen, um Feuchtigkeit aus dem
Ventil zu entfernen (Ventilauslaß zeigt auf den Boden). Wenn
die Flasche leer ist, Flasche schütteln während das Aus-
lassventil nach unten gehalten wird, um Wasserrückstände
zu entfernen.
Instandhaltung und Wartung
Die Instandhaltungsanforderungen für die
Dräger Life Preserver Rettungsweste sind in geplante und
ungeplante Verfahren aufgeteilt. Es sind die jeweiligen natio-
nalen Vorgaben und Bestimmungen zu beachten.
Instandhaltungsanforderungen
Instandhaltungen
CODE Zeitraum
S Halbjährlich
A Jährlich
24M Alle 2 Jahre
60M Alle 5 Jahre
R je nach Situation und Zustand
U ungeplant
M-1R monatlich oder wie erforderlich
Bezeichnung Wann
Inspektion und Reinigung der
Dräger Life Preserver Ret-
tungsweste
Halbjährlich
Luftflasche innen gemäß nationalen Vorschriften
Prüfung des Überdruckventils Jährlich
Hydrostatische Prüfung der
Luftflaschen
Gemäß nationalen Vorschrif-
ten
Flaschenventil reparieren Nach Bedarf/Zustand
Test über magnetische Kenn-
zeichnung
Gemäß nationalen Vorschrif-
ten/nach Reparaturen und
Austausch von Teilen
Luftflaschen füllen Vor jedem Tauchgang
Abläufe vor dem Tauchgang Vor jedem Tauchgang
Abläufe nach dem Tauchgang Nach jedem Tauchgang
Dicht- und Funktionsprüfung Vor jedem Tauchgang
CO2Patronen wiegen Vor jedem Tauchgang
Flasche/Ventil entfernen /
ersetzen
Gemäß nationalen Vorschrif-
ten
Tarierblase reparieren Bei Beschädigungen
Überdruckventil reparieren Bei Beschädigungen oder fal-
scher Lieferleistung
WARNUNG
Die Montage von nicht durch Dräger zugelassenen Teilen an
die Dräger Life Preserver Rettungsweste ist nicht erlaubt
und kann zu Verletzungen des Tauchers führen. Sicherstel-
len, dass während der Wartung nur geprüfte Teile verwendet
werden.

Instandhaltung und Wartung
9
Inspektion und Reinigung
●Sichtprüfung der Tarierblase und Nähte auf Abnutzung
oder Beschädigung durchführen. Gurte und Gurtteile auf
Beschädigungen, lose Stiche und fehlende oder beschä-
digte Kunststoffteile prüfen.
●Sichtprüfung auf Beschädigungen, lose Klemmverschlüsse
oder beschädigten Füllschlauch an Flasche/Ventil, Über-
druckventil und Mundaufblassystem durchführen.
●Sicherstellen, dass O-Ringe auf Luftflasche und Flaschen-
adaptern vorhanden sind, bei Beschädigung austauschen.
●Schrauben am Adapter prüfen, um sicherzustellen, dass sie
fest sind und Dräger Life Preserver Rettungsweste über
das Mundaufblassystem voll aufblasen.
●Die Tarierblase, Außenhülle und Gurte mit einer milden Sei-
fenlauge und Bürste reinigen, falls die Teile Schmutz auf-
weisen oder mit Chemikalien verschmutzt sind. Mit
frischem Wasser abspülen und trocknen lassen.
●Dräger Life Preserver Rettungsweste an einem kühlen,
trockenen Ort lagern. Weste nicht für längere Zeit ultravio-
letter Strahlung aussetzen.
Flaschen füllen
●Flaschen auf Beschädigungen überprüfen. Es wird em-
pfohlen, Hochdruckgasversorgungsflaschen nach nationa-
len Richtlinien (z.B. PED Pressure Equipment Directive der
EU) zu prüfen.
●Flasche direkt an den Füllanschluss anschließen, um Fla-
schen auf 200 bar zu füllen, dabei die Flaschen langsam
und kontrolliert mit Druckluft füllen. Flaschenventile schlie-
ssen.
●Etikett mit Angaben zu Fülldruck und Fülldatum an gefüllten
Flaschen anbringen.
HINWEIS
Beutel nicht öffnen, bevor die Weste betriebsbereit ist.
Nicht getestete Teile oder nicht verpackte Teile dürfen nicht
an die Dräger Life Preserver Rettungsweste angeschlossen
werden. Funktionsbeeinträchtigung möglich.
Funktions- und Dichtprüfung
●Tarierblase ganz aufblasen, dann mit der Hand zusammen-
drücken bis das Überdruckventil entlüftet. In gefülltem
Zustand Dichtprüfung im Wasserbecken durchführen.
— Die Tarierblase kann als funktionsfähig angesehen werden,
wenn sie voll aufgeblasen bleibt und keine Luftblasen sicht-
bar sind.
●Falls Luftblasen vorhanden sind, Stelle markieren und zur
Reparatur an den Dräger Safety senden. Wenn die Nähte
oder die CO2Messingstutzen der Tarierblase beschädigt
sind, muss die Blase ersetzt werden
CO2-Patronen wiegen
●Sicherstellen, dass die CO2-Patrone betriebsbereit ist.
Dazu CO2-Patrone auf Beschädigungen an den Gewinden
und der Patrone prüfen. Patrone wiegen. Patronen, die
WENIGER als das aufgedruckte Gewicht wiegen, nicht ver-
wenden. Zugelassene Patronen haben ein Gewicht, das
dem aufgedruckten Gewicht entspricht oder höher ist.
Während der Prüfung können Luftblasen zwischen der
Tarierblase und der Außenhülle aufsteigen. Deshalb
Dräger Life Preserver Rettungsweste unter Wasser bewe-
gen und drehen und anschließend die Prüfung durchführen.

Fehlersuche
Technische Daten
10
Fehlersuche
Fehler Ursache Abhilfe
Tarierblase bleibt
nicht gefüllt
Anschlüsse locker,
Leckage
Anschlüsse nach-
ziehen, eventuell
Leckage durch Prü-
fung im Wasserbad
suchen. Weste zur
Reparatur an Drä-
ger Safety senden
Life Preserver
blässt sich nicht auf
Luftflaschen oder
CO2Patronen ver-
braucht
Nachfüllen oder
ersetzen
defektes Mund-
stückventil
Weste zur Repara-
tur an Dräger Safety
senden
Luftadapter ist nicht
mehr durchgängig
Luftadapter korro-
diert
Reinigen oder
Weste zur Repara-
tur an Dräger Safety
senden
Technische Daten
Abmessungen
Höhe: ca. 660 mm (ca. 26 inches)
Breite: ca. 254 mm (ca. 10 inches)
pro Seite
Gewicht ohne Inflatoren: ca. 2 kg (ca. 4,4 lbs)
mit je 2 Flaschen/
Ventilen: ca. 4 kg (ca. 8,8 lbs)
mit je 2 doppelten
Inflatoren: ca. 2,6 kg (ca. 5,8 lbs)
Tarierkammer
Material: 420 Denier Nylon, einseitig
beschichtetes Urethan,
dielektrisch abgedichtet
Volumen: ca. 6 cu/ft, wenn gefüllt
Überdruckventil: öffnet zwischen ca. 0,120 bar bis
0,19 bar (1.7 bis 2.8 psi)
Gasquellen: 2 x 0,4 Liter Luftflaschen, plus
Aufblasen über Mundstück und
Power Inflation (nur amagneti-
sche Version) oder 2 x CO2Infla-
tion, plus Aufblasen über Mund-
stück
Betriebsbedingungen
Meerwasser
Temperaturbereich: ca. 2 oC bis 32 oC
(28 bis 90 oF)
Auftriebskraft max.: ca. 16,8 kg (37 lbs)
Betriebstiefe: siehe "Konfigurationen"
auf Seite 5
ca. 17 L (0,6 cu/ft), wenn gefüllt

Bestell-Liste
11
Bestell-Liste
Benennung Bestell-Nr.
Shadow Life Preserver T14 757
Shadow Life Preserver NM T14 436
DR-Flasche T 0,4/200R NM T15 538
DR-Flasche T 0,4/200L NM T15 539
Shadow Life Preserver CO2T14 921
CO2-Einsatzpatrone T14 922

Table of Contents
12
For your Safety . . . . . . . . . . . . . . . . . . . . . . . . . . . . . . . . . . 13
What's what? . . . . . . . . . . . . . . . . . . . . . . . . . . . . . . . . . . . 13
Intended Use . . . . . . . . . . . . . . . . . . . . . . . . . . . . . . . . . . . 14
Description . . . . . . . . . . . . . . . . . . . . . . . . . . . . . . . . . . . . . . . . . . . . 14
Operation . . . . . . . . . . . . . . . . . . . . . . . . . . . . . . . . . . . . . . 15
Configurations . . . . . . . . . . . . . . . . . . . . . . . . . . . . . . . . . . . . . . . . . . 15
Test before diving . . . . . . . . . . . . . . . . . . . . . . . . . . . . . . . . . . . . . . . 16
Donning . . . . . . . . . . . . . . . . . . . . . . . . . . . . . . . . . . . . . . . . . . . . . . . 16
Test by the diving partner . . . . . . . . . . . . . . . . . . . . . . . . . . . . . . . . 16
Use whilst diving . . . . . . . . . . . . . . . . . . . . . . . . . . . . . . . . . . . . . . . . 17
Switching from SCUBA to LAR under water . . . . . . . . . . . . . . . . 17
Emergency ascent . . . . . . . . . . . . . . . . . . . . . . . . . . . . . . . . . . . . . . 18
After the dive . . . . . . . . . . . . . . . . . . . . . . . . . . . . . . . . . . . . . . . . . . . 18
Service and maintenance . . . . . . . . . . . . . . . . . . . . . . . . . 18
Maintenance requirements . . . . . . . . . . . . . . . . . . . . . . . . . . . . . . . 18
Inspection and cleaning . . . . . . . . . . . . . . . . . . . . . . . . . . . . . . . . . . 19
Filling the cylinders . . . . . . . . . . . . . . . . . . . . . . . . . . . . . . . . . . . . . . 19
Functional and leak test . . . . . . . . . . . . . . . . . . . . . . . . . . . . . . . . . . 19
Weighing the CO2cartridges . . . . . . . . . . . . . . . . . . . . . . . . . . . . . 19
Fault finding . . . . . . . . . . . . . . . . . . . . . . . . . . . . . . . . . . . . 20
Technical data . . . . . . . . . . . . . . . . . . . . . . . . . . . . . . . . . . 20
Ordering List . . . . . . . . . . . . . . . . . . . . . . . . . . . . . . . . . . . 21

For your Safety
What's what?
13
For your Safety
Strictly follow the Instructions for Use
Any use of the apparatus requires full understanding and strict
observation of these instructions.
The device is only to be used for the purposes specified here.
Maintenance
The apparatus must be inspected and serviced regularly by
trained service personnel.
Repairs to the device may only be carried out by trained ser-
vice personnel.
We recommend that a service contract should be obtained
with Dräger Safety and that all repairs also be carried out by
Dräger Safety.
Only authentic Dräger parts may be used for maintenance.
Note the instructions in the section entitled "Maintenance
intervals".
Accessories
Use only accessories shown in the Ordering List.
What's what?
Front view
Rear view
1Outer cover
2Buoyancy control device in outer jacket
3Mouth piece valve
4Storage pockets for compressed air cylinders or CO2
cartridges and compressed gas connection pieces to
attach to cylinder fittings or CO2inflators
5Relieve valve
1Back strap
2Slider
3Quick-release buckle
4Hip strap with slider
00221305.eps
1
2
3
4
4
5
1
2
3
4
00321305.eps

Intended Use
14
Compressed air cylinder connection
CO2Inflator system
1High pressure O ring
2Nozzle
3Hand wheel G5/8
4Sealing ring
1Hexagon cap nut
2Top seal
3CO2inflator
4Bottom seal
5Safety clip for manual release
6CO2replacement cartridge
1
2
3
4
3
6
1
5
3
2
1
4
00521305.eps
Intended Use
The Dräger Life Preserver rescue vest is used in combination
with self-contained diving apparatus of the equipment range
LAR.
The Dräger Life Preserver rescue vest is a vest with attached
collar, hip and leg straps for use in the following situations:
— Swimming aid on the surface of the water
— Rescue escape apparatus
— Buoyancy vest
The Dräger Life Preserver rescue vest can be filled either from
high pressure compressed air containers or CO
2
cartridges (both
are accessories). For this the vest has two compressed air connec-
tion pieces. The antimagnetic version of the vest can also be filled
with low pressure air from oxygen demand systems ("Power Infla-
tion") if used in a self-contained diving apparatus.
Description
The basic components of the Dräger Life Preserver rescue
vest are the buoyancy control device with outer jacket, hip,
back and leg straps, two air cylinders with attachment adapter
(or two CO2inflators with CO2cartridges), oral inflation
system and pressure relief valve.
The buoyancy control device is partially folded and attached
with snap fasteners to the outer jacket. During diving the
buoyancy control device remains folded. In an emergency,
when the device is filled, the snap fasteners are opened by the
gas pressure in the air chamber and the vest is inflated fully.
The buoyancy control device contains two brass connection
pieces ultrasonically welded to the air chamber and permits
the use of a dual CO2cartridge system or, via adapter, the use
of two aluminium cylinders with valve. The standard air system
contains cylinders with TÜV approval. Each cylinder supplies
approx. 0.4 litres (liquid content) of air and has an operating
pressure of 200 bar.
The Dräger Life Preserver rescue vest can also be inflated via
a mouth piece and manually operated valve. Air can be
released through manual operation of the valve and by holding
the mouth piece above the head. A pressure relief valve keeps
the gas spreading in the Dräger Life Preserver rescue vest at a
pressure of approx. 0.120 to 0.190 bar (1.7 to 2.8 psi) above
the ambient pressure.
The standard straps of the Dräger Life Preserver rescue vest
consist of a hip strap with approx. 50 mm (2 inch) belt width and
a back strap with approx. 50 mm (2 inch) belt width plus two leg
straps with approx. 25 mm (1 inch) wide belting. For possible
configurations of the Dräger Life Preserver rescue vest and gas
supply options for the respective diving task siehe “Configurati-
ons” auf Seite 15. A label or mark on the outer jacket shows the
serial number of the Dräger Life Preserver rescue vest.

Operation
15
Operation
The following chapters contain information about the use of
the Dräger Life Preserver rescue vest and checks before and
after diving. The paragraph on configuration on this page pro-
vides divers with information about the required configuration
of the Dräger Life Preserver rescue vest for the respective
diving apparatus, depth and operating conditions.
Configurations
Compatibility with the diving apparatus:
Combine Dräger Life Preserver rescue vest in the horizontal
column with the diving apparatus in the vertical row to arrive at
the suitable combination for the diving apparatus and depth
requirements.
Designation Life Preserver Shadow Life Preserver Shadow CO2Life Preserver
Shadow lowmag
Height1
Width1
Weight1
1 all details are approximations
660 mm (26 inches)
254 mm (10 inches) each side
4 kg (8.8 lbs)
660 mm (26 inches)
254 mm (10 inches) each side
3 kg (6.6 lbs)
660 mm (26 inches)
254 mm (10 inches) each side
4 kg (8.8 lbs)
Gas sources Oral inflator
and up to 2 x 0.4 litre/200 air
cylinders
Oral inflator and up to
2 x CO2inflators with cartrid-
ges
Oral inflator, Power Inflation
and up to 2 x 0.4 litre/200 bar
air cylinders
LAR V
LAR VI
LAR VII (O2-operation)
up to 10 msw cylinder pressure
of min. 200 bar (2900 psi)
up to 10 msw min.
2 x 32 gram CO2
up to 10 msw cylinder pressure
of min. 200 bar (2900 psi)
SCUBA up to 54 msw with Power Infla-
tion and min. 200 bar
(2900 psi) cylinder pressure
up to 54 msw with Power Infla-
tion and with min.
2 x 32 gram CO2cartridges
up to 54 msw with Power Infla-
tion and min. 200 bar
(2900 psi) cylinder pressure
LAR VII
(mixed gas operation)
up to 24 msw min. 200 bar
(2900 psi) cylinder pressure
up to 24 msw with
2 x 32 gram CO2cartridges
up to 24 msw min. 200 bar
(2900 psi) cylinder pressure

Operation
16
Test before diving
Each time before diving the Dräger Life Preserver rescue vest
must be checked for proper condition and operating conditi-
ons. The diver must familiarise himself with all components
and functions of the Dräger Life Preserver rescue vest to
ensure proper handling.
●Carry out a visual inspection of the buoyancy control device
and seams for wear and damage. Check belts and belt com-
ponents for damage, loose stitching and missing or dama-
ged plastic components.
●Carry out a visual inspection of the cylinder/valve, pressure
relief valve and oral inflator for damage or loose connec-
tions. Ensure that the air cylinders are full. The maximum
operating pressure is 200 bar.
●Before connecting the cylinders ensure that
the O rings are present. Insert air cylinders into their pok-
kets and close with Velcro fastener; screw the hand wheels
of the adapters onto the cylinder valve and tighten.
●If the vest is equipped with CO2inflators, move the pull
lever into the upright, closed position. Ensure that the CO2
cartridges are undamaged and have been properly filled;
lightly grease the threads of the cartridges and insert the fil-
led CO2cartridges firmly into the inflators. Close the pok-
ket and secure with the Velcro fasteners on the top of the
vest.
●Fully inflate Dräger Life Preserver rescue vest via the oral
inflator. Check for leaks. Check the function of the pressure
relief valve by pressing the Dräger Life Preserver rescue
vest together.
●Empty the Dräger Life Preserver rescue vest by pressing
the valve at the oral inflator. Fold protruding components of
the buoyancy control device into the outer jacket. To do so
push the components of the buoyancy control device into
the outer jacket until the snap fasteners can be closed.
WARNING
Risk of drowning. After completing the tests before diving
position the Dräger Life Preserver rescue vest in a location
where it cannot be damaged by other items of equipment.
Never use the vest as a buffer or cushion for other equip-
ment. The Dräger Life Preserver rescue vest could be dama-
ged.
Donning
In the uninflated state the Dräger Life Preserver rescue vest is
worn like any vest. The vest is secured in the deployment posi-
tion by the hip and leg straps.
●Open the quick action release on the right-hand side of the
hip strap and the buckle on the front of the vest. Don the
vest by pulling the two side chambers over the head. The
"wings" of the buoyancy control device point to the front of
the body. Close the buckle and adjust the hip strap for a
comfortable but tight fit.
●Place the leg straps across the back and pull them through
the legs to the front and upwards. Attach each leg strap with
the quick-release buckles to the hip strap; adjust the straps
to be comfortable but tight.
The oral inflator (only antimagnetic Life Preserver Version) is
equipped with a Power Inflation System; connect the medium
pressure hose to a medium pressure outlet (3/8 - 24 UNF) of
the pressure reducer. Connect the medium pressure hose via
the quick release to the medium pressure connection of the
oral inflator.
●After donning the Dräger Life Preserver rescue vest don
the weight strap in such a way that the weight strap can be
released with the right hand and is not obstructed by the
straps.
Test by the diving partner
Before diving the diving partner must ensure that:
— the Dräger Life Preserver rescue vest has been donned
and adjusted properly and breathing is not obstructed by a
self-contained diving apparatus worn on the chest.
— the buoyancy control device is not filled and all Velcro clos-
ures, cylinder connections and CO2cartridges have been
secured.
— the buoyancy control device is completely empty.
— the release device for the weight strap is accessible and not
blocked by the other straps.
— the medium pressure hose is connected to the oral inflator
and the vest is supplied with gas if used with an open diving
appratus (SCUBA).
CAUTION
Risk of injury. Adjust the straps in such a way that the brea-
thing from the diving apparatus is not obstructed. Straps
must sit tightly to ensure the best possible position for swim-
ming.
When using self-contained diving apparatus of the equip-
ment range LAR the strap must be pulled fully through the
quick-release buckle and opened to allow the self-contained
diving apparatus to be hung around the neck. The front
buckle of the Dräger Life Preserver rescue vest is then clo-
sed over the self-contained diving apparatus.

Operation
17
Use whilst diving
The vest can be used as swimming aid at the surface, as an
emergency escape device and as a buoyancy vest.
Inflation via the oral valve
●The Dräger Life Preserver rescue vest can be inflated via
the oral valve when the button at the end of the inflation
system is pressed in by mouth. Release the oral valve to
retain the air in the vest.
Filling via air cylinders
●Inflate the Dräger Life Preserver rescue vest by unscrewing
the compressed air cylinders anticlockwise. Slowly and
carefully open the air valve to prevent too much air from flo-
wing into the rescue vest too fast.
When the buoyancy control device is full set an overpressure
between approx. 0.120 bar and 0.190 bar (1.7 and 2.8 psi) at
the pressure relief valve.
"Power" Inflation
●If used with an open diving apparatus connect the additio-
nal medium pressure hose of the diving apparatus via the
quick-release connection to the inflator system. By pressing
the inflator button on the side of the inflator head fill the
Dräger Life Preserver rescue vest with compressed gas
from the diving apparatus.
●To inflate the vest via the CO2cartridges pull the trigger line
of the CO2inflators abruptly down.
Deflating the Dräger Life Preserver rescue vest
●The rescue vest can be deflated via the oral valve, the flus-
hing button at the Power Inflator or by pulling the cord of
the pressure relief valve.
Clear the mouthpiece from sand or salt water. To do so blow
in before pressing the button.
WARNING
Risk of uncontrolled fast ascension.
When using the vest as a buoyancy vest and when filling the
vest as described above add air carefully for improved con-
trol of the buoyancy.
WARNING
After activation the CO2cartridges empty completely into the
control device of the buoyancy vest. This process cannot be
stopped.
Swimming on the surface of the water
●Slowly inflate the Dräger Life Preserver rescue vest via the
mouthpiece (or the Power Inflator if using an open diving
apparatus) until a comfortable swimming position has been
achieved.
●When swimming at the surface of the water with a self-con-
tained diving apparatus, fill the breathing bag of the self-
contained diving apparatus to at least half its volume, then
slowly inflate the Dräger Life Preserver rescue vest until a
comfortable position has been achieved; this results in a
comfortable swimming position without the snap fasteners
being opened.
Dependent on the buoyancy of the diver and the equipment
used it is often possible to partially inflate the vest without the
snap fasteners opening in order to achieve a corresponding
buoyancy.
Switching from SCUBA to LAR under water
●When switching from an open diving apparatus (SCUBA)
to a self-contained diving apparatus, fully release the front
strap of the Dräger Life Preserver rescue vest and open the
front buckle. Briefly remove the second stage (demand air
system) of the diving apparatus (SCUBA) and put your head
through the top straps of the self-contained diving appara-
tus. Ensure that the housing of the self-contained diving
apparatus is positioned between the two bottom chambers
of the rescue vest (NOT on the chambers) and close the
front buckle.
●Flush with LAR as per instructions for use and start brea-
thing from the LAR.
●When swiching from SCUBA to a self-contained diving
apparatus open the quick-release buckle at the bottom
strap of the LAR, lead the strap around the front of the LAR
or the housing of the LAR and then close the quick-release
buckle again.
●Take off the self-contained diving apparatus, close the cylin-
der valve of the LAR and remove the mouthpiece. Breathe
from the demand air system of the SCUBA. Open the front
strap of the Dräger Life Preserver rescue valve and open
the neck strap of the LAR. Remove LAR and close the front
strap of the Dräger Life Preserver rescue vest again. Adjust
strap for shortest distance.

Service and maintenance
18
Emergency ascent
The Dräger Life Preserver rescue vest permits a very rapid
ascent. During the diving training proper ascent methods must
be trained to prevent embolism and/or decompression acci-
dents.
— Emergency ascent methods for self-contained diving appa-
ratus are described in the training instructions of e.g. the
navy.
After the dive
●Ensure that the cylinder valves are closed. Open the leg
straps, then open the hip strap and pull the
Dräger Life Preserver rescue vest over the head.
●Press all water completely out of the vest and partially
inflate the vest. Fill the vest one third via the mouthpiece
with fresh water and flush the inside. Hold the vest down
and allow water to flow out through the oral inflator. Rinse
the whole system in clear fresh water.
●Rinse all metal and moving parts with fresh water, allow to
dry and check for damage.
●Remove air cylinders from the Dräger Life Preserver rescue
vest and fill. Remove damaged or used CO2cartridges and
replace with new ones. Store Dräger Life Preserver rescue
vest at a cool dry location; do not store underneath other
equipment.
Dependent on the circumstances requiring an emergency
ascent and the conditions the diver finds himself in (e.g.:
depth, water in the diving apparatus, etc.) it is recommended
in emergencies to only activate the filling source on the right-
hand side. If the appropriate positive buoyancy is achieved,
the left filling source can be used as reserve if required. If
more gas is needed to achieve a positive buoyancy the
reserve on the left-hand side must be activated.
NOTICE
Immersion of the vest in warm fresh water after diving remo-
ves salt and mineral deposits better than rinsing. By briefly
immersing the vest in warm water the deposits on the inside
are dissolved which are not removed during a normal rinsing
process. Avoid water temperatures above approx. 49 oC
(120°F) during rinsing or immersion. The buoyancy control
device could be damaged.
After removing the air cylinders rinse them in fresh water and
briefly open the valve to remove moisture from the valve
(valve outlet facing down). If the cylinder is empty, shake the
cylinder whilst holding the outlet valve down to remove water
residue.
Service and maintenance
The maintenance requirements for the Dräger Life Preserver
rescue vest are divided into planned and unplanned procedu-
res. The applicable national rules and regulations must be
observed.
Maintenance requirements
Maintenance
CODE Time period
S Every 6 months
A Every year
24M Every 2 years
60M Every 5 years
R Depending on situation and condition
U Unplanned
M-1R Monthly or as required
Designation When
Inspection and cleaning of the
Dräger Life Preserver rescue
vest
Every 6 months
Air cylinder interior As per national regulations
Checking the pressure relief
valve
Every year
Hydrostatic test of the air cylin-
ders
As per national regulations
Repair cylinder valve As required/per condition
Test via magnetic marking As per national regulations/
after repair and replacement of
components
Fill air cylinders Before every dive
Pre-diving procedures Before every dive
After-diving procedures After every dive
Leak and functional test Before every dive
Weigh CO2cartridges Before every dive
Remove / replace cylinder/
valve
As per national regulations
Repair buoyancy control
device
If damaged
Repair pressure relief valve If damaged or if incorrect deli-
very is observed
WARNING
The fitting of parts not approved by Dräger to the
Dräger Life Preserver rescue vest is not permitted and can
result in injuring the diver. Ensure that only tested parts are
used during maintenance.

Service and maintenance
19
Inspection and cleaning
●Carry out a visual inspection of the buoyancy control device
and seams for wear and damage. Check belts and belt com-
ponents for damage, loose stitching and missing or dama-
ged plastic components.
●Carry out visual inspection for damage, loose clamp con-
nections or damaged filling hose at the cylinder/valve, pres-
sure relief valve and oral inflator.
●Ensure that the O rings are present at the air cylinder and
cylinder adapters, replace if damaged.
●Check screws at the adapter to ensure their tight fit and
fully inflate the Dräger Life Preserver rescue vest via the
oral inflator.
●Clean the buoyancy control device, outer jacket and straps
with mild soapy water and a brush if the components are
soiled or contaminated with chemicals. Rinse with fresh
water and allow to dry.
●Store the Dräger Life Preserver rescue vest at a cool dry
location. Do not expose the vest to ultraviolet rays for a pro-
longed period of time.
Filling the cylinders
●Check cylinders for damage. It is recommended to test the
high pressure supply cylinders in accordance with national
regulations (e.g. EU PED Pressure Equipment Directive).
●Connect the cylinder directly to the filling connection to fill
the cylinders to 200 bar; fill the cylinders slowly and control-
led with compressed air. Close the cylinder valves.
●Attach label with details of filling pressure and filling date to
the filled cylinders.
NOTE
Do not open the bag before the vest is ready for operation.
Untested or unpacked components must not be connected
to the Dräger Life Preserver rescue vest. They could impair
its operation.
Functional and leak test
●Fully inflate the buoyancy control device, then press toge-
ther by hand until the pressure relief valve deflates. Carry
out a leak test in a water basin in the filled condition.
— The buoyancy control device can be considered as opera-
tional if it remains fully inflated and no air bubbles are visi-
ble.
●If air bubbles are visible mark the location and send for
repair to Dräger Safety. If the seams or the CO2brass con-
nection pieces of the buoyancy control device are dama-
ged, the device must be replaced
Weighing the CO2cartridges
●Ensure that the CO2cartridge is ready for operation. Test
the CO2cartridge for damage at the threads and the cart-
ridge. Weigh the cartridge. Cartridges weighing LESS than
the printed weight must not be used. Approved cartridges
have a weight corresponding to or higher than the printed
weight.
During the test air bubbles can rise between the buoyancy
control device and the outer jacket. The
Dräger Life Preserver rescue vest should therefore be
moved and turned under water and the test carried out after-
wards.

Fault finding
Technical data
20
Fault finding
Fault Cause Remedy
Buoyancy control
device does not
remain filled
Connections loose,
leak
Retighten connec-
tions, if necessary
search for leak by
testing in a water
bath. Send the vest
for repair to Dräger
Safety
Life Preserver does
not inflate
Air cylinders or
CO2cartridges
used up
Replenish or
replace
Faulty mouthpiece
valve
Send the vest for
repair to Dräger
Safety
Air adapter blocked Air adapter corro-
ded
Clean or send the
vest for repair to
Dräger Safety
Technical data
Dimensions
Height: approx. 660 mm
(approx. 26 inches)
Width: approx. 254 mm
(approx. 10 inches)
per side
Weight without inflators: approx. 2 kg (approx. 4.4 lbs)
with 2 cylinders/valves
each: approx. 4 kg (approx. 8.8 lbs)
with 2 dual
inflators: approx. 2,6 kg (approx. 5.8 lbs)
Buoyancy chamber
Material: 420 Denier Nylon, one-sided
coated Urethane,
dielectrically sealed
Volume: approx. 6 cu/ft, when filled
Pressure relief valve: opens between approx. 0.120 bar
and 0.19 bar (1.7 and 2.8 psi)
Gas sources: 2 x 0.4 litre air cylinders, plus
inflation via mouthpiece and
Power Inflation (only
antimagnetic version) or 2 x CO2
inflation, plus inflation via
mouthpiece
Operating conditions
Sea water
Temperature range: approx. 2 oC to 32 oC
(28 to 90 oF)
Buoyancy max.: approx. 16.8 kg (37 lbs)
Operating depth: see "configuration"
on page 15
approx. 17 L (0.6 cu/ft), when filled
Table of contents
Languages:
Other Dräger Protection Device manuals

Dräger
Dräger PSS BG 4 User manual

Dräger
Dräger SPC 4800 User manual

Dräger
Dräger X-plore 8000 User manual

Dräger
Dräger CPS 7900 User manual

Dräger
Dräger WorkMaster Industry User manual

Dräger
Dräger R56963 User manual

Dräger
Dräger FPS 7000 User manual

Dräger
Dräger CPS 6900 User manual

Dräger
Dräger CPS 6800 User manual

Dräger
Dräger CPS 5900 Training User manual