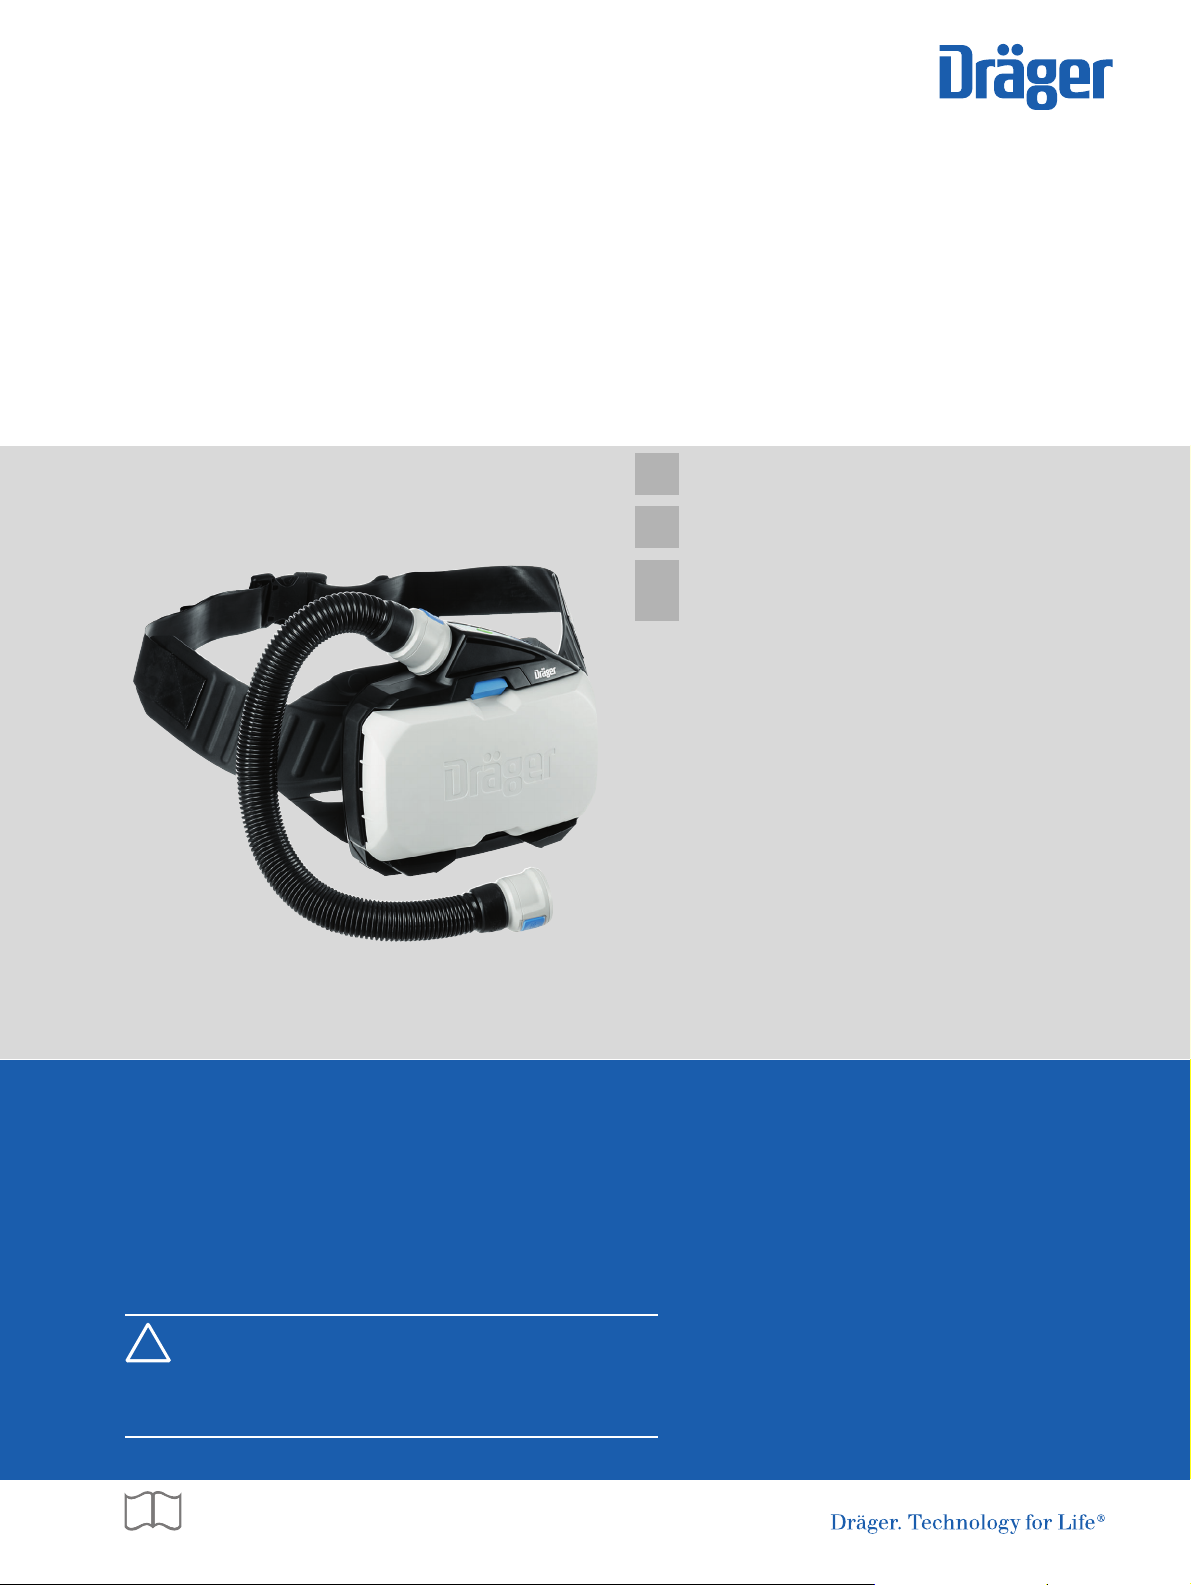
Dräger X-plore 8000 User manual

WARNING
Strictly follow the Instructions for Use.
The user must fully understand and strictly observe the
instructions. Use the product only for the purposes specified
in the Intended use section of this document.
!
Dräger X-plore®8000
i
enUS Instructions for use (for NIOSH-approved products)
5
fr Notice d'utilisation (pour les produits homologués NIOSH)
16
es
Instrucciones de uso
(para productos homologados por NIOSH)
28


A
1
43
2
B
5
63
21
4
C
0158
IP 65
EN 12941
EN 12942
CAXXX (Brasilien)
Contains FCC ID: T7VPAN10
Contains IC: 216Q-PAN10
Dräger Safety AG & Co. KGaA, 23560 Lübeck, Germany Made in Germany
X-plore 8500 (IP)
Part-No. : R59XXX
Serial-No. : AREE-0001
2
5
1
43
4
12 3
F
334
2
1
E
D
1
2
6
5
34
00133412.eps
3
2
1
G

4X-plore 8000
00233412.eps
J
X-plore 8000 Standard Charger
IP 30
T50
Input: 15 V / 4 A
Output: 9 - 12,6 V / 4 A
Dräger Safety AG & Co. KGaA, 23560 Lübeck, Germany Made in China
X
Part-No. : R59580
Serial-No. : AREE-0001
192
4
12
5
67 15 13
9
10
11
14
X
0158
IP 65
EN 12941
EN 12942
Dräger Safety AG & Co. KGaA, 23560 Lübeck, Germany Made in Germany
X-plore 8000
Standard Battery
Part-No. : R59565
Serial-No. : AREE-0001
Rechargeable Li-Ion Battery 10,8 V; 3,35 Ah; 36 Wh
Must be recycled or disposed of properly
Caution: Charge with dedicated charger only
May explode if damaged or disposed of in fire
Do not short circuit
117
9
10
11
8
23
6
4
5
16
7
I
H
0681
0158
IP 65
EN 12941
EN 12942
FCC ID: X60-XPLORE8500
IC: 5895F-XPLORE8500
CAN ICES-3 (B)/NMB-3(B)
Part-No. : R59500
Serial-No. : ARJC-0001
X-plore 8500 (IP)
Made in Germanywww.draeger.com
Dräger Safety AG & Co. KGaA
23560 Lübeck, Germany
1
23 3
4
5
67
8
9
10
11

Content
X-plore 8000 5
1 For your safety . . . . . . . . . . . . . . . . . . . . . . . . . . . . .6
1.1 General safety statements . . . . . . . . . . . . . . . . . . . .6
1.2 Definitions of alert icons . . . . . . . . . . . . . . . . . . . . . .6
2 Description . . . . . . . . . . . . . . . . . . . . . . . . . . . . . . . .6
2.1 System overview . . . . . . . . . . . . . . . . . . . . . . . . . . . .6
2.2 Components . . . . . . . . . . . . . . . . . . . . . . . . . . . . . . .6
2.2.1 Blower unit . . . . . . . . . . . . . . . . . . . . . . . . . . . . . . . .6
2.2.2 Respiratory filters and respiratory inlet coverings . . .7
2.2.3 Breathing hoses . . . . . . . . . . . . . . . . . . . . . . . . . . . .7
2.2.4 Carrying systems . . . . . . . . . . . . . . . . . . . . . . . . . . .7
2.2.5 Rechargeable batteries . . . . . . . . . . . . . . . . . . . . . . .7
2.2.6 Standard battery charger . . . . . . . . . . . . . . . . . . . . .8
2.3 Functional description . . . . . . . . . . . . . . . . . . . . . . . .8
2.4 Intended use . . . . . . . . . . . . . . . . . . . . . . . . . . . . . . .8
2.5 Limitations on use . . . . . . . . . . . . . . . . . . . . . . . . . . .8
2.5.1 General cautions and limitations . . . . . . . . . . . . . . . .8
2.5.2 NIOSH cautions and limitations . . . . . . . . . . . . . . . .8
2.6 Approvals . . . . . . . . . . . . . . . . . . . . . . . . . . . . . . . . .8
2.7 Symbol explanation and type identical labels . . . . . .9
2.7.1 Name plates . . . . . . . . . . . . . . . . . . . . . . . . . . . . . . .9
2.7.2 Packaging . . . . . . . . . . . . . . . . . . . . . . . . . . . . . . . . .9
3 Use . . . . . . . . . . . . . . . . . . . . . . . . . . . . . . . . . . . . . .9
3.1 Preconditions for use . . . . . . . . . . . . . . . . . . . . . . . .9
3.2 Preparations for use . . . . . . . . . . . . . . . . . . . . . . . . .9
3.3 During use . . . . . . . . . . . . . . . . . . . . . . . . . . . . . . . .10
3.3.1 Adjusting the flow rate . . . . . . . . . . . . . . . . . . . . . . .10
3.3.2 Warnings and alarms . . . . . . . . . . . . . . . . . . . . . . .10
3.4 After use . . . . . . . . . . . . . . . . . . . . . . . . . . . . . . . . .10
4 Troubleshooting. . . . . . . . . . . . . . . . . . . . . . . . . . .11
4.1 Warnings . . . . . . . . . . . . . . . . . . . . . . . . . . . . . . . . .11
4.2 Alarms . . . . . . . . . . . . . . . . . . . . . . . . . . . . . . . . . . .11
4.2.1 Blower unit . . . . . . . . . . . . . . . . . . . . . . . . . . . . . . .11
4.2.2 Standard battery charger . . . . . . . . . . . . . . . . . . . .11
5 Maintenance . . . . . . . . . . . . . . . . . . . . . . . . . . . . . .11
5.1 Maintenance intervals . . . . . . . . . . . . . . . . . . . . . . .11
5.2 Cleaning and disinfecting . . . . . . . . . . . . . . . . . . . .11
5.2.1 Cleaning and disinfecting procedure for the USA only
12
5.2.2 Cleaning and disinfecting procedure for other coun-
tries . . . . . . . . . . . . . . . . . . . . . . . . . . . . . . . . . . . . .12
5.3 Maintenance work . . . . . . . . . . . . . . . . . . . . . . . . . .12
5.3.1 Visual inspection . . . . . . . . . . . . . . . . . . . . . . . . . . .12
5.3.2 Replacing or charging the rechargeable battery . . .12
5.3.3 Replacing the respiratory filter . . . . . . . . . . . . . . . .13
5.3.4 Check the flow rate and warning devices . . . . . . . .13
5.3.5 Replacing the O-ring at plug-in or bayonet-type hose
connector . . . . . . . . . . . . . . . . . . . . . . . . . . . . . . . .13
6 Transport . . . . . . . . . . . . . . . . . . . . . . . . . . . . . . . .14
7 Storage . . . . . . . . . . . . . . . . . . . . . . . . . . . . . . . . . .14
8 Disposal . . . . . . . . . . . . . . . . . . . . . . . . . . . . . . . . .14
9 Technical data . . . . . . . . . . . . . . . . . . . . . . . . . . . 14
9.1 Overall system . . . . . . . . . . . . . . . . . . . . . . . . . . . 14
9.2 Rechargeable batteries . . . . . . . . . . . . . . . . . . . . . 14
9.3 Standard battery charger . . . . . . . . . . . . . . . . . . . 14
10 Component list . . . . . . . . . . . . . . . . . . . . . . . . . . . 15
Content

6X-plore 8000
For your safety
1 For your safety
1.1 General safety statements
Before using this product, carefully read these Instructions
for Use and those of the associated components.
Strictly follow the Instructions for Use. The user must fully
understand and strictly observe the instructions. Use the
product only for the purposes specified in the Intended use
section of this document.
Do not dispose of the Instructions for Use. Ensure that they
are retained and appropriately used by the product user.
Only fully trained and competent users are permitted to use
this product.
Comply with all local and national rules and regulations
associated with this product.
Only trained and competent personnel are permitted to
inspect, repair and service the product.
Use only genuine Dräger spare parts and accessories, or
the proper functioning of the product may be impaired.
Do not use a faulty or incomplete product. Do not modify
the product.
Notify Dräger in the event of any product or component
fault or failure.
1.2 Definitions of alert icons
The following warning symbols are used in this document to
provide and highlight areas of the associated text that require
a greater level of awareness from the user. The meanings of
the symbols are as follows:
2 Description
2.1 System overview
The Dräger X-plore®8000 1powered air purifying respirator
may be composed of different components depending on its
field of application and the required protection class. Observe
particularly the respiratory filter operating limits (see
Instructions for Use of the respiratory filters).
►Illustration of the system overview on the fold-out page
(Figure A)
A complete device includes:
1 Breathing hose
2 Respiratory inlet covering (example with hood)
3 Carrying system
4 Blower unit with respiratory filter and rechargeable battery
2.2 Components
2.2.1 Blower unit
►Illustration on the front of fold-out page (Figure B)
1 Tube connection
2 Control panel
3 Suction inlet
4 Splash guard cover
5 Respiratory filter (not enclosed with blower unit)
6 Respiratory filter lock button
►Illustration on back of the fold-out page (Figure C)
1 Carrying system socket
2 Name plate
3 Carrying system lock button
4 Battery lock button
5 Rechargeable battery (not enclosed with blower unit)
WARNING
Indicates a potentially hazardous situation which, if not
avoided, could result in death or serious injury.
CAUTION
Indicates a potentially hazardous situation which, if not
avoided, could result in physical injury, or damage to
the product or environment. It may also be used to
warn against unsafe practices.
NOTICE
Indicates additional information on how to use the product.
!
!
i
i
1 X-plore®is a registered trademark of Dräger.
NOTICE
For an overview of the device combinations and the
corresponding protection class, refer to the Approval
Label on the separate „Notes on approval“ sheet.
The listed components are designated for use with the
X-plore 8500 blower unit and the rechargeable
batteries.
Dräger would be happy to answer any questions you
may have regarding device configuration.
i
i

Description
X-plore 8000 7
Control panel
►Illustration on the fold-out page (Figure D)
1 Rechargeable battery status indicator
2 Residual particulate filter capacity indicator
3 On/off button
4 Flow rate indicator
5 Reduce flow rate
6 Increase flow rate
Display on control panel
Warning devices
The blower unit displays malfunctions with segments blinking
red or yellow (see section 4 on page 11). The blower unit will
also trigger an sound and vibration alarm.
2.2.2 Respiratory filters and respiratory inlet coverings
Respiratory filters and respiratory inlet coverings are described
in separate Instructions for Use.
The respiratory inlet covering types full facepiece and hood/
helmet/protective visor have varying flow ranges (see section
9.1 on page 14). The blower unit automatically detects the
respiratory inlet covering type and automatically selects the
appropriate flow range.
2.2.3 Breathing hoses
The following breathing hoses are available:
standard hose
flexible hose for increased comfort
Both breathing hoses are available for each of the following
respiratory inlet covering types:
plug-in connector (hood)
bayonet-type connector (helmet and protective visor)
round-thread connector (full facepiece)
2.2.4 Carrying systems
►Illustration on the fold-out page (Figure E)
1 Connection plate
2 Webbing
3 Clips on ends of the belt
4 Buckle
The following carrying systems are available:
Standard belt
The standard belt consists of a textile webbing and press
studs to attach comfortable padding.
Decontaminable belt:
The decontaminable belt has a smooth plastic webbing
and is particularly recommended for decontamination.
Welding belt:
The webbing of the welding belt consists of leather. The
welding belt is intended for welding applications.
2.2.5 Rechargeable batteries
►Illustration on the fold-out page (Figure F)
1 Battery lock button
2 Battery status indicator
3 Button to display battery capacity
4 Name plate
The rechargeable Li-ion batteries are specially designed for
use with the powered air purifying respirator. A long-life
rechargeable battery is also available in addition to the
standard rechargeable battery.
The battery status indicator shows the battery capacity while
you charge the unit with the standard charger or when you
push the button. The segments of the battery status indicator
are flashing while you charge the unit.
Indicator Meaning
Segments light up
in green.
Battery capacity depending on number
of displayed segments:
> 75 % (4 segments)
> 50 % (3 segments)
> 25 % (2 segments)
< 25 % (1 segment)
Segments light up
in green.
Residual capacity of particulate filter 1
depending on number of displayed
segments:
> 75 % (4 segments)
> 50 % (3 segments)
> 25 % (2 segments)
< 25 % (1 segment)
1 The residual capacity of the chemical cartridge or the chemical
cartridge components of the combination filter cannot be indicated.
Segments light up
in green.
Flow rate intensity depending on number
of displayed segments:
high flow rate (3 segments)
medium flow rate (2 segments)
low flow rate (1 segment)
Segments blink
yellow or red.
Malfunction (see section 4 on page 11)
NOTICE
Depending on the thickness and material of the
clothing, the vibration alarm might not be perceived.
i
i

8X-plore 8000
Description
The charge status display is identical to the one on the blower
unit control (see section 2.2.1 on page 6).
The rechargeable batteries reach their full capacity after
5 charge and discharge cycles. The standard charge takes
approx. 3 hours.
In cases where the battery has been completely drained
charging may take up to 4 hours longer. During this time the
battery status indicator is not supported.
To prevent damage to or explosion of the rechargeable battery,
charging is limited to a temperature range of 32 to 122 °F (0 to
50 °C). If this temperature range is exceeded or falls below,
charging will stop automatically and continue once the
temperature range is reached again.
2.2.6 Standard battery charger
►Illustration on the fold-out page (Figure G)
1StatusLED
2 Power supply unit
3 Battery compartment
Explanation of the status LED
When the rechargeable battery is fully charged, the charger
switches automatically to standby. In standby mode, the
rechargeable battery stays fully charged at all times. In this mode
the rechargeable battery is neither overcharged nor damaged.
2.3 Functional description
The powered air purifying respirator is a respiratory protective
device depending on circulating air. It filters the ambient air and
makes it available as breathable air. The device continuously
takes in ambient air through the respiratory filter. The
respiratory filter absorbs harmful substances depending on the
respiratory filter type. In this way, the ambient air is recycled
and finally reaches the respiratory inlet covering. There it is
available as breathable air.
A continuous overpressure in the respiratory inlet covering
prevents ambient air from penetrating.
2.4 Intended use
Depending on the employed respiratory filter type, the device
protects against particles, gases and vapours or combinations
hereof.
2.5 Limitations on use
2.5.1 General cautions and limitations
The device is not suitable for use:
in explosion-hazard areas (Ex-areas)
when there is a suspicion of contaminants with low warning
properties (smell, taste, irritation of eyes and airways)
in unventilated tanks, pits, canals etc.
when there is suspicion of immediate danger to life or
health - also called IDLH (Immediately Dangerous to Life
and Health)
2.5.2 NIOSH cautions and limitations
See Approval Label on separate „Notes on approval“ sheet.
2.6 Approvals
The device is approved according to NIOSH 42 CFR Part 84.
This device complies with part 15 of the FCC Rules and
Industry Canada licence-exempt RSS standard(s). Operation
is subject to the following two conditions: (1) This device may
not cause harmful interference, and (2) this device must accept
any interference received, including interference that may
cause undesired operation.
Changes or modifications not expressly approved by the party
responsible for compliance could void the user's authority to
operate the equipment.
Note: This equipment has been tested and found to comply
with the limits for a Class B digital device, pursuant to part 15
of the FCC Rules. These limits are designed to provide
reasonable protection against harmful interference in a
residential installation. This equipment generates, uses and
can radiate radio frequency energy and, if not installed and
used in accordance with the instructions, may cause harmful
interference to radio communications.
Indicator Meaning
Status-LED is green.
Rechargeable battery is inserted and
fully charged (standby mode)
Status-LED is flashing
green.
Rechargeable battery is inserted and
being charged.
Status-LED is flashing
yellow.
Temporary disruption of charging
(e. g. from excessively high
temperatures)
Status-LED is red.
Rechargeable battery is not inserted.
Status-LED flashing red.
Malfunction(see section 4.2.2 on
page 11)

Use
X-plore 8000 9
However, there is no guarantee that interference will not occur
in a particular installation. If this equipment does cause harmful
interference to radio or television reception, which can be
determined by turning the equipment off and on, the user is
encouraged to try to correct the interference by one or more of
the following measures:
Reorient or relocate the receiving antenna.
Increase the separation between the equipment and
receiver.
Connect the equipment into an outlet on a circuit different
from that to which the receiver is connected.
Consult the dealer or an experienced radio/TV technician
for help.
2.7 Symbol explanation and type identical
labels
2.7.1 Name plates
►Illustration of name plates on page 4
1 Product name
2 International Protection Code
3 Fulfilled standards
4 Symbol "Follow instructions for use"
5 WEEE symbol "Separate collection of electrical and
electronic equipment"
6 Country of production
7 Manufacturer
8 CE marking
9 DataMatrix code with part and serial number
10 Serial number
11 Product code
12 Only for indoor use, not for outdoor use
13 Maximum ambient temperature
14 Electrical data
15 Pin assignment
16 Recycling symbol
17 Warning notice
Information on year of manufacture
The year of manufacture results from the 3rd letter of the serial
number: F = 2014, G = omitted, H = 2015, I = omitted, J = 2016,
K = 2017 etc.
Example: Serial number ARFH-0054: The third letter is F, the
year of manufacture is therefore 2014.
2.7.2 Packaging
3Use
3.1 Preconditions for use
The ambient conditions (in particular type and
concentration of the contaminants) must be known.
The oxygen content of the ambient air must not drop below
the limit value of at least 19.5 vol.% oxygen.
Observe the national guidelines in other countries.
3.2 Preparations for use
Blower unit: Figure H
Rechargeable battery: Figure I
Standard battery charger:
Figure J
Follow the instructions for use
Maximum storage area humidity
Storage temperature range
WARNING
Fire hazard due to sparks or liquid metal splashes!
Always use powered air purifying respirators with a
particle or combination filter with additional prefilter
if sparks or liquid metal splashes may occur during
use.
Replace the prefilter at regular intervals; at least
once per shift, but in case of visible saturation at
the very latest.
Replace particle and combination filters as soon as
they are visibly saturated with dust even if the
residual capacity indicator of the powered air
purifying respirator indicates that the residual
capacity is still sufficient.
Avoid direct contact of sparks and liquid metal
splashes with the powered air purifying respirator:
Contact of a heavily saturated prefilter, particle or
combination filter with sparks or liquid metal
splashes can cause damage to the filter or ignite
the collected particles.
WARNING
Ambient air penetration!
Incorrect assembly of the components can impair the
device function.
For rechargeable battery, splash guard cover, and
chemical cartridge or combination filter ensure that:
Both connection points engage into the intended
sockets when inserted
The respective components do not get jammed
when they snap into place
≤95%
-20°C
+60°C
!
!

10 X-plore 8000
Use
Perform the following activities outside the danger zone:
1. Select components of the powered air purifying respi-
rator according to the required protection class and task
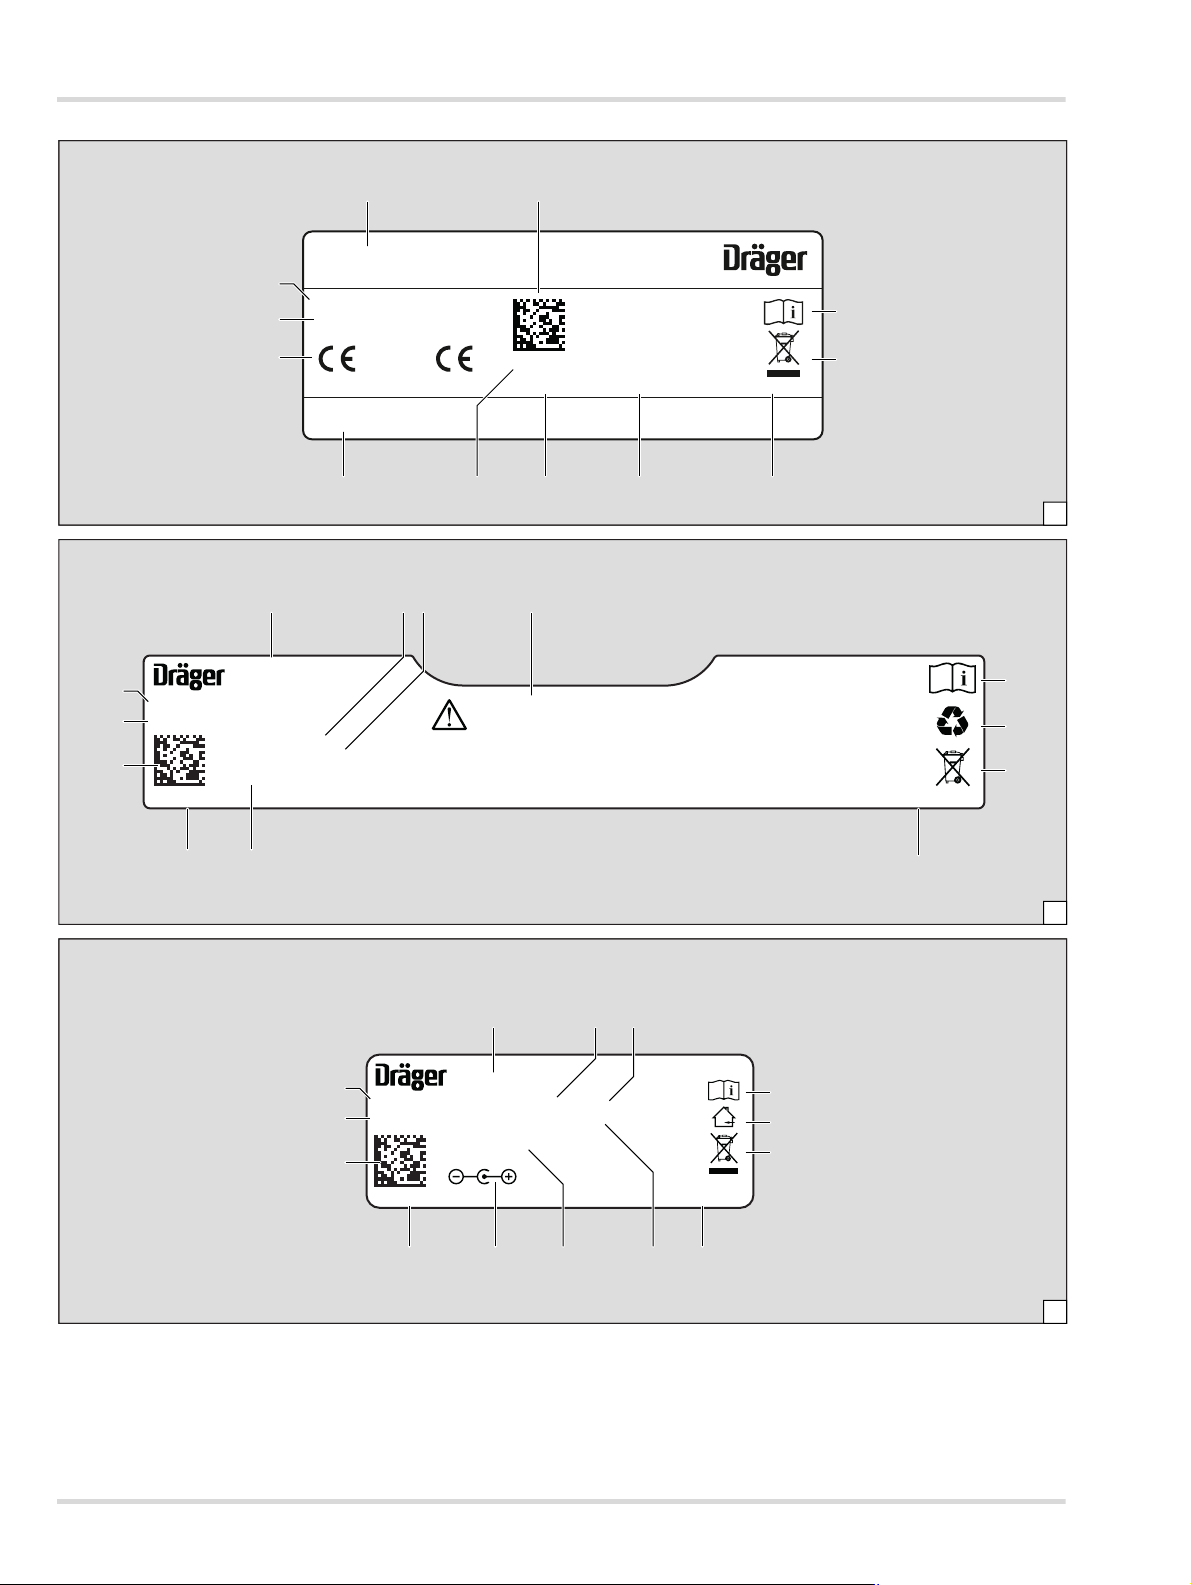
(see Approval Label on separate „Notes on approval“
sheet).
2. Visual inspection (see section 5.3.1 on page 12)
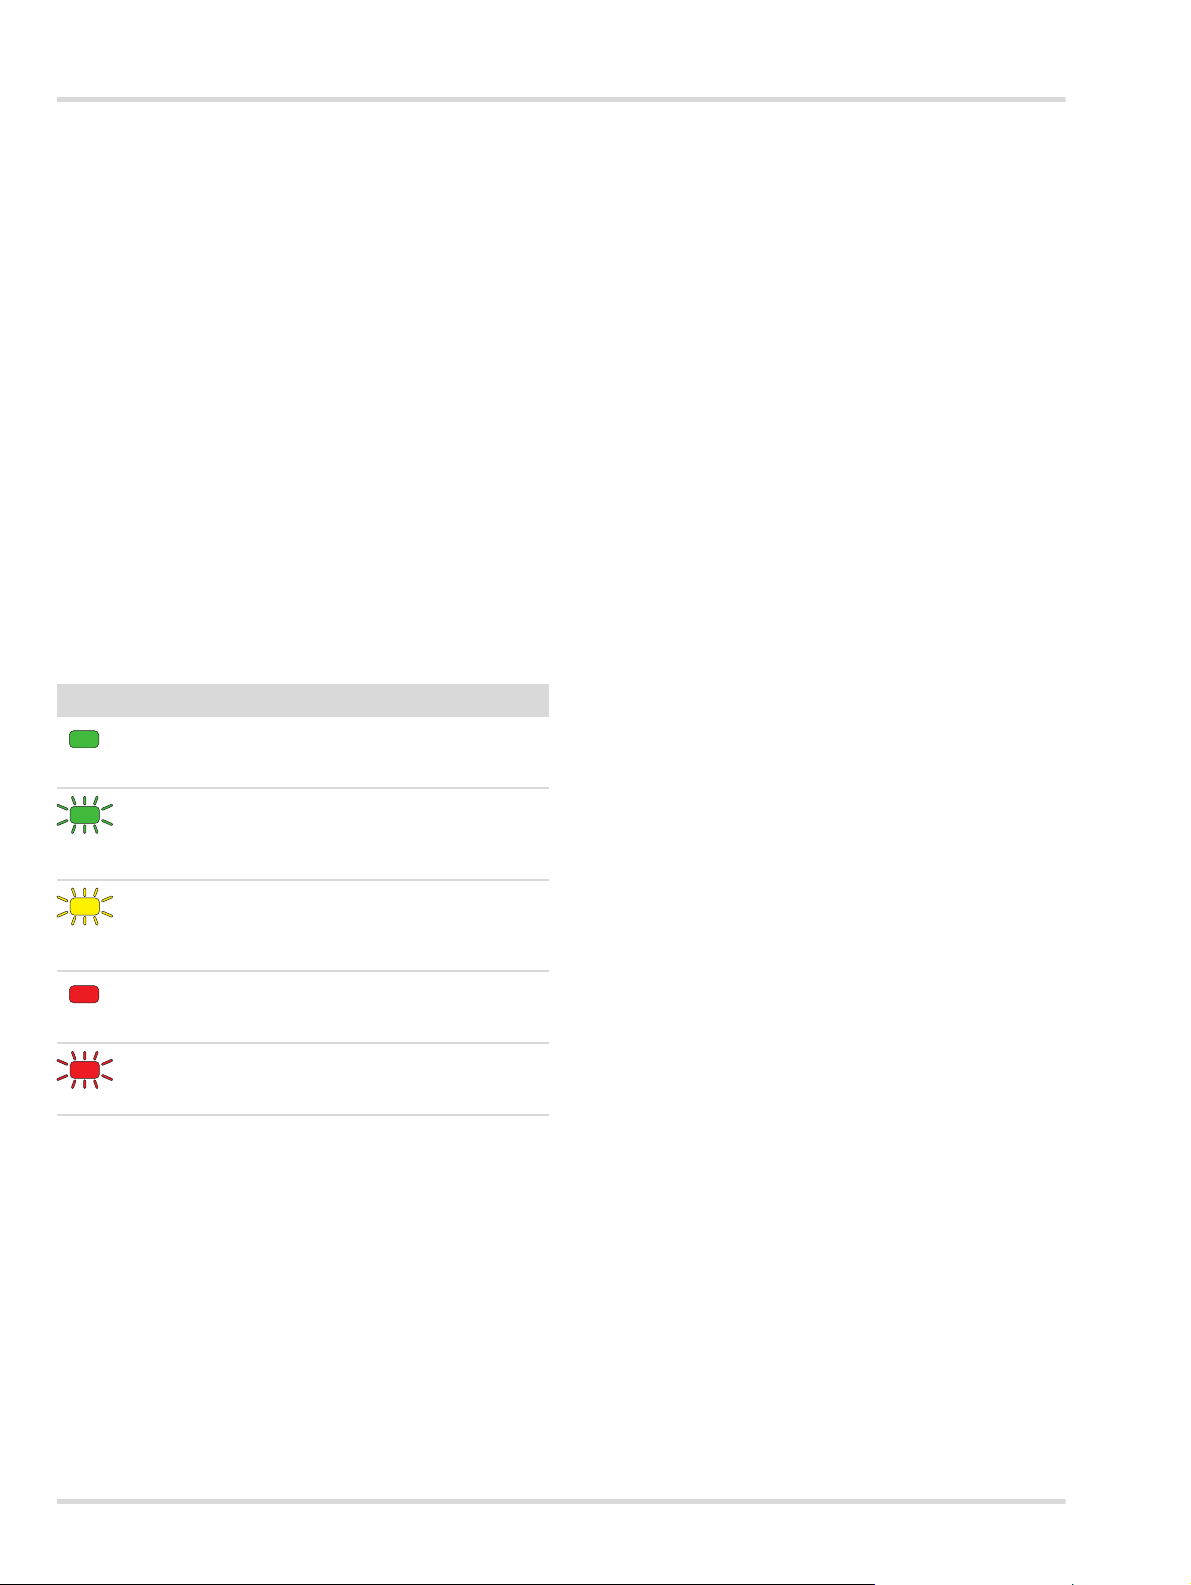
3. Checking the battery capacity:
a. Press the button to display the battery capacity on the
rechargeable battery.
b. Read the battery status indicator.
c. If the battery capacity is insufficient for the planned pe-
riod of service: Replace or charge rechargeable battery
(see section 5.3.2 on page 12).
4. Inserting the respiratory filter (see section 5.3.3 on page
13).
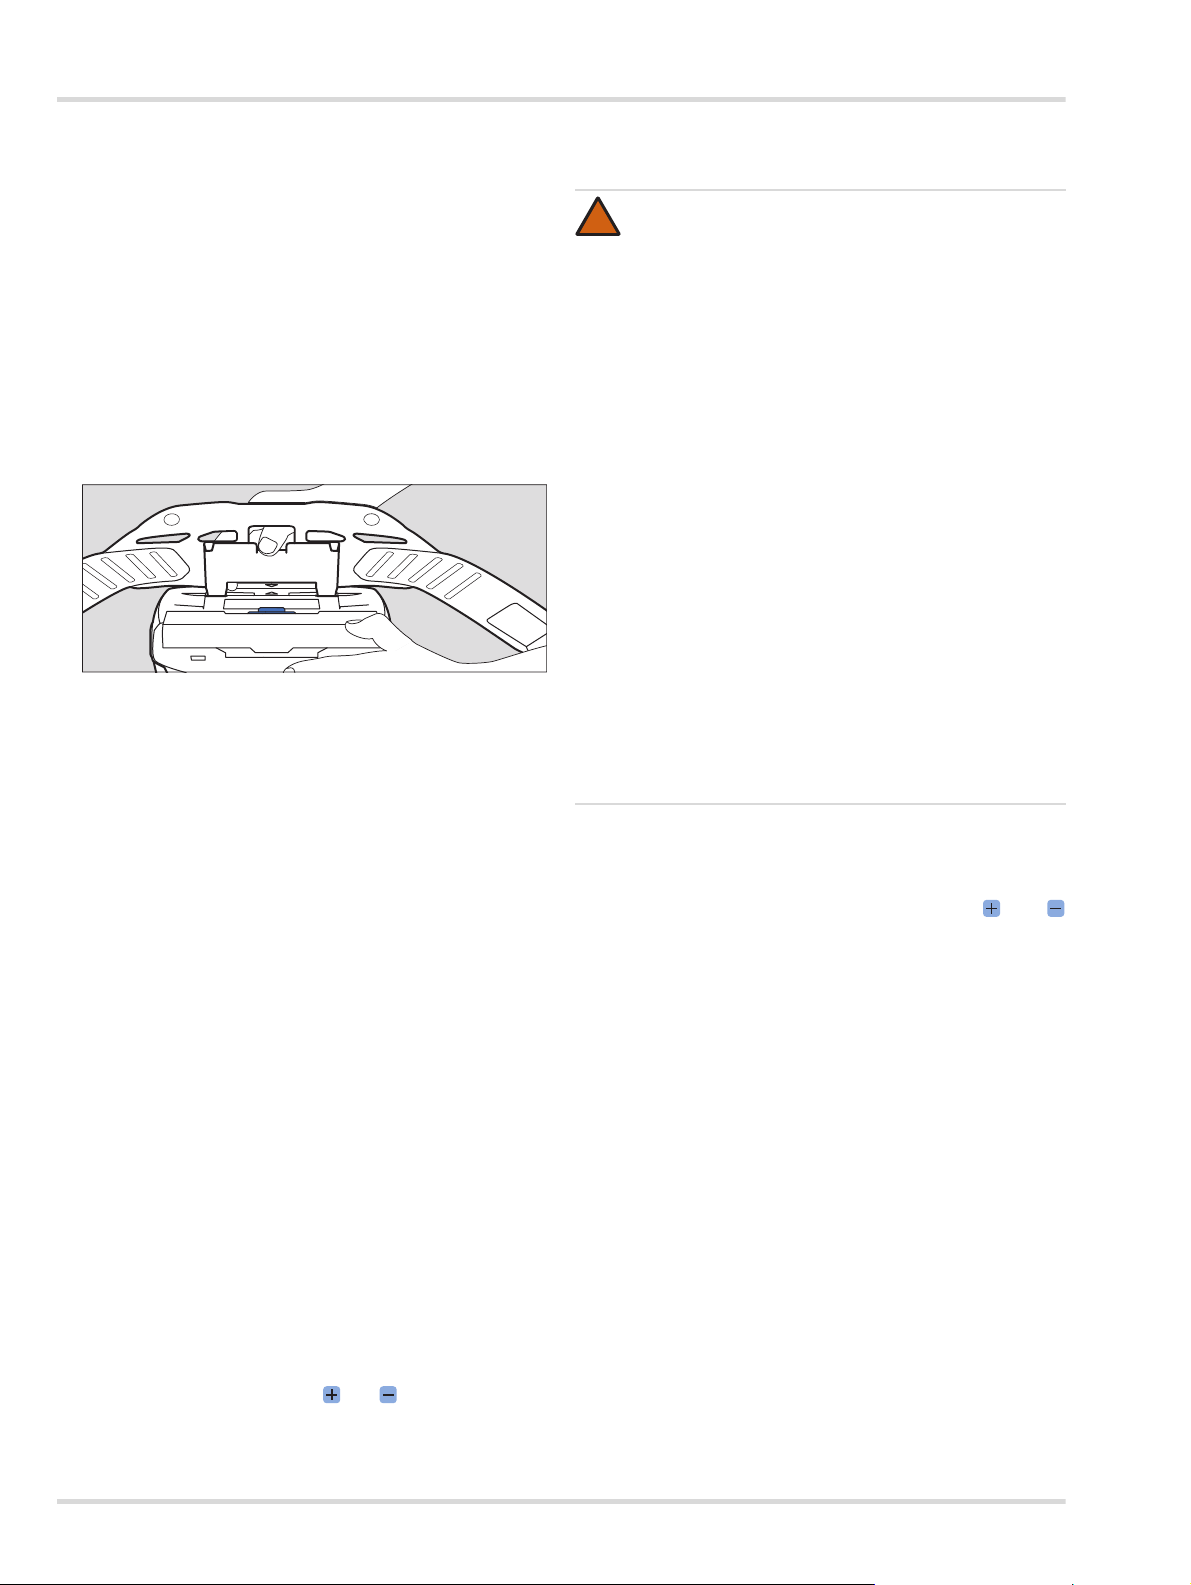
5. Assembling the carrying system:
a. Position both connection points of the connection plate
on the fan unit sockets.
Ensure that the arrows on the belt and the rear of the
fan unit go together.
b. Push down connection plate until it snaps audibly into
place.
6. Attach accessories if applicable:
Attach comfortable padding to the standard belt with the
press studs.
If needed, the belt extension is attached to the belt
buckle.
For any other accessories refer to the provided assembly
instructions.
7. Donning the device:
a. Adjust the carrying system belt to approximately the
correct circumference.
b. Put on belt and close buckle. The device is located on
the back of the user.
c. Tighten belt and fasten protruding ends with clips on
ends of the belt.
8. Connecting the respiratory inlet covering:
a. Connect the plug-in connector of the breathing hose to
the blower unit.
b. Connect the other end of the breathing hose to the re-
spiratory inlet covering.
9. Switching on the device:
Switch on the blower unit by pushing the button on the
control panel for approx. 2 seconds.
After switching on, the device performs a self-test. Cor-
rect malfunction if the device fails to work properly or
warning devices are triggered (see section 4 on page 11).
10. Don the respiratory inlet covering (see Instructions for
Use of the corresponding respiratory inlet covering).
11.
Adjust the flow rate
using the and buttons as desired.
3.3 During use
3.3.1 Adjusting the flow rate
If necessary (e. g. during increased physical exertion), the flow
rate must be adjusted during operation using the and
buttons.
3.3.2 Warnings and alarms
If a warning appears, leave the working area promptly in view
of the potentially hazardous situation.
Lower the flow rate to increase the period of service if a
warning appears. (Only possible if the lowest level has not
already been chosen.) By lowering the flow rate you can e.g.
extend the battery runtime.
If an alarm is triggered, leave the working area immediately
without any delay.
Check the function of the device after a warning or alarm has
been triggered (see section 4 on page 11).
3.4 After use
Do the following:
1. Leave the hazardous area.
2. Remove the respiratory inlet covering (see Instructions for
Use of the corresponding respiratory inlet covering).
04733412.eps
WARNING
Health hazard!
Leave the danger zone immediately in case of:
Decreasing or interrupted air supply (e.g. after
blower failure)
In the hood/helmet/protective visor respiratory inlet
covering type, carbon dioxide can quickly build up
or lack of oxygen may occur. Noxious ambient air
may also penetrate the hood.
Odour or taste developing in the respiratory inlet
covering (filter break). The residual capacity of the
chemical cartridge or the chemical cartridge
components of the combination filter are exhausted.
(replace respiratory filter see section 5.3.3 on page 13).
Drowsiness, dizziness, or other complaints
Damage to the equipment
Displayed alarms(see section 4 on page 11)
Breathing hoses or other components involve the risk
of getting caught. This may damage the device and
interrupt the air supply!
Handle the device with care.
Breathing in during heavy work while wearing the
hood/helmet/protective visor respiratory inlet covering
type may result in negative pressure and the
penetration of unfiltered ambient air!
Increase the flow rate to prevent this from happening.
!

Troubleshooting
X-plore 8000 11
3. Switch off the blower unit by pushing the button on the
control panel for approx. 2 seconds.
4. Open the carrying system belt and take off the device.
5. Clean and disinfect the device (see section 5.2 on page 11).
4 Troubleshooting
4.1 Warnings
4.2 Alarms
4.2.1 Blower unit
4.2.2 Standard battery charger
5 Maintenance
5.1 Maintenance intervals
5.2 Cleaning and disinfecting
Fault Cause Remedy
A segment of the
battery status
indicator is flashing
yellow.
The residual run-
time of the
rechargeable
battery is low
(< 30 minutes).
Recharge the
battery soon or
replace with fully
charged battery (see
section 5.3.2 on
page 12).
A segment of the
particulate filter
residual capacity
indicator is flashing
yellow.
The particulate filter
residual capacity is
low (< 20 %).
Change particulate
or combination filter
soon (see section
5.3.3 on page 13).
A segment of the
flow rate indicator is
flashing yellow.
Malfunction during
switch-on (e. g.
caused by missing
hose or respiratory
filter).
Verify device
function and prepare
again for use (see
section 3.2 on page
9).
Fault Cause Remedy
A segment of the
battery status
indicator is flashing
red.
The residual run-
time of the
rechargeable
battery is almost
exhausted
(< 10 minutes).
Recharge the
battery or replace
with fully charged
battery (see section
5.3.2 on page 12).
A segment of the
particulate filter
residual capacity
indicator is flashing
red.
The particulate filter
residual capacity is
almost exhausted
(< 10 %).
Change particulate
or combination filter
(see section 5.3.3 on
page 13).
A segment of the
flow rate indicator is
flashing red.
Faulty breathing air
supply during
operation (e. g.
caused by missing
hose, respiratory
filter or kinked hose).
Verify device
function and prepare
again for use (see
section 3.2 on page
9).
One segment at a
time is flashing red.
General system
error
Device must be
checked by Dräger
Service.
Fault Cause Remedy
Status-LED flashing
red.
General error or
defect
Return rechargeable
battery to charger.
If the malfunction
occurs repeatedly
have Dräger Service
check battery and
charger.
Work to do
Annually
Every 2 years
Clean and disinfect the device X1
1 for gas-tight packed devices, otherwise every 6 months
Visual inspection X1)
Replacing the O-ring at plug-in or bayonet-type
hose connector
X
CAUTION
Potential damage to components!
Do not use any solvents (e.g. acetone, alcohol) or
cleaning agents containing abrasive particles for
cleaning and disinfecting. Only use the methods and
the approved cleaning and disinfecting agents
described in this section. Other methods or agents can
cause damage to the components.
Health hazard!
Undiluted agents that come into direct contact with
eyes or skin are hazardous to health. Always wear
suitable protective equipment when working with the
cleaning and disinfecting agents described in this
section.
!

12 X-plore 8000
Maintenance
5.2.1 Cleaning and disinfecting procedure for the USA
only
1. Dismantling the device:
a. Separate breathing hose, respiratory inlet covering and
blower unit from each other.
b. Disconnect the carrying system from the blower unit.
c. If available, dismantle any accessories (e.g. hose and
device sleeves).
d. Dismantle splash guard cover and respiratory filter (see
section 5.3.3 on page 13).
2. Clean the respiratory inlet covering according to the
corresponding Instructions for Use.
3. Cleaning the breathing hose and carrying system:
a. Clean all parts with lukewarm water and 1008 GREEN
LIQUID HAND DISH WASH using a soft cloth.
b. Thoroughly rinse all parts under running water.
c. Prepare a disinfectant bath
containing water and 800
SPUR-TEX Disinfectant (max. temperature: 86 °F/
30 °C, concentration: 2 fl.oz. per 1 gallon/60 ml per
3.79 l)
.
d. Place the parts to be disinfected into the disinfectant
bath (duration: 15 minutes).
e. Thoroughly rinse all parts under running water.
f. Dry all parts in the air or in a drying cabinet (max. tem-
perature: 140 °F/60 °C). Do not expose to direct sun-
light.
4. Clean and disinfect blower unit and splash guard cover
using disinfectant cloths (alcohol based).
In cases of strong contamination, the blower unit can be rinsed
under running water as follows:
1. Make sure the rechargeable battery remains inserted. Wa-
ter must not enter the battery compartment.
2. Close suction inlet and tube connection with protective
caps (available as accessories).
5.2.2 Cleaning and disinfecting procedure for other
countries
1. Dismantling the device:
a. Separate breathing hose, respiratory inlet covering and
blower unit from each other.
b. Disconnect the carrying system from the blower unit.
c. If available, dismantle any accessories (e.g. hose and
device sleeves).
d. Dismantle splash guard cover and respiratory filter (see
section 5.3.3 on page 13).
2. Clean the respiratory inlet covering according to the
corresponding Instructions for Use.
3. Cleaning the breathing hose and carrying system:
a. Prepare a cleaning solution containing water and NEU-
TRAL DISINFECTANT CLEANER (max. temperature
86 °F/30 °C, concentration: 1 fl. oz. per 2 gallons/30 ml
per 7.57 l).
b. Immerse the breathing hose and carrying system in the
solution (duration: 10 minutes). Make sure that all parts
are wetted.
c. Thoroughly rinse all parts under running water.
d. Dry all parts in the air or in a drying cabinet (max. tem-
perature: 140 °F /60 °C). Do not expose to direct sun-
light.
4. Clean and disinfect blower unit and splash guard cover
using disinfectant cloths.
In cases of strong contamination, the blower unit can be rinsed
under running water as follows:
1. Make sure the rechargeable battery remains inserted. Wa-
ter must not enter the battery compartment.
2. Close suction inlet and tube connection with protective
caps (available as accessories).
5.3 Maintenance work
5.3.1 Visual inspection
Check all parts thoroughly and replace damaged parts if
necessary. Check particularly the respiratory filter sealing
surface and O-rings of the blower unit for damage (e. g.
scratches) or contamination.
5.3.2 Replacing or charging the rechargeable battery
Removing the rechargeable battery:
1. Fold up carrying system if necessary.
2. Push battery lock button. Ensure that the rechargeable
battery does not fall down.
3. Remove rechargeable battery.
Inserting the rechargeable battery:
1. Fold up carrying system if necessary.
2. Position the two lower connection points of the
rechargeable battery at an angle in the battery
compartment sockets.
3. Fold the rechargeable battery in until it snaps audibly into
place.
NOTICE
Since the use of certain cleaning and disinfecting
agents is not allowed among all countries, Dräger
tested and recommends several cleaning and
disinfecting agents. However, Dräger makes no
representations that such agents comply with or are
approved for use in your specific country's regulations.
Make sure to follow the procedure that is suitable for
your country.
For further information please contact Dräger or your
local dealer.
i
i
CAUTION
A short circuit could damage the rechargeable battery!
Make sure that the battery terminals do not come into
contact with metal during storage.
!

Maintenance
X-plore 8000 13
Charging the battery:
1. Check to make sure that voltage of mains supply is correct.
The operational voltage of the power supply unit must
match the mains supply voltage.
2. Connect charger to power supply unit.
3. Connect the power supply unit to the mains supply.
4. First position the rechargeable battery at an angle in the
charger and then fold it in until it snaps audibly into place.
5. Wait for the end of the charging process.
6. When the rechargeable battery is fully charged, push the
battery lock button and remove the battery.
7. Disconnect the power supply unit and charger from the
mains supply.
5.3.3 Replacing the respiratory filter
Particulate filter
Removing the respiratory filter:
1. Push respiratory filter lock button.
2. Fold out splash guard cover with respiratory filter (Figure
A).
3. Remove used respiratory filter (Figure B).
Inserting the respiratory filter:
1. Check rubber seal on respiratory filter for damage.
2. Insert new respiratory filter into splash guard cover so that
the respiratory filter is firmly seated in the splash guard
cover.
3. Hook the two lower connection points of the splash guard
cover at an angle into the fan unit sockets.
4. Fold splash guard cover in until it audibly snaps into place
at the filter lock button.
Chemical cartridge or combination filter
Removing the respiratory filter:
1. Push respiratory filter lock button.
2. Fold out respiratory filter with splash guard cover (Figure
A).
3. Dismantling the splash guard cover:
a. Press on the centre of the upper splash guard cover
edge until it snaps out.
b. Fold out splash guard cover (Figure B).
Inserting the respiratory filter:
1. Check rubber seal on respiratory filter for damage.
2. Place splash guard cover with its lower edge at an angle on
the respiratory filter.
3. Push on splash guard cover until it snaps audibly into place.
4. Hook the two lower connection points of the respiratory
filter at an angle into the fan unit sockets.
5. Fold respiratory filter in until it audibly snaps into place at
the filter lock button.
5.3.4 Check the flow rate and warning devices
1. Make sure that a respiratory filter is inserted (see section
5.3.3 on page 13).
2. Connect the plug-in connector of the breathing hose to the
blower unit.
3. Switch on the blower unit by pushing the button on the
control panel.
After switching on, the device performs a self-test. Correct
malfunction if the device fails to work properly or warning
devices are triggered (see section 4 on page 11).
4. Cover open end of the breathing hose with hand.
The blower unit starts to run faster after approx. 5 seconds.
After approx. 20 seconds an alarm is triggered.
Have the blower unit checked if the blower speed remains
unchanged and no alarm is triggered.
5. If you wish, you can switch off the blower unit by pushing
the button on the control panel again.
5.3.5 Replacing the O-ring at plug-in or bayonet-type
hose connector
1. Use the O-ring removal tool to lift the old O-ring out of the
groove.
2. Insert new O-ring in the provided groove.
NOTICE
Always disconnect the charger from the power supply
if not in use.
WARNING
No protection without respiratory filter!
Do not use the device without respiratory filter.
CAUTION
Damage to blower unit due to penetration of particles!
Make sure when you remove the respiratory filter that
no particles enter the device through the suction inlet.
NOTICE
The respiratory filter changing process may differ
depending on the respiratory filter type used.
i
i
!
!
i
i
02633412.eps
A
02733412.eps
B
B
02933412.eps
02833412.eps
A

14 X-plore 8000
Transport
6 Transport
Transport in the original packaging or in optionally available
transport box.
7 Storage
Storing the whole system:
Remove respiratory filter and rechargeable battery.
Store the components in a container or cabinet dry and
clean and protect them from direct sunlight and thermal
radiation.
Storing rechargeable batteries:
Deeply discharged batteries may get damaged after prolonged
storage. Charge them to 50 to 70 % prior to storage.
If storage lasts for over 6 months, charge them in the
meantime.
Do not store rechargeable batteries for prolonged periods
outside the recommended temperature range. This might
reduce the remaining capacity and number of potential
charge cycles.
8 Disposal
Dispose of the device according to local waste disposal
regulations.
9 Technical data
9.1 Overall system
9.2 Rechargeable batteries
9.3 Standard battery charger
Flow rate of respiratory protective
device/helmet/visor
170/190/210 l/min
Flow rate of full facepiece 115/130/145 l/min
Rated period of service 4 hours
with standard
rechargeable battery
8 hours
with long-life
rechargeable battery
Operating temperature114 °F to 140 °F (-10 °C
to 60 °C)
Working and storage humidity 1) ≤95 % relative humidity
Storage temperature 1) -4 °F to 140 °F (-20 °C to
60 °C)
Noise approx. 64 dB(A)
International Protection Code IP 65
RFID
Technology Induction transfer
Frequency range 13553 to 13567 kHz
Broadcast transmission capacity -2,30 dBµA/m (10 m)
Bluetooth
Technology FHSS 2.4 GHz
(BT 2.1 + EDR)
Frequency range 2402.0 to 2483.5 MHz
Broadcast transmission capacity 0,97 mW / -0.14 dBm
EIRP
1 For the battery charger and rechargeable batteries, refer to the
separate information provided in this chapter.
For other components, refer to the corresponding Instructions for
Use.
Operating temperature 14 °F to 131 °F (-10 °C to
55 °C)
Operating/storage area humidity ≤95 % relative humidity
Storage temperature -4 °F to 122 °F (-20 °C to
50 °C)
Charging temperature 32 °F to 122 °F (0 °C to
50 °C)
Standard rechargeable battery
Charging time < 4 hours
Operational life time after a full
charge approx. 4 hours1)
Rated voltage 10,8 V
Rated capacity 3,35 Ah
Stored energy 36 Wh
Long-life rechargeable battery
Charging time < 4 hours
Operational life time after a full
charge approx. 8 hours1
1 Varies depending on the preset flow rate and the employed respi-
ratory filter and respiratory inlet covering type
Rated voltage 10,8 V
Rated capacity 6,70 Ah
Stored energy 72 Wh
Input voltage 15 V
Input current 4 A
Output voltage 9 - 12,6 V
Output current 4 A
International Protection Code IP 30
Operating temperature 32 °F to 122 °F (0 °C to
50 °C)

Component list
X-plore 8000 15
10 Component list
Operating/storage area humidity ≤95 % relative humidity
Storage temperature -4 °F to 122 °F (-20 °C to
50 °C)
Name and description Order no.
Components
1 Dräger X-plore 8500 (IP) Blower unit R59500
2 Dräger X-plore 8000 Standard rechargeable
battery
R59565
3 Dräger X-plore 8000 High capacity
rechargeable battery
R59585
4 Dräger X-plore 8000 Odour filter 6739605
5 Dräger X-plore 8000 Odour filter, set 6739735
6 Dräger X-plore 8000 Filter HE 6739540
7 Dräger X-plore 8000 Filter OV 6739575
8 Dräger X-plore 8000 Filter CL/HF/AM/MA/FM/
HS/SD/HC
6739590
9 Dräger X-plore 8000 Filter OV/HE 6739560
10 Dräger X-plore 8000 Filter OV/AG/HE 6739565
11 Dräger X-plore 8000 Filter CL/HF/AM/MA/FM/
HS/SD/HC/HE
6739570
12 Dräger X-plore 8000 Prefilter 6739730
13 Dräger X-plore 8000 Standard hood, short
(S/M)
R59800
14 Dräger X-plore 8000 Standard hood, short
(L/XL)
R59810
15 Dräger X-plore 8000 Standard hood, long
(S/M)
R59820
16 Dräger X-plore 8000 Standard hood, long
(L/XL)
R59830
17 Dräger X-plore 8000 Premium hood, short
(S/M)
R59840
18 Dräger X-plore 8000 Premium hood, short
(L/XL)
R59850
19 Dräger X-plore 8000 Premium hood, long
(S/M)
R59860
20 Dräger X-plore 8000 Premium hood, long
(L/XL)
R59870
21 Dräger X-plore 8000 Helmet with visor, black R58325
22 Dräger X-plore 8000 Helmet with visor, white R59910
23 Dräger X-plore 8000 Protective visor R59900
24 Dräger X-plore 8000 Welding visor with ADF
5-13
R59940
25 Dräger X-plore 6300 EPDM/PMMA R55800
26 Dräger X-plore 6530 EPDM/PC R55795
27 Dräger X-plore 6570 SI/PC R55790
28 Dräger FPS 7000 EPDM-S1-PC-CR R56502
29 Dräger FPS 7000 EPDM-M2-PC-CR R56310
30 Dräger FPS 7000 EPDM-L2-PC-CR R56503
31 Dräger X-plore 8000 Standard hose
(for tight fitting headpieces)
R59630
32 Dräger X-plore 8000 Standard hose
(for hoods)
R59620
33 Dräger X-plore 8000 Standard hose
(for helmets and visors)
R59640
34 Dräger X-plore 8000 Flexible hose
(for tight fitting headpieces)
R59610
35 Dräger X-plore 8000 Flexible hose
(for hoods)
R59600
36 Dräger X-plore 8000 Flexible hose
(for helmets and protective visors)
R59650
37 Dräger X-plore 8000 Standard belt R59700
38 Dräger X-plore 8000 Decon belt R59710
39 Dräger X-plore 8000 Welding belt R59720
40 Dräger X-plore 8000 Standard charger R59580
Accessories
41 Dräger X-plore 8000 Comfortable padding R59730
42 Belt extension for X-plore 8000 Standard belt,
35 cm
R59750
43 Belt extension for X-plore 8000 Decon belt, 35
cm
R59760
44 Dräger X-plore 8000 Shoulder carrying
system, all belts
R59740
45 Dräger X-plore 8000 Hose cover, disposable R59670
46 Dräger X-plore 8000 Hose cover, spark
protection
R59660
47 Dräger X-plore 8000 Plug (for blower unit tube
connection)
R59563
48 Dräger X-plore 8000 Plug (for blower unit
suction inlet)
R59564
49 Dräger X-plore 8000 Flow measurement tube R59566
Name and description Order no.

16 X-plore 8000
Table des matières
1 Pour votre sécurité . . . . . . . . . . . . . . . . . . . . . . . .17
1.1 Consignes générales de sécurité . . . . . . . . . . . . . .17
1.2 Définition des symboles d'avertissement . . . . . . . . 17
2 Description. . . . . . . . . . . . . . . . . . . . . . . . . . . . . . . 17
2.1 Aperçu du système . . . . . . . . . . . . . . . . . . . . . . . . .17
2.2 Composants . . . . . . . . . . . . . . . . . . . . . . . . . . . . . . 17
2.2.1 Unité de ventilation . . . . . . . . . . . . . . . . . . . . . . . . . 17
2.2.2 Filtres respiratoires et pièces faciales . . . . . . . . . . . 18
2.2.3 Tuyaux respiratoires . . . . . . . . . . . . . . . . . . . . . . . . 18
2.2.4 Systèmes de transport . . . . . . . . . . . . . . . . . . . . . . 18
2.2.5 Batteries rechargeables . . . . . . . . . . . . . . . . . . . . .18
2.2.6 Chargeur standard . . . . . . . . . . . . . . . . . . . . . . . . .19
2.3 Description du fonctionnement . . . . . . . . . . . . . . . .19
2.4 Domaine d'utilisation . . . . . . . . . . . . . . . . . . . . . . . .19
2.5 Limites d'utilisation . . . . . . . . . . . . . . . . . . . . . . . . . 19
2.5.1 Mises en garde et limites d'ordre général . . . . . . . .19
2.5.2 pour des concentrations de substances nocives, qui
représentent un danger immédiat pour la vie et la san-
té – aussi appelées concentrations IDLH (Immediately
Dangerous to Life and Health)Mises en garde et li-
mites NIOSH . . . . . . . . . . . . . . . . . . . . . . . . . . . . . . 19
2.6 Autorisations . . . . . . . . . . . . . . . . . . . . . . . . . . . . . . 19
2.7 Explication des marquages d'identification et des
symboles . . . . . . . . . . . . . . . . . . . . . . . . . . . . . . . .20
2.7.1 Plaques signalétiques . . . . . . . . . . . . . . . . . . . . . . . 20
2.7.2 Emballage . . . . . . . . . . . . . . . . . . . . . . . . . . . . . . . . 20
3 Utilisation . . . . . . . . . . . . . . . . . . . . . . . . . . . . . . . . 20
3.1 Conditions relatives à l'utilisation . . . . . . . . . . . . . . 20
3.2 Opérations préalables à l'utilisation . . . . . . . . . . . .21
3.3 Pendant l'utilisation . . . . . . . . . . . . . . . . . . . . . . . . . 21
3.3.1 Régulation a posteriori du débit volumétrique . . . .22
3.3.2 Avertissements et alarmes . . . . . . . . . . . . . . . . . . . 22
3.4 Après l'utilisation . . . . . . . . . . . . . . . . . . . . . . . . . . .22
4 Élimination des pannes . . . . . . . . . . . . . . . . . . . . 22
4.1 Avertissements . . . . . . . . . . . . . . . . . . . . . . . . . . . . 22
4.2 Alarmes . . . . . . . . . . . . . . . . . . . . . . . . . . . . . . . . . 22
4.2.1 Unité de ventilation . . . . . . . . . . . . . . . . . . . . . . . . . 22
4.2.2 Chargeur standard . . . . . . . . . . . . . . . . . . . . . . . . .23
5 Maintenance. . . . . . . . . . . . . . . . . . . . . . . . . . . . . .23
5.1 Intervalles de maintenance . . . . . . . . . . . . . . . . . . . 23
5.2 Nettoyage et désinfection . . . . . . . . . . . . . . . . . . . . 23
5.2.1 Procédure de nettoyage et de désinfection pour les
États-Unis uniquement . . . . . . . . . . . . . . . . . . . . . . 23
5.2.2 Procédure de nettoyage et de désinfection pour les
autres pays . . . . . . . . . . . . . . . . . . . . . . . . . . . . . . . 23
5.3 Travaux de maintenance . . . . . . . . . . . . . . . . . . . . 24
5.3.1 Réaliser le contrôle visuel . . . . . . . . . . . . . . . . . . . .24
5.3.2 Remplacer ou charger la batterie rechargeable . . .24
5.3.3 Remplacer le filtre respiratoire . . . . . . . . . . . . . . . .24
5.3.4 Contrôle du débit volumétrique et des dispositifs
d'avertissement . . . . . . . . . . . . . . . . . . . . . . . . . . . . 25
5.3.5 Remplacer le joint torique sur le raccord à encliqueter
ou le raccord à baïonnette des tuyaux . . . . . . . . . .25
6 Transport . . . . . . . . . . . . . . . . . . . . . . . . . . . . . . . .25
7 Stockage. . . . . . . . . . . . . . . . . . . . . . . . . . . . . . . . .25
8 Collecte et traitement des déchets . . . . . . . . . . .26
9 Caractéristiques techniques. . . . . . . . . . . . . . . . .26
9.1 Ensemble du système . . . . . . . . . . . . . . . . . . . . . .26
9.2 Batteries rechargeables . . . . . . . . . . . . . . . . . . . . .26
9.3 Chargeur standard . . . . . . . . . . . . . . . . . . . . . . . . .26
10 Liste de composants . . . . . . . . . . . . . . . . . . . . . . .27
Table des matières

Pour votre sécurité
X-plore 8000 17
1 Pour votre sécurité
1.1 Consignes générales de sécurité
Avant d'utiliser le produit, veuillez lire attentivement la
notice d'utilisation et celle des composants associés.
Respecter rigoureusement la notice d'utilisation.
L'utilisateur doit comprendre entièrement les instructions et
les suivre scrupuleusement. Respecter rigoureusement le
domaine d'utilisation indiqué.
Ne pas jeter la notice d'utilisation. Veillez à ce que les
utilisateurs conservent et utilisent ce produit de manière
adéquate.
Seul un personnel compétent et muni d'une formation
complète est autorisé à utiliser ce produit.
Se conformer à toutes les réglementations locales et
nationales en vigueur associées à ce produit.
Seul le personnel compétent et muni de la formation
adéquate est autorisé à contrôler, réparer et entretenir le
produit.
N'utiliser que des pièces et des accessoires Dräger
d'origine. Sans quoi, le fonctionnement correct du produit
pourrait être compromis.
Ne pas utiliser de produits défectueux ou incomplets. Ne
pas effectuer de modifications sur le produit.
Informer Dräger en cas de défaut ou de panne sur le
produit ou des composants du produit.
1.2 Définition des symboles d'avertissement
Les symboles d'avertissement suivants ont pour fonction de
caractériser et souligner les textes d'avertissement qui
requièrent l'attention accrue de l'utilisateur. Les symboles
d'avertissement sont définis comme suit :
2 Description
2.1 Aperçu du système
Le système filtrant à ventilation assistée Dräger X-
plore®80001peut être composé de différents éléments en
fonction du domaine d'utilisation et de la classe de protection
nécessaire. Respecter ici en particulier les limites d'utilisation
des filtres respiratoires (voir la notice d'utilisation des filtres
respiratoires).
►Représentation de l'aperçu du système sur la page
dépliante (figure A)
Un appareil complet comporte les éléments suivants :
1 Tuyau respiratoire
2 Pièce faciale (celle de l'exemple est dotée d'une cagoule)
3 Système de transport
4 Unité de ventilation avec filtre respiratoire et batterie
rechargeable
2.2 Composants
2.2.1 Unité de ventilation
►Représentation du panneau avant sur la page dépliante
(figure B)
1 Raccord de tuyau
2 Panneau de commande
3 Ouverture d'aspiration
4 Couvercle de protection contre les projections
5 Filtre respiratoire (non livré avec l'unité de ventilation)
6 Touche de verrouillage du filtre respiratoire
►Représentation du panneau arrière sur la page dépliante
(figure C)
1 Logement du système de transport
2 Plaque signalétique
3 Touche de verrouillage du système de transport
4 Touche de verrouillage de la batterie
5 Batterie rechargeable (non livrée avec l'unité de
ventilation)
AVERTISSEMENT
Signale une situation potentiellement dangereuse qui,
si elle n'est pas évitée, peut constituer un danger de
mort ou d'accident grave.
ATTENTION
Signale une situation potentiellement dangereuse qui,
si elle n'est pas évitée, peut constituer des dommages
physiques ou matériels pour le produit ou
l'environnement. Peut également servir
d'avertissement en cas d'utilisation non conforme.
REMARQUE
Informations complémentaires sur l'utilisation du produit.
!
!
i
i
1 X-plore®est une marque déposée de Dräger.
REMARQUE
Pour un aperçu des combinaisons des appareils et de
la classe de protection correspondante, voir l'étiquette
d'homologation sur la feuille séparée intitulée
« Remarques concernant les homologations ».
Les composants énumérés sont conçus ici pour une
utilisation avec l'unité de ventilation X-plore 8500 et les
batteries rechargeables.
En cas de questions à propos de la configuration de
l'appareil, contacter Dräger.
i
i

18 X-plore 8000
Description
Panneau de commande
►Représentation sur la page dépliante (figure D)
1 Affichage de l'état de charge de la batterie rechargeable
2 Affichage de la capacité restante du filtre à particules
3 Touche marche/arrêt
4 Affichage du débit volumétrique
5 Diminuer le débit volumétrique
6 Augmenter le débit volumétrique
Affichages sur le panneau de commande
Dispositifs d'avertissement
L'unité de ventilation affiche les défauts à l'aide de segments
clignotants jaunes ou rouges (voir la section 4 à la page 22).
De plus, l'unité de ventilation déclenche des signaux
acoustiques et une alarme vibratoire.
2.2.2 Filtres respiratoires et pièces faciales
Les filtres respiratoires et pièces faciales sont décrits dans les
notices d'utilisation séparées.
Les types de pièces faciales masque complet et cagoule/
casque/visière de protection ont différents domaines de débits
volumétriques (voir la section 9.1 à la page 26). L'unité de
ventilation reconnaît le type de pièce faciale et sélectionne
automatiquement la plage correcte du débit volumétrique.
2.2.3 Tuyaux respiratoires
Les tuyaux respiratoires suivants sont disponibles :
Tuyau standard
Tuyau flexible pour un confort accru
Les tuyaux respiratoires sont disponibles pour les types
suivants de pièce faciale :
Raccord à encliqueter (cagoule)
Raccord à baïonnette (casque et visière de protection)
Raccord fileté rond (pièce faciale complète)
2.2.4 Systèmes de transport
►Représentation sur la page dépliante (figure E)
1 Plaque de liaison
2 Sangle
3 Attaches du ceinturon
4 Boucle
Les systèmes de transport suivants sont disponibles :
Ceinturon standard
Le ceinturon standard comporte une sangle textile et des
boutons à pression pour fixer une mousse de confort
optionnelle.
Ceinturon décontaminable :
Le ceinturon décontaminable comporte une sangle en
plastique lisse et convient spécialement à la
décontamination.
Ceinture de soudure :
La sangle de la ceinture de soudure est en cuir. La ceinture
de soudure est conçue pour des applications de soudure.
2.2.5 Batteries rechargeables
►Représentation sur la page dépliante (figure F)
1 Touche de verrouillage de la batterie
2 Affichage de l'état de charge
3 Touche pour afficher l'état de charge
4 Plaque signalétique
Les batteries rechargeables Li-ion sont spécialement prévues
pour une utilisation avec le système filtrant à ventilation
assistée. En plus de la batterie rechargeable standard, une
batterie rechargeable longue durée avec une durée de
fonctionnement supérieure est également disponible.
L'affichage de l'état de charge indique l'état de charge pendant
la charge avec le chargeur standard ; il est également obtenu
en appuyant sur la touche. Pendant la charge, les segments
de l'affichage de l'état de charge clignotent.
L'affichage de l'état de charge correspond à celui qui se trouve
sur le panneau de commande de l'unité de ventilation (voir la
section 2.2.1 à la page 17).
Affichage Signification
Les segments sont
allumés en vert.
État de charge selon le nombre des
segments affichés :
> 75 % (4 segments)
> 50 % (3 segments)
> 25 % (2 segments)
< 25 % (1 segment)
Les segments sont
allumés en vert.
Capacité restante du filtre à particules 1
selon le nombre des segments affichés :
> 75 % (4 segments)
> 50 % (3 segments)
> 25 % (2 segments)
< 25 % (1 segment)
1 La capacité restante de la cartouche à produits chimiques ou des
éléments de la cartouche à produits chimiques du filtre combiné
ne peut être affichée.
Les segments sont
allumés en vert.
Intensité du débit volumétrique selon le
nombre des segments affichés :
Débit volumétrique élevé (3 segments)
Débit volumétrique moyen (2 segments)
Débit volumétrique faible (1 segment)
Les segments
clignotent en jaune
ou en rouge.
Défaut (voir la section 4 à la page 22)
REMARQUE
Selon l'épaisseur et le matériau du vêtement, l'alarme
vibratoire peut ne pas être perçue.
i
i

Description
X-plore 8000 19
Les batteries rechargeables ne disposent de leur pleine
capacité qu'après 5 cycles de charge et de décharge. La durée
de charge normale est de 3 heures env.
Lorsque la batterie est complètement déchargée, le
chargement peut prendre jusqu'à 4 heures de plus. Au cours
de cette période, l'affichage de l'état de charge n'est pas actif.
Afin d'empêcher tout dommage ou explosion de la batterie
rechargeable, le chargement est limité est à une plage de
températures limites située entre 32 et 122 °F (0 et 50 °C). Si
la température de charge se trouve au-dessus ou en dessous
de la plage de températures limites, le chargement prendra fin
automatiquement et reprendra une fois que la température
reviendra dans la plage de températures limites.
2.2.6 Chargeur standard
►Représentation sur la page dépliante (figure G)
1 LED de statut
2 Bloc d'alimentation
3 Logement de la batterie
Signification de la LED de statut
Lorsque la batterie rechargeable est entièrement chargée, le
chargeur commute automatiquement en mode veille. En mode
veille, la batterie rechargeable reste toujours chargée
complètement. Dans ce mode, la batterie rechargeable n'est ni
surchargée ni endommagée.
2.3 Description du fonctionnement
Le système filtrant à ventilation assistée est un appareil de
protection respiratoire dépendant de l'air environnant. Il filtre
l'air ambiant et vous met ainsi à disposition de l'air respirable.
Pour cela, l'appareil aspire en permanence l'air ambiant à
travers le filtre respiratoire. En fonction du type de filtre
respiratoire, les substances nocives sont retenues dans le filtre
respiratoire. De cette manière, l'air ambiant est retraité et
parvient ensuite à la pièce faciale. Il est alors disponible
comme air respiratoire.
Une surpression continue dans la pièce faciale agit contre la
pénétration d'air ambiant.
2.4 Domaine d'utilisation
Selon le type de filtre respiratoire utilisé, l'appareil offre une
protection contre les particules, les gaz, les vapeurs ou des
mélanges de ces derniers éléments.
2.5 Limites d'utilisation
2.5.1 Mises en garde et limites d'ordre général
L'appareil ne convient pas pour une utilisation :
dans les zones à risque d'explosion (zones ex)
pour des substances nocives avec des caractéristiques
d'alerte faibles (odeur, goût, irritation des yeux et des voies
respiratoires)
pour des interventions dans des cuves, fosses, canaux non
aérés, etc.
pour des concentrations de substances nocives, qui
représentent un danger immédiat pour la vie et la santé –
aussi appelées concentrations IDLH (Immediately
Dangerous to Life and Health)
2.5.2 Mises en garde et limites NIOSH
Voir l'étiquette d'homologations sur la feuille séparée intitulée
« Remarques concernant les homologations ».
2.6 Autorisations
L'appareil est homologué conformément à la norme NIOSH
42 CFR section 84.
Cet appareil est conforme à la section 15 de la réglementation
FCC et à la norme ou aux normes RSS d'Industrie Canada
exemptes de licence. Son utilisation est assujettie aux deux
conditions suivantes : (1) Cet appareil ne doit pas causer
d'interférences nuisibles ; et (2) cet appareil doit accepter toute
interférence reçue, y compris des interférences qui peuvent
provoquer un fonctionnement non désiré.
Tout changement ou modification, non expressément
approuvé par la partie responsable de la conformité, pourrait
faire perdre son droit à l'utilisateur à utiliser l'équipement.
Remarque : Cet équipement a été testé et déclaré conforme
aux limites pour appareils numériques de classe B, selon la
section 15 des règlements de la FCC. Ces limitations sont
conçues pour fournir une protection raisonnable contre les
interférences nocives dans un environnement domestique.
Cet équipement produit, utilise et peut émettre de l'énergie de
radiofréquence et, s'il n'est pas installé et utilisé conformément
aux directives, peut causer une interférence nuisible aux
communications radio.
Affichage Signification
La LED de statut est
verte.
La batterie rechargeable est insérée
et est chargée complètement (mode
veille)
La LED de statut est
verte et clignote.
La batterie rechargeable est insérée
et est chargée.
La LED de statut est
jaune et clignote.
Interruption temporaire du
chargement (par ex. en cas de
dépassement de la température)
La LED de statut est
rouge.
La batterie rechargeable n'est pas
insérée.
La LED de statut est
rouge et clignote.
Défaut (voir la section 4.2.2 à la page
23)

20 X-plore 8000
Utilisation
Cependant, on ne peut garantir que des interférences ne se
produiront pas dans certaines installations. Si cet appareil
cause des interférences nuisibles à la réception des signaux
de radio ou de télévision, ce qui peut être déterminé en mettant
l'équipement sous et hors tension, il est conseillé à l'utilisateur
d'essayer de corriger cette interférence grâce à l'une ou
plusieurs des mesures suivantes :
Réorienter ou repositionner l'antenne de réception.
Augmenter la distance entre l'équipement et le récepteur.
Brancher l'équipement à une prise de courant d'un circuit
autre que celui utilisé pour le récepteur.
Contacter le revendeur ou un technicien radio/télévision
expérimenté pour obtenir de l'aide.
2.7 Explication des marquages
d'identification et des symboles
2.7.1 Plaques signalétiques
►Représentation des plaques signalétiques à la page 4
1 Désignation du produit
2 Type de protection
3 Normes EN satisfaites
4 Symbole « Respecter la notice d'utilisation »
5 Symbole DEEE « Collecte sélective des déchets
électriques et électroniques »
6 Pays de production
7 Fabricant
8 Marquage CE
9 Code DataMatrix avec numéro de pièce et de fabrication
10 Numéro de fabrication
11 Référence du produit
12 Utilisation uniquement en intérieur, pas en extérieur
13 Température ambiante maximale
14 Données électriques
15 Affectation des connecteurs
16 Symbole de recyclage
17 Mise en garde
Information sur l'année de fabrication
L'année de production est déduite de la 3e lettre du numéro de
fabrication : F = 2014, G = néant, H = 2015, I = néant, J = 2016,
K = 2017 etc.
Exemple : numéro de fabrication ARFH-0054 : la troisième
lettre est F, donc l'année de production est 2014.
2.7.2 Emballage
3 Utilisation
3.1 Conditions relatives à l'utilisation
Les conditions ambiantes (en particulier le type et la
concentration des substances toxiques) doivent être
connues.
Le taux d'oxygène dans l'air environnant ne doit pas
descendre en dessous de la valeur limite d'oxygène d'au
moins 19,5 vol.%.
Dans les autres pays, observer la réglementation
nationale.
Unité de ventilation : Figure H
Batterie rechargeable : Figure I
Chargeur de batterie
standard :
Figure J
Observer la notice d'utilisation
Humidité maximale de stockage
Plage de la température de stockage
AVERTISSEMENT
Risque d'incendie suite à des étincelles ou des
projections métalliques incandescentes !
Toujours utiliser le système filtrant à ventilation
assistée avec un filtre à particules ou un filtre
combiné en association avec un pré-filtre lorsqu'il
est possible que des étincelles ou des projections
métalliques incandescentes se produisent en
cours d'utilisation.
Remplacer régulièrement le pré-filtre ; au moins
une fois par poste et dès qu’une saturation est
visible.
Remplacer le filtre particules ou le filtre combiné
dès que vous observez une saturation en
poussière, même si le système filtrant à ventilation
assistée indique une capacité résiduelle suffisante.
Éviter les étincelles ou les projections métalliques
incandescentes directes sur le système filtrant à
ventilation assistée : l'exposition d'un filtre
particules ou d'un filtre combiné saturé à des
étincelles ou des projections métalliques
incandescentes peut entraîner un
endommagement du filtre ou une inflammation des
particules accumulées.
≤95%
-20°C
+60°C
!
Other manuals for X-plore 8000
18
Table of contents
Languages:
Other Dräger Protection Device manuals

Dräger
Dräger PSS BG 4 User manual

Dräger
Dräger CPS 6800 User manual

Dräger
Dräger SPC 4800 User manual

Dräger
Dräger CPS 6900 User manual

Dräger
Dräger FPS 7000 User manual

Dräger
Dräger WorkMaster Industry User manual

Dräger
Dräger Life Preserver User manual

Dräger
Dräger CPS 7900 User manual

Dräger
Dräger R56963 User manual

Dräger
Dräger CPS 5900 Training User manual