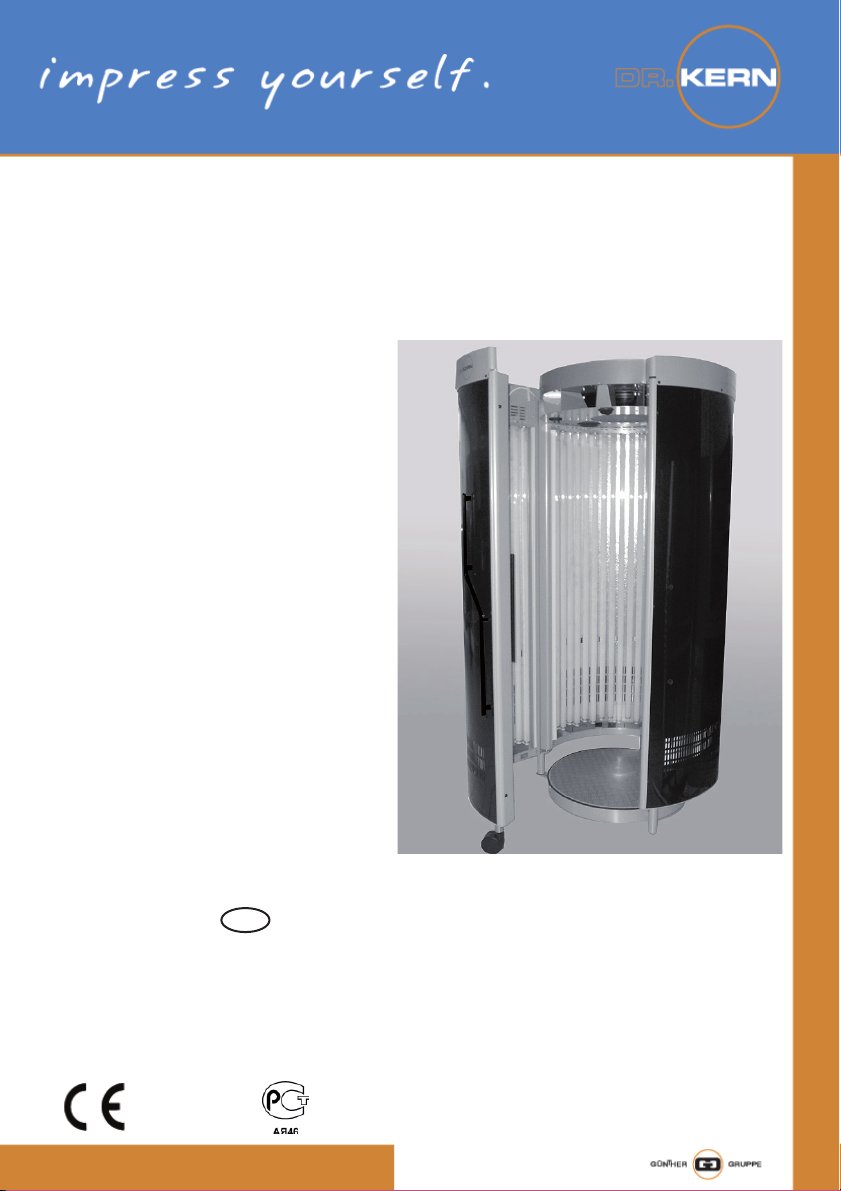
Dr. Kern Skinfresh Tancan 3000 Planning guide

1
D
IP20
Skinfresh Tancan 3000
Druck Nr. 29494042en/ 15.11
GB Assembly and operating instruction

2GB
English
Table of Contents
Interesting information on collagen.........................................................................3
Important notes on the use of collagen...................................................................5
Collagen exposure program ...................................................................................5
Exposure distance.............................................................................................5
After exposure...................................................................................................5
System Installation..................................................................................................6
1. Baseplate ......................................................................................................6
2. Right element ................................................................................................6
3. Left element .................................................................................................7
4.
Installing the elements preassembled in steps 2 and 3 ................................7
5. Installation of the exhaust air unit..................................................................8
6. Installing the door element ............................................................................9
7. Electrical connection of the elements..........................................................10
8. Installing the upper trim panels ...................................................................10
9. Installation of main connection cable / cover panel.....................................10
Operation ..............................................................................................................12
Timer adjustment ..................................................................................................12
Operation via external timer control......................................................................12
Maintenance .........................................................................................................14
Cleaning the collagenshower and the acrylic plates .......................................14
Replacing tubes and starters ..........................................................................14
System exhaust configuration...............................................................................15
Technical data.......................................................................................................15
Switching to coin box operation ............................................................................16
Returning to timer operation .................................................................................16
Timer adjustment ..................................................................................................16
Service address ....................................................................................................17
Guarantee.............................................................................................................17
Handling procedures for return shipments (RMA) - Details for all returns ! ..........18

3
GB
Dear customer,
With the purchase of a DR. KERN collagen/
tanning combination unit, you have selected
high quality technology and a high-perfor-
mance unit. During production of this unit, we
have taken all measures possible to guaran-
tee fault-free, safe operations.
Furthermore, you can make a significant
contribution to ensuring that you are satisfied
with your unit for a long time. Please read the
operating instructions carefully and assemble
the unit following the enclosed assembly in-
structions. The full function of the equipment
can only be guaranteed if it is assembled
correctly.
Interesting information on colla-
gen
The collagen exposure uses visible red light
with a frequency of 633 nm in order to stimu-
late the body's own process of "Photo Bio Sti-
mulation". This process is mainly responsible
for the development of collagen and elastin
and provides a more taut, youthful and fresh
complexion. The penetrability of the skin
for cosmetic products is also increased so
that the effective nourishment can penetrate
deeper into the skin. Skinfresh can be used
on the whole body and is particularly suitable
for the: face, eye contours, hands, feet, thighs
and legs.
• Regeneration and rejuvenation of the skin
• Visible anti-aging effect: combats wrinkles
and fine lines.
• Improves the skin's appearance for une-
ven skin
• Clinically-proven stimulation of collagen
and elastin
• Preparation of the skin for cosmetic appli-
cations
• Reduces the effects of damaging environ-
mental influences
This unit is not intended for commercial use
in medical treatments.
The acrylic sheets are not compatible with
some cosmetics and cleaning detergents on
the market. We do not accept any liability for
damages to the acrylic sheets due to the use
of unsuitable chemical products.

4GB
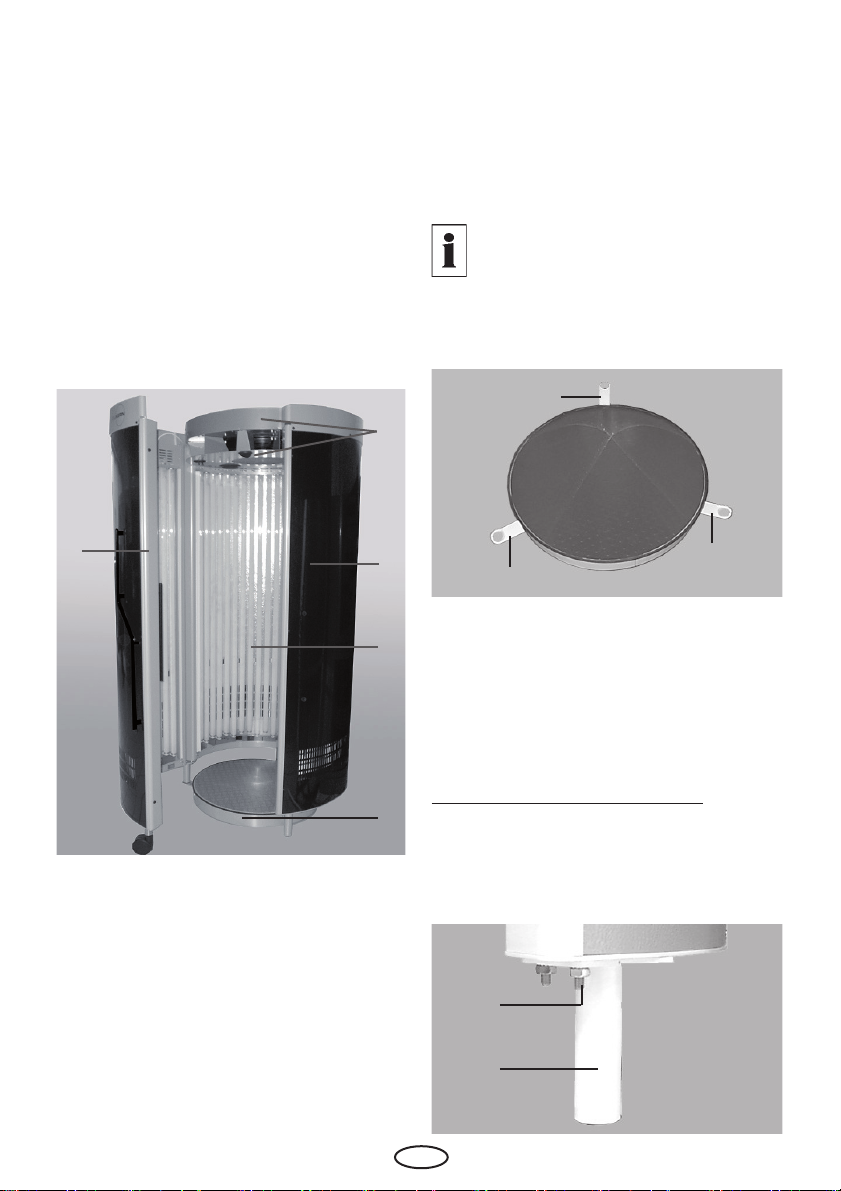
In new units, the lamps may flicker or display
shadow effects. This does not have an effect
on the tanning function.
Slight blackening may appear on the ends
of the lamp but this does have any influence
on the function of the unit or the life span of
the lamps.
If the power supply cable has to be exchanged
or reattached, the type stated in the technical
data must be used.
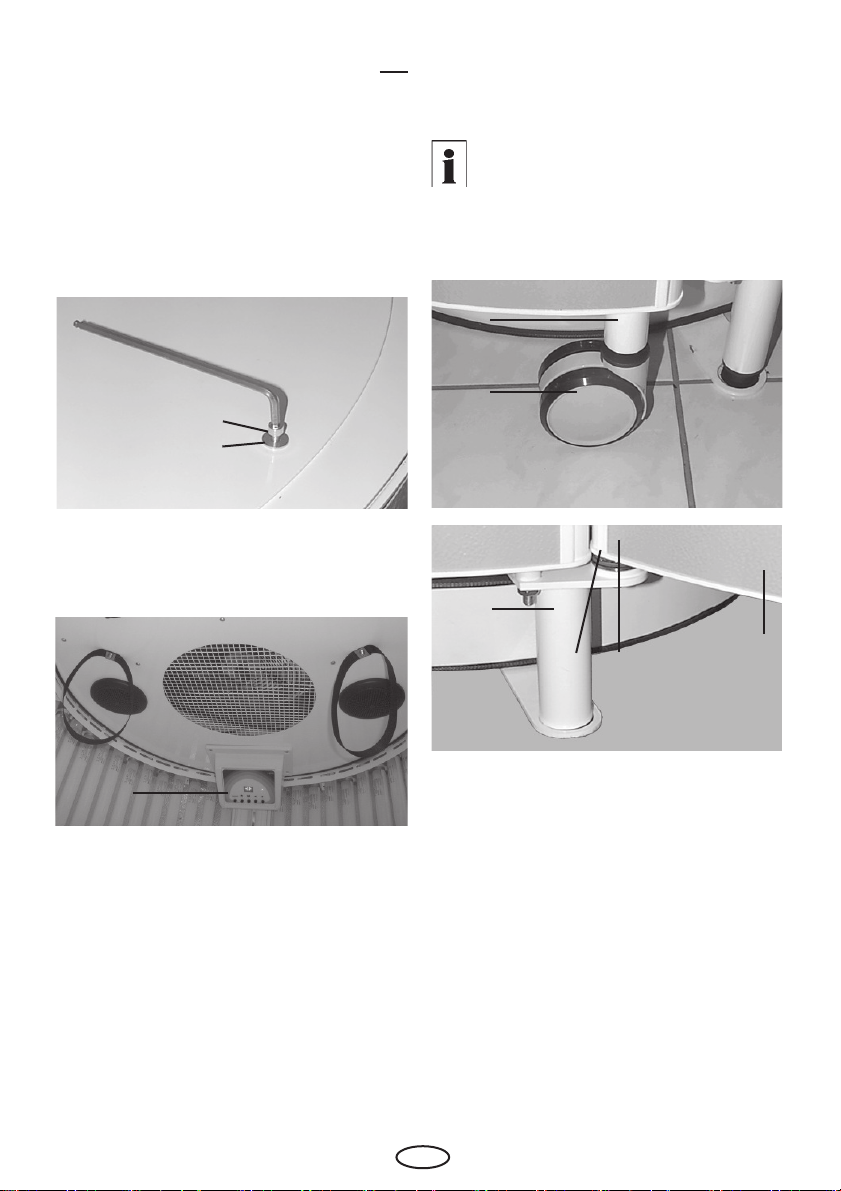
Air intake slits or hot air ventilati-
on openings may
not be covered,
otherwise
the unit will overheat
.
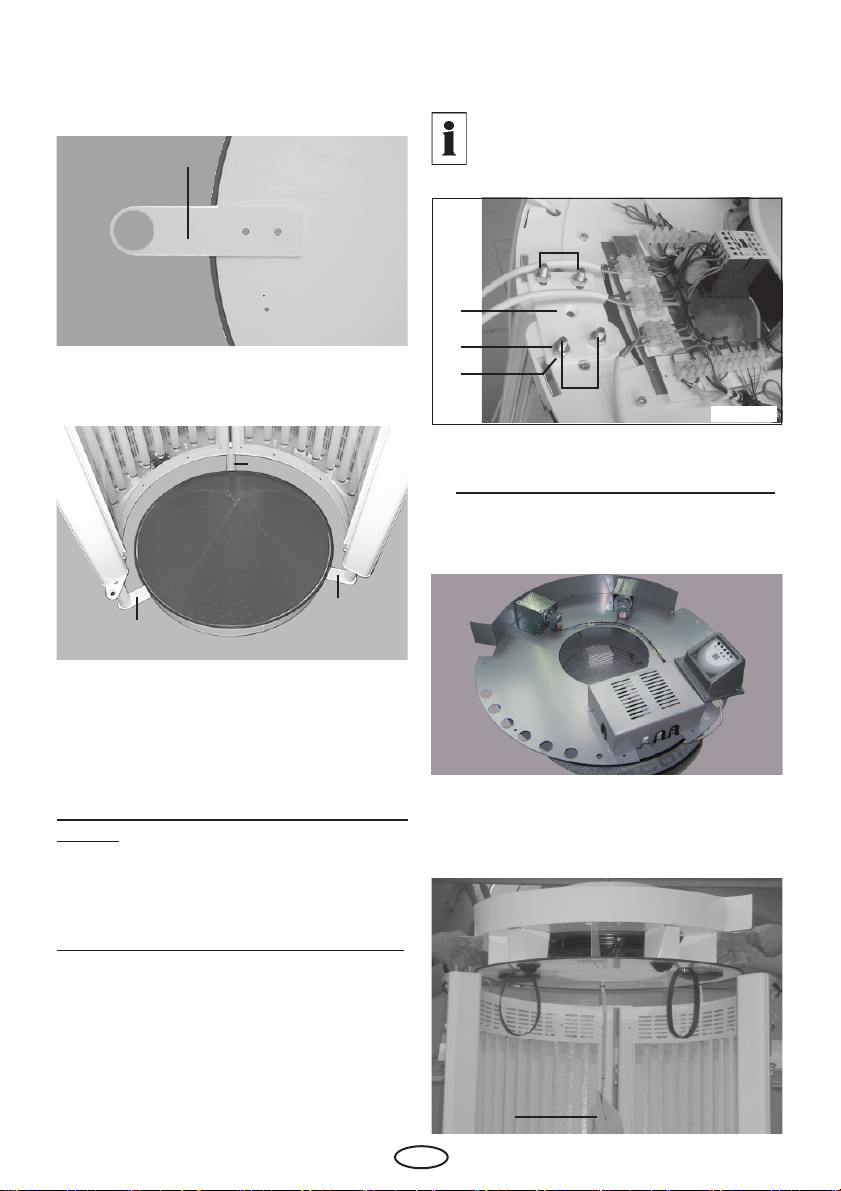
All poles on the unit should be
disconnected from the mains du-
ring any work on the combination
unit (lamps, starter replacement or
cleaning work).
Repairs on the combination unit may only be
carried out by an authorized local electrical
installer or the factory customer services.
UV and collagen lamps may only be re-
placed with types marked on the unit.
Atlernative: the lamps may only be re-
placed after receiving advice from an
authorized customer services employee.
• This unit is not intended for use by
persons (including children) with re-
stricted physical, sensory or mental
capacity or by persons without the ne-
cessary experience and/or knowledge
unless they are supervised by some-
one responsible for their safety or re-
ceive instructions from them on how to
use the unit.
• Children do not recognize the dangers
that can occur when using electrical
equipment. Therefore, never leave
children to work with electrical equip-
ment when unsupervised.
• Do not use the unit in bathrooms, hu-
mid areas or near to swimming pools.
• The combination unit may only be set
up in dry rooms that are protected from
splashes and drips.
• When installing the unit, make sure
that the floor is designed to take a load
of at least 4.5 kN/m2. If this is not the
case, the floor must be reinforced and
the installer must provide the respec-
tive proof.
• The unit should be set up on a level
floor.
• A relative air humidity of 70% and a
room temperature of 15 - 28°C may not
be exceeded or fail to be achieved. A
higher room temperature means a hig-
her temperature on the bed or under
the solarium.
• Do not switch the unit on in areas at
risk of explosion.
The combination unit should be connected
to the mains according to the technical data;
fixed connection through an authorized elec-
trical installer only.

5
GB
Collagen exposure program
• Photosensitive persons (e.g. LE or MCS)
should consult a physician before use.
• Please note: certain medication can influ-
ence the body's general reaction to light.
Please consult your physician in case of any
doubt.
• If you notice any uncomfortable skin re-
actions during or after use, stop using the
unit immediately and seek advice from a
dermatologist.
Exposure distance
The exposure distance is specified by the
construction of the unit and may never be
reduced. For standing units, the exposure
distance is provided separately in the "ope-
rating" chapter.
The recommended period of use is 20 mi-
nutes, 2-3 times per week.
Important notes on the use of col-
lagen
Read the instructions carefully.
When using a collagen unit, it is necessary
that possible overreactions of the skin are
carefully observed and the following advice
is precisely followed.
Please consult a physician before use if
the below points apply to you.
• Persons who suffer from sunburn;
•
Persons with more than 20 moles on their
bodies;
• Persons who have unusual moles -
consult a physician in case of any dou-
bt;
•
Persons with unusual discolored areas of
skin;
• Persons who suffer, or have suffered
from skin cancer or persons who are
predisposed to this;
• Persons whose close relatives have
been diagnosed with skin cancer;
• Always use the protective eyewear provi-
ded. Contact lenses and sunglasses are
not an alternative for the protective eye-
wear;
•
Remove any cosmetics before exposu-
re and do not use any sun protection
lotions or acceleration products;
• Certain medical conditions or side-
effects from medication can be rein-
forced by exposure; ask physician for
advice in case of any doubt;
• Please allow at least 48 hours to elapse
before another exposure session takes
place.
After exposure
Use a moisturizing lotion after the session to
care for your skin. This will keep the appea-
rance of your skin fresh.

6GB
System Installation
The system is delivered in several separa-
tely packed sections for transport to its final
installation point. The complete package
contains the following individual elements:
A right element (package 3)
B. left element (package 2)
C. door element (package 1)
D. base
E. exhaust unit
System assembly is described step by step
in the following sections.
Please ensure that electrical wiring and
connection is performed by a qualified
electrician in keeping with national and
local regulations.
1. Baseplate
Begin the assembly by removing the base-
plate (D) from package 4, and placing it at
the intended location of the system.
Note:
The baseplate must be placed flat
and level!
For orientation purposes, the rear positioning
tongue is provided with an adhesive label.
Fig. 2
1
14
13
2. Right element
Remove the right element (A) from package
1. You must now carry out the initial assem-
bly of the two stand feet.
Stand foot, facing side lower right:
From the accessory pack, take the stand
foot (4), two M10 nuts (5) and washers (6),
and assemble the foot as shown in Fig. 3.
Fig. 3
4
5/6
Fig. 1
E
A
B
C
D

7
GB
Stand foot, facing side lower left:
From the accessory pack, take the stand
foot (7), two M10 nuts (5) and washers (6),
and assemble the foot as shown in Fig. 4.
Fig. 4
7
6
5
Ensure that the installation plate of the stand
foot is correctly positioned for connection to
the next element (Fig. 4).
3. Left element
Remove the left element (B) from package 2,
and assemble the stand foot (8) as follows:
From accessory pack 2, take 2 distance col-
lars (9), two M10 nuts (10) and 2 lock-was-
hers (11), and assemble as shown in Fig. 5.
Note: The bearing (12) for the door element
is already fitted in stand foot (8).
9
12
10/11
8
Fig. 5
Fig. 6
13
Installation of the right element
Lift the element and place it in the tongues
provided (13 + 1) in the baseplate (Figs. 6
and 7).
Note!
The element will need to be held in place
by one person.
Fig. 7
1
13
14
Installation of the left element
Lift the element and place the lower right
side on the installation plate of the stand foot
(7) (Fig. 8).
4.
Installing the elements preassem-
bled in steps 2 and 3
Fig. 8
7
6
5

8GB
Now lift the stand foot (8) on the lower left
side into the positioning tongue (14) in the
baseplate (Fig. 9).
The current assembly condition is shown in
Fig. 10.
Fig. 9
Fig. 10
1
13
14
14
Bolting together the two elements at stand
foot (7).
For this step, you will need two M10 nuts (5)
and 2 lock-washers (6) from the accessory
pack (Fig. 8).
Bolting together the two elements at the top
For this step, you will need the installation
plate (15), 4 nuts (5) and 4 lock-washers (6)
from the accessory pack.
M10 bolts (16) are provided in the upper sec-
tions of both elements. Place the installation
plate with its holes over the bolts (16), and
fix it firmly in place using the nuts (Fig. 11.
Note! Both elements must be held in the
upright position until they are bolted to-
gether.
The two elements are now assembled.
Note: Check the correct position in
relation to the baseplate and the ali-
gned position!
Fig. 11
5. Installation of the exhaust air unit
Remove the complete preassembled exhaust
air unit from package 4 (Fig. 12):
The exhaust air unit is now lifted onto the
tanning elements (Fig. 13).
Fig. 13
Fig. 12
5
15
6
16
16
17

9
GB
Now place the attachment holes in the ex-
haust unit over the matching holes in the
tanning elements.
Use 6 hex-head bolts (18) with washers (19)
from the accessory pack to bolt the exhaust
unit in place (Fig. 14).
19
18
Fig. 14
Now bolt the operating panel (17) to the lo-
wer ceiling plate (Fig. 15), using the bolts
provided in the accessory pack.
Fig. 15
6. Installing the door element
Remove the door element (C) from package
3.
Note: The retaining bolt (21) for the
castor, and the upper and lower bea-
rings (23) and (28) are already fitted to
the door element (Figs. 16 - 18).
22
21
Fig. 17
20
23
8
12
Fig. 16
Now screw the castor (22) onto the retaining
bolt (21) (Fig. 16).
Lift the door element (20) with the pre-assem-
bled
bearing bolt (23) onto the installation
plate (12), and slide the bearing into place
(fig. 17).
To assemble the upper bearing (Fig. 18), you
will need the installation plate (24), which is
first loosely assembled using the two threa-
ded bolts (25), the nuts (26) and lock-was-
hers (27).
Swing the door element over the installation
plate (24) so that the upper bearing point of
the door element (28) is positioned opposite
the opening in the installation plate (24).
Note: The operating panel (17) must not
be bolted to the lower plate yet!
The following auxiliary elements are built
into to ceiling plate of the TAN CAN 3000
- 2 air jets for the head area
- 2 loudspeakers for connection to an exter-
nal audio system
- control unit
17

10 GB
Now let the installation plate (24) drop down
over the upper bearing, and tighten the two
nuts (26) firmly (Fig. 18).
Fig. 18
7. Electrical connection of the ele-
ments
All 3 elements have their electrical connec-
tions at the top, and are connected to the
control unit (29) by means of the 3 plugs (30
- 32) (Fig. 19).
Fig. 19
29 = Control unit
30 = Connection cable, right element
31 = Connection cable, left element
32 = Connection cable, door element
35 = Main connection cable
8. Installing the upper trim panels
Finally, fit the three trim panels (33) around
the upper edge of the system (Fig. 20), using
for each panel two self-tapping screws (34)
on the outside, and two M4 screws in the
central area.
Ensure that a distance sleeve is placed bet-
ween the trim panel and rear wall of the unit
at each attachment point.
Fig. 20
9. Installation of main connection ca-
ble / cover panel
The main connection cable (35) is pre-as-
sembled to the control unit (29), and lies
rolled up on the exhaust unit.
Take the cable (35) and lead it down along
the side of the system (Fig. 21).
Now remove the cover panel (37) from pa-
ckage 3, and fit it as shown in Fig. 22.
Note:
The existing screws in the rear
walls are used for the attachment of
the cover panel (37). These screws
must be removed before fitting the co-
ver panel.
25
24
26
27
28
29
30
31
32
35
33
34

11
GB
Fig. 23
Fig. 22
37
36
37
Connect the main power cable to the mains
power source using a fixed connection or a
plug connection (CECON plug).
The system is now ready for operation.
35
Fig. 21

12 GB
Operation via external timer con-
trol
Further on you can use your unit via external
timer control (e.g. coin box). The connection
is to be made according to the following wi-
ring diagram (fig. 26).
Please pay attention, that a control line for
the fan delay has to be available in either
case.
The connection line between the application
and the external timer control is inducted into
the appliance besides the main connection
line and applied to the connection terminal.
See wiring diagram.
Timer adjustment
Jumper, left side (fan delay)
opened = without fan delay
closed = with fan delay
Fig. 25
Operation
The unit will be switched on by using the On/
Off- switch (1) at the digital-timer.
With the keys (4) and (5) (fig. 24) you can
select your tanning time (max. 30 minutes).
(5) = up, (4) = down
With the key (3) the body fans are switched
on or off.
Fig. 24
ON/OFF
8.8.
(1) (2) (3) (4) (5)
Attention: The switch (2) is inoperable in
this collagen appliance.
After loose of time the digital timer of the unit
switches off automatically.
After the session the unit is switching over to
after cooling mode for 3 minutes.
Jumper 2, left side
Please observe at least 5 cm safety gap to
the UV lamps when using the solarium.

13
GB
Wiring diagram
Fig. 26
K1
2Kl
1Kl
1Bu 2Bu Bu 3
3
Kl
Steuerplatine
Segment 1 Segment 2 Segment 3
Hauptanschluß Münzanschluß
rechts/rightTür/door links/left
Körperlüfter
Körperlüfter
L
Zeit
N
4
N PE
1 2 3
L1 L2 N PE
421 3
PEL3 N
1 2 3 4
L1
N
Zeit
3 54
SD
PE
N
L3
L2
L1
LN
Zeit
NC
L
N
PE
2 64
531
14 A2
13 A1
1 2
Körperlüfter

14 GB
Maintenance
Cleaning the collagenshower and the
acrylic plates
Use a moist cloth to clean the collagensho-
wer. The acrylic plates should also be clea-
ned at regular intervals. Use only solvent-
free, non-caustic and non-aromatic cleaning
agents.
To remove the acrylic plates, pull each plate
forward from its position, gripping the profile
bars on the side (38) from behind as shown
in Fig. 27. Bend the plate (39) slightly toward
the inside. Then press the plate down and
out of the mounting frame grooves on the si-
des. The plate can now be cleaned on both
sides.
After cleaning, replace each plate in the fol-
lowing manner:
Set the lower edge of the plate on the pin
(40), grip the side profile bars and press
the outer edge of the plate (41) against one
edge of the mounting frame.
Then bend the plate slightly toward the in-
side and press until the opposite edge locks
into place on the other edge of the mounting
frame. Fig. 28.
Replacing tubes and starters
To replace tubes and starters, first remove
the acrylic plates as described above.
The tubes in your tanning system must be
replaced after a certain number of operating
hours.
The effective service life of the low-pressure
tubes is about 500 hours.
Please ensure that only original re-
placement parts are used when re-
placing tubes and starters.
Replacement parts can be ordered from
customer service or your local dealer.
Please indicate the system number (see
ID plate). This applies to orders for all re-
placement parts.
Collagen low-pressure tubes (42) are remo-
ved/inserted by turning them 90° in their so-
ckets (43) both above and below and pulling
them forward. When inserting new tubes,
please ensure that the contact pins on the
tubes are fitted properly into the sockets.
Starters (44) are located at the upper ends
of the tubes and are removed/inserted by
turning them 90° and out of their sockets.
Fig. 29.
Fig. 27
38
39
Fig. 28
41
40 Fig. 29
43 42 44

15
GB
System exhaust configuration
Exhaust air should be removed from your
collagenshower via a hose. Please take the
following points into account with regard to
the configuration of the exhaust system.
Outside temperature has a considerable im-
pact on system operation. Ideally, outside
temperature should be 28° with a relative
humidity of 70%. Use only 400-mm hose
for the exhaust line. Ideally, exhaust hose
should lead in a straight line up and away
from the cell. Bends in the hose generate
air-flow resistance. Avoid 180° bends in all
cases. Given a straight exhaust line confi-
guration, exhaust hoses can be as long as 2
m without the need for an additional blower
unit. If the exhaust line is longer than 2 m or
has bends, the addition of an auxiliary blo-
wer unit is recommended in order to ensure
effective exhaust air removal. Hose output
diameter should not be reduced at any point
in the exhaust line, as this may result in air
blockage.
Technical data
Subject to technical modifications.
Type Skinfresh Tancan 3000
Collagen lamps 30 x 100 W
Length of lamps 1,76 m
Power rating, app. 3400 W
Power supply N AC 230 V
Fuses
Mains cable
16 A
3 x 2,5 mm2
Minimum ventilation rate, app. 570 m3/h
Timer integrated timer
coin box optional
External dimensions Ø 1.10 m, height 2.30 m
Internal dimensions Ø 0.88 m, height 2.00 m
Weight, app. 263 kg

16 GB
Timer adjustment
Jumper, left side
Switching to coin box operation
2 persons are required for this procedure.
• When the coin box is not connected yet,
separate the sun bed completely from the
power supply.
• While one person keeps the [up] and
[down] buttons at the timer control panel
simultaneously pressed, the other person
shall connect the sun bed to the power
supply.
• When the coin box is already connected,
the sun bed must not be disconnected
from the power supply.
In this case proceed as follows:
one person keeps the [up] and [down]
buttons at the timer control panel simulta-
neously pressed.
- the other person shall start the coin box
running by throwing in a coin (token).
• Keep pressing the [up] and [down] buttons
until “0” appears on the timer display.
The sun bed is now coin box operated.
After being released by the coin box the
time will start counting from “0” minutes up-
wards.
The sun bed can be turned on or off within
this time.
The [up] and [down] buttons are locked, the
other buttons remain functional.
The pre-set time has elapsed, the sun bed
will be completely switched off and time dis-
play will go out.
Attention: The fan delay has to be
executed by the coin box!
Returning to timer operation
Returning the sun bed back to timer operati-
on is only possible if the coin box is comple-
tely disconnected and the jumper “L1-Time”
is restored (see connection diagram).
2 persons are required for this procedure.
• Disconnect the sun bed completely from
the power supply.
• While one person keeps the body fan
and face tanner buttons simultaneously
pressed, the other person shall connect
the sun bed to the power supply again.
• Keep pressing both buttons until “88” ap-
pears on the timer display.
• The display will go out thereafter.
The sun bed is now timer operated.
Jumper, left side (fan delay)
opened = without fan delay
closed = with fan delay

17
GB
Guarantee
The guarantee is taken over according to the le-
gal regulations at present.
Manufacturer’s warrenty
- The period of warranty starts from the date
of purchase and is in principle valid for 12
months.
- Always include the completed warrenty certifi-
cate when returning equipment.
- The warrenty expires for appliances which
have been modified without manufacturer’s ex-
plicit agreement.
- Damages caused by incorrect operation or
handling through non-authorized persons are
not covered under the terms of warranty.
- In the event of a claim, please indicate the se-
rial number as well as the article code number
and type name with expressive description of
the fault.
- This warrenty covers damaged parts but no
defects due to wear and tear.
In case of complaint please return the equipment
in its original packaging or other suitable pa-
ckaging (caution: danger of transport damage)
to our service department.
Always include the completed warrenty certifica-
te when returning equipment.
Possible shipping costs arising from the trans-
port to and from point of repair cannot be borne
by us.
Outside of Germany please contact your spe-
cialist dealer in case of warranty claims. Direct
warranty processing with our service department
is in this case not possible.
Equipment start-up date:
Stamp and signature of the authorized electrici-
an:
Please keep this address in a safe place
together with the installation guide.
To help us answer your questions quickly
and competently, please provide data prin-
ted on the ID plate, to include system type,
article no. and serial no., in all inquiries.
Service address
EOS-Werke Günther GmbH
Adolf-Weiß-Straße 43
35759 Driedorf-Mademühlen, Germany
Fon: +49 (0)2775 82-240
Fax: +49 (0)2775 82-483
www.dr-kern.de

18 GB
3) Problems of installation
and functioning
• Please read the manual ca-
refully first of all and pay
attention to the indicated as-
sembly or installing instruc-
tions.
• Your dealer should be the
first contact person becau-
se he knows his products
best and also knows possible
problems.
• In case of function problems
with an article, please check
at first whether there is an
obvious material defect. The
quality system in our factory
reduces malfunctions of new
appliances to almost zero.
Handling procedures for return shipments (RMA) - Details for all returns !
Dear customer
we hope that you will rejoice in the ordered articles. Just in case that you are not entirely contented as an
exeption, please follow the procedures specified below.This enabling us to ensure a quick and smooth
handling of the return shipment.
Form of complaint:
Please absolutely respect for all returns!
• Please add the available RMA-voucher always completely filled out together with an invoice
copy to the return shipment! Do not stick it on the goods or on the packaging. We do not accept
the return shipment without these papers.
• Not prepaid parcels will be refused and returned to Sender! Please always ask for the RMA-No.
for the cheapest return.
• Please pay attention that the goods have to be sent back without visible marks of use in the
original scope of delivery and in original packing.
• We recommend to use an additional solid and break-proof covering box which should be pad-
ded out with styrofoam, paper or similar. Transport damages as a result of faulty packing are for the
sender‘s account.
2) Faulty goods
• The implied warrenty period is
2 years.Please contact your
dealer in case of faulty or
wrong articles or missing
accessories. He will discuss
with you the individual case
and try for immediate and
customer-friendly solution.
• For economic returns within
Germany you will get an
RMA-number from the ma-
nufacturer.
• All returns have to be in the
original packing of the
goods with corresponding
accessories. Please repack
the goods to avoid damages.
In case of wrong delivery, ple-
ase do not use this article !
1) Transport damage
• Please check the content of
your parcel immediately and
advise the forwarding compa-
ny of a claim (parcel service/
freight forwarder)
• Do not use damaged goods!
• Ask the forwarder for a writ-
ten acknowledgement of
the damages.
• Report the claim promptly
by phone to your dealer.
He will discuss with you how
to act in this case.
• If the transport box has been
damaged, please use an ad-
ditional covering box. Do
not forget to add the acknow-
ledgement of the damage of
the forwarding company !
Table of contents
Other Dr. Kern Personal Care Product manuals
Popular Personal Care Product manuals by other brands

Silvercrest
Silvercrest SNS 45 A3 operating instructions

Atos
Atos PROVOX Electrolarynx SolaTone Plus Instructions for use

Silvercrest
Silvercrest SBT 3.6 C1 operating instructions

Lloydspharmacy
Lloydspharmacy ColdSoreClear Advance LLCS1 user manual

Silvercrest
Silvercrest SHE 3 A1 operating instructions

Silvercrest
Silvercrest SMPS 7 A1 operating instructions