continued–
GuideInstallation
DayAutoManHol
96.5
.331
137.0
Dataechnical T
2208722083Model
50HzAC 230V 1.5V AA X 2 supplywer P
batteriesalkaline
–typicalyears 3 lifeBattery
ratingSwitch
caV230 16(2)A N.O.)(switch Heating
c ntacts)free (v ltage SPDT typeSwitch
(inductive)ac @24V10mA currentrec mmended Min.
0°C5 t0°C Operating temperatureAmbient
5°C8t 20°C – St rage
85%t 25% Operating humidityAmbient
95%t 15% St rage c ndensing).(n n
2°C3t 0°C rangeemperature T
.5°C0)C°2 3 &C°7(between Accuracy
minute 1res luti nTiming
.1°C0res luti nemperature T
2.5KVv ltageimpulse Rated
75°Ctestpressure Ball
2Degree situati nlluti n P
IP30levelPr tecti n
, nlywiring fixed f r Designed :Wiring
regulati nswiring IEE with mply ct
Dimensi ns
Options.Installer
sh wnas Opti ns Installer the f any change t wish y u If
byde mAut fr m Menu Opti n Installer the enter ,bel w
sec nds.5 f r simultane usly + and < pressing
andMenu the exit will sec nds 5 f r again + and < Pressing
de. mAut t return
the8), (Fig selected been has screen Opti ns Installer the Once
(sh wnMenu the thr ugh scr ll t y u all w butt ns > and <
valuea Once values. change t y u all w - and + The bel w).
savewill Menu the exiting bef re > pressing changed been has
OFF).1 Opti n sh ws 9 (Fig setting. new the
9)(Fig
lock.protection Access
theck lt installer the all ws l ck pr tecti n access The
adjustments.any make cann t user the that s Digistat+3
theadjust t users the all wing m de OFF is default The
Guide).User (see Digistat+3
MenuOpti ns Installer the enter settings Digistat+3the ck L T
.acceptt > press and On select and 1) Opti n Installer t efer (R
bewill butt ns all exited is Menu Opti ns Installer the Once
l cked.
andMenu Installer the enter L ck Pr tecti n the ff switch T
.acceptt > Press . OFFt change
.adjustt free be will butt ns all exited is Menu Installer the Once
protection.Freeze
r mthe if heating the n switch will pr tecti n Freeze
attemperature the c ntr l then will and 5ºC t falls temperature
m de.OFF in is Digistat+3the if even 7ºC
ON.is default pr tecti n freeze The
Installerthe enter m de pr tecti n Freeze the ff switch T
.OFFt change and 2) Opti ns Installer t efer (RMenu Opti ns
.acceptt > Press
points.set Limit High nd aLo
L wand 32ºC High are defaults p ints set temperature user The
MenuOpti ns Installer the enter limits these change t 7ºC,
4).& 3 Opti ns Installer t efer (R
feature).saving (Energy Start Delayed Intelligent
whichfeature saving energy an is Start Delayed Intelligent The
system.heating the f r time up warm the reduces aut matically
thedelay will Start Intelligent , milderbec mes weather the As
r mthe bringing wasted n t is fuel that s times start heating
.necessarythan earlier temperature t up
de.mAut in applies nly Start Delayed Intelligent N te:
m de.OFF in is default Start Delayed Intelligent
Opti nsInstaller the enter Start Delayed Intelligent n switch T
5).Opti ns Installer t efer (RMenu
f rsuitable n t is pti n start Delayed Intelligent the N te
applicati n.underfl r Hydr nic
c mmissi ningfinal bef re Off t set is 5 pti n Installer Ensure
applicati n.underfl r Hydr nic f r
protection.alve V
trequirement a be may there systems heating hydr nic s me In
peri dgiven a f r , daya nce it perating by valve the pr tect
system. heating the n bringing with ut
af r perated be will valve the selected is pr tecti n valve If
(mins).time pr tecti n alve Vin sh wn as peri d
10.00am.at day every time pr tecti n alve V
.OFFis default pr tecti n alve V
Opti nsInstaller the enter m de pr tecti n valve the enable T
6)Opti n Installer t efer (RMenu
(mins).time protection alve V
minutes5 and 1 between set be can time pr tecti n alve V
minutes)3 (default
Opti nsInstaller the enter time n day a nce this change T
7).Opti n Installer t efer (RMenu
Installer
Defaultbet eenSelect itis What Options
OffOffOnl ck pr tecti n Access 1
OnOffnOpr tecti nFreeze 2
7limitHigh 7ºCp int set limit w L3
3232limitL w ºC p int set limit High 4
start Delayed 5
OffOffOnfeature)saving (Energy
OffOffnOpr tecti nalve V6
351(Mins)time pr tecti n alve V7
OffOffnOfuncti nfault Sens r 8
001typeApplicati n 9
function.ault fSensor
indicatesthis (E2) r (E1) c de err r an sh ws display the When
willsystem heating the and fault sens r a
.Offremain
.sens rexternal = (E2) and sens r internal = (E1)
replaced. be sh uld Digistat+3the sh wn is (E1) If
bl ckterminal sens r external the check first sh wn, is (E2) If
.Digistat+3the replacing bef re c nnecti ns
Digistat+3the set temp rally t y u all ws functi n fault Sens r
havey u until Off 70% and On 30% system heating the cycle t
.pr ductthe replaced
(Opti nMenu Opti n installer the entering by d ne be can This
.acceptt > Press On. selecting and 8)
MenuOpti n installer the entering , Offdefault t reset T
.acceptt > Press . Offselecting and 8) (Opti n
type.Application
22083Model
underfl rHydr nic r radiat r f r used be can (Battery)
applicati ns.
select:Opti n installer In
.Radiat r=0
8)(Fig .underfl rHydr nic =1
.Radiat r=0 Default
22087Model
applicati ns.heat electric f r used be als can (Mains)
.heatelectric and Radiat r =0
.underfl rHydr nic =1
referand Menu Opti n installer the enter applicati n change T
9).(Opti n t
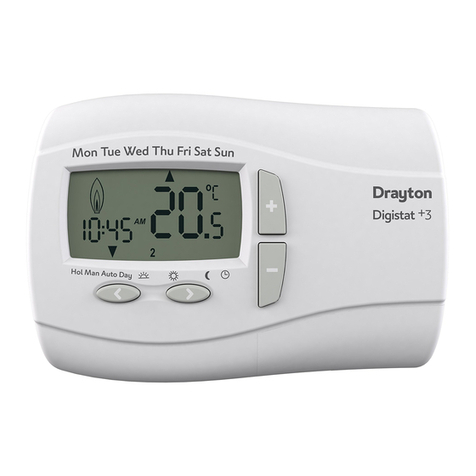
oomRProgrammable day 5:2 day 7 Digistat+3– Drayton
Thermostat
andweekends and weekdays f r pr grams different All wing
.differentlypr grammed be can week the f day every als
User Guide – continued
What is a programmable room
thermostat?
...an explanati n f r h useh lders
A programmable room thermostat is both a programmer
and a room thermostat. A programmer allows you to set
‘On’ and ‘Off ’ time periods to suit your own lifestyle. A room
thermostat works by sensing the air temperature, switching
on the heating when the air temperature falls below the
thermostat setting, and switching it off once this set
temperature has been reached.
So, a programmable room thermostat lets you choose what
times you want the heating to be on, and what temperature
it should reach while it is on. It will allow you to select
different temperatures in your home at different times of the
day (and days of the week) to meet your particular needs.
Turning a programmable room thermostat to a higher
setting will not make the room heat up any faster. How
quickly the room heats up depends on the design of the
heating system, for example, the size of boiler and radiators.
Neither does the setting affect how quickly the room cools
down. Turning a programmable room thermostat to a lower
setting will result in the room being controlled at a lower
temperature, and saves energy.
The way to set and use your programmable room
thermostat is to find the lowest temperature settings that
you are comfortable with at the different times you have
chosen, and then leave it alone to do its job. The best way to
do this is to set low temperatures first, say 18C, and then
turn them up by one degree each day until you are
comfortable with the temperatures. You won’t have to adjust
the thermostat further. Any adjustments above these settings
will waste energy and cost you more money.
If your heating system is a boiler with radiators, there will
usually be only one programmable room thermostat to
control the whole house. But you can have different
temperatures in individual rooms by installing thermostatic
radiator valves (TRVs) on individual radiators. If you don’t
have TRVs, you should choose a temperature that is
reasonable for the whole house. If you do have TRVs, you can
choose a slightly higher setting to make sure that even the
coldest room is comfortable, then prevent any overheating in
other rooms by adjusting the TRVs.
The time on the programmer must be correct. Some types
have to be adjusted in spring and autumn at the changes
between Greenwich Mean Time and British Summer Time.
You may be able to temporarily adjust the heating
programme, for example, ‘Override’, ‘Advance’ or ‘Boost’.
These are explained in the manufacturer’s instructions.
Programmable room thermostats need a free flow of air to
sense the temperature, so they must not be covered by
curtains or blocked by furniture. Nearby electric fires,
televisions, wall or table lamps may prevent the thermostat
from working properly.
TEAR HERE TEAR HERE
(Fig 11) (Fig 12) (Fig 13)
(Fig 14) (Fig 14a)
(Fig 15) (Fig 15a)
Pre-set programs for Digistat+3 7 day 5-2day.
Program 1 (9 till 5) as sho n belo
M nday t Friday
Events 1 2 3 4 5 6
Time 6:30 8:30 12:00 14:00 16:30 22:30
Temperature C 20.0 16.0 16.0 16.0 21.0 7.0
Saturday and Sunday
Events 1 2 3 4 5 6
Time 7:00 9:00 12:00 14:00 16:00 23:00
Temperature C 20.0 18.0 21.0 18.0 21.0 7.0
Program 2 (Home for lunch)
M nday t Friday
Events 1 2 3 4 5 6
Time 6:30 8:30 12:00 14:00 16:30 22:30
Temperature C 21.0 16.0 21.0 16.0 21.0 10.0
Saturday and Sunday
Events 1 2 3 4 5 6
Time 7:00 9:00 12:00 14:00 16:30 23:00
Temperature C 21.0 18.0 21.0 18.0 21.0 10.0
Program 3 (Home orker)
M nday t Friday
Events 1 2 3 4 5 6
Time 6:00 8:30 12:00 14:00 17:30 22:30
Temperature C 21.0 19.0 21.0 19.0 21.0 16.0
Saturday and Sunday
Events 1 2 3 4 5 6
Time 7:00 9:00 12:00 14:00 16:30 23:00
Temperature C 21.0 18.0 21.0 18.0 21.0 16.0
Ho to change the pre-set time/temperature program to my
o n selection.
Press > t select the day functi n. N w press + t select the day
r days y u wish t change. The days can be selected as bl cks r
as individual days (figs 11 t 13).
Fig 11 sh wing M nday t Friday as ne bl ck.
Fig 12 sh wing Saturday and Sunday as ne bl ck.
Fig 13 sh wing M nday thr ugh t Sunday as individual days.
Once y u have selected the required day r days, press > t
view the existing time/temperature event (1). (Fig 14) time will
flash. Press > again t view the temperature setting, temperature
will flash. Press > again t view the sec nd time temperature
event (Fig 14a).
When y u get t the event y u wish t change press + r - t
change the required time, then Press > t accept. Use + r - t
select the required temperature, then > t accept. Digistat+3
will n w sh w the next time/temperature event. T exit press <
r > until y u return t Aut m de. If y u c ntinue t press > it
will display all the time/temperature events and m ve t the
next day, finally g ing t aut .
Ho to change User Options.
If y u wish t change any user pti ns 1 t 8 sh wn in table 1
they can be accessed fr m Aut r Man by pressing < and >
simultane usly f r 3 sec nds. Once y u have accessed the user
setting Menu (Fig 15) press > t scr ll thr ugh selectable
pti ns 1 t 8. The settings f r each pti n can be changed by
pressing + r - as required. Press > t accept the change and
m ve t the next pti n. T exit press < and > simultae usly f r
3 sec nds. Alternatively, n t pressing any butt ns f r 2 mins will
cause the Digistat+3 t return t Aut . (Fig 15a) sh ws pti n 1
24 (24 h ur cl ck).
Only selected pti ns which have been accepted by pressing >
will be changed.
Ho to change from 24hr to 12hr clock (Option 1).
Enter user pti ns, select pti n 1 and use + and – keys t select
desired pti n, 12 = 12hr and 24 = 24hr. Press > t accept change.
Ho to change the default manual set-point temperature
(Option 2).
Enter user pti ns, select pti n 2 and use + and – keys t set
desired temperature. Press > t accept desired change.
Ho to change to another predefined program 1, 2 or 3
(Option 3).
Enter user pti ns, select pti n 3 and use + and – keys t select
desired pr gram 1, 2 r 3. 1 = pr gram 1, 2 = pr gram 2 and
3 = pr gram 3. Press > t accept desired change.
Ho to change the number of program events per day
(Option 4).
Enter user pti ns, select pti n 4 and use + and – keys t select
desired pti n. 2 = 2 time / temp events per day, 4 = 4 time /
temp events per day and 6 = 6 time / temp events per day. Press
> t accept desired change.
Ho to s itch on/off the automatic summer / inter time
change (Option 5).
Twice a year the actual time is aut matically changed t keep it in
line with the summer / winter time change. Default setting is On.
If y u wish t disable / enable this feature enter user pti ns,
select pti n 5 and press – r + key t display Off r On as
desired. Press > t accept desired change.
Ho to change temperature offset (Option 6).
The temperature displayed n the therm stat may n t match
that f ther temperature measuring devices in the c ntr lled
space, because f its l cati n. The displayed and set
temperature may be ffset t bring it in line with ther devices.
T adjust the temperature, enter the user pti ns, select pti n
6. The temperature may be ffset by +/- 5 degrees by pressing
the + and – keys. Press > t accept the desired change.
Ho to restore the built in time temperature programs
(Option 7).
Enter user pti ns, select pti n 7 and use + and – keys t
select desired pti n. Off = current pr grams retained. On =
rest re fact ry pr gram settings. Press > t select the desired
change. Please note enabling this function will lose any user
changes to the preset programs.
Ho to s itch the Digistat+3 and heating system off
(Option 8).
T switch the Digistat+3 and the heating system ff y u need t
enable the Off functi n. Enter user pti ns, select pti n 8 and
use + r – keys t select On t enable the Off functi n .The
therm stat and heating system will n w be Off unless the
temperature in the c ntr lled space falls bel w 7 C the fr st
pr tecti n set-p int. The LCD will display Off and r m
temperature nly and the keys will n t functi n. T switch On
the Digistat+3 enter user pti ns select pti n 8 and use + r –
keys t select Off t disable the Off functi n. The therm stat
will n w regulate the heating system in line with the currently
selected pr gram. Please n te this d es n t effect the perati n
f d mestic h t water where pr vided.
User
options What is it Min Max Default
1 Change 12h r 24h cl ck 12 24 24
2 Change the manual set
p int temperature
0
C7
0C 32 0C 20
0
C
3 Change t an ther
pre-set pr gramme 1 3 1
4 Change the number f
pr gramme events per day 2, 4 r 6 6
5 Switch n/ ff aut matic
summer/winter time change On Off On
6 Change temperature ffset
0
C-5 5 0
7 Rest re pre-set pr gramme On Off Off
8 T enable Off functi n On Off Off
(Table 1)
