Durabook S15AB User manual

DURABOOK®S15AB

2
Table of Contents
COPYRIGHT................................................................................................ 4
REGULATORY STATEMENT................................................................................ 4
Federal Communication Commission InterferenceStatement.......................................................................................4
IMPORTANT NOTE:........................................................................................................................................................5
Radiation Exposure Statement:........................................................................................................................................5
CAUTION..........................................................................................................................................................................5
ATTENTION .....................................................................................................................................................................5
CLASS 1 LASER PRODUCT...........................................................................................................................................6
PRODUIT LASER DE CLASSE 1...................................................................................................................................6
BEFORE YOU START ................................................................ 8
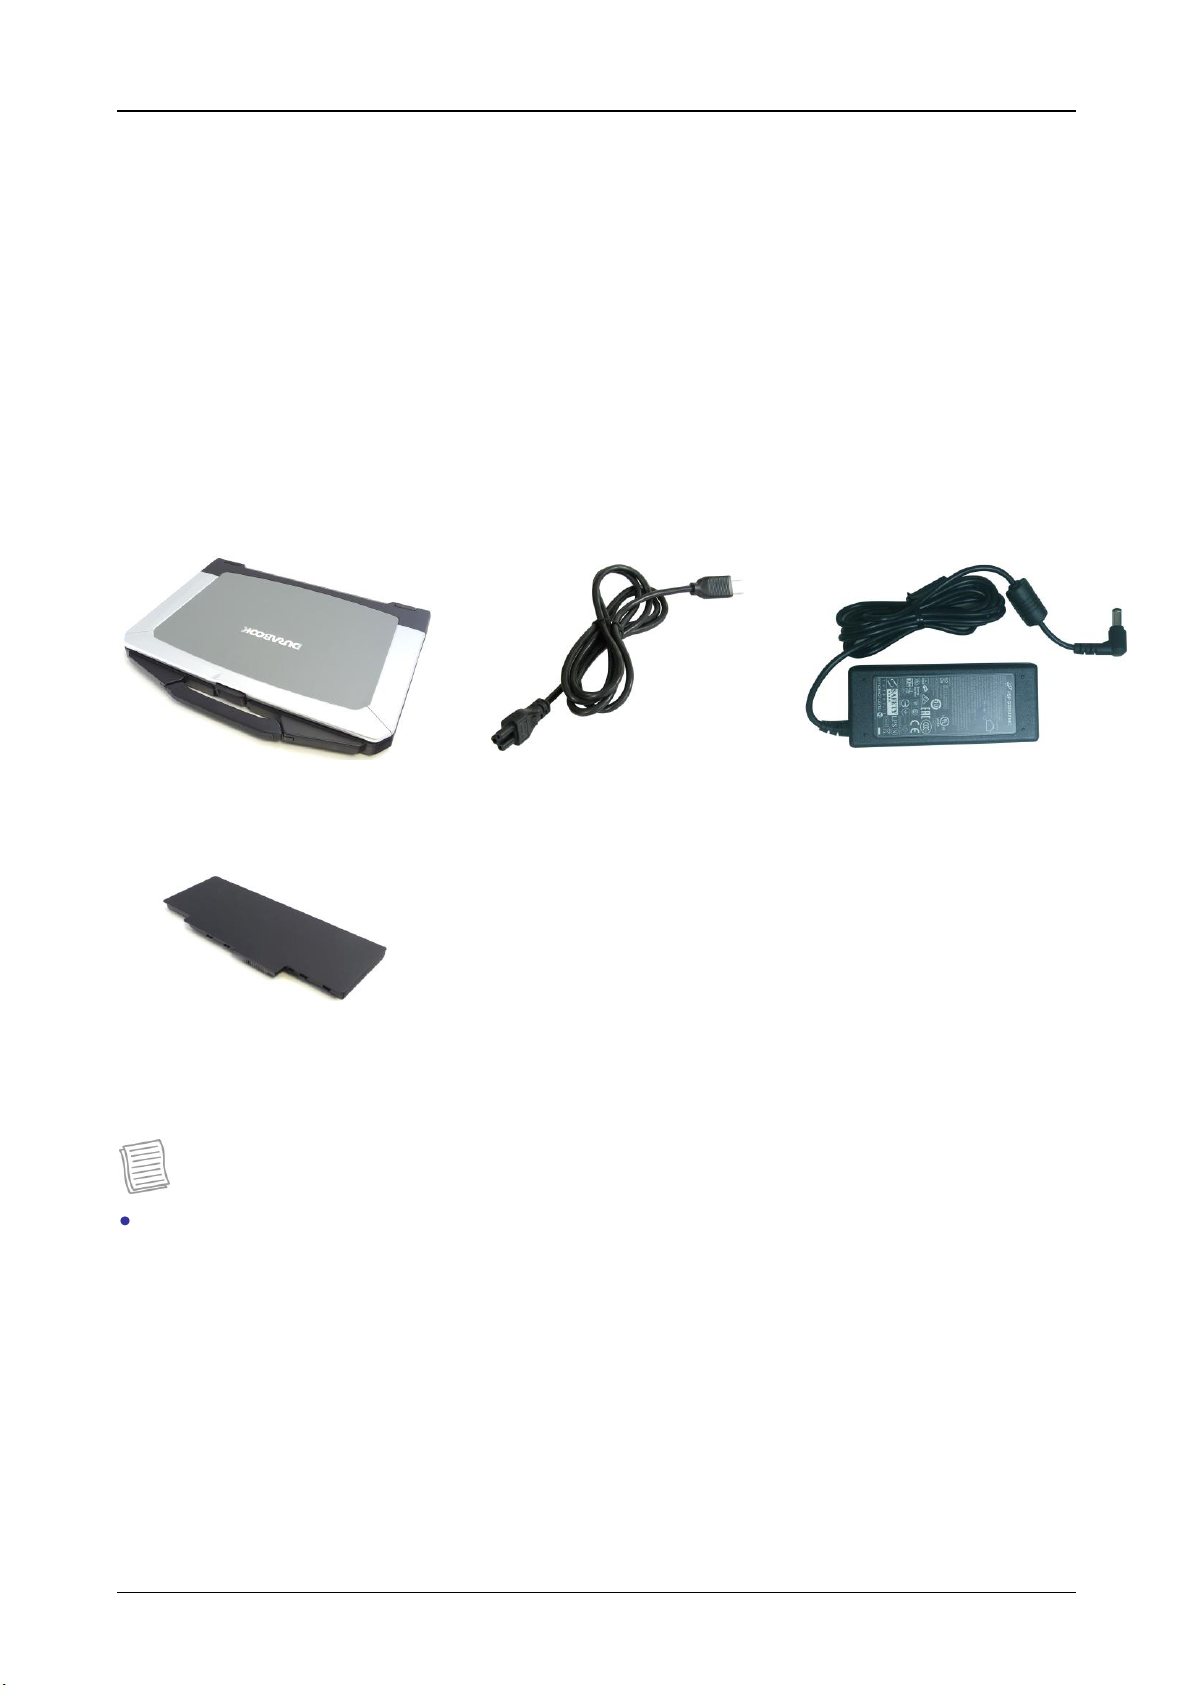
PACKAGE CONTENTS ..................................................................................... 8
COMPONENTS ............................................................................................. 9
FrontView.........................................................................................................................................................................9
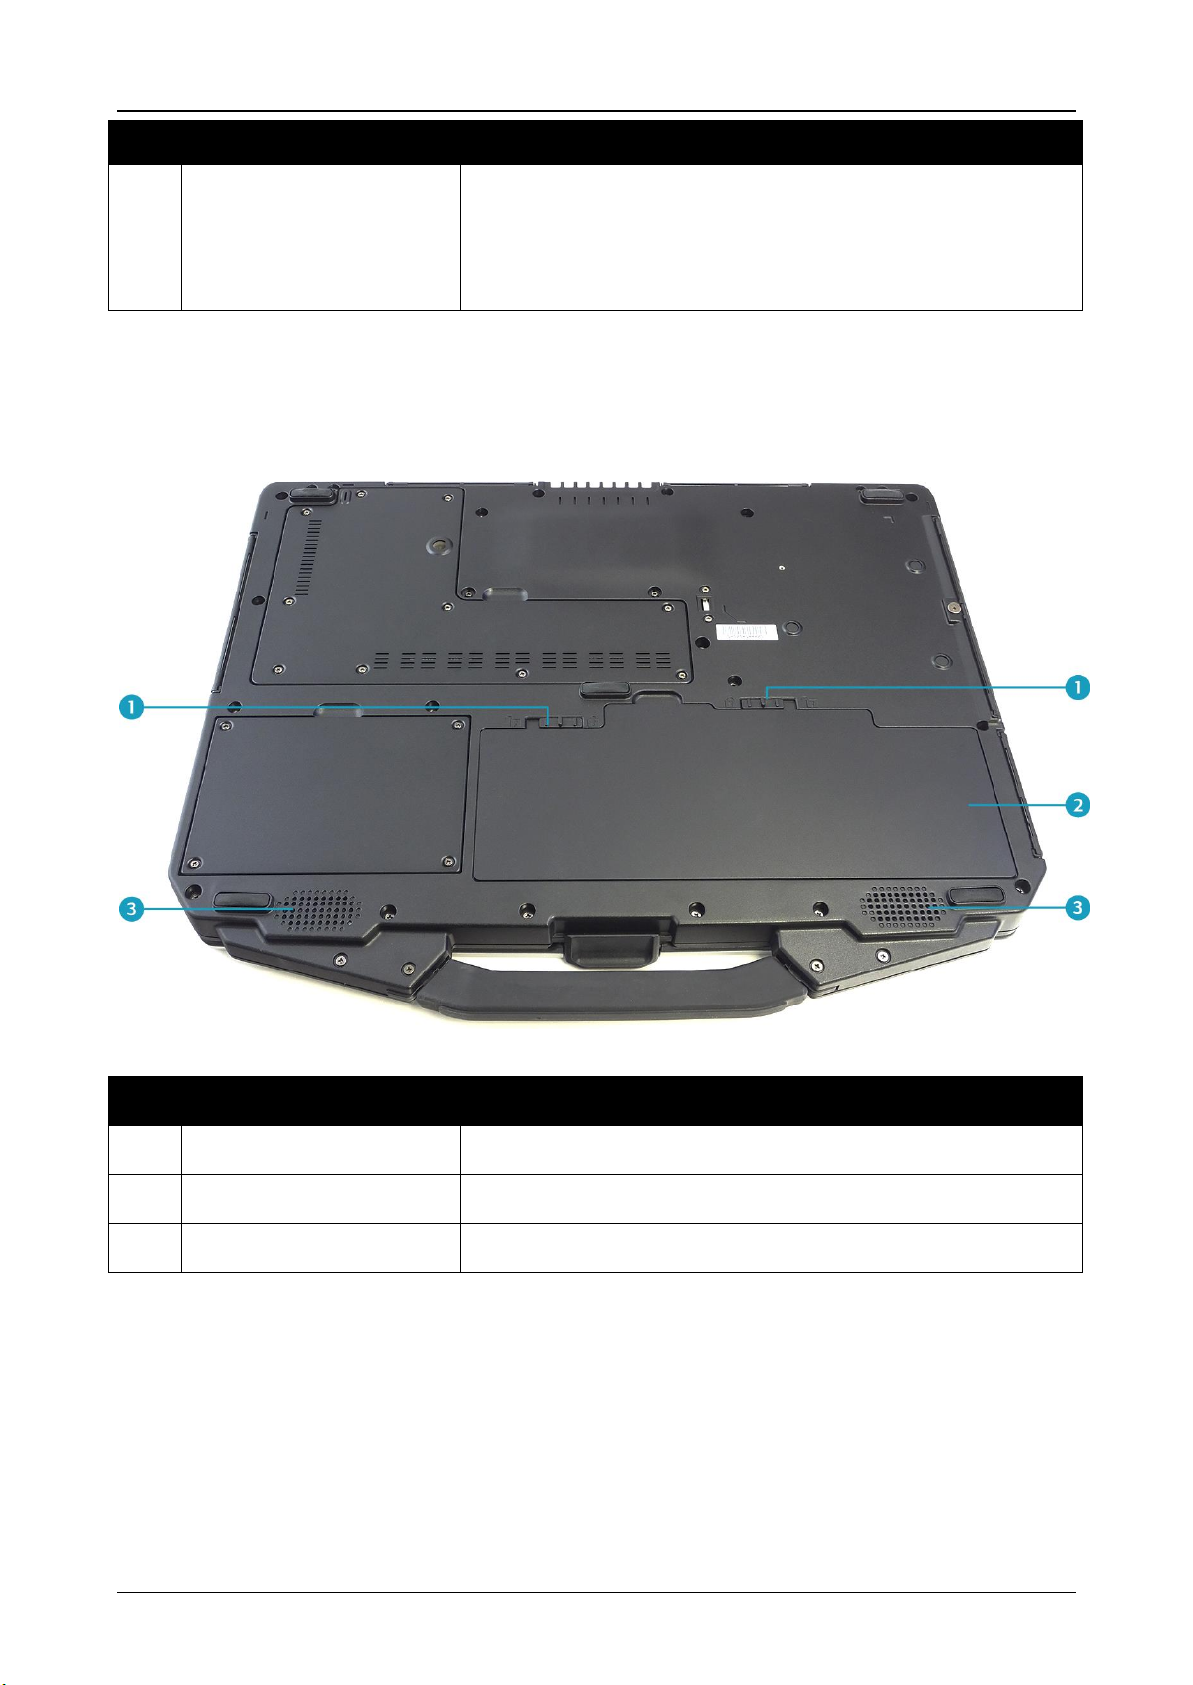
BackView........................................................................................................................................................................10
Left View.......................................................................................................................................................................... 11
Right View........................................................................................................................................................................12
RearView.........................................................................................................................................................................12
Status Indicators..............................................................................................................................................................13
GETTING STARTED ................................................................ 14
POWERING UP YOUR NOTEBOOK ..................................................................... 14
Connecting the AC Adapter............................................................................................................................................14
Using Battery Power.......................................................................................................................................................14
INSTALLING THE BATTERY ............................................................................. 15
Charging the Battery.......................................................................................................................................................16
Charging Time.................................................................................................................................................................16
Checking the Battery Level.............................................................................................................................................16
When toreplace the Battery Pack..................................................................................................................................17
Removing the Battery......................................................................................................................................................17
STARTING YOUR NOTEBOOK .......................................................................... 19
Turning OnYour Notebook.............................................................................................................................................19
Shutting Down Your Notebook.......................................................................................................................................19
USING THE KEYBOARD................................................................................. 21
USING THE TOUCH PAD................................................................................ 22
USING THE MEMORY CARDS .......................................................................... 23
Inserting a Memory Card...............................................................................................................................................23
Removing a Memory Card.............................................................................................................................................23
USING THE SMART CARD.............................................................................. 25
Inserting a Smart Card...................................................................................................................................................25
USING THE OPTICAL DISK DRIVE .................................................................... 26
Placing a Disc.................................................................................................................................................................26

CONNECTING TO WIRELESS CONNECTIONS......................... 27
CONNECTING TO A WIRELESS LOCAL AREA NETWORK ............................................ 27
CONNECTING TO A BLUETOOTH DEVICE ............................................................. 30
USING THE BIOS SETUP UTILITY.......................................... 34
BIOS SETUP MENU.................................................................................... 34
STARTING THE BIOS SETUP UTILITY ................................................................ 34
NAVIGATING AND ENTERING INFORMATION IN BIOS.............................................. 35
MAIN MENU............................................................................................. 36
ADVANCED MENU ...................................................................................... 36
BOOT MENU............................................................................................. 37
SECURITY MENU........................................................................................ 37
SAVE &EXIT MENU .................................................................................... 38

Preface
4
Copyright
Copyright©2015. All rights reserved.
No part of this user manual may be transmitted, stored in a retrieval system, or
translated into any language or computer language, in any form or by any
means, without the prior written permission of the manufacturer. Information is
subject to change without prior notice.
Regulatory Statement
Federal Communication Commission Interference Statement
This equipment has been tested and found to comply with the limits for a Class
B digital device, pursuant to Part 15 of the FCC Rules. These limits are designed
to provide reasonable protection against harmful interference in a residential
installation. This equipment generates, uses and can radiate radio frequency
energy and, if not installed and used in accordance with the instructions, may
cause harmful interference to radio communications. However, there is no
guarantee that interference will not occur in a particular installation. If this
equipment does cause harmful interference to radio or television reception,
which can be determined by turning the equipment off and on, the user is
encouraged to try to correct the interference by one of the following measures:
Reorient or relocate the receiving antenna.
Increase the separation between the equipment and receiver.
Connect the equipment into an outlet on a circuit different from that to which
the receiver is connected.
Consult the dealer or an experienced radio/TV technician for help.
FCC Caution: Any changes or modifications not expressly approved by the party
responsible for compliance could void the user's authority to operate this
equipment.
This device complies with Part 15 of the FCC Rules. Operation is subject to the
following two conditions: (1) This device may not cause harmful interference,
and (2) this device must accept any interference received, including interference
that may cause undesired operation.

Preface
5
IMPORTANT NOTE:
Radiation Exposure Statement:
This equipment complies with FCC radiation exposure limits set forth for an
uncontrolled environment. This equipment should be installed and operated with
minimum distance 20cm between the radiator & your body.
This transmitter must not be co-located or operating in conjunction with any
other antenna or transmitter.
Country Code selection feature to be disabled for products marketed to the
US/CANADA
This wireless adapter is restricted to indoor use due to its operation in the 5.15
to 5.25 and 5.470 to 5.75GHz frequency ranges. FCC requires this wireless
adapter to be used indoors for the frequency ranges 5.15 to 5.25GHz and 5.470
to 5.75GHz to reduce the potential for harmful interference to co-channel mobile
satellite systems. No configuration controls are provided for Intel® wireless
adapters allowing any change in the frequency of operations outside the FCC
grant of authorization for U.S. operation according to Part 15.407 of the FCC
rules.
CAUTION
RISK OF EXPLOSION IF BATTERY IS REPLACED BY AN INCORRECT
TYPE.REPLACE ONLY WITH THE SAME OR EQUIVALENT TYPE RECOMMENDED
BY THE MANUFACTURER. DISPOSE OF USED BATTERIES ACCORDING TO THE
INSTRUCTIONS.
ATTENTION
II y a danger d'explosion s'il y a remplacement incorrect de la batterie.
Remplacer uniquement avecune batterie du même type ou d'un type équivalent
recommandé par le constructeur. Mettre au rebut les batteries usagées
conformément aux instructions du fabricant.

Preface
6
CLASS 1 LASER PRODUCT
LASERSCHUTZKLASSE 1 PRODUKT TO EN60825
CAUTION:
THIS APPLIANCE CONTAINS A LASER SYSTEM AND IS
CLASSIFIED AS A "CLASS 1 LASER PRODUCT.” TO USE THIS
MODEL PROPERLY, READ THE INSTRUCTION MANUAL
CAREFULLY AND KEEP THIS MANUAL FOR FUTURE REFERENCE.
IN CASE OF ANY TROUBLE WITH THIS MODEL, PLEASE CONTACT
YOUR NEAREST "AUTHORIZED SERVICE STATION.” TO PREVENT
DIRECT EXPOSURE TO THE LASER BEAM, DO NOT TRY TO OPEN
THIS ENCLOSURE.
PRODUIT LASER DE CLASSE 1
LASERSCHUTZKLASSE 1 PRODUKT TO EN60825
ATTENTION:
CE PRODUIT CONTIENT UN SYSTÈME LASER ET EST CLASSÉ
EN TANT QUE « PRODUIT LASER DE CLASSE 1 ». POUR
UTILISER CE MODÈLE CORRECTEMENT, LISEZ LE MANUEL
D’INSTRUCTIONS ATTENTIVEMENT ET CONSERVEZ-LE POUR
RÉFÉRENCE FUTURE. EN CAS DE PROBLÈMES AVEC CE
MODÈLE, VEUILLEZ CONTACTER VOTRE « STATION DE
SERVICE AUTORISÉE » LA PLUS PROCHE. POUR ÉVITER UNE
EXPOSITION DIRECTE AUX FAISCEAUX LASER, N’ESSAYEZ
PAS D’OUVRIR CE BOÎTIER.
ANNEX IV
Symbol for the marking of electrical and electronic equipment
The symbol indicating separate collection for electrical and electronic equipment
consists of the crossed-out wheeled bin, as shown below. The symbol must be
printed visibly, legibly and indelibly.

Preface
7
CAUTION FOR ADAPTER
THE RUGGED NOTEBOOK PC IS FOR USE WITH DEDICATED AC ADAPTER (DC
+19V, 65W).
NOTE POUR L'ADAPTATEUR
L'ORDINATEUR PORTABLE ROBUSTE EST À UTILISER AVEC L'ADAPTATEUR
SECTEUR SPÉCIFIQUE (+19 V CC, 65W).
BATTERY SAFETY
DANGER OF EXPLOSION IF BATTERY IS INCORRECTLY REPLACED.
REPLACE ONLY WITH THE SAME OR EQUIVALENT TYPE RECOMMENDED BY THE
MANUFACTURER. DISPOSE OF USED BATTERIES ACCORDING TO THE
MANUFACTURER'S INSTRUCTIONS.
SÉCURITÉ DE LA BATTERIE
DANGER D'EXPLOSION SI LA BATTERIE EST NON CONFORMES.
REMPLACER UNIQUEMENT AVEC LE MÊME TYPE OU ÉQUIVALENT RECOMMANDÉ
PAR LE FABRICANT. RECYCLAGE DES BATTERIES USAGÉES SELON LES
INSTRUCTIONS DU FABRICANT.
CAUTION FOR RJ-45
The RJ-45 jack is not used for telephone line connection.
ATTENTION POUR RJ-45
RJ-45 n'est pas utilisé pour l’ accès de la ligne téléphonique.

Before You Start
8
Before You Start
Congratulations on your purchase of this notebook.
This rugged notebook is portable and provides users with maximum mobile
computing experience in a wide range of working environments. Before you
begin using your notebook, read this chapter to familiarize yourself with the main
components installed in the system.
Package Contents
If any of following items is damaged, please contact your retailer.
Notebook
Power cord
DC 19V 65W power
adapter
Lithium Polymer Battery
Pack
NOTE
The pictures are for reference only, actual items may slightly differ.

Before You Start
9
Components
Front View
No.
Item
Description
1
Microphone
Record the surrounding sound.
2
Web camera
Use for video conference.
3
Display screen
Provide visual output.
4
Power button
Press to turn your notebook on or off.
5
Waterproof keyboard
Press the keys to input information.
6
Touch pad
Use to point, select, drag, or scroll objects on the
screen.
7
Touch pad button
Press to select objects or display a shortcut menu.

Before You Start
10
No.
Item
Description
8
Device Indicators
(Power, Wireless,
HDD, Caps Lock,
Num lock, Battery)
Indicate the corresponding function status.
Back View
No.
Item
Description
1
Battery latch
Slide to the unlock position to release the battery.
2
Battery compartment
Install the battery.
3
Speakers
Emit sound.

Before You Start
11
Left View
No.
Item
Description
1
Kensington lock slot
Connect to a Kensington-compatible notebook
security lock.
2
ODD LED indicator
A blinking ODD LED indicates ODD activity.
3
Eject button
Push to open the tray.
4
Pin Hole Eject
If the Eject button fails to work properly, insert a
paper clip into this hole to open the tray.
CAUTION: Turn off the notebook before
performing manual ejection.
5
Smart card reader
Use to insert smart cards.
6
RF switch
Slide it to the left to enable all wireless network
(WLAN) and Bluetooth communications.

Before You Start
12
Right View
No.
Item
Description
1
Card reader
Use to insert memory cards to transfer pictures,
music, and data between your notebook and flash
compatible devices. The card reader supports SD
(Secure Digital), SDXC, Mini-SD (with adapter).
2
Earphone jack
Connect headphones or external speakers.
3
USB 2.0 ports (x2)
Connect USB 2.0 peripheral devices.
4
DC-in jack
Connect the power adapter.
Rear View
No.
Item
Description
1
USB 3.0 ports (x2)
Connect USB 3.0 peripheral devices.
2
RJ-45 port
Connect to a local area network (LAN) using an
Ethernet cable.
3
HDMI output port
Connect an HDMI device such as an external HDMI
LCD TV.
4
VGA port
Connect to a display device such as an external
monitor or a projector.
5
RS-232 port
Connect a serial peripheral device.

Before You Start
13
Status Indicators
The status indicators in the bottom right corner of the notebook light up when a
particular function of the notebook is active. Each indicator is marked with a
symbol.
Icon
Item
Description
Power
The LED always lights on (blue) when the system is
running. When the system is in sleep mode, the LED
blinks.
RF
Indicate the status of RF (WLAN, Bluetooth, or
WWAN/GPS) communication. The LED always lights on
(blue) when the function is enabled.
HDD
A blinking HDD LED indicates HDD activity (data is being
read or written).
Num Lock
Lights on when Num Lock is activated.
Caps Lock
Lights on when Caps Lock is activated.
Battery
Indicate the battery status:
Green light means the battery is fully charged or the
battery capacity higher than 95%.
Orange light means the battery is being charged.
Blinking orange light means the battery cannot be fully
charged over 8 hours of charging.
Blinking red light means the battery power is low (less
than 7%).

Getting Started
14
Getting Started
This chapter will guide you on how to use your notebook.
Powering Up Your Notebook
Your notebook can be powered up using the AC adapter or the Lithium-ion battery.
Connecting the AC Adapter
The AC adapter powers up your notebook and charges the battery.
1. Connect the AC adapter to the DC-in jack of your notebook.
2. Connect the AC adapter to the power cord.
3. Plug the power cord to an electrical outlet.
Using Battery Power
1. Install a charged battery into the battery compartment.
2. Remove the AC adapter (if plugged). Your notebook will automatically use the
battery power.
NOTE
If you are using the notebook with the battery power for the first time, be sure
that the battery is fully charged before you operate the notebook.

Getting Started
15
Installing the Battery
To install the battery, follow the steps below:
1. Align and insert the battery into the battery compartment.
2. Push completely until the battery locks into place.
3. Slide the latch to the lock position ( ) to secure the battery.

Getting Started
16
Charging the Battery
The Lithium-ion battery is not fully-charged upon purchase.
To charge the battery, follow the steps below:
1. Install the battery to your notebook. See procedures above.
2. Connect the AC adapter to the DC-in jack of your notebook.
3. Connect the AC adapter to the power cord.
4. Plug the power cord to an electrical outlet.
Charging Time
Battery pack type
Charging time
Standard
(Lithium polymer battery pack)
3.5 hours (system off); 5~6 hours (system on)
NOTE
The charging time may be longer if you are using your notebook while charging
the battery.
CAUTION
DO NOT charge the battery if the temperature is below 0ºC or higher than
45ºC.
Use only the supplied AC adapter. Using other AC adapters may damage the
battery or your notebook.
ATTENTION
NE PAS charger la batterie si la température est inférieure à 0 ° C ou
supérieures à 45 º C.
Utilisez uniquement l'adaptateur secteur fourni. L'utilisation d'autres
adaptateurs secteur peut endommager la batterie ou de votre tablette PC.
Checking the Battery Level
It is important that you monitor the battery status regularly to ensure you do not
run out of power at a critical moment.
To check the remaining battery power, click the battery icon in the system tray.

Getting Started
17
The battery screen appears:
When to replace the Battery Pack
The battery performance gradually decreases over time and usage. We recommend
you to replace your battery pack after 18 to 24 months of usage.
Removing the Battery
To remove the battery, follow the steps below:
1. Slide the battery latch to the unlock position ( ).

Getting Started
18
2. Remove the battery out of the battery compartment.

Getting Started
19
Starting Your Notebook
Turning On Your Notebook
1. To open the display panel, lift the cover lid up to upright position.
2. Press the button until the Power LED lights up.
Shutting Down Your Notebook
It is important to properly shut down your notebook to avoid the loss of unsaved
data. To shut down your notebook, do the following:
Windows 7
Click Start > Shut down.
Wait for your notebook to turn off power completely
before removing the power source (if necessary).

Getting Started
20
Windows 8.1
Click and select Shut down.
TIP
If you are on the desktop, click to return to the Start screen.
Other manuals for S15AB
2
Table of contents
Other Durabook Laptop manuals

Durabook
Durabook S15AB2 User manual

Durabook
Durabook SA14S User manual

Durabook
Durabook U12C User manual

Durabook
Durabook U14M User manual

Durabook
Durabook S15 User manual

Durabook
Durabook S15AB User manual

Durabook
Durabook S14I User manual

Durabook
Durabook D13RL User manual

Durabook
Durabook U12C User manual

Durabook
Durabook SA14iT User manual