REPLACING THE SQUEEGEE BLADES
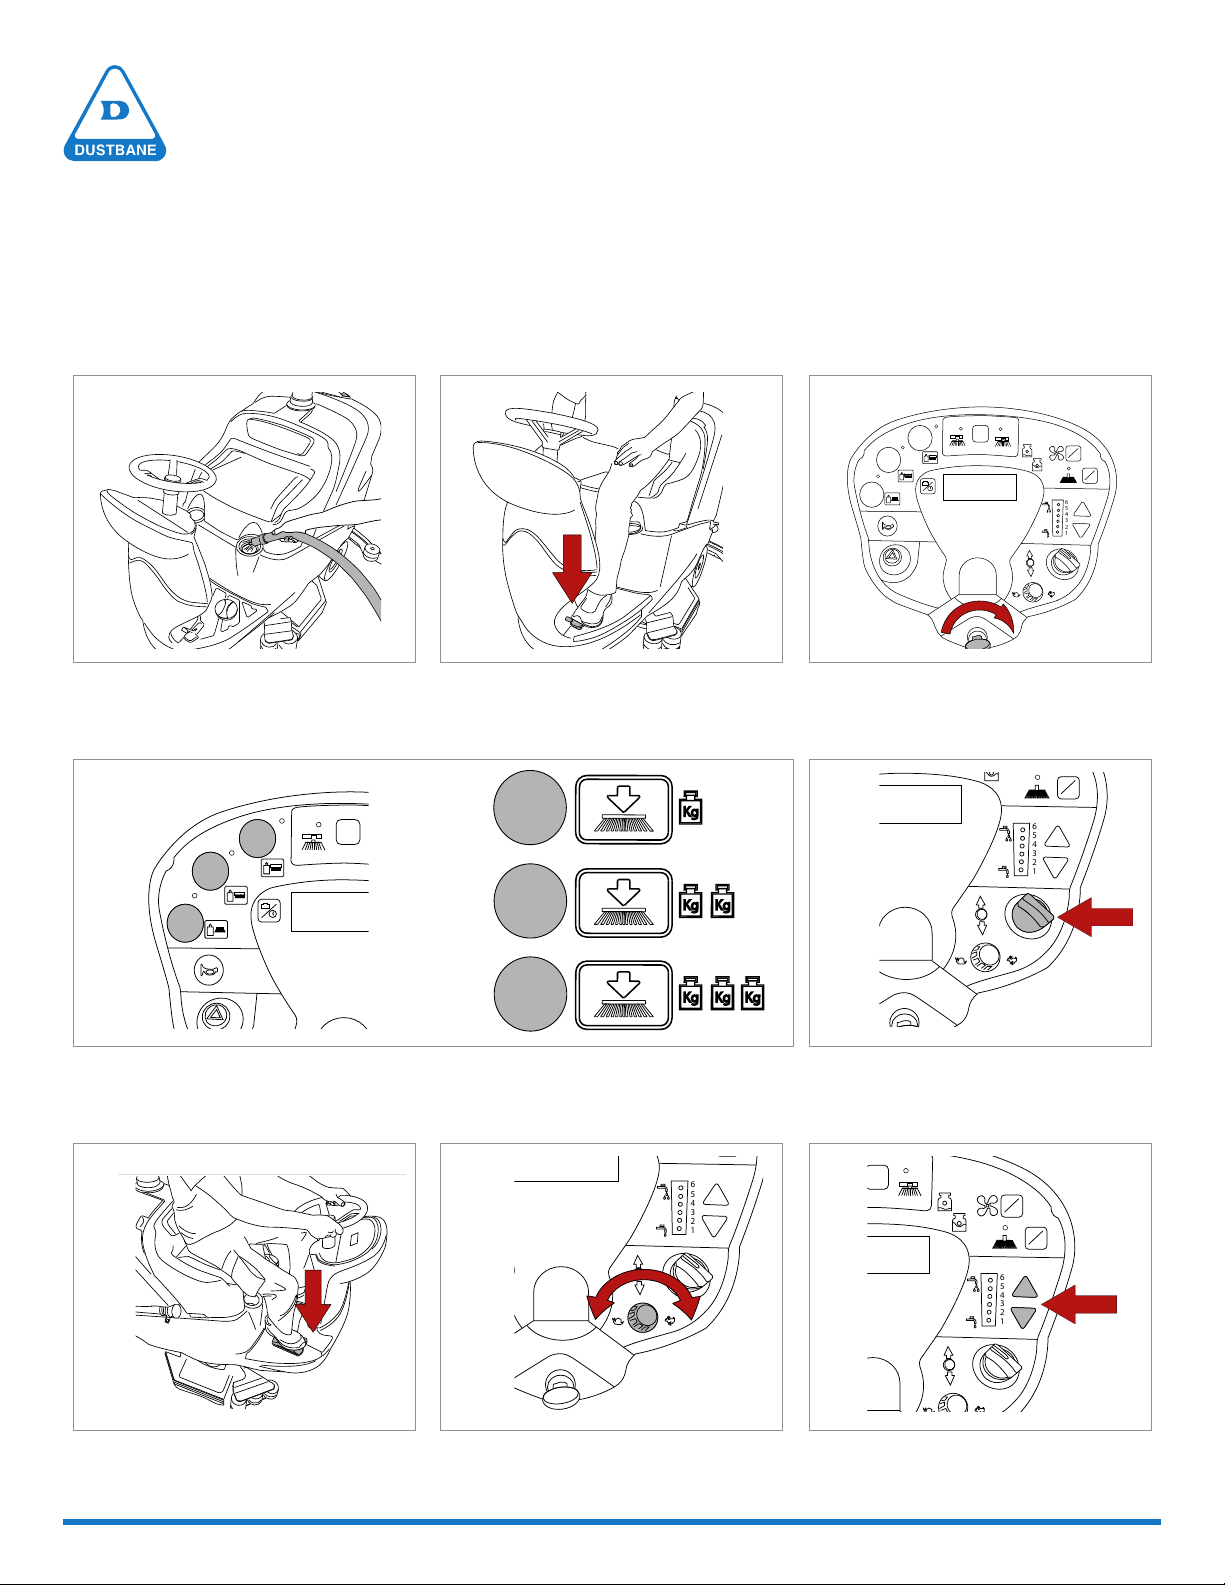
ATTACHING/REMOVING THE BRUSHES
Attaching:
Press the CLICK ON-OFF button. The machine first performs
a release operation, then immediatley afterwards enables the
attachment operation. Press the CLICK ON-OFF button again
to automatically attach the brushes.
Removing:
Press the CLICK ON-OFF button, the machine releases the
brushes.
Ref. 1
REPLACING THE SQUEEGEE BLADES
ATTACHING/REMOVING THE BRUSHES
unscrew the wing nuts xing the blade retainer;
remove the blade retainer;
remove the blade;
put the same blade back, reversing the edge in contact with the oor, or replace with a new one;
reposition the blade retainer and x the wing nuts back;
Attaching:
Press the “Click-O-On” button. The machine rst performs a release operation, then immediately afterwards enables the attachment
operation. Press the “Click-O-On” button again to automatically attach the brushes.
Releasing:
Press the “Click-O-On” button, the machine releases the brushes.
DAILY MAINTENANCE
Clean the dirty
water tank.
Check the suction lter is
undamaged and clean.
Check that the
detergent outlet lter
is clean.
Check that the
brushes are clean.
Check that the
squeegee is clean
and the blades are not
worn.
PLDC01851
36V
P1
P2
Click-O
Click-On
1
2
3
Click-O
Click-On
REPLACING THE SQUEEGEE BLADES
ATTACHING/REMOVING THE BRUSHES
unscrew the wing nuts xing the blade retainer;
remove the blade retainer;
remove the blade;
put the same blade back, reversing the edge in contact with the oor, or replace with a new one;
reposition the blade retainer and x the wing nuts back;
Attaching:
Press the “Click-O-On” button. The machine rst performs a release operation, then immediately afterwards enables the attachment
operation. Press the “Click-O-On” button again to automatically attach the brushes.
Releasing:
Press the “Click-O-On” button, the machine releases the brushes.
DAILY MAINTENANCE
Clean the dirty
water tank.
Check the suction lter is
undamaged and clean.
Check that the
detergent outlet lter
is clean.
Check that the
brushes are clean.
Check that the
squeegee is clean
and the blades are not
worn.
PLDC01851
36V
P1
P2
DAILY MAINTENANCE
Clean the dirty water tank.
Make sure the brushes/drive pad are
clean and not worn out. Replace if
necessary.
Make sure the squeegee is clean and
the blades are not worn.
TO CHARGE BATTERIES
1. Disconnect battery pack from the
machine.
2. Connect battery pack to the charger.
3. Plug in charger to power outlet.
NOTE: Never stop charge until cycle is
complete (Green light).
Make sure the suction filter and debris
filter is clean and undamaged.
Make sure detergent outlet filter is
clean and free of debris.
REPLACING THE SQUEEGEE BLADES
ATTACHING/REMOVING THE BRUSHES
unscrew the wing nuts xing the blade retainer;
remove the blade retainer;
remove the blade;
put the same blade back, reversing the edge in contact with the oor, or replace with a new one;
reposition the blade retainer and x the wing nuts back;
Attaching:
Press the “Click-O-On” button. The machine rst performs a release operation, then immediately afterwards enables the attachment
operation. Press the “Click-O-On” button again to automatically attach the brushes.
Releasing:
Press the “Click-O-On” button, the machine releases the brushes.
DAILY MAINTENANCE
Clean the dirty
water tank.
Check the suction lter is
undamaged and clean.
Check that the
detergent outlet lter
is clean.
Check that the
brushes are clean.
Check that the
squeegee is clean
and the blades are not
worn.
PLDC01851
36V
P1
P2
REPLACING THE SQUEEGEE BLADES
ATTACHING/REMOVING THE BRUSHES
unscrew the wing nuts xing the blade retainer;
remove the blade retainer;
remove the blade;
put the same blade back, reversing the edge in contact with the oor, or replace with a new one;
reposition the blade retainer and x the wing nuts back;
Attaching:
Press the “Click-O-On” button. The machine rst performs a release operation, then immediately afterwards enables the attachment
operation. Press the “Click-O-On” button again to automatically attach the brushes.
Releasing:
Press the “Click-O-On” button, the machine releases the brushes.
DAILY MAINTENANCE
Clean the dirty
water tank.
Check the suction lter is
undamaged and clean.
Check that the
detergent outlet lter
is clean.
Check that the
brushes are clean.
Check that the
squeegee is clean
and the blades are not
worn.
PLDC01851
36V
Unscrew the wing nuts fixing the blade retainer.
Remove the blade retainer.
Remove the blade.
Put the same blade back, reversing the edge in contact with
the floor, or replace with a new one.
Reposition the blade retainer and fix the wing nuts back.
Dustbane Products Ltd., 1000 Last Mile Dr., Ottawa, ON K1G 6Y1 • Tel: 1-800-387-8226 Fax: 1-800-363-5309 www.dustbane.ca