Eargo 99-0001-001 User manual

Charger

What’s Included:
Micro USB
Cord
Charger USB Plug

Contents
01
Indications for Use
05
Charging Your Eargo
11
Charging Your Charger
13
Storage
15
Share The Love!
17
Troubleshooting
19
Support
21
Appendix

1 2
Indications for Use
The hearing instrument is intended to amplify and transmit
sound to the ear and thereby compensate for mild to
moderate impaired hearing.
Warning to Hearing Aid Dispensers
A hearing aid dispenser should advise a prospective hearing
aid user to consult promptly with a licensed physician
(preferably an ear specialist) before dispensing a hearing aid
if the hearing aid dispenser determines through inquiry, actual
observation, or review of any other available information
concerning the prospective user, that the prospective user has
any of the following conditions:
(i) Visible congenital or traumatic deformity of the ear.
(ii) History of active drainage from the ear within the previous
90 days.
(iii) History of sudden or rapidly progressive hearing loss within
the previous 90 days.
(iv) Acute or chronic dizziness.
(v) Unilateral hearing loss of sudden or recent onset within the
previous 90 days.
(vi) Audiometric air bone gap equal to or greater than 15
decibels at 500 hertz (Hz), 1,000 Hz, and 2,000 Hz.

1 2
(vii) Visible evidence of significant cerumen accumulation or a
foreign body in the ear canal.
(viii) Pain or discomfort in the ear.
Important Notice for Prospective Hearing Aid Users
Good health practice requires that a person with hearing loss
have a medical evaluation by a licensed physician (preferably
a physician who specializes in diseases of the ear) before
purchasing a hearing aid. Licensed physicians who specialize
in diseases of the ear are often referred to as otolaryngologists,
otologists or otorhinolaryngologists. The purpose of medical
evaluation is to assure that all medically treatable conditions
that may affect hearing are identified and treated before the
hearing aid is purchased.
Following the medical evaluation, the physician will give you
a written statement that states that your hearing loss has
been medically evaluated and that you may be considered a
candidate for a hearing aid. The physician will refer you to
an audiologist or a hearing aid dispenser, as appropriate, for
a hearing aid evaluation.
The audiologist or hearing aid dispenser will conduct a hearing
aid evaluation to assess your ability to hear with and without
a hearing aid. The hearing aid evaluation will enable the

3 4
audiologist or dispenser to select and fit a hearing aid to your
individual needs.
If you have reservations about your ability to adapt to
amplification, you should inquire about the availability of a trial
rental or purchase option program. Many hearing aid dispensers
now offer programs that permit you to wear a hearing aid for a
period of time for a nominal fee after which you may decide if
you want to purchase the hearing aid.
Federal law restricts the sale of hearing aids to those individuals
who have obtained a medical evaluation from a licensed
physician. Federal law permits a fully informed adult to sign a
waiver statement declining the medical evaluation for religious or
personal beliefs that preclude consultation with a physician. The
exercise of such a waiver is not in your best health interest and
its use is strongly discouraged.
Children with Hearing Loss
In addition to seeing a physician for a medical evaluation, a
child with a hearing loss should be directed to an audiologist
for evaluation and rehabilitation since hearing loss may cause
problems in language development and the educational and
social growth of a child. An audiologist is qualified by training
and experience to assist in the evaluation and rehabilitation of
a child with a hearing loss.

3 4
Additional Notices
A hearing aid will not restore normal hearing and will not
prevent or improve a hearing impairment resulting from
organic conditions. In most cases infrequent use of a hearing
aid does not permit a user to attain full benefit from it.
The use of a hearing aid is only part of hearing habilitation and
may need to be supplemented by auditory training and instruction
in lip reading. Please see the accompanying Guide to Your First
Month with Eargo for additional information about adjusting to and
maximizing your experience using your Eargo hearing devices.
Possible Side Effects
Minor irritation and inflammation may occur as your ear becomes
accustomed to having an object in it. If this or anything related may
arise, please contact Eargo.
If an actual allergic reaction occurs, contact your hearing
care professional.
Severe swelling, discharge from the ear, excessive wax or other
unusual conditions warrant immediate consultation with a physician.
If, for any reason, your hearing devices do not operate properly, do
NOT attempt to fix them yourself. Not only are you likely to violate
any applicable warranties, you could cause further damage.

5
Let’s Get All Charged Up
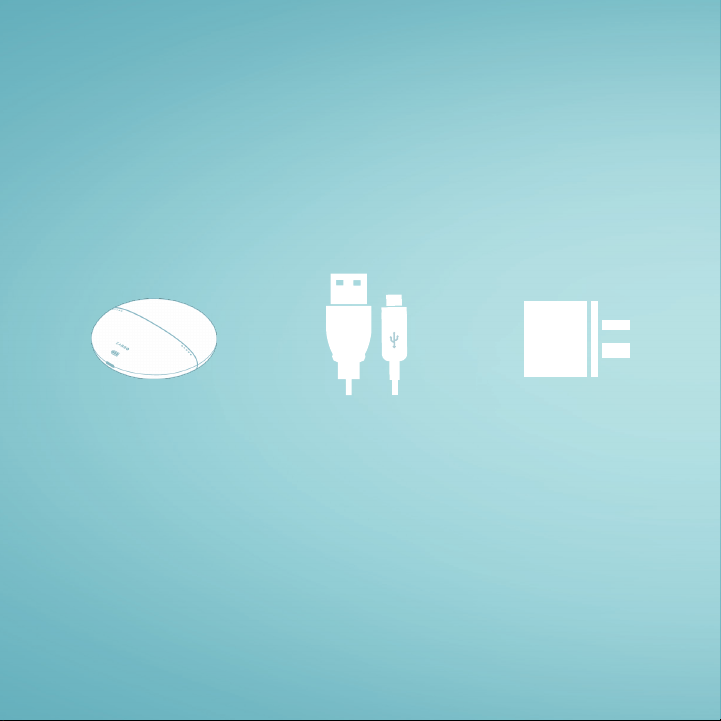
The Charger and Charging Base
Ok, this is the part where we tell you some things you might find kind
of obvious. We’d just ask that you read everything through – you
never know when you’re going to run across something you don’t
know but need to. Heck, we’ve gone to the trouble to write all these
words, it’d be a shame if no one read them. They’d get so lonely.
The Eargo charger is portable, which means it can charge your
Eargo devices on the go. The charger also needs to get charged
from time to time. That’s what the white charging base is for.
Let’s make sure your charger and Eargo devices are fully
charged before using them. Top those babies up! Sometimes
the batteries drain while in shipment from our factory. It’s a long
trip and they get bored and lonesome. You know how it is.
As you know by now, we like to make things as easy as we can
for you. So when your Eargo devices arrive, they’re already
placed inside the charger. Please leave them there for now.
• Connect the smaller end of the micro USB cord to the white
charging base, and the larger end of the cord to the USB plug
• Plug the USB plug into a powered wall outlet
• Place the charger, with lights and logo facing up, on top of
the white charging base

6
Charging Base
Charger
Micro
USB Cord
Indicator Light
Make sure the charger is centered on the charging base. When
the charger is properly seated on the charging base, a light on
the charging base will briefly turn on, and you will hear a tone.
On the charger itself, all indicator lights will briefly glow. When
this happens, the charger (and the Eargo devices inside) will
begin to charge via inductive charging. Bada bing, bada boom.
If the light on the charging base does not turn on and you don’t
hear a tone, please reposition the charger in the center of the
charging base.
It takes approximately 6 hours to fully charge
your charger and Eargo devices.
When charging is complete, you can
start using your Eargo devices.
Please discard the tape and foam
that is used to secure the Eargo
devices during shipping before
removing your Eargo devices
from the charger for the first time.
The Eargo charger can also
be charged by connecting
the micro USB cord directly
to the bottom of the charger.

7
Let’s Continue To Get All Charged Up
Inserting Eargo Devices Into The Charger
When it comes time to charge your Eargo devices, simply
insert them into the charger, one Eargo at a time. Gently
wiggle them into the cradles with the domes facing inward
and the removal threads out and up. Do not force them into
place - a little wiggle, and they slide right into place.
When inserting your Eargo into the cradle, gently push
straight down on the black body of the Eargo above the
gold contacts, not on the white Flexi Fibers.
When the charging light under the Eargo changes from
solid blue to solid white, charging will begin. This charging
light may flash blue for a few seconds before turning solid
white when you first insert the Eargo. This is normal. But, if
this charging light continues to flash blue for an extended
period of time, or remains solid blue, the Eargo is not
inserted correctly. Remove and re-insert the Eargo.
You will know you’re all set when the charging lights under
the Eargo devices remain solid white, and the indicator
lights on the outside of the charger start scrolling.

Charging
light inside
charger
Removal thread
out and up
Push down
into cradle
8
Cradle

9

10
FULL CHARGE
LOW CHARGE
Let’s Continue To Get All Charged Up
Charging Indicators
After your Eargo devices are inserted, the charge indicator
lights will turn on and start scrolling. This will last for about
90 seconds while the charger is assessing how much charge
the Eargo devices have left. This way the charger will know
if it should charge the devices full blast, or just gently trickle-
charge them. Clever little charger, eh?
After this assessment period, the lights will show how much
juice you have in each Eargo (1 to 4 lights) and will dim after
approximately 10 seconds.
It takes approximately 6 hours to fully charge your Eargo
devices and a full charge will give you up to 16 hours of use.

11 12
Charging Your Charger
The Eargo charger is portable, and you can use it to charge
your Eargo devices on the go. What we mean is the charger
runs on its own internal rechargeable battery. The charger will
hold a charge for about a week while charging your Eargo
devices every day.
To recharge your charger, simply put it on the charging base or
plug in the micro USB cord. It’ll take about 6 hours to charge up
fully. Then you’re good to go. In a literal and figurative sense.
While charging the charger, the Eargo devices will also charge.
If you’re the curious sort – and we can’t blame you if you are
– gently tap the charge indicator wake-up button at any time.
This is an invisible button (pretty cool, isn’t it?) that’s located
between the Eargo logo and the battery symbol. Tapping it will
wake up the indicator lights and check the charge levels of the
charger and Eargo devices. You know the old saying, a watched
Eargo charges at approximately the same rate as an unwatched
Eargo. That is an old saying, right? Well, it should be.

11 12
When charger is fully
charged, all battery
lights glow white.
Full Charge
When charger is at
low charge, one battery
light glows red.
Low Charge

13

14
Storage and Battery Life
Keep Your Eargo Devices Safe and Working Well
Proper storage of your Eargo devices will increase their
lifespan and keep them in top working condition. They’re
kind of like people in that way.
When not in use, store them in the charger. That’ll keep them
fully charged.
Maximizing Battery Life
To maximize the battery life of your Eargo devices, it is best
to wear them all day until their batteries run low or run out,
and then recharge them fully overnight in the charger.
To maximize the battery life of the charger, please place it on
the charging base each night.
Turning Off Your Eargo Devices
Placing your Eargo devices in the charger automatically turns
them off.

15 16
Share the Love!
Sample Packs for Friends
Don’t keep the ease and comfort of Eargo devices all
to yourself. Included in your box are three non-working
sample packs to pass along to friends and family. If any
of them purchase Eargo devices, and they use the code
included in the box, they’ll receive a $100 credit towards their
Eargo purchase, and will probably give you a big hug.
Your friends can also order sample packs at eargo.com or
by calling 1-800-61-EARGO.

15 16
Size 12 Size 15

17 18
Troubleshooting Guide
Issue Possible Cause Solutions
Poor sound quality • Low battery
• Wax or debris buildup
• Change in hearing level
• Charge Eargo
• Clean with alcohol pad
• Adjust sound profile
Eargo devices
don’t charge
• Eargo devices not placed
correctly in charger
• Remove and reposition Eargo devices correctly in charger
• If on charging base, reposition charger on charging base
No LEDs showing
on charger
• Did not tap wake-up button
• Charger discharged
• Tap charge indicator wake-up button
• Charge charger using USB cord and USB plug
No sound • Dead battery
• Wax or debris is blocking
the speaker
• Charge Eargo
• Clean dome with alcohol pad or cotton swab moistened
with alcohol
Different volume in left
and right ear
• Not set to correct program • Cycle through SP on one ear until volume
matches in both
Repeated beeps • Battery low • Charge Eargo
Charging light
flashing blue
• Eargo device not inserted
correctly in charger
• Remove and reposition Eargo device correctly in charger
How do I turn them off? • Not in charger • Place devices in charger to automatically turn them off
This manual suits for next models
3
Table of contents