manuals.online logo
Brands
  1. Home
  2. •
  3. Brands
  4. •
  5. Earlex
  6. •
  7. Kitchen Appliance
  8. •
  9. Earlex SS200 User manual

Earlex SS200 User manual

SS200
Hands-Free Wallpaper Stripper
Décolleuse à papier peint « mains libres »
Handenvrije behangstomer
Tapetenablöser zur freihändigen Verwendung
Please read these instructions carefully before use.
Thank you for purchasing an Earlex Hands-Free Steam Wallpaper Stripper. n order to obtain the
best results, please read these instructions BEFORE commencing any work.
Please also make a special note of the safety rules and
RETAIN FOR FUTURE REFERENCE
Earlex Ltd. will not accept any responsibility for the use of this product,
if used for any purposes other than those detailed in this manual.
Veuillez lire ces instructions attentivement avant utilisation.
Merci d’avoir acheté une décolleuse à papier peint « mains libres » d’Earlex. Afin d’obtenir les meilleurs résultats possibles,
veuillez lire ces instructions AVANT toute utilisation.
Veuillez également prendre connaissance des consignes de sécurité et
CONSERVEZ-LES AFIN DE POUVOIR LES CONSULTER ULTÉRIEUREMENT.
Earlex Sarl ne saurait en aucun cas être tenue responsable en cas d’utilisation de ce produit pour des travaux
autres que ceux décrits dans ce manuel.
Lees deze instructies voor gebruik alstublieft zorgvuldig door.
Hartelijk bedankt voor uw aankoop van de Earlex Handenvrije behangstomer. Om de beste resultaten te kunnen behalen
dient u deze instructies zorgvuldig door te lezen VOOR u met het werk aanvangt.
Besteed ook speciale aandacht aan de veiligheidsvoorschriften en
BEWAAR DEZE VOOR LATER.
Earlex Ltd. zal geen aansprakelijkheid voor het gebruik van dit product aanvaarden wanneer dit
gebruikt wordt voor andere doeleinden dan welke staan beschreven in deze handleiding.
Bitte lesen Sie diese Anleitung sorgfältig durch, bevor Sie das Gerät verwenden.
Vielen Dank für den Kauf des Earlex Dampf-Tapetenablösers zur freihändigen Anwendung. Um das bestmögliche
Ergebnis zu erzielen, lesen Sie bitte diese Anleitung, BEVOR Sie mit der Arbeit beginnen.
Bitte achten Sie besonders auf die Sicherheitsrichtlinien und
BEWAHREN SIE DIESE ZUM SPÄTEREN NACHSCHLAGEN AUF.
Earlex Ltd. übernimmt keine Verantwortung für den Gebrauch dieses Produktes, wenn es für andere,
nicht hierin beschriebene Zwecke verwendet wird.
2
CONTENTS
Page 2 Safety Rules
Page 3 What’s Included & Set Up
Page 4 Preparation & Operation
• Filling
• Stripping
Page 5 Completion & Storage
Page 6 Safety Cut Out
Other Uses & Trouble Shooting
Page 7 Guarantee
Page 8 Other Products in the Earlex Range
SAFETY RULES - PLEASE READ CAREFULLY
Please ensure that you test the plaster before commencing work. If the wallpaper stripper is left attached to the wall for long
periods of time (over 10 seconds) it may loosen damaged or blown plaster.
SYMBOLS
CAUTION
Warning: hot liquid or steam can burn. Danger of scalding. Steam may also condense into boiling droplets. Steam
should not be directed towards electrical appliances. Danger of scalding appears on the cap as this symbol.
DO NOT:
• Leave unattended.
• Leave steam plate attached to the wall for longer than 10 seconds. This is dependant on the type of wall covering being
removed and condition of plaster. Always test on a small area first.
• Modify pressure valve supplied.
• Stand on the stripper.
• Pull by the mains lead.
• Point hose or steam plate at anyone.
• Allow water or steam to enter light switches or sockets.
• Strain or kink hose.
• Block the top safety pressure relief valve; it is there for your protection.
• Switch off the vacuum whilst the steam plate is attached to the wall/ceiling.
• Be careful of overhead water dripping down when working on the ceiling.
• When removing Paper/Artex® from ceiling, ensure the steam plate is tilted away from face and body, and regularly check that
excessive water is not being retained in the steam plate. When using on the ceiling, remember to empty the waste water tank if it
becomes full.
• Always use and store upright.
• If using on the stairs, ensure boiler is in a safe and secure position.
• The unit becomes hot in use. Do not touch. Only move by using the carry handle.
• Always wear suitable protective clothing when operating the stripper.
• A small amount of water will be expelled from a small hose in the base of the unit onto the surface below. This is to ensure the safe
running of the wallpaper stripper and should not be blocked. Protect areas beneath the boiler, likely to be damaged by water or
heat by placing the unit on a tray or plastic sheet.
• The equipment must be unplugged after use and before cleaning.
• This appliance is not intended for use by persons (including children) with reduced physical, sensory or mental capabilities, or lack
of experience and knowledge, unless they have been given supervision or instruction concerning use of the appliance by a person
responsible for their safety.
• Children should be supervised to ensure they do not play with the appliance.
• Never remove filler cap or detach hose whilst unit is operating.
• Switch off and wait for 2 minutes before removing filler cap to refill boiler.
• Allow to cool completely before emptying boiler.
• Use only standard tap water. Never use detergents or chemicals.
• Extreme care must be taken if the unit is used in bathrooms. Always be aware of danger of electrocution from stored water in baths
or sinks.
• It is recommended that an RCD (residual current device) rated at 30mA is fitted into the mains supply socket for added protection
against electric shock.
• Keep equipment away from children and pets.
• Use only genuine Earlex replacement parts.
3
Please follow these simple instructions to fully assemble your
hands-free wallpaper stripper BEFORE use.
1. Remove hoses and Velcro straps from plastic bags.
2. The main hose has two small black tubes
coming out of one end. The larger tube
(A) is for steam and the smaller tube (B)
is for the vacuum. Attach these tubes to
the steam plate by inserting through the
handle hole. Attach the larger tube (A)
to the steam outlet (D), and the smaller
tube (B) to the vacuum inlet (C). Make
sure the spring clip (8) provided is fitted
as shown. You will need a pair of long-
nose pliers to pinch the spring clip to
widen it to fit over the tube.
3. Once the tubes are connected, clip
the hose into the steam plate handle
as shown.
4. Use Velcro straps to secure both hoses
together.
5. CEILING SET UP
Connect the Ceiling Waste Water
Drainage Hose to the Waste Water
Outlet on the steam plate. Store the
Waste Water Outlet Cover (E) in the
tube on the steam plate for security.
6. WALL SET UP
Store the Ceiling Waste Water
Drainage Hose in the tube on the
steam plate for security. Ensure the
Waste Water Outlet Cover is pushed
into the Waste Water Outlet to prevent
steam escaping when using the unit
on walls.
7. Screw on the other end of the main
hose to the boiler, and tighten by
hand.
8. Connect the rubber Boiler Vacuum
Tube (F) from the the vacuum outlet of
the main hose to the vacuum port on
top of the unit.
9. Place the end of the ceiling waste water
hose into the waste water collection
tank.
10. The unit is now ready to operate. Please
see operation instructions below.
NB: The ceiling waste water hose is only required when working
on ceilings and is not needed for work on walls. It can be secured
to the main hose using the Velcro straps and stored in the tube
when not in use, or left off the assembly of the product.
WHATS INCLUDED...
SET UP
1
2
68
7
5
4
3
9
AB
C
D
E
10
11
12
F
1 Boiler
2 Ceiling Waste Water Collection Tank
(Spare Part - HF0021)
3 Main Steam Hose
(Spare Part - HF0058)
4 Ceiling Waste Water Drainage Hose
5 Steam plate (Spare Part - HF0026)
with Foam Filter and Vacuum Seal
6 Vacuum Seal (Spare Part - HF0061)
7 Foam Filter (Spare Part - HF0063)
8 Spring Clip (Spare Part - M0211)
9 Spatula
10 Filler Cap (Spare Part - F13)
11 Velcro Straps x 4
12 Hose & Cable Storage Clips
(Spare Part - HF0016)
A Steam Tube
B Steam Plate Vacuum Tube
(Spare Part - HF0086)
C Vacuum Inlet
D Steam Outlet
E Waste Water Outlet Cover
F Boiler Vacuum Tube
(Spare Part - HF0092)
PARTS LIST
A
B
C
D
F
E
E
4
OPERATION
DANGER FROM STEAM The unit has been designed for safe and fast removal of wallpaper but you must be aware at all times that
steam is being produced and it can burn.
FILLING
WARNING: BEWARE OF HOT WATER DISCHARGE PRIOR TO STEAM EMISSION.
DO NOT:
• Over-tighten the filler cap.
• Overfill the unit by tilting the unit as hot water may be forced up the hose.
• Leave unattended.
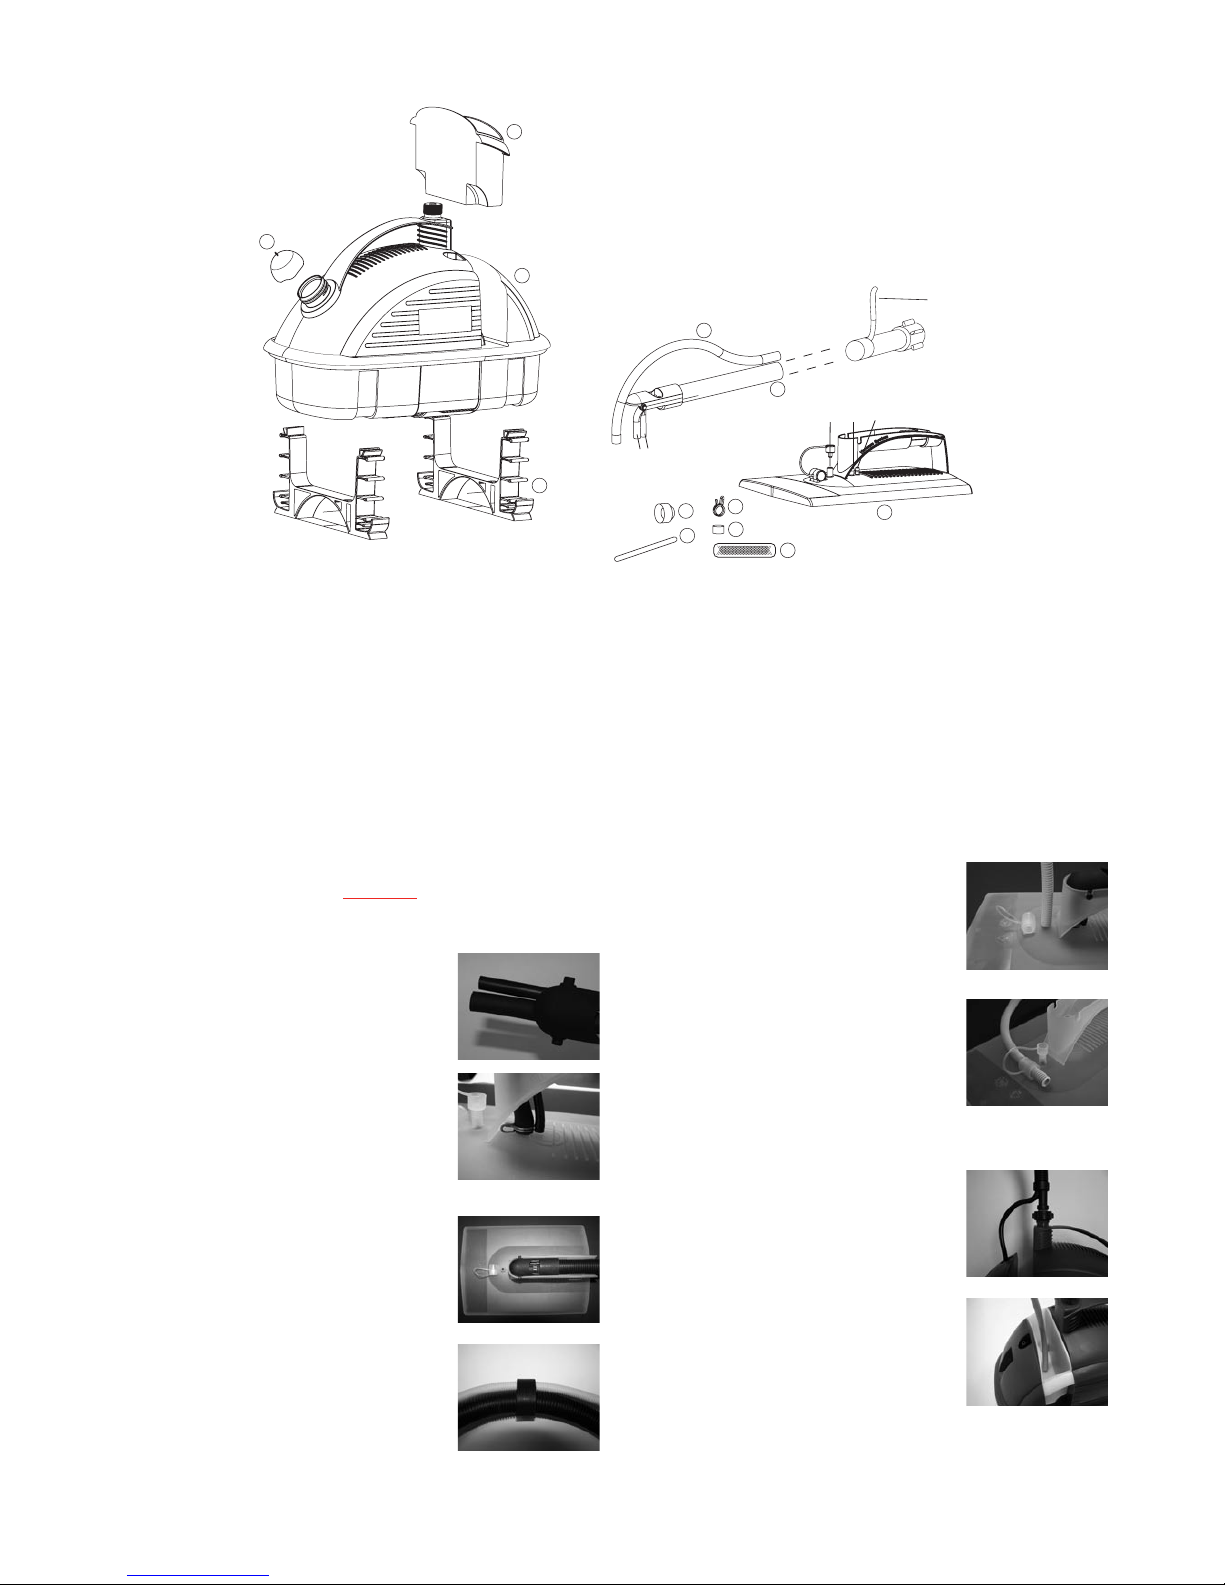
1. Remove filler cap on top of the boiler and fill to the top with clean water, preferably hot. Do not tilt the unit when filling. If refilling
the unit, ensure that itis disconnected from the main power
2. If filled to the maximum (point of overflow) 5 litres, the stripper will operate for approximately 78 minutes before requiring refilling.
It will take longer to commence steaming on a maximum fill, taking up to 15 minutes.
3. Always replace the filler cap after filling. The cap only needs to be hand tight.
4. The capacity of 5 litres (9 pints) provides approximately 78 mins steaming time before the safety cut-out operates. For
a shorter steaming time use less water.
5. Connect mains lead to the power socket and switch on the steam switch only, indicated by this symbol. It will take
between 8 - 15 minutes (approx.) for the unit to start producing steam depending on the temperature and the quantity
of water used.
WARNING - Hot water discharge before steam is produced.
6. Once steam is produced at the steam plate, you will need to switch the vacuum pump on, indicated by this symbol.
You are then ready to commence operation. Make sure that the motor air inlet on the base of the unit is not blocked
by the dustsheet as this will cause the motor to overheat. The motor is fitted with a re-setting thermal cut-out. If thermal cut-out
is activated, please allow 15 minutes for the unit to reset.
STRIPPING
Remember to check a small area first.
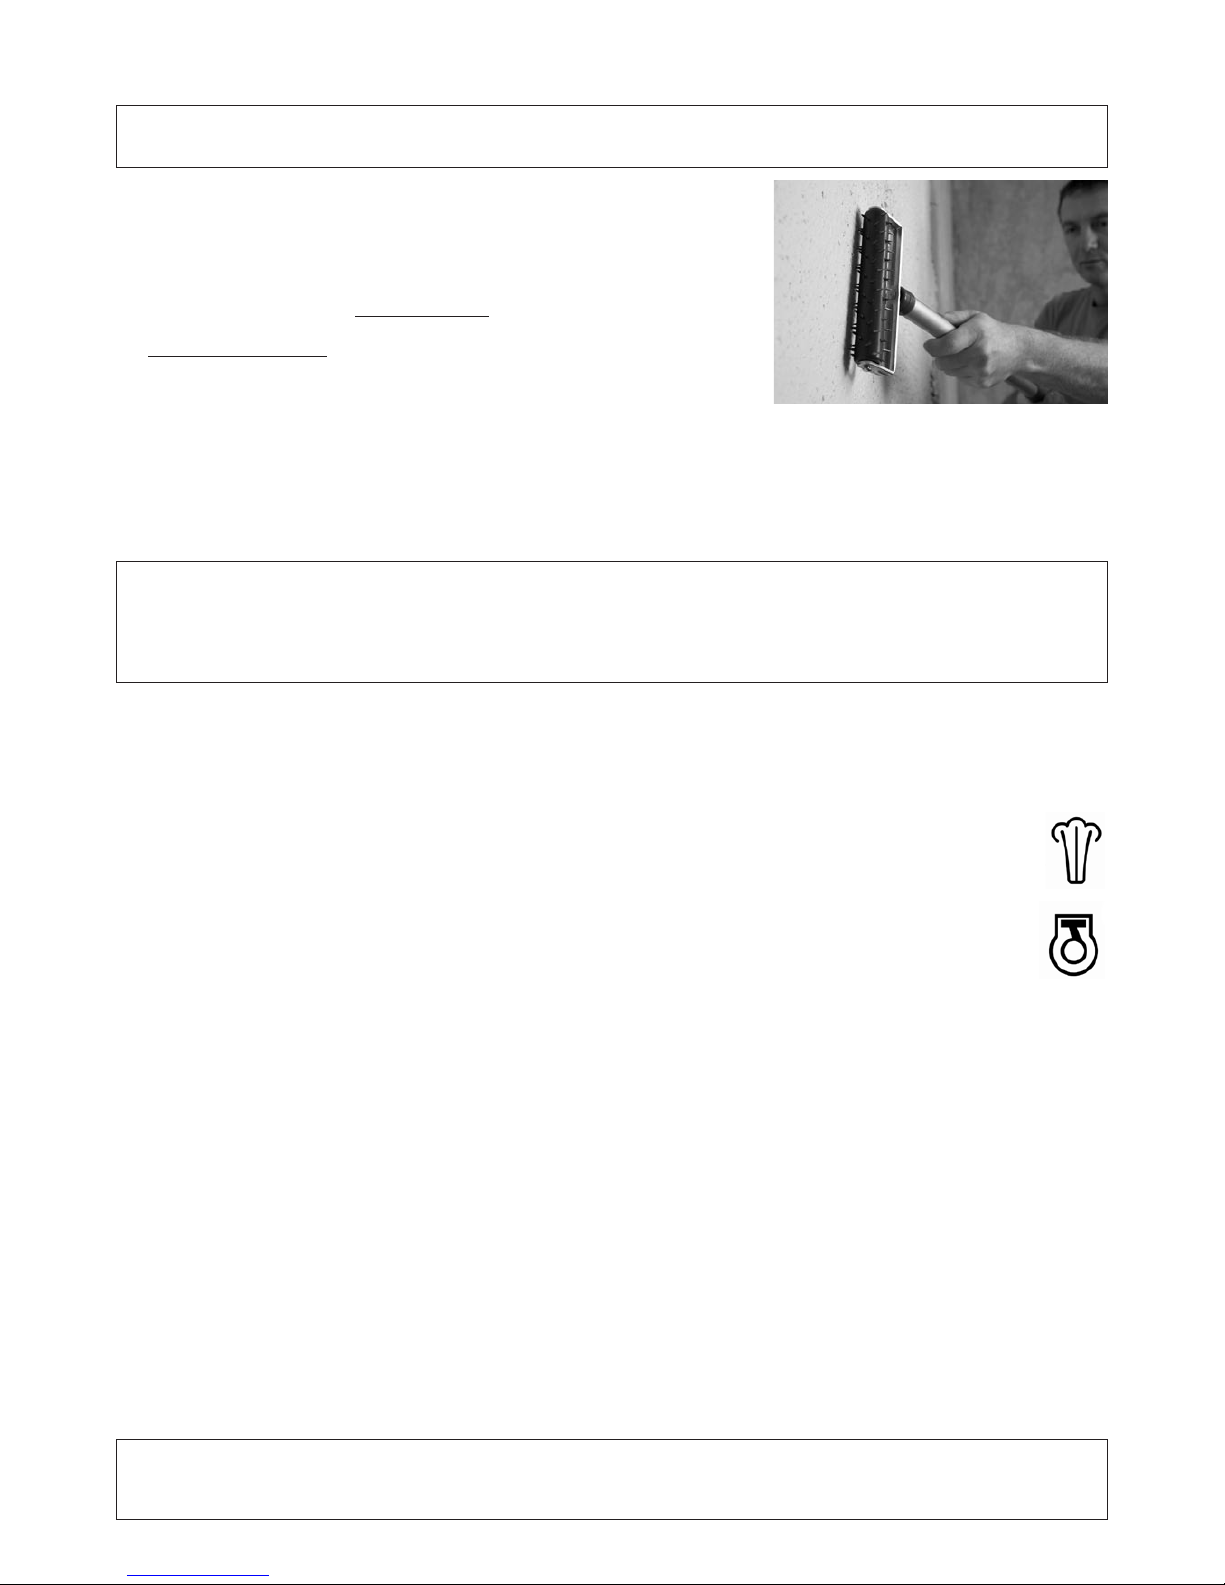
WALLS
1. If you are right handed, hold the steam plate in your left hand and place flat against the wall where you wish to commence
removing the paper.
2. Leave the plate against the wall for approximately 10 seconds. The length of time will depend on the type of wall covering you
are removing.
3. If you are left handed you may find it easier to operate with the other hand.
4. Move the steam plate to the section immediately next to where you have just been working and use a wallscraper to remove the
section that has just been steamed.
5. By working in this way you should be able to remove paper continuously.
6. Operate the steamer until steam is no longer produced (there is a safety cut out when water level gets too low), switch off the
vacuum pump and boiler switch, and then leave for a minimum of 2 minutes before refilling. Allow to cool completely before
packing away.
CEILINGS
Please note: While using the steam plate on the ceiling the unit will expel a small amount of water out of the base of the
unit from the vacuum pump exhaust hose onto the surface below. Ensure that all floor surfaces are protected by dust
sheets or plastic.
PREPARATION
If the plaster underneath the Paper or Artex is in a poor state of repair, care must be taken. If the plaster is old or cracked, the
steam may penetrate, causing the plaster to “blister” or fall out. Check the plaster first and do not continue if this is unsound.
1. In order to achieve the fastest result it is best to gently score the wallpaper to
be removed before operating the stripper.
2. If you have heavily embossed paper or painted paper this is essential.
3. Perforate the paper using a perforator tool, or alternatively score the paper in a
criss-cross pattern approximately 6 inches apart with the edge of a wallscraper.
A perforator tool is extremely useful for large surface areas and is available to
buy through the online shop www.earlex.co.uk. For further availability please call
our Customer Care Line on 01483 454666 quoting part number PPF1, or email
[email protected]
4. As with all decorating, care should be taken to protect carpets and furniture
with covers.
5
COMPLETION & STORAGE
1. Switch off steam and vacuum pump switches, and unplug the unit.
2. Allow the unit to cool completely and then empty the unit and waste water collection tank of any remaining water. Never leave
water in the unit whilst being stored.
3. Once the unit has cooled, wind the cable around the base of the feet on the unit and then wind the hose around the leg clips.
Slot the steam plate into the side slots on the feet.
HOW TO ASSEMBLE THE SPARE VACUUM CUP
AND STEAM PLATE FILTER
Insert the vacuum seal (6) into the steam plate as shown.
Insert the foam pump filter (7) as shown.
1.1 1.2 1.3
1.4 1.5
2.1 2.2 2.3 2.4
1. If you are right handed, hold the steam plate in your left hand and place flat against the ceiling where you wish to commence
removing the Artex/paper.
2. Leave the plate on the ceiling for a maximum of 10 seconds. The length of time will depend on the type of covering you are
removing.
3. If you are left handed you may find it easier to operate with the other hand.
4. Move the steam plate to the section immediately next to where you have just been working and use a wallscraper to remove the
section that has just been steamed.
5. Empty the ceiling waste water tank when it starts to become full. It holds a total of 500ml of water and in 78 minutes should only
require emptying once if a full tank is used.
6. By working in this way you should be able to remove Artex/Paper continuously.
7. You may have to leave the plate on the ceiling for longer periods or re-steam if not completely removed.
8. Operate the steamer until steam is no longer produced (there is a safety cut out when water level gets too low), switch off the
vacuum and leave for a minimum of 2 minutes before refilling. Allow to cool completely before packing away.
5mm
6
SAFETY CUT-OUT
If the unit should cut out when being used, this is because the safety thermal cut-out has operated. Wait 2 minutes and refill
with water. The cut-out will automatically reset and you should have to wait between eight and fifteen minutes before steam is
again produced.
The cut-out will not protect the element if a part filled unit is tilted during use in a way which enables part of the element
to be out of the water for longer than 15-20 seconds.
OTHER USES
Artex®
Normally Artex can be removed using the same method as for wallpaper although the steaming time may be longer.
Vinyl Floor Tiles
Vinyl floor tiles can also be removed if the plate is left long enough for the heat to penetrate the adhesive. Once the adhesive is hot it
softens and the tile can be peeled from the floor. Suction cap is to be removed if used for this operation.
TROUBLESHOOTING
My unit fails to boil?
The unit has probably not been left for long enough to cool, please refer to section on safety cut-out. Check the fuse in the plug is
sound and is rated at 13 amps. If using an extension lead, check that it is rated at 13 amps and it is fully unwound.
My unit leaks steam from the Pressure Release Valve?
The pressure release valve is a special low pressure valve and it must not be replaced by any other valve. Never block the safety
valve. Allow time to cool then clean the rubber washer on the valve and the seat in the neck of the box. Check the hose for kinks.
Check the hole inside the steam plate for obstructions. If the hose is blocked NEVER force the safety valve closed.
The base of my unit is leaking water?
This is the residue water valve which releases a small amount of water collected by the vacuum on the steam plate when working on
the ceiling. This happens to ensure the safe running of the unit. A maximum of 45ml of water will be expelled from this in 78 minutes.
Please protect all carpets and flooring with dust sheets during operation.
The steam plate is not sticking to the wall?
Ensure you have switched the vacuum on and inserted the foam vacuum cup and filter into the steam plate as per the instructions
on page 5 of this manual.
If you require further assistance please contact our Customer Care Line on:
Tel: 01483 454666
Fax: 01483 454548
Email: [email protected]
Opening hours: Monday-Friday 08.30-17.00 (excluding bank holidays)
Website: www.earlex.co.uk
Information on the disposal of waste electrical equipment known as WEEE:
Your attention is bought to new directives applicable to the disposal of this electrical equipment, where in
accordance with the legislation this product must not be disposed of in your normal household waste. Instead it
is your responsibility to dispose of this type of waste by handing it over to special designated collection points
for recovery and recycling. This product is marked with a ‘wheelie bin’ symbol with a cross on it to remind you of
this action. The objective of this directive is to help conserve resources and ensure that it is recycled in a manner
that protects human health and the environment. For more information about where you can drop off your waste,
please contact your local authority. Take back facilities are free of charge.
7
GUARANTEE
This product is guaranteed for domestic use for a period of 24 months against faulty materials and workmanship. It is not
guaranteed for HIRE purposes. This guarantee does not affect your statutory rights.
Whilst every possible care is taken by the manufacturer to ensure that our products leave the factory in good working order, we
cannot under any circumstances, accept liability for problems or damage caused by their subsequent use. It is the responsibility
of the user to ensure that surfaces to be cleaned or stripped are suitable for steam.
In the event of a fault occurring please contact our helpline on 01483 454666 before returning the unit to our Service Department
at the address below together with a copy of your purchase receipt. All repairs will be dealt with speedily.
EC Declaration of Conformity
We declare that the unit SS200 conforms to: 2006/95/EC, EN60335-1, EN60335-2-54, 2004/108/EC, EN55014-1,
EN55014-2, EN61000-3-2, EN61000-3-3 & EMF EN 50366.
Tim Hopper - Technical Director
MAINS CONNECTION
This product is supplied with a specially prepared mains lead, if the cord is damaged, it must be replaced by the manufacturer, its
service agent or similar qualified persons in order to avoid a hazard.
Please read the following safety instructions before use.
1. If the moulded plug is cut off from the mains lead then the plug must be disposed of safely. NEVER under any circumstances
insert such a plug into a 13 amp socket.
2. NEVER under any circumstances use the appliance or mains lead without the fuse cover fitted. This is the little cover fixed into
the base of the plug to hold the fuse in place.
3. If you lose the fuse cover then please contact our helpline on 01483 454666.
4. A replacement fuse must be rated at 13 amp. These must be manufactured and approved to BS1362.
IF IN ANY DOUBT PLEASE CONSULT AN ELECTRICIAN.

Other Earlex Kitchen Appliance manuals

Earlex WS125 User manual

Earlex

Earlex WS125 User manual

Earlex SS76 User manual

Earlex

Earlex SS76 User manual

Earlex Pro-Steam LCS176 User manual

Earlex

Earlex Pro-Steam LCS176 User manual

Earlex SS125 User manual

Earlex

Earlex SS125 User manual

Earlex SS76 User manual

Earlex

Earlex SS76 User manual

Earlex Super Steamer SS100 User manual

Earlex

Earlex Super Steamer SS100 User manual

Earlex SS76 User manual

Earlex

Earlex SS76 User manual

Earlex STEAM DYNAMO PRO User manual

Earlex

Earlex STEAM DYNAMO PRO User manual

Earlex SS50 User manual

Earlex

Earlex SS50 User manual

Earlex VAP75 User manual

Earlex

Earlex VAP75 User manual

Earlex Steam Master LMB110V User manual

Earlex

Earlex Steam Master LMB110V User manual

Earlex STEAMmaster LMB User manual

Earlex

Earlex STEAMmaster LMB User manual

Popular Kitchen Appliance manuals by other brands

Linea DOMO DO9175KR Instruction booklet

Linea

Linea DOMO DO9175KR Instruction booklet

Zelmer 177 user manual

Zelmer

Zelmer 177 user manual

iFAVINE Rivera & bar iSommelier BV1000A manual

iFAVINE

iFAVINE Rivera & bar iSommelier BV1000A manual

Tescoma Della Casa Instructions for use

Tescoma

Tescoma Della Casa Instructions for use

McCulloch MC1290 manual

McCulloch

McCulloch MC1290 manual

Pro-Line Boats VS-D2 user manual

Pro-Line Boats

Pro-Line Boats VS-D2 user manual

Küppersbusch EEH 650.0 Instructions for use and installation instructions

Küppersbusch

Küppersbusch EEH 650.0 Instructions for use and installation instructions

Bosch MS 6 user manual

Bosch

Bosch MS 6 user manual

Kalorik FT 44845 manual

Kalorik

Kalorik FT 44845 manual

Metos RG-250 Installation manual and operating instructions

Metos

Metos RG-250 Installation manual and operating instructions

Tricity Bendix SIE326 Operating and installation instructions

Tricity Bendix

Tricity Bendix SIE326 Operating and installation instructions

TEFAL Ultracompact Sandwich SM155283 manual

TEFAL

TEFAL Ultracompact Sandwich SM155283 manual

DeLonghi DE 60 E Installation and care guide

DeLonghi

DeLonghi DE 60 E Installation and care guide

Soul of India DosaMaker quick start guide

Soul of India

Soul of India DosaMaker quick start guide

KRATOS 109 manual

KRATOS

KRATOS 109 manual

Börner ClassicLine V1 instructions

Börner

Börner ClassicLine V1 instructions

Vollrath JW30PA Operator's manual

Vollrath

Vollrath JW30PA Operator's manual

Fritel CR 1695 instruction manual

Fritel

Fritel CR 1695 instruction manual

manuals.online logo
manuals.online logoBrands
  • About & Mission
  • Contact us
  • Privacy Policy
  • Terms and Conditions

Copyright 2025 Manuals.Online. All Rights Reserved.