Earlex Super Steamer SS100 User manual

STEAM WALLPAPER STRIPPER
OPERATING INSTRUCTIONS
MODEL SS100
PLEASE READ THESE INSTRUCTIONS CAREFULLY BEFORE USE
Thank you for purchasing an Earlex Steam Wallpaper Stripper. This is a highly versatile machine
for use all around the home. In order to obtain the best results please read the instructions
before commencing any work.
Please also make a special note of the safety rules and
RETAIN FOR FUTURE REFERENCE
Earlex Ltd. will accept no responsibility for the use of this product if used for any purposes other
than those detailed herein.

CAUTION !
Check the state of your plaster before starting work.
Steam can loosen weak, porous or poorly bonded plaster - which also loosens readily if cracked, holed or if the steam
plate is held in one position for too long after the paper is soaked.
Weak plaster can normally be detected by tapping a few areas of wall. A hollow sound indicates that you should
proceed only with extreme care - stopping immediately if you hear a cracking sound or plaster starts to break loose.
The steam stripper is safe for drywall/plaster board surfaces but whatever the material, it is always wise to check a
small area before starting work properly.
PROTECT YOUR HOME
The heat generated by the boiler unit can mark carpets, soft furnishings, table tops, cabinets etc. To prevent this we
recommend placing the unit on a wooden board, tray or other barrier - making sure it will not slip of one side or tilt
during use.
Dust sheets or newspapers are not suitable heat protectors for delicate surfaces.
PREPARATION
To achieve fastest paper removal always gently score the areas to be stripped.
With heavily embossed, vinyl coated or painted papers this is essential. Either use a proprietory
perforator tool or alternatively score the paper with the edge of a wall scraper in a criss-cross
pattern with 150mm (6 inch) spacing.
As with all decorating work be sure to protect carpets and furniture with covers.
FITTING CORNER BUMPERS AND CASTORS
Apack of 4 plastic corner pieces and 4 castors is enclosed to protect the unit. To fit the corner pieces
simply push these over the aluminium edges at each corner and press home. To fit the castors turn the
boiler upside down and push the castors in hard until they stop. Once installed these remain in place
permanently.
OPERATION
STEAM IS HOT! The unit is designed for safe, fast removal of wallpaper but please be aware that steam is produced at
100oC - so be careful, wear protective clothing and protect your hands with heat resistant gloves or mitts.
FILLING:
Remove filler cap and fill unit to Max. level line or indicator with clean - preferably hot - water. Replace filler cap.
The capacity of 4.5 litres (8 pints) provides approx.70 mins. steaming time before the safety cut-out operates.
For a shorter steaming time use less water. Do not overfill the unit or hot water will be forced up the steam hose.
Screw hose onto threaded outlets of boiler and steam plate, hand tight is sufficient. Do not over tighten but do check
for hand tight fit from time to time during use.
Connect mains lead from unit to power socket and switch on. lt can take up to 15 mins (approx.) before steam is
produced - depending on fill water quantity and temperature.
Do not leave unattended and keep children & pets out of the room.
lKeep equipment away from children and pets.
lEnsure boiler is placed on a flat level surface, and
should the boiler become tilted in use - level again
immediately.
Failure to do so can result in severe overheating,
complete element failure and void of your guarantee.
lBlock boiler unit securely if using on stairs.
lThe boiler becomes hot in use. Move only by using
the carrying handle.
lSteam is produced at 100oC. Be careful, wear
protective clothing and protect your hands with heat
resistant gloves or mitts.
lNever point hose or steam plate at anyone.
lAlways keep steam plate tilted away from face and
body, beware of hot drips and regularly empty
collected condensation from plate - especially when
stripping ceilings and high areas.
lNever remove filler cap or detach hose whilst unit is
operating.
lNever block the safety valve.
lNever use outside when raining.
lSwitch off and wait for 2 minutes before removing
filler cap to refill boiler.
lDo not overfill.
lAllow to cool completely before emptying boiler.
lDo not stand on boiler or hose.
lDo not drag or try to move boiler by pulling the
mains lead.
lDo not allow water or steam to enter light switches
or power points.
lDo not leave unattended.
lUse only standard tap water. Never add detergents
or chemicals.
lExtreme care must be taken if the unit is used in
bathrooms. Always be aware of danger of
electrocution from stored water in baths and sinks.
lNever change tools when the unit is operating.
lAlways store upright.
lDo not overfill the reservoir.
lIt is recommended that a RCD (residual current
device) rated at 30mA is fitted into the mains supply
socket for added protection against electric shock.
lUse only genuine Earlex replacement parts.
SAFETY RULES
2

Just before full steam production a small amount of bubbling and water will occur at the steam plate.
Beware of hot water discharge prior to steam emission.
STRIPPING: Remember to check a small area first.
Operation is simple for both right and left handed people.
Simply hold the steam plate flat against the wallpaper for approx. 10 seconds. Now move the plate
to the spot immediately next to the one just steamed - from which the paper should now easily
come away with a little help from a wall scraper.
Working this way should enable continuous paper removal although it may be necessary to steam
for longer periods with some papers, or if not completely removed first time.
Operate steamer until water level is low, then unplug unit and allow to cool for at least 2 minutes before removing filler
cap - Beware of steam - and re-filling unit.
When finished, allow to cool completely and empty unit. Always store unit empty.
SAFETY CUT-OUT
A safety cut-out is fitted to prevent overheating the element if the water boils low. If unit stops boiling during use this
may be the cause. Wait for 2 minutes before removing filler cap then re-fill with water. The cut-out will self reset and
steam be produced again within 5-15 minutes.
The cut-out will not protect the element if a part filled unit is tilted during use in a way which enables part of the
element to be out of the water for longer than 15-20 seconds.
OTHER USES FOR THE STEAM PLATE
Artex
Normally Artex can be removed using the same method as for wallpaper although the steaming time will be longer.
CAUTION: Some textured finishes may contain asbestos which may be hazardous to health and which are subject to
licensing controls operated by the HSE (Health & Safety Executive).
Vinyl Floor Tiles
Vinyl floor tiles can also be removed if the plate is left long enough for the heat to penetrate the adhesive. Once the
adhesive is hot it softens and the tile can be peeled from the floor.
Sterilising Soil
To sterilise soil in seed trays or greenhouses rake the soil to obtain a fine surface. Leave the
steam plate on each section, for 2 to 2.5 minutes which should ensure that the steam has
penetrated through the surface.
Killing Weeds
Steam will kill weeds on paths and patios without the use of chemicals. You will need to steam
the weeds for 1 to 1.5 minutes in order to kill them.
TROUBLE SHOOTING
Unit Fails to Boil
The unit has probably not been left for long enough to cool- refer to section on safety cut-out. Check the fuse in the plug
is sound and is rated at 13 amps.
If using an extension lead check that it is rated at a minimum of 10 amps and fully unwound.
Unit Leaks Steam from Pressure Relief Valve
The pressure relief valve is a special low pressure valve and cannot be replaced by any other valve. If steam is leaking
from the valve, the most likely cause is a blockage in the hose. Allow the hose to cool then remove the hose and check
for any blockage. Always check the inlet in the tool you are using.
UNDER NO CIRCUMSTANCES FORCE THE VALVE SHUT. THIS IS OPERATING FOR YOUR PROTECTION.
DESCALING
To maintain peak performance of the unit, particularly in areas of hard water, it may be necessary to descale
the element in the unit. Proprietary kettle descaling products can be used in your unit - always follow the
manufacturer’s instructions.
IF YOU REQUIRE FURTHER ASSISTANCE PLEASE CONTACT OUR HELPLINE ON:
Opening Hours: Monday-Friday 08.30-18.00 (Excluding Bank Holidays)
website: www.earlex.co.uk
3
R
R

Earlex Ltd., Earlex House, Moorfield Road, Slyfield Industrial Estate, Guildford, Surrey. GU1 1RU.
Tel: +44 (0) 1483 454666. Fax: +44 (0) 1483 454548.
MAINS CONNECTION
Your unit has been supplied with a mains lead and a fitted plug. This is identified by the fuse holder in the base of the plug. Please read the following
safety instructions before use.
1If the fitted plug is cut off from the mains lead then the plug must be disposed of safely. NEVER under any circumstances insert such a plug into a
13 amp socket.
2 NEVER under any circumstances use the appliance or mains lead without the fuse cover fitted. This is the little cover fixed into the base of plug to
hold the fuse in place.
3If you lose the fuse cover then please contact any electrical dealer for a replacement or ring our helpline.
4A replacement fuse must be rated at 13 amp. These must be manufactured and approved to BS1362.
5 IF IN ANY DOUBT PLEASE CONSULT AN ELECTRICIAN.
If you need to fit a plug to the mains lead, this should be fitted in accordance with the wiring instructions below, and will need to be used with a 13
amp fuse. If in doubt consult an electrician.
WARNING - THlS APPLIANCE MUST BE EARTHED. If you are using an extension lead it must be rated at a minimum of 10 amps and fully
unwound. Do not operate with a lead rated at less than 10 amps as this will cause premature failure of the element which is not covered by the
guarantee.
As the colours of the wires in the mains lead of this appliance may not correspond with the coloured markings identifying the terminals in your plug,
proceed as follows:
The wire which is coloured green and yellow must be connected to the terminal in the plug which is marked with the letter E or
by the earth symbol, or coloured green or green and yellow.
The wire which is coloured blue must be connected to the terminal which is marked with the letter N or coloured black.
The wire which is coloured brown must be connected to the terminal which is marked with the letter L or coloured red.
GUARANTEE
This product is guaranteed for a period of 24 months against faulty materials and workmanship.
Whilst every possible care is taken by Earlex to ensure that our products leave the factory in good working order, Earlex cannot
under any circumstances accept liability for problems or damage caused by their subsequent use.
It is the responsibility of the user to ensure that surfaces to be treated, cleaned or stripped are suitable for steam.
This guarantee does not affect your statutory rights. This guarantee excludes the use for hire purposes.
In the event of a fault occuring please contact our helpline before returning the unit to our Service Department at the address
below together with a copy of your purchase receipt. All repairs will be dealt with speedily.
EC Declaration of Conformity
We declare that the unit: SS100 conforms to: 73/23/EEC, BSEN60335-2-15 & 89/336/EEC, EN55014-1, EN55014-2, EN61000-3-2,
EN61000-3-3.
Tim Hopper-Technical Director
4
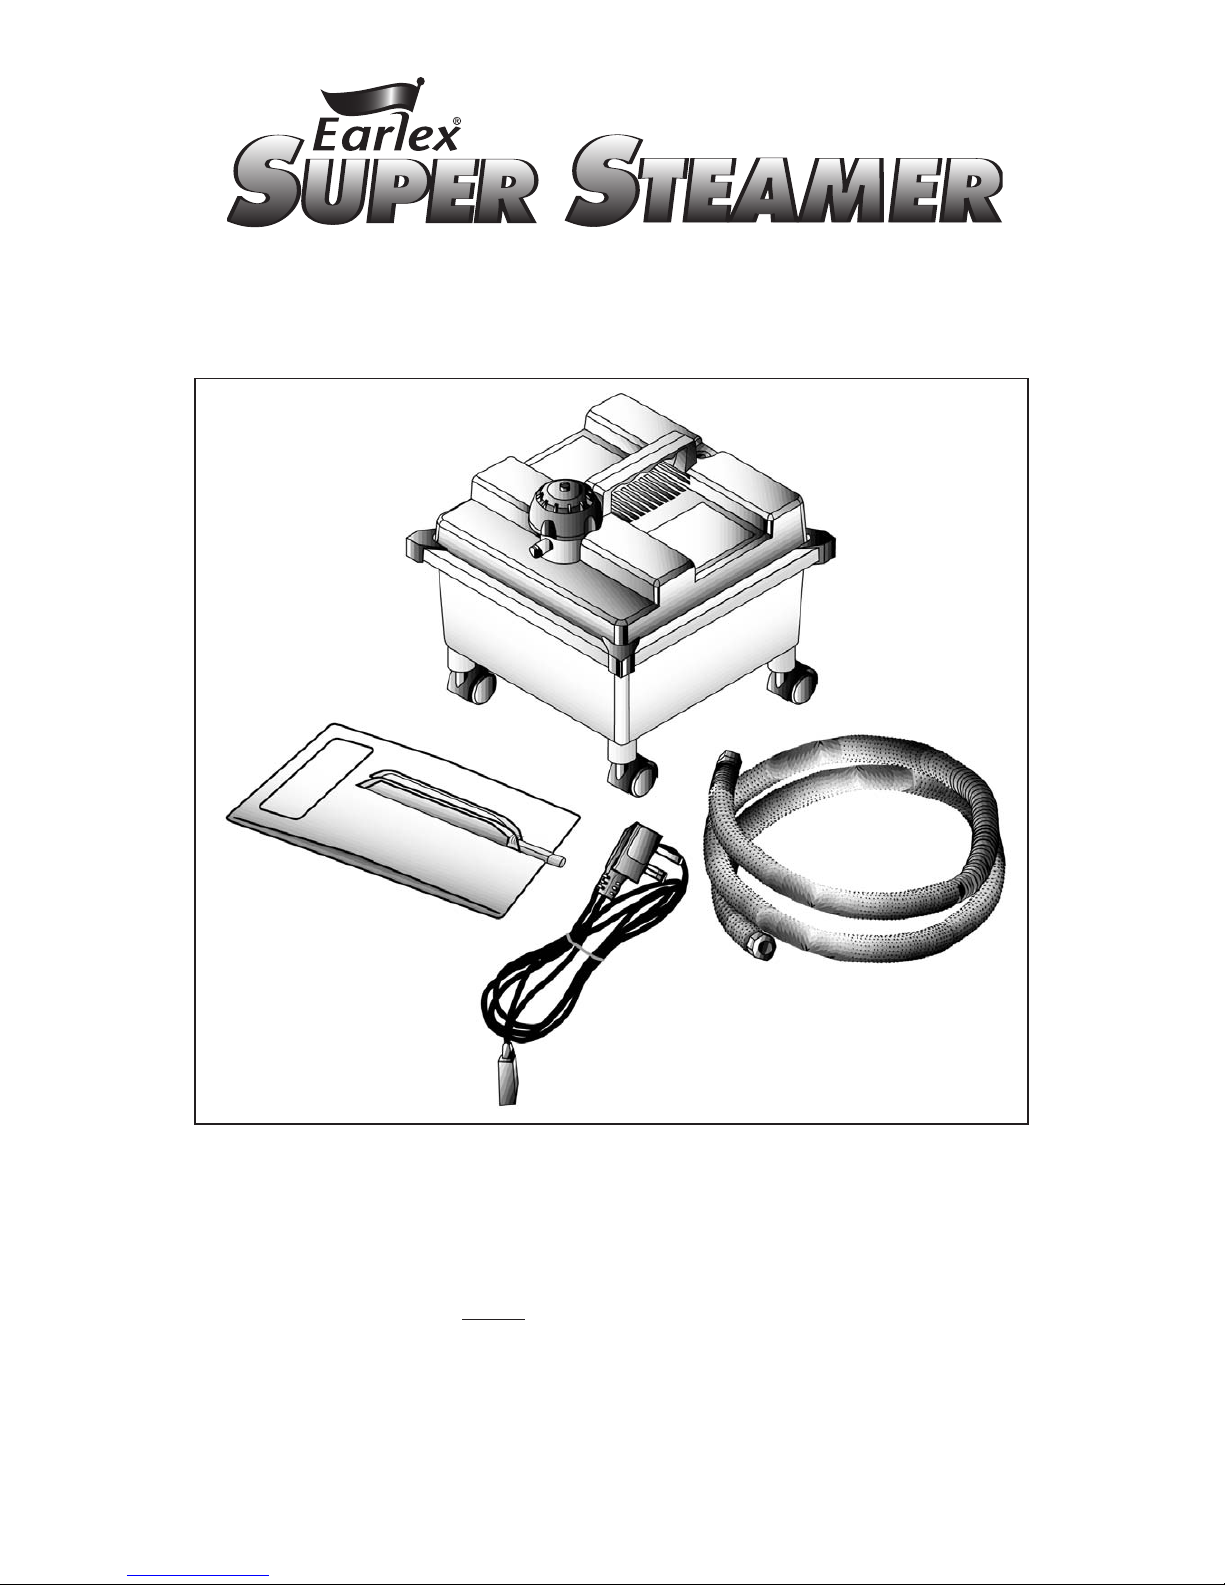
STEAM CLEANING ACCESSORIES
Arange of accessories is available for use with the wallpaper
stripper to adapt it for many other tasks around the home.
EA11 Floor Cleaner - ideal for bringing your carpets up like new.
No chemicals required.
EA12 Window/Tile Cleaner - Gets your windows sparkling
clean. Cleans floor tiles and wall tiles.
EA13 Jet Nozzle -With scraper and brush for cleaning cookers,
lawnmowers etc. Defrosts freezers. Gets rid of unsightly black
growth on grouting.
EA20 - Complete set of 3 Accessories - EA11, 12 & 13.
EA30 - Upholstery Cleaner - For cleaning painted walls,
curtains and furniture
EA31 - Spare towels for Floor Cleaner (pack of 3).
EA32 - Spare towels for Upholstery Cleaner (pack of 3).
OTHER PRODUCTS
PR9 Autofeed Cordless Painting System - Portable battery
operated paint rolling system. It has a 3 litre paint reservoir and
23cm (9”) roller and automatically feeds paint to the roller head.
Easy to use the PR9 provides enough capacity for one coat of a
3.6m x 2.7m (12” x 9”) room without having to refill.
WD1000 - Combivac Workshop Vacuum & Blower. The
1000W motor provides a powerful suction and blowing facility
which is ideal for use around the workshop, garage, caravan, car,
garden and home. The 20 litre recovery tank has 12 litres wet
capacity and is designed for the rough and tumble of every day
use. The Combivac has on board storage facilities for its
accessories, 6 metres of working length and a two year
guarantee. There is also a variety of additional accessories
available for use with the Combivac.
HG1600K - Heat Gun Kit. The Earlex Heat Gun Kit offers a
1600 Watt heat gun in a strong carry case and includes a range
of useful accessories. With two heat settings the heat gun can be
set at 350˚C or 520˚C. It is provided with a selection of four
nozzles, three shavehooks and a scraper to suit different tasks
and it all stores away conveniently in the carry case.
ASG55 Super Sprayer - Sprays a 6’x6’ fence panel in 5
minutes! 55W Electric Airless Spray Gun, ideal for spraying
wood preservatives, shed & fence treatments, water and solvent
based paints. Ideal for shed, fences and trellis. It has a 1 litre
capacity, easy-grip handle that provides good balance and
control. Hardened steel cylinder and stainless steel piston for
longer life. Kit includes 0.6mm & 1mm nozzles & lubricating oil.
Check the Earlex website for up - to-date information on what
you can spray.
ASG120 - Super Sprayer 120. The 120W motor Super Sprayer
is perfect for spraying water and solvent based paints, wood
preservaties, varnishes, stains, emulsion, latex and laquers.
These can be applied either from the can using the remote pick-
up system or from the paint container. The Super Sprayer 120 is
also supplied with 1.0mm, 0.8mm and 0.6mm nozzles, viscosity
cup for thinning the paint, flexible extension tube for spraying
hard to reach areas/decking and a cleaning kit.
Spray Station - HVLP (High Volume Low Pressure) Complete
paint spraying system - Ideal for spraying large or detailed jobs
with equal ease. Fast and easy, provides a quality finish with no
unsightly brush marks. The Spray Station can spray many types
of paint, such as stains, varnishes, emulsion, glazes, wood
treatments and many more.
C95 12/03
R
©Earlex Ltd. 2003
Table of contents
Other Earlex Kitchen Appliance manuals

Earlex
Earlex SS200 User manual

Earlex
Earlex SS76 User manual

Earlex
Earlex SS50 User manual

Earlex
Earlex SS125 User manual

Earlex
Earlex VAP75 User manual

Earlex
Earlex SS76 User manual

Earlex
Earlex Steam Master LMB110V User manual

Earlex
Earlex STEAM DYNAMO PRO User manual

Earlex
Earlex STEAMmaster LMB User manual

Earlex
Earlex SS76 User manual
Popular Kitchen Appliance manuals by other brands

Groen
Groen SSB-10EF Brochure & specs

Nostalgia Electrics
Nostalgia Electrics RETRO SERIES RKP630 Instructions and recipes

Vox
Vox MS 984 instruction manual

TZS First AUSTRIA
TZS First AUSTRIA Grill Fever instruction manual

Van Berkel International
Van Berkel International RED LINE Series user manual

Aroma Professional
Aroma Professional AMC-300SG instruction manual