Earlex SC125 - AUTRE User manual

STEAM CLEANING KIT
OPERATING INSTRUCTIONS
MODELS: SC75
SC77
SC125
SC165
PLEASE READ THESE INSTRUCTIONS CAREFULLY BEFORE USE
Thank you for purchasing an Earlex Steam Cleaning Kit. In order to obtain the
best results please read the instructions before commencing any work.
Please also make a special note of the safety rules.
EARLEX LTD. WILL ACCEPT NO RESPONSIBILITY FOR THE USE OF THIS
PRODUCT IF USED FOR ANY OTHER PURPOSES THAN THOSE DETAILED
HEREIN.
RETAIN FOR FUTURE REFERENCE.
IF YOU HAVE ANY PROBLEMS WITH YOUR STEAM CLEANER OR IF YOU BELIEVE A PART IS
MISSING, DO NOT RETURN TO STORE. PLEASE CONTACT EARLEX LTD ON 01483 454666.

lKeep equipment away from children and pets.
lEnsure boiler is placed on a flat level surface, and
should the boiler become tilted in use - level again
immediately.
Failure to do so can result in severe
overheating, complete element failure and void
your guarantee.
lBlock boiler unit securely if using on stairs.
lAlways protect areas beneath the boiler likely
to be damaged by heat. The boiler becomes hot in
use. Move only by using the carrying handle.
lSteam is produced at 100˚C. Be careful, wear
protective clothing and protect your hands with
heat resistant gloves or mitts.
lNever point hose or steam plate at anyone.
lAlways keep steam plate tilted away from face and
body, beware of hot drips and regularly empty
collected condensation from plate - especially when
stripping ceilings and high areas.
lNever remove filler cap or detach hose whilst unit is
operating.
lNever block the safety valve.
lNever use outside when raining.
lSwitch off and wait for 2 minutes before removing
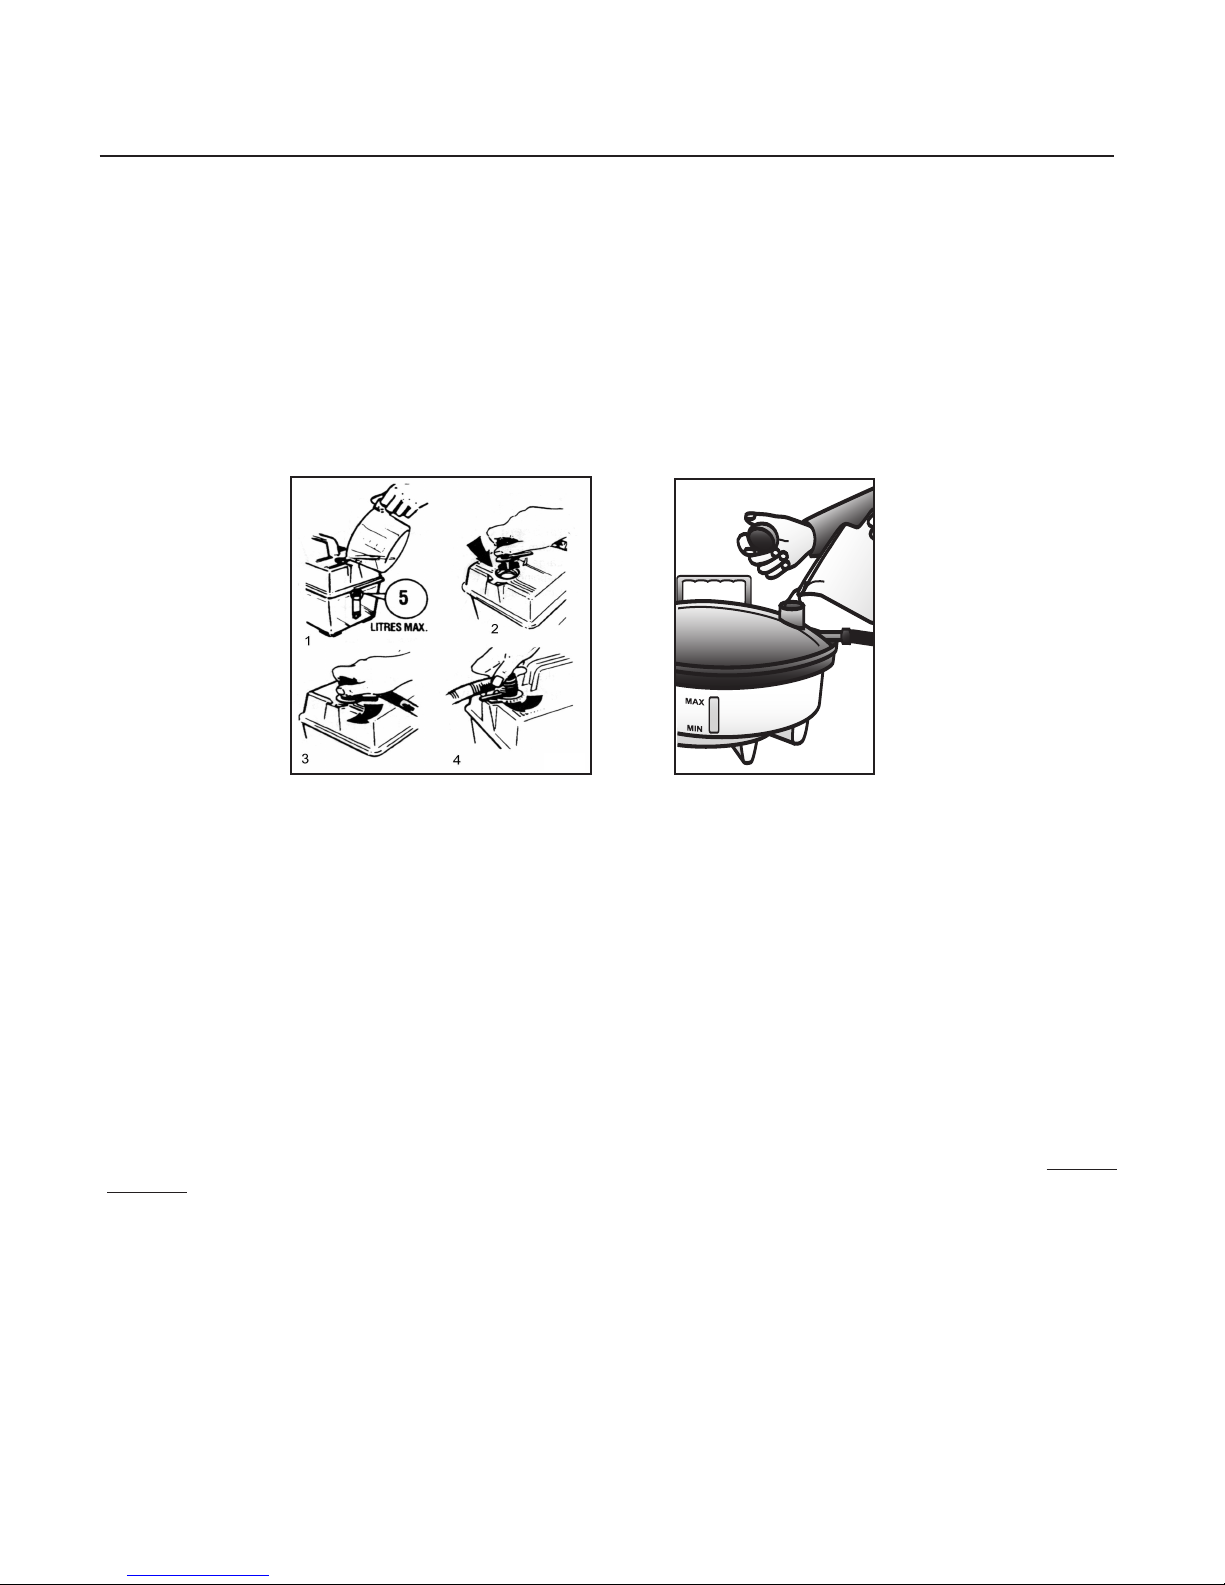
filler cap to refill boiler.
lDo not overfill.
lAllow to cool completely before emptying boiler.
lDo not stand on boiler or hose.
lDo not drag or try to move boiler by pulling with
hose or mains lead. If fitted with castors, move with
hose only.
lDo not allow water or steam to enter light switches
or power points.
lDo not leave unattended.
lUse only standard tap water. Never add detergents
orchemicals.
lDo not point the accessories at anyone.
lExtreme care must be taken if the unit is used in
bathrooms. Always be aware of danger of
electrocution from stored water in baths or sinks.
lNever change tools when the unit is operating.
lAlways store upright.
lIt is recommended that a RCD (residual current
device) rated at 30mA is fitted into the mains supply
socket for added protection against electric shock.
lThis appliance is not intended for use by persons
(including children) with reduced physical, sensory
or mental capabilities, or lack of experience and
knowledge, unless they have been given supervision
or instruction concerning use of the appliance by a
person responsible for their safety’.
lUse only genuine Earlex replacement parts.
lWarning: hot liquid or steam can burn. Steam may
also condense into boiling droplets. Steam should
not be directed towards electrical applicances (e.g
the inside of an oven).
lThe equipment must be unplugged after use and
before cleaning.
INTRODUCTION
Thank you for purchasing an Earlex Steam Cleaning Kit. The uses around the home, car and garden are
numerous and we hope you will find this product is in constant use to save time, improve the look of your
furnishings and to keep everything spotlessly clean.
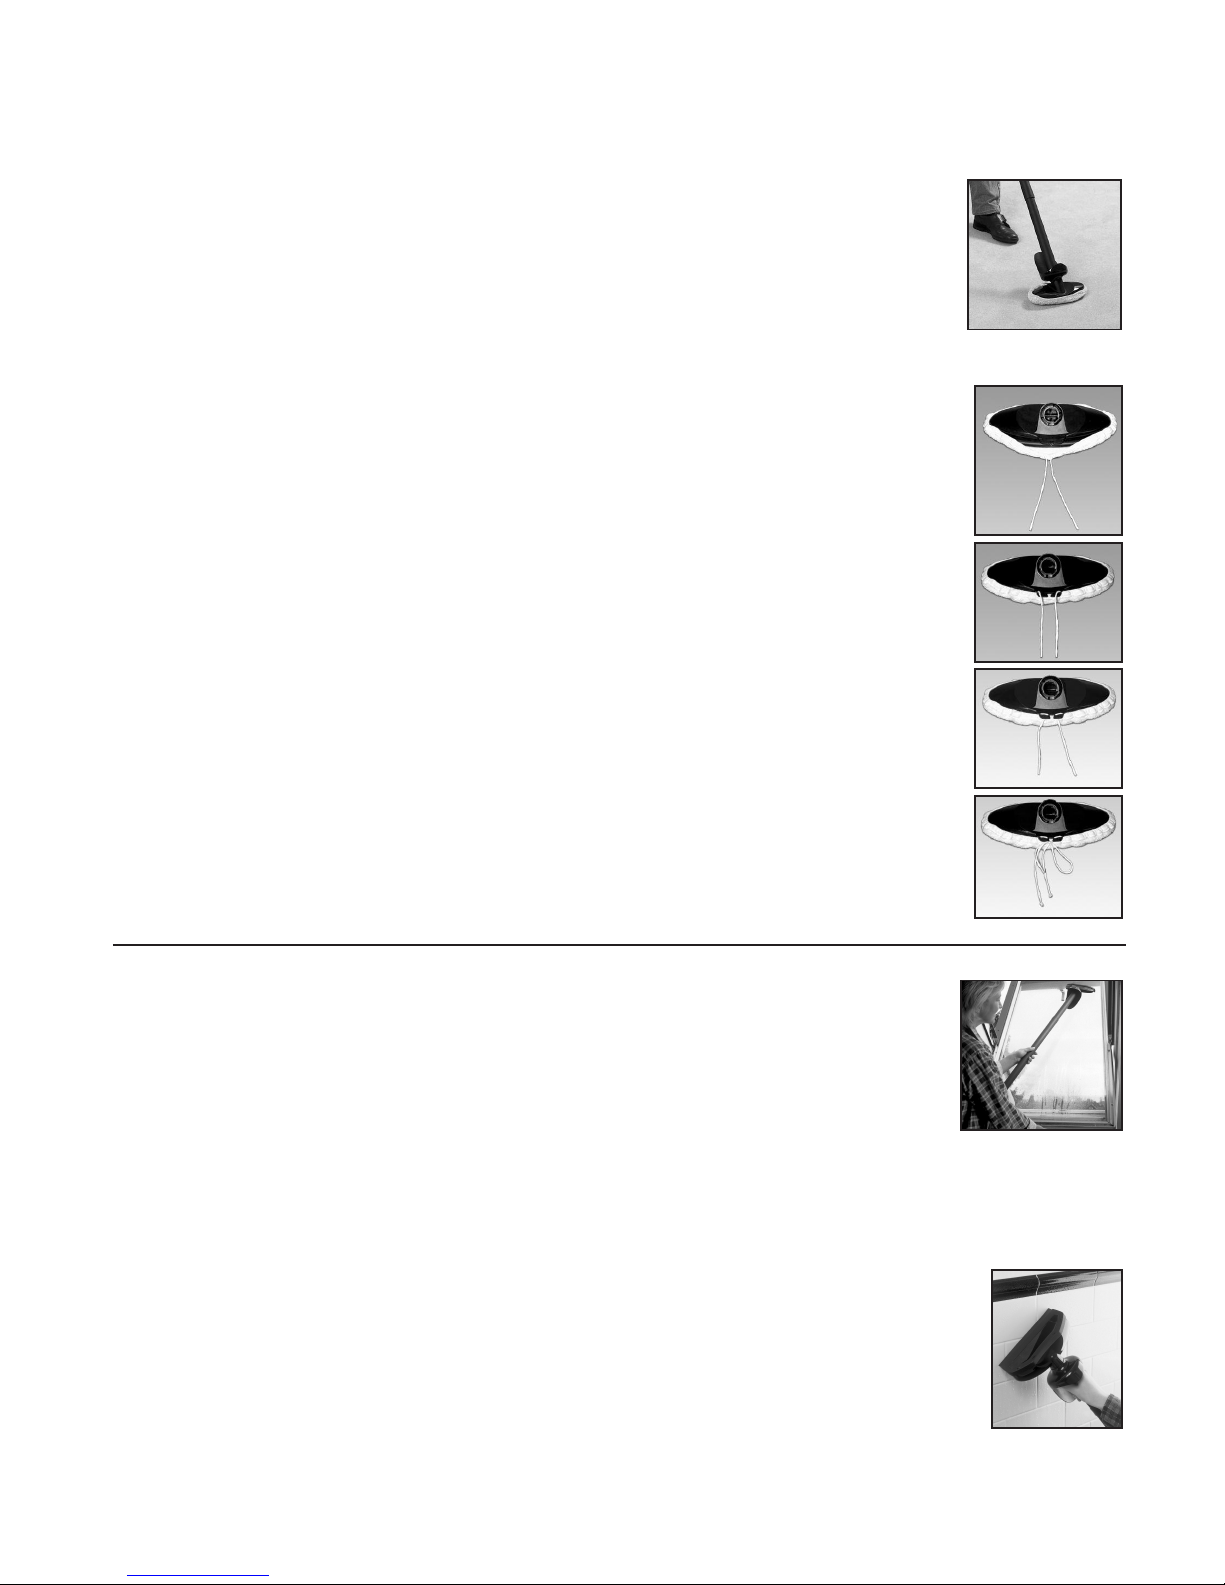
When cleaning, the Earlex Steam Cleaning Kit will brighten and refresh the colour and restore carpet piles.
When decorating, the Earlex Steam Plates (not included in all kits) will remove wallpaper extremely fast and
can also be used to remove Artex®, vinyl tiles etc. CAUTION: Some textured finishes may contain asbestos
which may be hazardous to health and which are subject to licensing controls operated by the HSE (Health &
Safety Executive).
The Earlex Steam Cleaning Kit is also ideal for disinfecting work surfaces, bathrooms, garden soil, etc, since
steam will kill house bugs, fleas, insects and many bacteria.
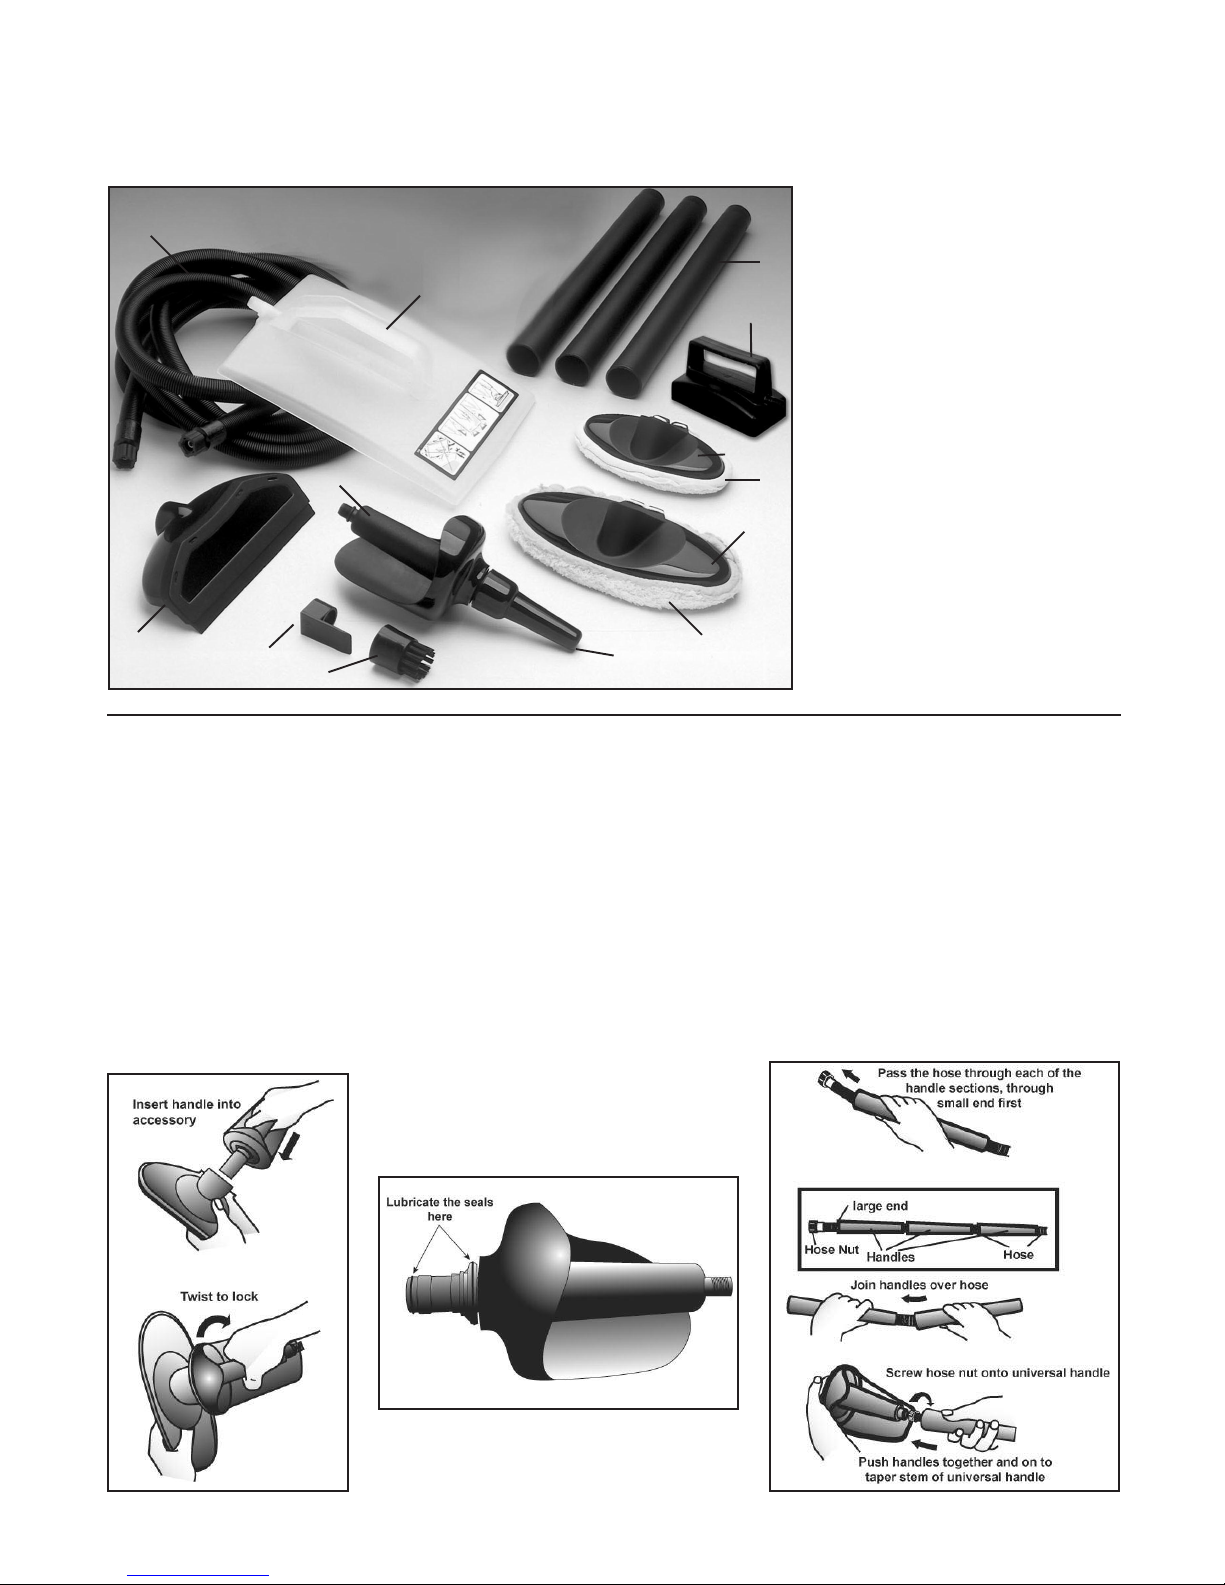
ABOUT YOUR STEAM CLEANER
The Earlex Steam Cleaning Kit will clean most types of surface using the power of steam. The various tools
supplied are designed for different applications. With these tools you can select the item most appropriate for
the job in hand.
Where towels are supplied dirt will be absorbed by the towel, which is washable and can be replaced as
necessary. Packs of replacement towels are available direct from Earlex Ltd.
The Earlex Steam Cleaning Kit does not require detergents, chemicals or other cleaners. It cleans purely by
the action of steam. This action also removes any traces of powder or liquid cleaners previously used.
PROTECT YOUR HOME!
The heat generated by the boiler unit can mark carpets, soft furnishings, table tops, cabinets etc.
Toprevent this we recommend placing the unit on a wooden board, tray or other barrier - making sure it will
not slip off one side or tilt during use.
Dust sheets or newspapers are not suitable heat protectors for delicate surfaces.
IMPORTANT NOTE
Always check the suitability of materials before steam cleaning. Steam is being generated at 100˚C. Do not
use on any surfaces that cannot stand this temperature e.g. Draylon®, delicate fabrics etc. Always test a small
area of the material - preferably a portion that is normally unseen - and allow to dry before starting the full
cleaning task.
Do not soak materials being cleaned. Only light application of steam is required.
CAUTION
STEAM IS HOT! Please be aware that steam is produced at 100˚C - so be careful, wear protective clothing
and protect your hands with heat resistant gloves or mitts.
SAFETY RULES
2

3
ASSEMBLING THE ACCESSORIES
The Universal Handle (AC302) is used in conjunction with the Floor Cleaner, Upholstery Cleaner, Window / Tile
Cleaner and Jet Nozzle. Align the outline triangle on the handle with the triangle on the accessory. Push the
handle into the accessory and twist so that the solid triangles on the handle and accessory are aligned (see
Diagram 1).
Over time, you may find that your steam cleaning accessories become awkward to assemble to the universal
handle. This is due to the steam reducing the lubrication properties of the ‘O’ ring seals. In this event, simply
lubricate the ‘O’ ring seals as illustrated (Diagram 2) using washing-up liquid or furniture polish.
The Long Handle Attachment (AC01) is designed to be used when cleaning floors or hard to reach areas. To
assemble, pass hose through each of the long handle sections, in at the small end out at the large end. Screw
the hose nut onto the universal handle and push the long handle sections together and onto the taper on the
universal handle (see Diagram 3). You can use one, two or three sections of the long handle. Disconnect in
reverse order. If you have any difficulty in disconnecting twist the handles apart.
Diagram 1 Assembling Handle Diagram 3 Fitting Long Handle Attachment
Diagram 2 Seal Lubrication
STEAM CLEANING KIT CONTENTS
Please note: Not all of the accessories shown in this instruction booklet are included in every steam cleaning
kit. To check the contents of your steam cleaning kit, please refer to the colour packaging (where supplied),
catalogue or store where the unit was purchased. If you are unsure about the contents of your steam cleaning
kit, please contact our helpline on 01483 454666.
Component List
Steam Boiler (not shown)
SC75 D87
SC125 B44
SC165 ST118
Mains Lead with Plug 3m (not shown) B17
Mains Lead with Plug 2m (not shown) C3P
a Floor Cleaner AC254
bTowel for Floor Cleaner AC275
cWindow/Tile Cleaner AC258
d Jet Nozzle AC262
eScraper for Jet Nozzle AC21
fBrush for Jet Nozzle AC25
g Universal Handle AC302
h3lengths of Handle AC01
i 3.6m Steam Hose ST94
3.6m Steam Hose (SC75)(not shown) D14
OPTIONAL ACCESSORIES
(Not included in all kits)
jLarge Plate for wallpaper stripping D39
k Small Steam Plate ST165
lUpholstery Cleaner AC250
m Towel for Upholstery Cleaner AC276
Sink Unblocker Tube (not shown) NRL/.5
Castors (SC165 optional)
(not shown) F17
i
j
ce
fd
g
b
a
l
m
k
h

4
CASTORS (MODEL SC165 OPTIONAL)
The castors are packed separately. Turn the boiler upside down and insert the 3 castors. These should be
pushed in hard until they stop. Once installed these remain in place permanently.
FILLING
SC75 (see Fig.1)
Remove elbow filler cap and fill unit to Max. level indicator with clean - preferably hot water.
Ensure that the ‘O’ ring is seated correctly on the elbow filler cap and place elbow filler cap lugs into filler hole
with the tongue pointing to the TWO O’CLOCK position. Turn the elbow filler cap clockwise to the SIX O’CLOCK
position so that the tongue locks into place between the two teeth.
SC77, SC125 & SC165 (see Fig.2)
Remove filler cap and fill unit to Max. level line or indicator with clean - preferably hot water.
Replace filler cap.
If the unit requires refilling, unplug and allow to cool for at least 2 minutes before removing filler cap - Beware
of steam - and re-filling. When finished, allow to cool completely and empty unit. Always store unit empty.
SAFETY CUT-OUT
A safety cut-out is fitted to prevent overheating of the element if water boils below the Min. level.
If unit stops boiling during use this may be the cause. Wait for 2 minutes before removing filler cap then re-fill
with water.The cut-out will self reset and steam be produced again within 20 minutes.
The cut-out will not protect the element if a part filled unit is tilted during use in a way which enables
part of the element to be out of the water for longer than 15-20 seconds.
CHANGING TOOLS
Never remove the hose or change tools when the unit is plugged in. Wait 2 minutes after unplugging before
changing tools. Screw the nut, which is on the end of the steam hose, onto the outlet of the tool - hand tight
only.
Fig.1 Fig.2
SC75 SC77 SC125, SC165
Do not overfill the unit or hot water will be forced up the steam hose.
Screw hose onto threaded outlets of boiler and accessory, hand tight is sufficient.
Do not over tighten but do check for hand tight fit from time to time during use.
Connect mains lead from unit to power socket and switch on. It can take approx 20 mins before steam is
produced - depending on fill water quantity and temperature.
Do not leave unattended and keep children & pets out of the room.
Just before full steam production a small amount of bubbling and water will occur at the accessory. Beware of
hot water discharge prior to steam emission.

Connect the universal handle and long handle to the floor cleaner head. Fit the cleaning
toweI to the head by placing the towel over the floor cleaner head and pulling the drawstring
tight. The drawstring can be secured at the back of the floor cleaner. (See diagrams to right)
Before using the floor cleaner, use a vacuum to pick up the larger dirt and grit particles.
Having prepared the area, plug the boiler unit in and wait for steam to appear at the
accessory head. Beware of hot water discharge prior to steam emission. Now begin to
move the floor cleaner head over the carpet at a steady pace. If there are stains on the
carpet pause for a few seconds to allow the steam time to penetrate.
Do not soak the carpet. Glide the floor cleaner over the surface. It is generally better, and
easier, to pull rather than push the head across heavy pile carpets. Do not try to scrub the
surface.
The towel will collect the dirt. Both sides of the towel can be used. Used towels can be
washed out and reused. Wash at 90˚C for maximum longevity.Do not use bleach or fabric
conditioner.Use only one third of normal soap powder to avoid clogging of the fibres.
Spare towels can be purchased from Earlex.
The Floor Cleaner can also be used on other types of flooring such as ceramic, cork,
marble, linoleum, stone, parquet etc. If you have an area to clean which has joints (such as
tiles) it may be useful to use the brush attachment of the jet nozzle in order to clean
completely.Be especially careful with parquet - older oak floors are very tough but on some
newer floors steam may cause the blocks to swell. Always take advice from the
manufacturer of the floor covering before proceeding to use steam. One useful point to note
is that steam will cause animal hairs to roll into easily removable balls. This attachment can
be used on car interiors, motor homes, painted doors, walls, louvres etc.
Window cleaning
with long
handle
Cleaning tiles
5
FLOOR CLEANER
IMPORTANT
Some carpets have stain resistant treatments, which have varying active Iives before breakdown.
Accordingly it is best to try a small area of carpet that is normally unseen, then allow 24 hours to check
whether the steam has any unusual effects on the carpet material, e.g. white streaks. If this happens
DO NOT CONTINUE USE - Check with your carpet supplier for further advice.
Used correctly the floor cleaner will refresh your carpet by removing surface grime, pet hairs
etc. leaving the carpet looking brighter.
It is not a dirt extraction system, so cannot necessarily remove deep stains or grease.
Attempting to make it do this by longer action of steam may result in watermarking or staining.
WINDOW/TILE CLEANER
IMPORTANT - You should only proceed at your own risk.
When cleaning exterior glass be extra careful not to pick-up any grit on the rubber
blade - which could cause scratches.
Antique glass and stained glass may be brittle and can crack under extreme
temperatures.
Do not use on glass at temperatures below 0˚C.
Connect the universal handle and long handle to the window/tile cleaner head. Select the
length of handle required (if any).
Plug the boiler unit in and wait for steam to appear at the accessory head. Beware of hot
water discharge prior to steam emission. Steam will be emitted from the apertures on the
accessory head. Move down the windows and clean with the rubber blade as the accessory
travels down the surface. Always pull the accessory towards the handle so that the blade is
acting after the steam. Do not push the accessory away from the handle. After you have
completely finished cleaning, switch off the unit and clean the glass or tiles from top to
bottom with the rubber blade only.
Steam will completely remove dust, film or greasy marks from windows, mirrors and patio
doors. The window/tile cleaner will remove soap and grease residues but cannot remove
deposits of scale. To remove black marks from grouting or corners use the jet nozzle with
brush or scraper attachment.
Cleaning carpets
This manual suits for next models
3
Table of contents
Other Earlex Steam Cleaner manuals

Earlex
Earlex SC125 User manual

Earlex
Earlex Pro-Steam LCS150NA User manual

Earlex
Earlex Pure Steam Pure Steam Cleaner Maintenance and service guide

Earlex
Earlex SS77USSG User manual

Earlex
Earlex STEAM CLEANING SC125 User manual

Earlex
Earlex SteamStation SC300 User manual

Earlex
Earlex STEAM CADDY IS 2000 User manual

Earlex
Earlex SteamStation SC300 User manual