Earlex SS77USSG User manual

STEAM GENERATOR
OPERATING INSTRUCTIONS
MODEL SS77USSG
PLEASE READ THESE INSTRUCTIONS CAREFULLY BEFORE USE
Thank you for purchasing an Earlex Steam Generator. This is a highly versatile machine.
In order to obtain the best results please read the instructions before commencing any work.
Please also make a special note of the safety rules and
RETAIN FOR FUTURE REFERENCE
GO TO WWW.EARLEX.COM TO REGISTER YOUR PRODUCT
Earlex Inc. will accept no responsibility for the use of this product if used for
any other purposes than those detailed herein.
K0051 SS77USSG 11 11_c94 06/04.qxd 09/11/2011 08:57 Page 1

2
●Keep equipment away from children and pets.
●Ensure boiler is placed on a flat level surface, and should
the boiler become tilted in use - level again immediately.
Failure to do so can result in severe overheating,
complete element failure and void your guarantee.
●The boiler becomes hot in use. Move only by using the
carrying handle.
●Steam is produced at 100oC. Be careful, wear protective
clothing and protect your hands with heat resistant gloves
or mitts.
●Never point the hose at persons or pets.
●Never remove filler cap or detach hose whilst unit is
operating.
●Never block the safety valve.
●Switch off and wait for 2 minutes before removing filler
cap to refill boiler.
●Do not use outside when raining.
●Allow to cool completely before emptying boiler.
●Do not stand on boiler or hose.
●Do not drag or try to move boiler by pulling the mains
lead.
●Do not allow water or steam to enter light switches or
power points.
●Do not leave unattended.
●Use only standard faucet water. Never add detergents or
chemicals.
●Always store upright.
●Do not overfill the reservoir.
●It is recommended that a GFCI is fitted into the mains
supply socket for added protection against electric shock.
●Use only genuine Earlex replacement parts.
SAFETY RULES
GROUNDING INSTRUCTIONS
This product should b ground d. In th v nt of an l ctrical short circuit, grounding r duc s th risk of l ctric shock by providing
an scap wir for th l ctric curr nt. This product is quipp d with a cord having grounding wir with an appropriat grounding
plug. Th plug must b plugg d into an outl t that is prop rly install d and ground d in accordanc with all local cod s and
ordinanc s.
DANGER - Improp r installation of th grounding plug can r sult in a risk of l ctric shock.
If r pair or r plac m nt of th cord or plug is n c ssary, hav your n ar st Earl x Authoriz d S rvic C nt r r plac it.
Ch ck with a qualifi d l ctrician or s rvic man if th grounding instructions ar not compl t ly und rstood, or if in doubt as to
wh th r th product is prop rly ground d. Do not modify th plug provid d; if it will not fit th outl t, hav th prop r outl t install d
by a qualifi d l ctrician.
EXTENSION CORDS
Us only a 3-wir xt nsion cord that has a 3-blad grounding plug, and a 3-slot r c ptacl that will acc pt th plug on th product.
Mak sur your xt nsion cord is in good condition and of a h avy nough gaug to carry th maximum curr nt as shown b low:
16 AWG for l ads up to 25’ in l ngth.
12 AWG for l ads up to 50’ in l ngth.
10 AWG for l ads up to 100’ in l ngth.
Ensur xt nsion l ad is prot ct d at th mains sourc by a 15A rat d circuit-br ak r in accordanc with UL489.
OPERATION
STEAM IS HOT! Please be aware that steam is produced at 100oC - so be careful, wear protective clothing and protect your hands
with heat resistant gloves or mitts.
FILLING:
Remove filler cap and fill unit to ax. level line or indicator with clean - preferably hot - water.
Replace filler cap.
The capacity of 5 litres (10 pints) provides approx.130 mins. steaming time before the safety cut-out operates. For a shorter steaming
time use less water.
Do not overfill the unit or hot water will be forced up the steam hose.
Screw hose onto threaded outlets of boiler, hand tight is sufficient.
Do not over tighten but do check for hand tight fit from time to time during use.
Connect mains lead from unit to power socket and switch on. lt can take up to 15 mins (approx.) before steam is produced -
depending on fill water quantity and temperature.
Do not leave unattended and keep children & pets out of the room.
K0051 SS77USSG 11 11_c94 06/04.qxd 09/11/2011 08:57 Page 2

SAFETY CUT-OUT
A safety cut-out is fitted to prevent overheating the element if the water boils low. If unit stops boiling during use this may be the
cause. Wait for 2 minutes before removing filler cap then re-fill with water. The cut-out will self reset and steam be produced again
within 5-15 minutes. The cut-out will not protect the element if a part filled unit is tilted during use in a way which enables
part of the element to be out of the water for longer than 15-20 seconds.
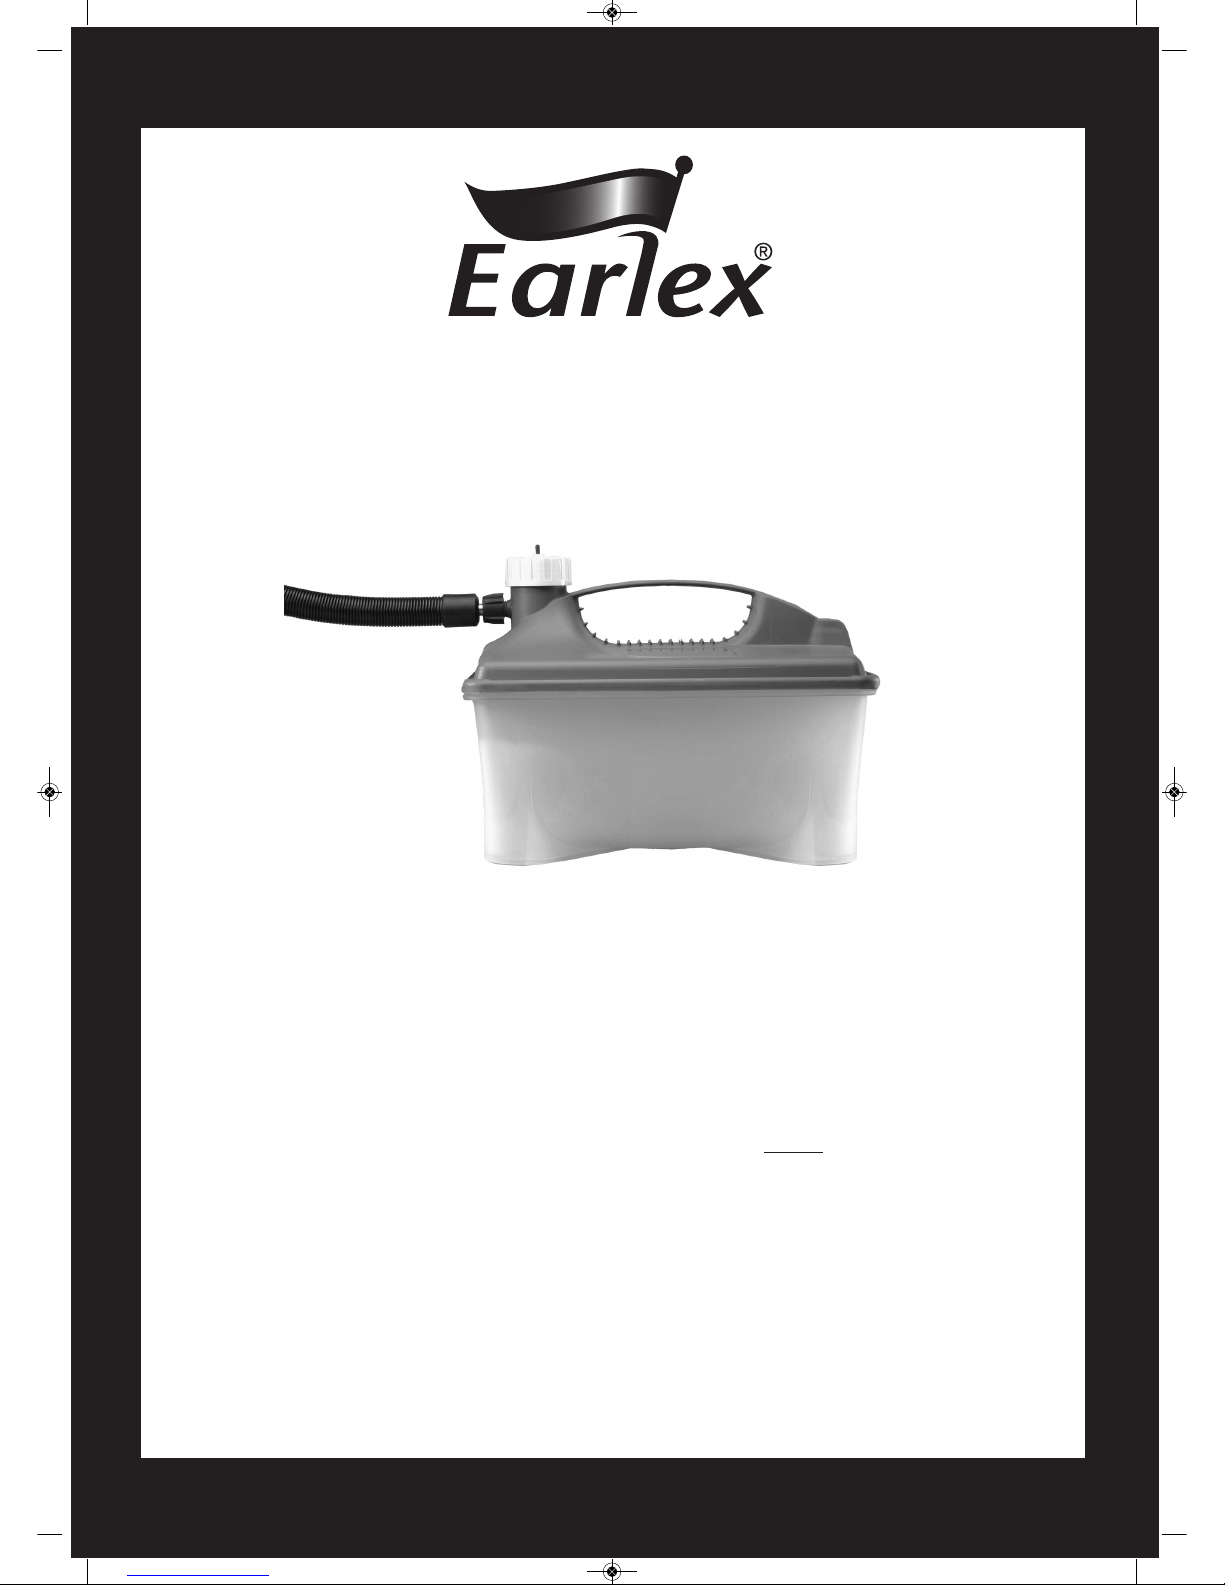
DESCALING
To maintain peak performance of the unit, particularly in areas of hard water, it may be necessary to descale the element in the unit.
Proprietary kettle descaling products can be used in your unit - always follow the manufacturer’s instructions.
Always w ar glov s or mitts for add d prot ction.
3
Just before full steam production a small amount of bubbling and water will occur. Beware of hot water discharge prior to steam
emission.
If unit requires refilling, unplug cord and allow to cool for at least 2 minutes before removing filler cap - Beware of steam. When
finished, allow to cool completely and empty unit. Always store unit empty.
Bending wood with steam can be dangerous and should only be performed by experienced woodworking enthusiasts. Thick, heat
resistant gloves are recommended as the steam can easily burn unprotected skin on contact. Also keep your face clear from any
areas where steam may escape and burn you.
Steam is a very effective medium for bending wood. ost hardwoods will bend better than softwoods.
Steam boxes can be built using plywood or hardwood; just make sure that it can stand up to moisture and heat. Your steam box
should be tight, but not too tight. The steam should be able to surround your wood piece and flow through the steam box. The steam
box could build up pressure and possibly explode if the steam does not adequately flow through the steam box and pressure relief
holes.
The best way is to build a relatively tight box and drill steam holes in the base so that the steam and condensation can escape. You
should have a steady stream of steam escaping through all vents. You will need to make sure that your wood pieces are
supported in your steam box and that the steam surrounds your wood on all sides. Dowel rods work the best as metal rods can
heat up and burn your wood as well as yourself.
As a wooded steam box, you can use common 1 x 6 material or 3/4” thick plywood. A 5” x 5” interior dimension with a 3ʼ-5ʼ length for
use with your Steam Generator. You should have a door opening with hinges and a latch. A rubber weather stripping can be used
to seal a leaky door.
The brass threaded fitting that is supplied with your Steam Generator is designed to fit a 0.531” hole. Drill this hole in your steam box
and separate the fitting, placing one end through the box with the thread that will connect to the hose sticking out of the box. Screw
the other part of the fitting onto the fitting inside the steam box and tighten up to ensure a good seal. There should be no movement
of the connector once tightened up.
Ideally the steam box should be on a slight incline for condensation to drain to one end and exit the steam box.
Fill your steam generator with clean water, do not add any additives. DO NOT FILL ABOVE MAX LEVEL LINE on Steam Generator
base. The steam up time will be controlled by how much water you fill the Steam Generator with and the temperature of the water.
The Steam Generator is designed to provide two hours of steam. If you only require one hour of steam then half fill the Steam
Generator.
Place your wood pieces into the steam box and connect the hose to the steam box and Steam Generator. Plug the Steam Generator
into a grounded outlet, preferably one with a GFCI. The Steam Generator will automatically start to heat up.
When initially starting we recommend that you insert a meat thermometer through a small hole to read the temperature. You want to
reach 212 degrees F, or as close as possible. Once you have reached this temperature to start timing how long your wood needs to
be steamed.
A general rule to follow is that you should steam the wood for 1 hour per every inch thickness of the wood. So for ½” thick
pieces you should allow 30 minutes.
You will need a mould or jig to hold the wood in place until it dries out after you remove such from the steam box.
*This is a general outline on building a steam box.*
*There are many websites available to use for more detailed instructions.*
How to Build a Steam Box - Safety Instructions
K0051 SS77USSG 11 11_c94 06/04.qxd 09/11/2011 08:57 Page 3

K0051 11/11
© Earlex Ltd. 2011
TROUBLE SHOOTING
Unit F ils to Boil
Th unit has probably not b n l ft for long nough to cool- r f r to s ction on saf ty cut-out.
Unit Le ks Ste m from Pressure Relief V lve
Th pr ssur r li f valv is a sp cial low pr ssur valv and cannot b r plac d by any oth r valv . If st am is l aking from th
valv , th most lik ly caus is a blockag in th hos . Allow th hos to cool th n r mov th hos and ch ck for any blockag .
Always ch ck th inl t in th tool you ar using.
UNDER NO CIRCUMSTANCES FORCE THE VALVE SHUT. THIS IS OPERATING FOR YOUR PROTECTION.
IF YOU REQUIRE FURTHER ASSISTANCE PLEASE CONTACT OUR HELPLINE ON:
Tel: 888-783-2612 em il: questions@e rlex.com
WARRANTY
This product is guarant d for a p riod of 24 months against faulty mat rials and workmanship.
Whilst v ry possibl car is tak n by Earl x to nsur that our products l av th factory in good working ord r, Earl x cannot
und r any circumstanc s acc pt liability for probl ms or damag caus d by th ir subs qu nt us .
It is th r sponsibility of th us r to nsur that surfac s to b tr at d, cl an d or stripp d ar suitabl for st am.
This warranty do s not aff ct your statutory rights. This warranty xclud s th us for hir purpos s.
In th v nt of a fault occurring pl as contact our h lplin b for r turning th unit to our S rvic D partm nt at th addr ss
b low tog th r with a copy of your purchas r c ipt. All r pairs will b d alt with sp dily.
Earlex Inc.
8261 Highway 73, Suite F,
Stanley, N.C. 28164, USA
Earlex Inc, Toll Free 888-783-2612
Email: [email protected] Website: www.earlex.com
uestions? Call toll free: 888-783-2612
K0051 SS77USSG 11 11_c94 06/04.qxd 09/11/2011 08:57 Page 4
Other manuals for SS77USSG
1
Table of contents
Other Earlex Steam Cleaner manuals

Earlex
Earlex SteamStation SC300 User manual

Earlex
Earlex SC125 - AUTRE User manual

Earlex
Earlex Pro-Steam LCS150NA User manual

Earlex
Earlex STEAM CLEANING SC125 User manual

Earlex
Earlex STEAM CADDY IS 2000 User manual

Earlex
Earlex Pure Steam Pure Steam Cleaner Maintenance and service guide

Earlex
Earlex SC125 User manual

Earlex
Earlex SteamStation SC300 User manual