manuals.online logo
Brands
  1. Home
  2. •
  3. Brands
  4. •
  5. Early Childhood Resources
  6. •
  7. Indoor Furnishing
  8. •
  9. Early Childhood Resources ELR-0631 User manual

Early Childhood Resources ELR-0631 User manual

Model No. ELR-0631
Combo Fold & Lock
(Medium Storage and
20-Tray Cabinet)
B
M
E
B
F
F
F
F
E
E
E
E
D
B
TIP!
DO NOT FULLY
TIGHTEN SCREWS
UNTIL ALL SCREWS
HAVE BEEN LOOSELY
POSITIONED。
!
WARNING:
- Adult Assembly Required. Two
adults recommended.
- Contains small parts, sharp points
and edges.
- Do not stand, sit, kneel, climb, lean
or pull on unit for support.
- Never leave children unattended.
- Do not place unit near high heat or
moisture.
-Adult Supervision Recommended.
Mount Laurel,NJ 08054 USA
www.ecr4kids.com
K
B
H
D
F
FF
F
I
J
JJ
L
E
A
1
G2
G1
C2
C1
A1
C2
L
E
A2 G2
B
Left Side Panel
Right Side Panel
Top Shelf
Middle Shelf(1)
Middle Shelf(2)
Bottom Shelf
Back Panel(5)
Divider(4)
D
E
F
C2
Left Unit
A1
A2
C1
G2
H
I
J
K
L
Right Side Panel
Left Side Panel
Top Shelf
Middle Shelf
Divider(3)
Bottom Shelf
Back Panel(2)
G1
Right Unit
M
N
O
P
Q
S
T
U
V
Metal Dowel(14)
LargeHexScrew(38)
WheelCaster(8)
Caster Screw(32)
Cam(14)
Hex Key Tool
Piano Hinge
Post(12)
Post Screw(12)
Safety Hasp with
7 Screws
W
Hardware
BEFORE ASSEMBLING,
MAKE SURE THERE
ARE NO
MISSING PARTS.
X8
M
B
F
Q
X8
M
F
F
F
1
Attach the Dividers to the Top Shelf
2
Insert the Back Panels
3
Insert the Middle Shelves
4
Attach the Divider Section to
the Base
5
Attach the Wheel Casters
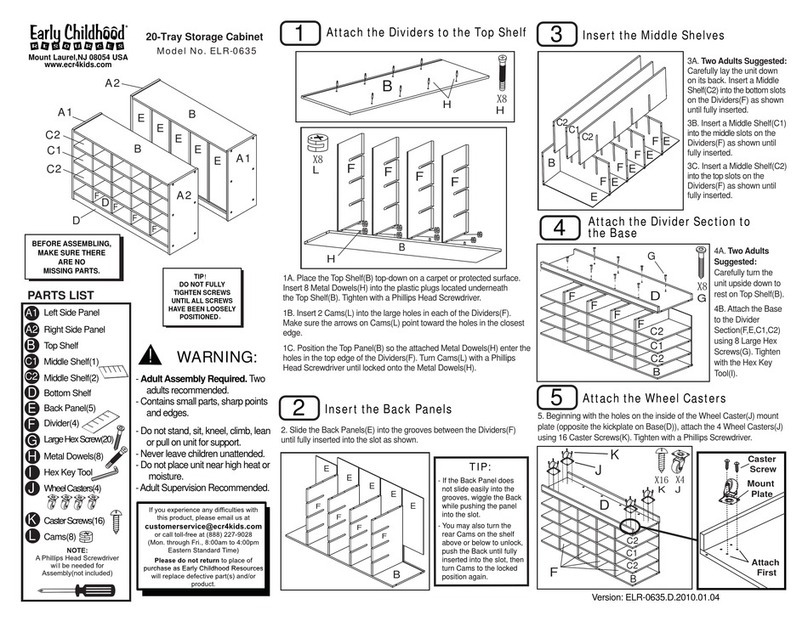
1A. Place the Top Shelf(B) top-down on a carpet or protected surface.
Insert 8 Metal Dowels(M) into the plastic plugs located underneath
the Top Shelf(B).Tighten with a Phillips Head Screwdriver.
1B. Insert 2 Cams(Q) into the large holes in each of the Dividers(F).
Make sure the arrows on Cams(Q) point toward the holes in the closest
edge.
1C. Position the Top Panel(B) so the attached Metal Dowels(M) enter the
holes in the top edge of the Dividers(F). Turn Cams(Q) with a Phillips
Head Screwdriver until locked onto the Metal Dowels(M).
2. Slide the Back Panels(E) into the grooves between the Dividers(F)
until fully inserted into the slot as shown.
N
X8
F
F
F
F
C2
C2
C1
N
B
D
F
O
P
X4
X16
C2
C2
C1
O
P
Version: ELR-0631.D.2010.01.03
4A. Two Adults
Suggested:
Carefully turn the
unit upside down to
rest on Top Shelf(B).
4B.Attach the Base
to the Divider
Section(F,E,C1,C2)
using 8 Large Hex
Screws(N). Tighten
with the Hex Key
Tool(S).
Attach
First
Mount
Plate
Caster
Screw
5. Beginning with the holes on the inside of the Wheel Caster(O) mount
plate, attach the 4 Wheel Casters(O) to the Base(D) using 16 Caster
Screws(P). Tighten with a Phillips Screwdriver.
F
EEEEE
FFF
B
C1
C2 C2
3A. Two Adults Suggested:
Carefully lay the unit down
on its back. Insert a Middle
Shelf(C2) into the bottom slots
on the Dividers(F) as shown
until fully inserted.
3B. Insert a Middle Shelf(C1)
into the middle slots on the
Dividers(F) as shown until
fully inserted.
3C. Insert a Middle Shelf(C2)
into the top slots on the
Dividers(F) as shown until
fully inserted.
D
6
Attach the Side Panels
N
X12
C2
C2
C1
B
A2
A1
F
F
F
F
6A. Two Adults Suggested: Carefully turn the assembled unit
upright as shown.
6B.Attach Left Side(A1) and Right Side Panels(A2) to the Middle
Shelf(C1) , Top Shelf(B) & Bottom Shelf(D) with 12 Large Hex
Screws(N), using 6 per side. Tighten using the Hex Key Tool(S).
7
The Left Unit is Done -
On to the Right Side!
8
Attach the Bottom Dividers
to the Base
Q
X4
8A
8A. Insert 4 Cams(Q)
into the large holes in
2 Dividers(J), using 2 in
each. Make sure the
arrows on Cams(Q)
point toward holes in
the closest edge.
N
8B
8B.Attach 2 Dividers(J)
to the Base(K) with 4
Large Hex Screws(N),
using 2 in each as shown.
Tighten using the Hex
Key Tool(S).
J
J
K
J
J
Q
Q
N
M
8C,8D
J
I
M
M
N
8C. Insert 4 Metal Dowels(M) into the plastic plugs located
underneath the Middle Shelf(I). Tighten with a Phillips Screwdriver.
8D. Secure the third Divider(J) to the Middle Shelf(I) using 2 Large
Hex Screws(N). Tighten with the Hex Key Tool(S).
9
Attach the Middle Shelf
M
J
J
JI
M
9. Position the Middle Shelf(I) so the attached Metal Dowels(M)
enter the holes in the top edge of the 2 lower Dividers(J) as shown.
Turn the Cams(Q) with a Phillips Screwdriver until locked onto the
Metal Dowels(M).
10
Attach the Top Shelf
10A. Insert 2 Metal Dowels(M) into the plastic plugs located
underneath the Top Shelf(H).Tighten using a Phillips Screwdriver.
10B. Position the Top Shelf(H) so the attached Metal Dowels(M)
enter holes in the top edge of the Divider(J) as shown. Turn Cams(Q)
with a Phillips Screwdriver until locked onto the Metal Dowels(M).
M
X2
HJ
J
J
I
M
Q
X2
Q
Version: ELR-0631.D.2010.01.03
11A. Slide Back Panels(L) into the grooves between Shelves(H,I,K)
until fully inserted into the slot as shown.
11B. Attach the Left Side Panel(G2) to the assembled unit using 6
Large Hex Screws(N). Tighten with the Hex Key Tool(S).
11
Attach the Back Panels
and Left Side
X6
N
J
JJL
L
G2
K
H
N
12
Attach the Right Side and
Wheel Casters
12A. On a carpet or
protected surface,
lay the unit on the
Left Side(G1).Attach
4 Wheel Casters(O)
underneath Bottom
Shelf(K) using 4
Caster Screws(P)
for each caster
(16 total). Tighten
with a Phillips Head
Screwdriver.
P
X16 O
X4
G1
KOP
12B. With the unit still
on its side, attach Right
Side Panel(G1) using 6
Large Hex Screws(N) as
shown. Tighten with the
Hex Key Tool(S).
X6
NG1
J
J
J
G2
I
H
K
S
N
13
The Right Unit is done!
Note: Make sure all screws and cams are fully tightened.
14
Attach the Hinge
T
X6X6
UV
U
V
14. Fasten the Piano Hinge(T) to the Right Side(A2) of the Left Unit and
the Left Side(G2) of the Right assembled units using 6 Posts(U) and 6
Post Screws(V) as shown.
Insert the Posts(U) into the holes on the inside of Right Side(A2) and Left
Side(G2). Insert the Post Screws(V) into the same holes from the outside
of the same panels, and tighten with a Phillips Head Screwdriver.
15
Attach the Hasp and Tighten
All Hardware
15. Install the Safety Hasp(W) to the outside of the unit using the 7 screws
provided.
Note: Before tightening the screws fully, make sure the Hasp Hinge Barrel lines
up and engages the Hasp Loop when the unit is closed, and that the hasp folds
flat against the unit when not in use.
Tighten all screws and hardware fully before using. Secure the Hasp(W)
with a padlock (not included) if desired.
!
CAUTION:
- Do not allow children to climb on shelves.
- Do not use as a ladder, seat or cart.
“Early Childhood Resources® guarantees the quality
of all of our products. You can trust the quality and
safety of our furniture and materials, along with the
peace of mind that our products are made to last. If
for any reason, you are not satisfied with the quality
and workmanship of our products, we will replace the
item or refund the sale.”
We appreciate your purchase of the Combo Fold & Lock
with 20-Tray and 5-Compartment Cabinet. Early Childhood
Resources® has made every effort to supply a quality product,
that with proper use and care, will bring you many years of
trouble free use!
Clean wood with a damp cloth or sponge using warm water
and mild soap. Wipe dry.
Do not place near heat, moisture or vaporizer which may
cause wood to warp and peel.
Check for loose or worn parts periodically and tighten or
replace as necessary.
Care and Cleaning
I
Model Number: ELR-0631
Purchase Order Number:
Record the Purchase Order Number here. Information is located
on a label enclosed, and on the shipping carton. Place label and
this sheet in an accessible place.
Version: ELR-0631.D.2010.01.03

Other Early Childhood Resources Indoor Furnishing manuals

Early Childhood Resources ELR-0634 User manual

Early Childhood Resources

Early Childhood Resources ELR-0634 User manual

Early Childhood Resources ELR-0635 User manual

Early Childhood Resources

Early Childhood Resources ELR-0635 User manual

Early Childhood Resources ELR-0625 User manual

Early Childhood Resources

Early Childhood Resources ELR-0625 User manual

Early Childhood Resources ELR-0636 User manual

Early Childhood Resources

Early Childhood Resources ELR-0636 User manual

Early Childhood Resources ELR-0627 User manual

Early Childhood Resources

Early Childhood Resources ELR-0627 User manual

Early Childhood Resources ELR-0633 User manual

Early Childhood Resources

Early Childhood Resources ELR-0633 User manual

Early Childhood Resources ELR-0687 User manual

Early Childhood Resources

Early Childhood Resources ELR-0687 User manual

Early Childhood Resources ELR-0728 User manual

Early Childhood Resources

Early Childhood Resources ELR-0728 User manual

Popular Indoor Furnishing manuals by other brands

Magick Woods Elements 30140 installation instructions

Magick Woods Elements

Magick Woods Elements 30140 installation instructions

Home Styles Naples Corner Entertainment quick start guide

Home Styles

Home Styles Naples Corner Entertainment quick start guide

Simpli Home brooklyn+max WyndenHall AXCACA22-GR manual

Simpli Home

Simpli Home brooklyn+max WyndenHall AXCACA22-GR manual

West Elm Sculptural Hook Rectangle Mirror Assembly instructions

West Elm

West Elm Sculptural Hook Rectangle Mirror Assembly instructions

SouthShore 3880 Assembly instructions

SouthShore

SouthShore 3880 Assembly instructions

QU-AX MONO 54F03-0400 Series manual

QU-AX

QU-AX MONO 54F03-0400 Series manual

HAMPTON BAY WOODFORD FRN-808120-ST Use and care guide

HAMPTON BAY

HAMPTON BAY WOODFORD FRN-808120-ST Use and care guide

Classic Flame 23DE9047 manual

Classic Flame

Classic Flame 23DE9047 manual

Herman Miller Layout Studio GNSDXT Series Installation and Disassembly for Recycling Instructions

Herman Miller

Herman Miller Layout Studio GNSDXT Series Installation and Disassembly for Recycling Instructions

J D Williams Corner Desk 021 9438 Series Assembly instructions

J D Williams

J D Williams Corner Desk 021 9438 Series Assembly instructions

SouthShore 9000-010 Assembly instructions

SouthShore

SouthShore 9000-010 Assembly instructions

PB TEEN Peg Shelf 3FT Mounting instruction

PB TEEN

PB TEEN Peg Shelf 3FT Mounting instruction

Work Smart SC117 operating instructions

Work Smart

Work Smart SC117 operating instructions

Fromm&Starck STAR-SEAT-18 user manual

Fromm&Starck

Fromm&Starck STAR-SEAT-18 user manual

Szynaka Meble Lima Assembling instructions

Szynaka Meble

Szynaka Meble Lima Assembling instructions

Home Styles 88 5180 181 quick start guide

Home Styles

Home Styles 88 5180 181 quick start guide

HunterDouglas Provenance Installation operation care

HunterDouglas

HunterDouglas Provenance Installation operation care

EQ3 3020-268 Assembly instructions

EQ3

EQ3 3020-268 Assembly instructions

manuals.online logo
manuals.online logoBrands
  • About & Mission
  • Contact us
  • Privacy Policy
  • Terms and Conditions

Copyright 2025 Manuals.Online. All Rights Reserved.