manuals.online logo
Brands
  1. Home
  2. •
  3. Brands
  4. •
  5. Early Childhood Resources
  6. •
  7. Indoor Furnishing
  8. •
  9. Early Childhood Resources ELR-0633 User manual

Early Childhood Resources ELR-0633 User manual

G
G
G
G
D
Q
J
F
F
F
F
F
F
FF
4
A1
2
D
F
GGGG
EX8
K
X8
Q
2A. Two Adults Suggested: On a carpet, or protected surface, attach
Upper Dividers(F) to the Lower Center Shelf(D) using 8 Flat Hex-Head
Screws(L), using 2 in each. Tighten with the Hex Key Tool(M).
2B. Insert 8 Metal Dowels(J) into the plastic plugs located underneath
Lower Center Shelf(D). Tighten with a Phillips Head Screwdriver.
B
Left Side Panel
Right Side Panel
Top Shelf
Upper Center Shelf
Lower Center Shelf
Bottom Shelf
Upper Divider(4)
Lower Divider(4)
Lower Back
Upper Back(5)
Metal Dowels(16)
RoundHexHead
Screw(24)
FlatHexHead
Screw(8)
Hex Key Tool
Hooks(10)
Posts(12)
Post Screws(12)
Cams(16)
D
E
F
A1
A2
C
H
I
J
K
L
G
M
N
O
P
Q
NOTE:
A Phillips Head Screwdriver
will be needed for
assembly (not included)
E
FFFF
G
G
GG
A2
B
A2
IIIII
H
B
C
5-Section Coat Locker
without Bench
Model # ELR-0633
Mount Laurel,NJ 08054 USA
www.ecr4kids.com
1
!
WARNING:
-AdultAssembly Required.Two
adultsrecommended.
-Containssmall parts,sharppoints
andedges.
-Donot stand,sit,kneel, climb,lean
orpullon unitforsupport.
-Neverleave childrenunattended.
-Donot placeunitnear highheator
moisture.
-AdultSupervisionRecommended.
TIP!
DO NOT FULLY
TIGHTEN SCREWS
UNTIL ALL SCREWS
HAVE BEEN LOOSELY
POSITIONED。
BEFORE ASSEMBLING,
MAKE SURE THERE
ARE NO
MISSING PARTS.
Attach Lower Dividers to
Bottom Panel
1A.Attach 4 Lower Dividers(G) to the Base(E) using 8 Round Hex Head
Screws(K), using 2 in each. Tighten with the Hex Key Tool(L).
Attach the Upper Dividers to the
Lower Center Shelf
L
X8 X8
J
3Attach the Top Section to the
Bottom Section
3C. Turn Cams(Q)
with a Phillips Head
Screwdriver until
locked onto the Metal
Dowels(J).
4A. Insert Upper Center
Shelf(C) onto the slots in
the 4 Upper Dividers(F)
as shown, until fully
engaged.
I
II
I
H
D
E
I
C
Version: ELR-0633.D.2010.01.02
4B. Two Adults
Suggested: Carefully
stand the unit upright.
4C. Slide the 5 Upper
Backs(I) into the grooves
between the Upper
Dividers(F) and into the
groove in the Lower Middle
Shelf(D) until fully inserted.
4D. Slide the Lower
Back(H) into the grooves
between Lower Middle
Shelf(D) and Bottom
Shelf(E) until fully inserted.
F
F
F
F
Attach the Upper Center Shelf
and Back Panels
3A. Lay the assembled Base(E,G) on its back, facing upward. Insert 8
Cams(Q) into the large holes located in the 4 Lower Dividers(G), using 2
in each. Make sure the arrows on Cams(Q) point toward the holes in the
closest ends.
3B. Two Adults Suggested: Position the assembled Upper Section(D,F)
so the Metal Dowels(J) attached to Lower Center Shelf(D) enter the holes
in the top edges of the Lower Dividers(G) as shown.
D
E
FFFF
G
G
G
G
CD
5
6
7
8
We appreciate your purchase of the 5-Section Coat Locker
without Bench. Early Childhood Resources has made every
effort to supply a quality product, that with proper use and care,
will bring you many years of trouble free use!
Clean wood with a damp cloth or sponge using warm water and
mild soap. Wipe dry.
Do not place near heat, moisture or vaporizer which may cause
wood to warp and peel.
Check for loose or worn parts periodically and tighten or
replace as necessary.
Care and Cleaning
0633
Purchase Order Number:
“Early Childhood Resources® guarantees the quality
of all of our products. You can trust the quality and
safety of our furniture and materials, along with the
peace of mind that our products are made to last. If
for any reason, you are not satisfied with the quality
and workmanship of our products, we will replace the
item or refund the sale.”
JQ
C
E
D
IF
F
F
BJ
Q
F
Attach the Top Shelf
5A. Insert 8 Metal
Dowels(J) into the plastic
plugs located underneath
Top Shelf(B). Tighten with
a Phillips Screwdriver.
5B. Insert 2 Cams(Q) into
the large holes in each of
the 4 Upper Dividers(F).
Make sure the arrow on the
Cams(Q) point toward the
holes in the closest edge.
5C. Position Top Shelf(B)
so the attached Metal
Dowels(J) enter the holes
in top edges of the Upper
Dividers (F). Turn Cams(Q)
with Phillips Screwdriver
until locked onto the Metal
Dowels(J).
Attach the Side Panels
K
X8
C
E
D
I
F
F
F
B
F
A1
6A.Attach the Left Side Panel(A1) to the assembled unit as shown,
using 8 Round Hex Head Screws(K). Tighten using the Hex Key
Tool(M).
K
X8
K
K
6B.Attach the Right Side Panel(A2) to the
assembled unit as shown, using 8 Round
Hex Head Screws(K). Tighten using the
Hex Key Tool(M).
!
CAUTION:
- Do not allow children to climb or stand on shelves.
- Do not use as a stepladder.
Attach the Coat Hooks
7A.Attach 8 Hooks(N) to the 4 Upper Dividers(K) using 8 Posts(O)
and 8 Post Screws(P). Tighten with a Phillips Head Screwdriver.
7B.Attach 8 Hooks(N) to the Side Panels (A1,A2) using 4 Posts(O)
and 4 Post Screws(P). Tighten with a Phillips Head Screwdriver.
You are done!
FF
F
N
X10 O
X12 P
X12
A1
E
FFFF
G
G
GG
B
C
A2
F
A1
A2
Version: ELR-0633.D.2010.01.02

Other Early Childhood Resources Indoor Furnishing manuals
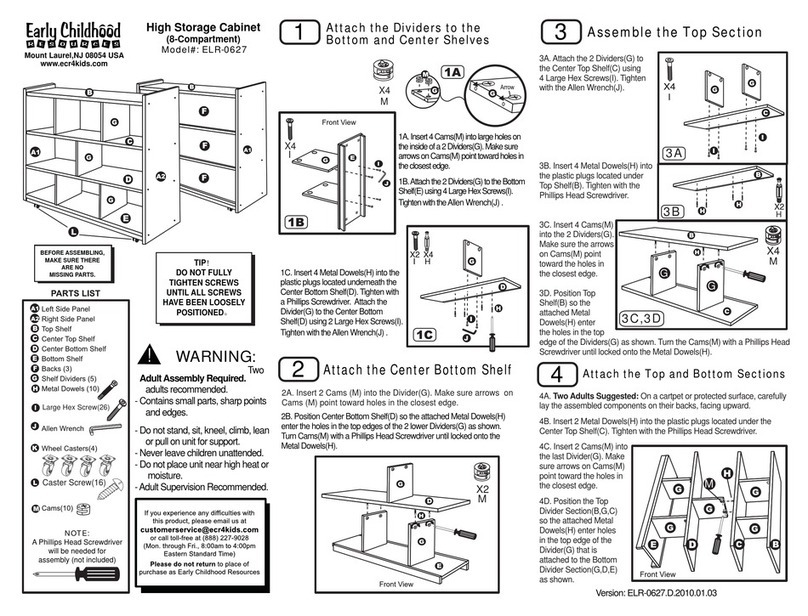
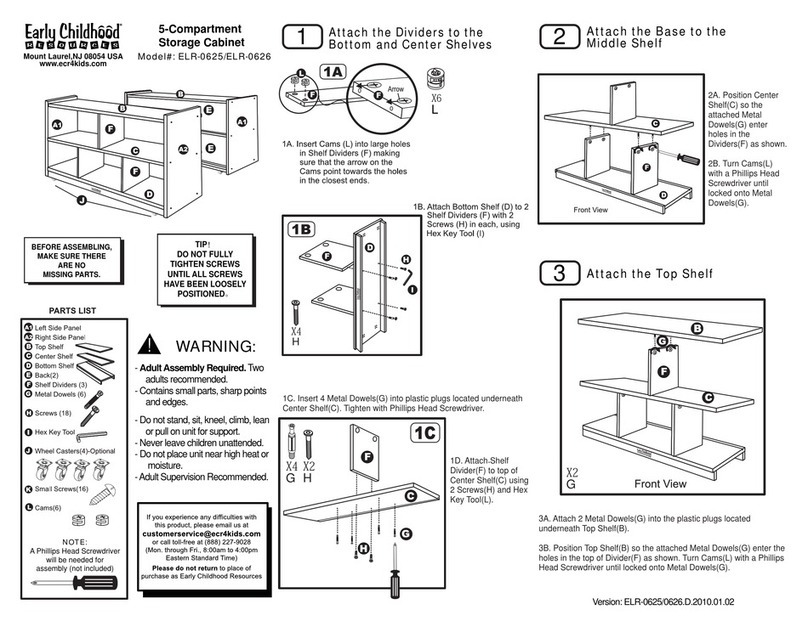
Early Childhood Resources ELR-0625 User manual

Early Childhood Resources

Early Childhood Resources ELR-0625 User manual

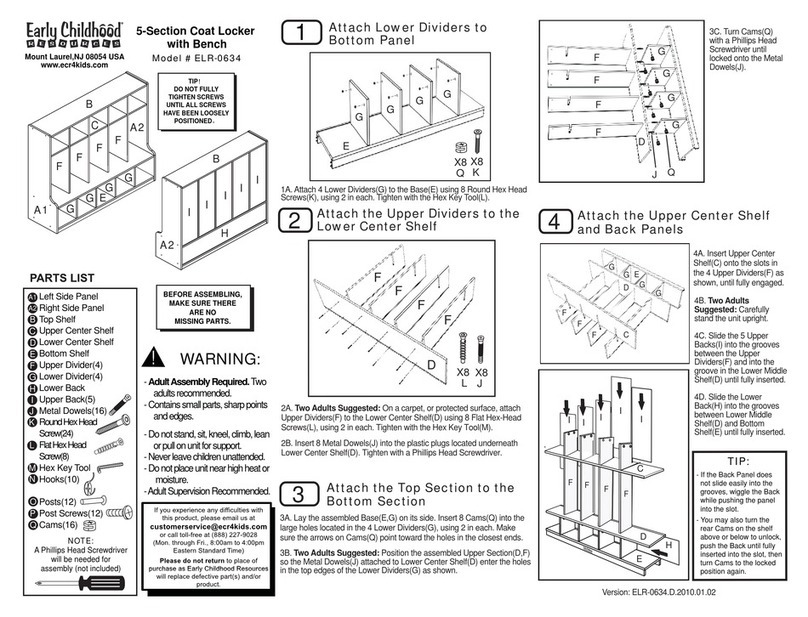
Early Childhood Resources ELR-0634 User manual
Early Childhood Resources

Early Childhood Resources ELR-0634 User manual

Early Childhood Resources ELR-0635 User manual

Early Childhood Resources

Early Childhood Resources ELR-0635 User manual

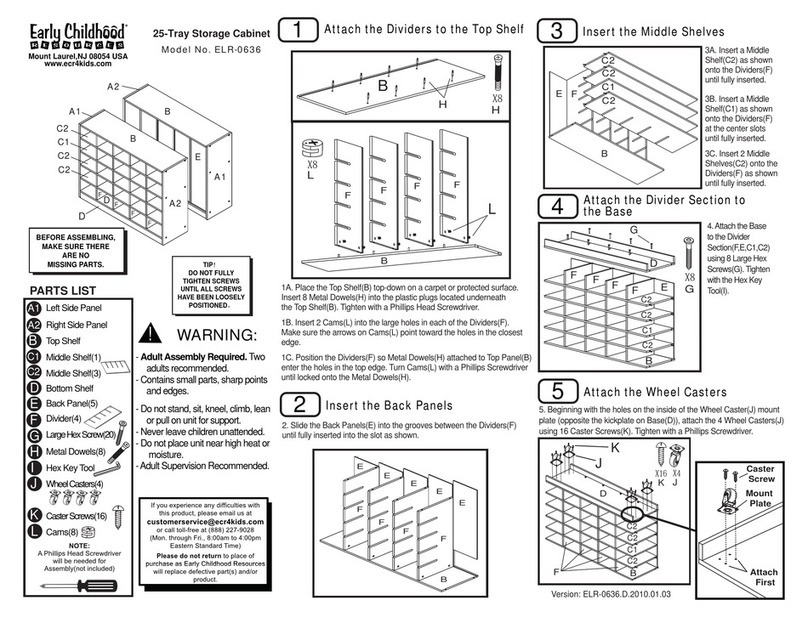
Early Childhood Resources ELR-0636 User manual
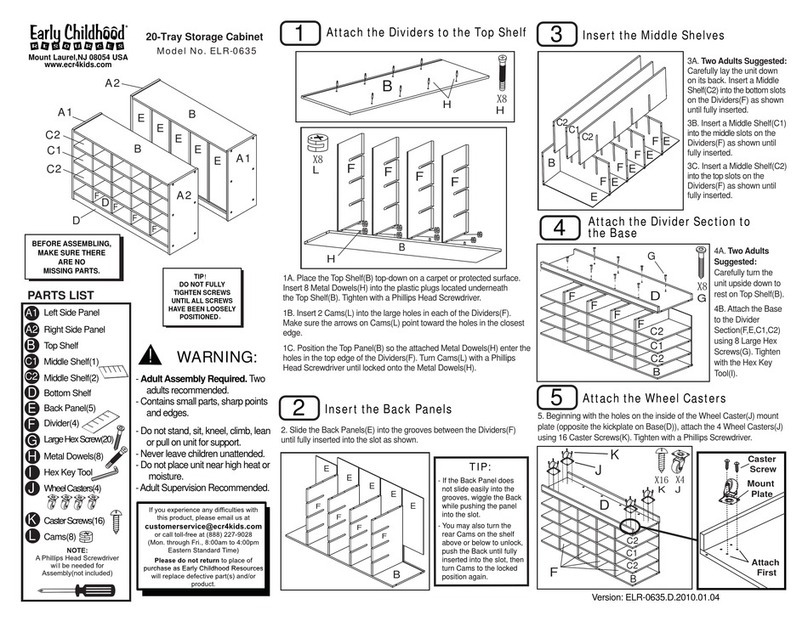
Early Childhood Resources

Early Childhood Resources ELR-0636 User manual

Early Childhood Resources ELR-0627 User manual

Early Childhood Resources

Early Childhood Resources ELR-0627 User manual

Early Childhood Resources ELR-0687 User manual

Early Childhood Resources

Early Childhood Resources ELR-0687 User manual

Early Childhood Resources ELR-0728 User manual
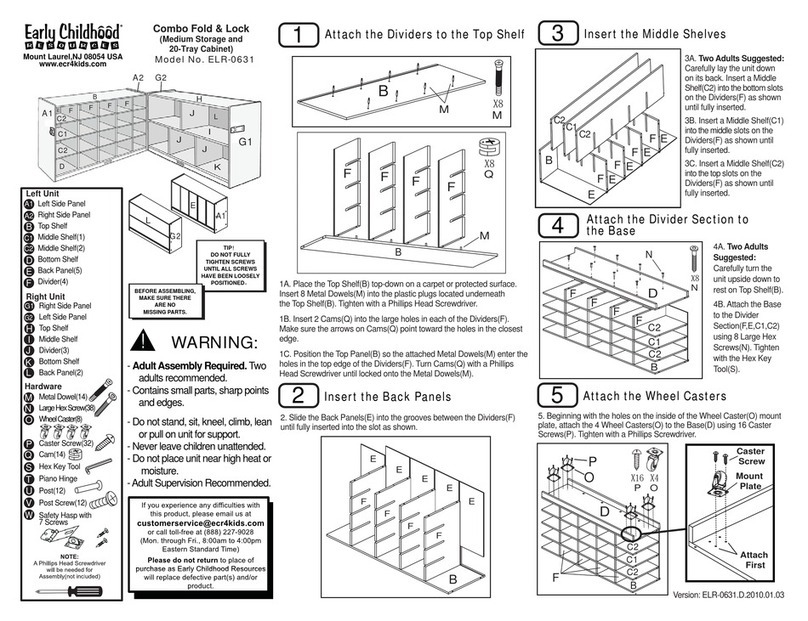
Early Childhood Resources

Early Childhood Resources ELR-0728 User manual

Early Childhood Resources ELR-0631 User manual
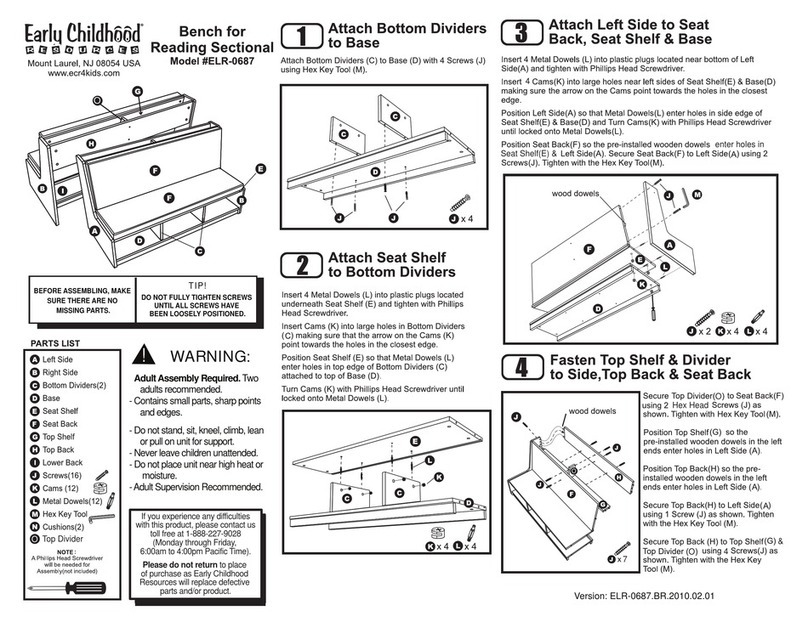
Early Childhood Resources

Early Childhood Resources ELR-0631 User manual

Popular Indoor Furnishing manuals by other brands

Furinno 11138 Assembly instruction

Furinno

Furinno 11138 Assembly instruction

dams Flux FL-MM3 Assembly instructions

dams

dams Flux FL-MM3 Assembly instructions

Furniture of America Clement CM-BK928TF Assembly instructions

Furniture of America

Furniture of America Clement CM-BK928TF Assembly instructions

Julian Bowen DOW001 Assembly instructions

Julian Bowen

Julian Bowen DOW001 Assembly instructions

Argos Mia 3 Drawer Chest Assembly instructions

Argos

Argos Mia 3 Drawer Chest Assembly instructions

DITALIA CD-164 Assembly manual

DITALIA

DITALIA CD-164 Assembly manual

Jorgenson Lockers Gladiator Assembling instructions

Jorgenson Lockers

Jorgenson Lockers Gladiator Assembling instructions

Rauch M2258 Assembly instructions

Rauch

Rauch M2258 Assembly instructions

Emmezeta LUNA 119739 Assembling instructions

Emmezeta

Emmezeta LUNA 119739 Assembling instructions

Kirsch Cellular Shade Getting started

Kirsch

Kirsch Cellular Shade Getting started

Kesseböhmer DISPENSA VVS Series Mounting instructions

Kesseböhmer

Kesseböhmer DISPENSA VVS Series Mounting instructions

Himolla Easy Comfort Series Assembly instructions

Himolla

Himolla Easy Comfort Series Assembly instructions

Rockler Blum 38411 instructions

Rockler

Rockler Blum 38411 instructions

BLACK RED WHITE BROOKLYN B172-REG1D2B2S manual

BLACK RED WHITE

BLACK RED WHITE BROOKLYN B172-REG1D2B2S manual

FourStar 11226036B Assembly instructions

FourStar

FourStar 11226036B Assembly instructions

Furinno 17081 Assembly instruction

Furinno

Furinno 17081 Assembly instruction

Mocka Juno Kids Assembly instructions

Mocka

Mocka Juno Kids Assembly instructions

Jorgenson Lockers Kids Sports Locker Assembly instructions

Jorgenson Lockers

Jorgenson Lockers Kids Sports Locker Assembly instructions

manuals.online logo
manuals.online logoBrands
  • About & Mission
  • Contact us
  • Privacy Policy
  • Terms and Conditions

Copyright 2025 Manuals.Online. All Rights Reserved.