EASEPAL EC-320D Manual

中国·厦门蒙发利科技有限公司
Xiamen Comfort Science & Technology Co.,Ltd
产 品 维 修 手 册
Maintenance Service Manual
产品型号/MODEL:EC-320D
适用电压规格/voltage specification:220-240V
蒙发利集团·客服
By the Easepal`s Customer Service Dept.

Precautions for inspection and repair
Inspection
Verify that the power cord is tightly connected on the machine.
Be careful to avoid electric shock.
Repair
Power off the supply before repair work begins.
Keep things tidy and in order during repair work.
When changing more than one part, identify the parts that are damaged and reuse the
serviceable parts.
During the dismantling or assembling process, do not damage other parts and PCB.
Be on the alert for loose or disconnected connectors during repair.
Do not leave any screws or other foreign objects in the unit after it is assembled.
Carry out test operation of the machine after the repair work is done.
It is preferable to perform the repair work on a carpet to prevent scratching or dirtying the
unit.
Clean the workplace after repair work is completed.

Tools List Tools required
Screwdriver size 1,2,3 Diagonal cutter and long
nose pliers
Soldering Kit Spanner tools Kit
Test pen Allen Key set Ratchet Tools Set Blower
Electric Driver electrical adhesive tape Cable Ties WIRE CONECTORS

一、产品故障列表 Trouble List
如下为 EC-325A 常见的故障现象及维修方法。
Common Troubles and Maintenance Methods are listed as below:
故障序
号 NO
现象
phenomenon
描述
Description
维修方法
maintenance method
A.手控器无显示:LCD NO DISPLAY
①、保险丝烧掉 Fuse melts
(电源盒处和中心板上(in the
Power Source Box and main PCB)
②、电源电路接触不良 Power supply
circuit Poorly connected
③、EUP 板不良 EUP board spoil
④、中心板坏 Main PCB failed
①、更换保险丝
Replace Fuse
②、更换电源盒
Replace Power Box
③、更换 EUP 板 Replace EUP board
④、更换中心板
Replace main PCB
01 开机无功能
No function
B.手控器有显示:LCD HAS DISPLAY
①、机械开关坏掉
或是机械开关的线材断开。
Mechanical switch fails or
it’s wire is broken
②、上下行程光电坏。
Up or Down Stroke
Photoelectricity was failed
③、中心板坏掉 Main PCB failed
④、开机直揉捏其他按键无效
kneading all the time from
powerand no response with
other button
①、更换机械开关或是线材
replace mechanical
switch or wire
②、更换行程光电
Replace stroke
photoelecruicity
③、更换中心板
Replace main PCB
④、宽度检测板坏,
更换宽度检测板
Replace Width
Inspection Board

02 宽中窄不能切换
the Width
switchover
isn`t change
①、中心板宽度检测端子线材接触不
良。The terminals of Width
Inspection on main PCB with wires
were poorly connected
②、机芯宽度检测板端子线材接触不
良。The terminals of Width
Inspection on mechanical with
wires were poorly connected
③、宽度检测板坏。
Width Inspection failed
④、中心板坏 Main PCB failed
①、②点将端子接插到位或是更换线
材 Plug the terminals
well or replace the wires
③、更换宽度检测板
Replace Width Inspection
④、更换中心板
Replace the main PCB
03 不行走
NO Rolling
①、端子或是线材接触不良
Terminals or Wire Poorly
Contact
②、上、下行程光电组件坏。
UP/ Down-stroke
Photoelectrictity
Subassembly Failed
③、行走电机坏
Rolling Motor Failed
④、中心板坏 Main PCB failed
①、将端子接插到位或是更换线材。
Plug the terminal well or replace
the wires
②、更换上、下行程组件
ReplaceUP/Down-StrokeSubassembly
③、更换机芯。
Replace gear box
④、更换中心板
Replace main PCB
04 不揉捏
No kneading
①、中心板端子没插到位或是线材接
触不良。The terminals on main PCB
and wires are poorly connected
②、揉捏电机坏
Kneading motor failed
③、中心板坏 Main PCB failed
①、将端子接插到位或是更换线材。
Plug the terminal well or
replace the wires
②、更换机芯
Replace gear box
③、更换中心板。
Replace main PCB
05 不敲击 ①、中心板端子没插到位 ①、将端子接插到位
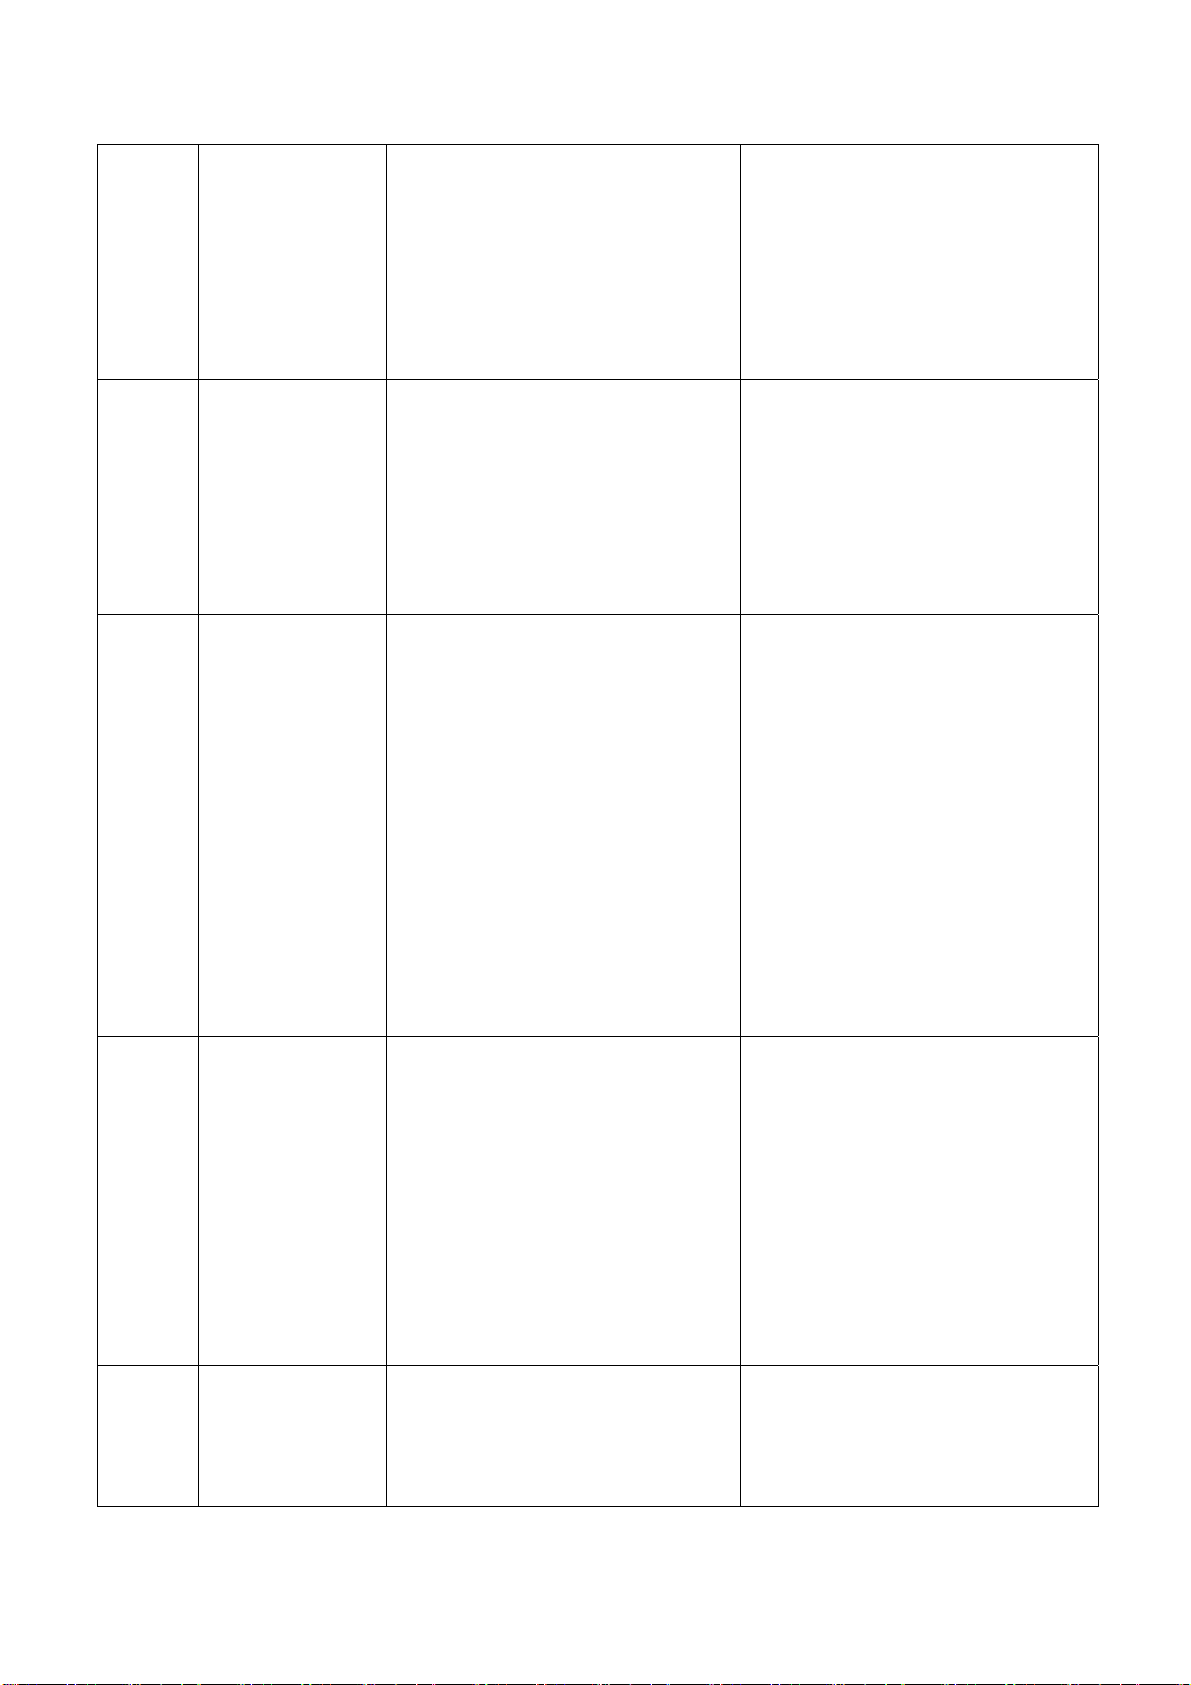
No tapping The terminals on main PCB
and wires are poorly connected
②、敲击电机坏
Tapping motor faild
③、中心板坏掉 Main PCB failed
Plug the terminal well
②、更换机芯
Replace gear box
③、更换中心板 R
Replace main PCB
06 手控器上按键无
反映
The all buttons
of controller
aren`t response
①、端子接触不良或线材接触不良
The terminals and wires are
poorly connected
②、手控器 PCB 板坏
The PCB in the controller failed
①、将端子接插到位或是更换线材。
Plug the terminal well or
replace the wires
②、更换手控器
Replace the controller
07 不升倒背,小腿不
能升降
backrest can`t
recline or lift ,
calves-rest can`t
lift or recline
①、电动推杆连接线未接插到位
The terminal of electrically
operated pusher and wires are
poorly connected
②、电动推杆坏
The electrically operated
pusher failed
③、中心板坏
Main PCB failed
①、将连接线接插到位
Plug the terminal well
②、更换电动推杆
Replace the electrically
operated pusher
③、更换中心板
Replace main PCB
8 电机不振动
no vibration by the
motor in the
seat-pad
①、振动电机坏
Print motors failed
②、端子接触不良或是线材坏掉。
The terminals and wires are
poorly connected or the
wires fail
③、中心板坏。Main PCB failed
①、更换振动电机
Replace the print motor
②、将端子接插到位或者更换线材。
Plug the terminal well or
replace the wires
③、更换中心板
Replace main PCB
9 小腿不充气
no gas charging in
the calves-rest
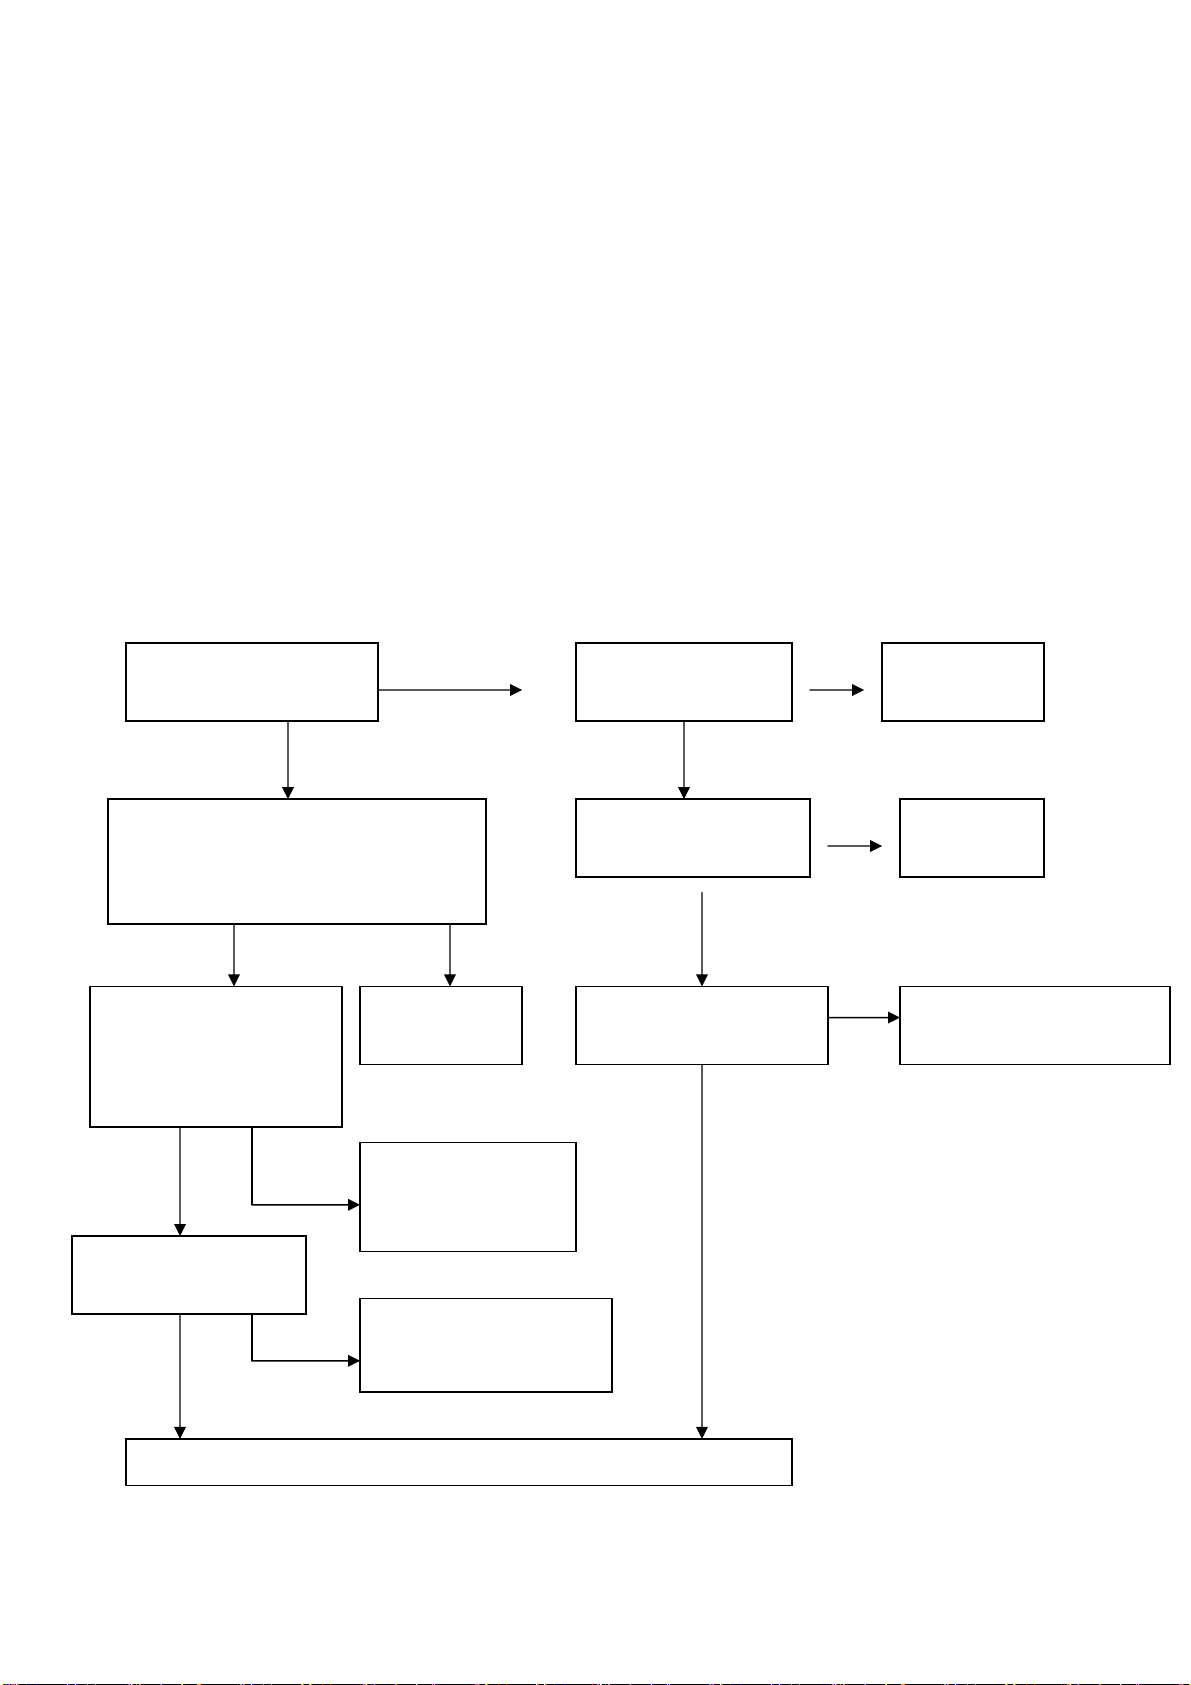
二.故障检修流程图 Troubleshooting Process
在修理或者替换零配件过程中注意下面几点:
A. 在拆卸连线,移动连接器,或者替换部件前一定要断开电源线插头。
B. 因为半导体(像集成电路,或者其它的)很容易被静电损坏,所以当要触摸 PCB 前,请确保你的身
体和大地有连线(佩带静电手环),或可以将手放在地端,以释放身体上所带的静电。
Notes for repairing chair or replacing parts
A. Make sure the power is off when you tear down the wires, move terminals or replacing parts.
B. The semiconductors( like IC or something else) will easily be damaged by static.
So you touch the PCB before, please make sure your body is connected with the ground.
1、开机无功能/ No function
是
上下行程组件端子线是否连接好
Check the terminals of Up and Down
Stroke Subassembly connected well
检查上下行程组件
是否损坏
Check the UP/DOWN
Stroke Subassembly
连接好端子线
Touch well
更换上下行程组件
Replace the UP or
DOWN Stroke
宽度检测板是否坏
Check the width board
更换中心板 Replace Main PCB
更换宽度检测板
Replace the width board
液晶片是否显示
Does LCD has display
NG
OK NG
检查保险丝是否烧
Check the fuse is
更换保险丝
Replace fuse
电源线是否断路
Check the power cord
电源滤波器是否损坏
Chenck the EUP Board
更换电源线
Replace fuse
更换电源滤波器
Replace the EUP board
NG
OK
NG
OK
NG
OK
NG
OK
NG
OK
OK
2、机芯宽中窄不能切换 No width switchover
3、不行走/ NO ROLLING
检查宽度检测板连接线是否与中心板连接好
Does the terminal of Width Inspection Board and
main PCB connected securely?
将连接线接好
Touch well
宽度检测板是否损坏
Check width Inspection board
更换宽度检测板
Replace the width inspection
更换中心板
Replace Main PCB
检查行走电机连接线是否与中心板连接好
Check the terminals of rolling motor wire with
main PCB connected securely?
将连接线接好
Touch well
检查行走电机是否损坏
Check the rolling motor
更换机芯
Replace gear box
更换中心板
Replace the Main PCB
OK
NG
NG
OK
NG
OK
NG
检查上下行程组件是否损坏
Check the UP or DOWN
Stroke Subassembly
更换上下行程组件
Replace the UP or DOWN Stroke
subassembly
NG
OK
OK

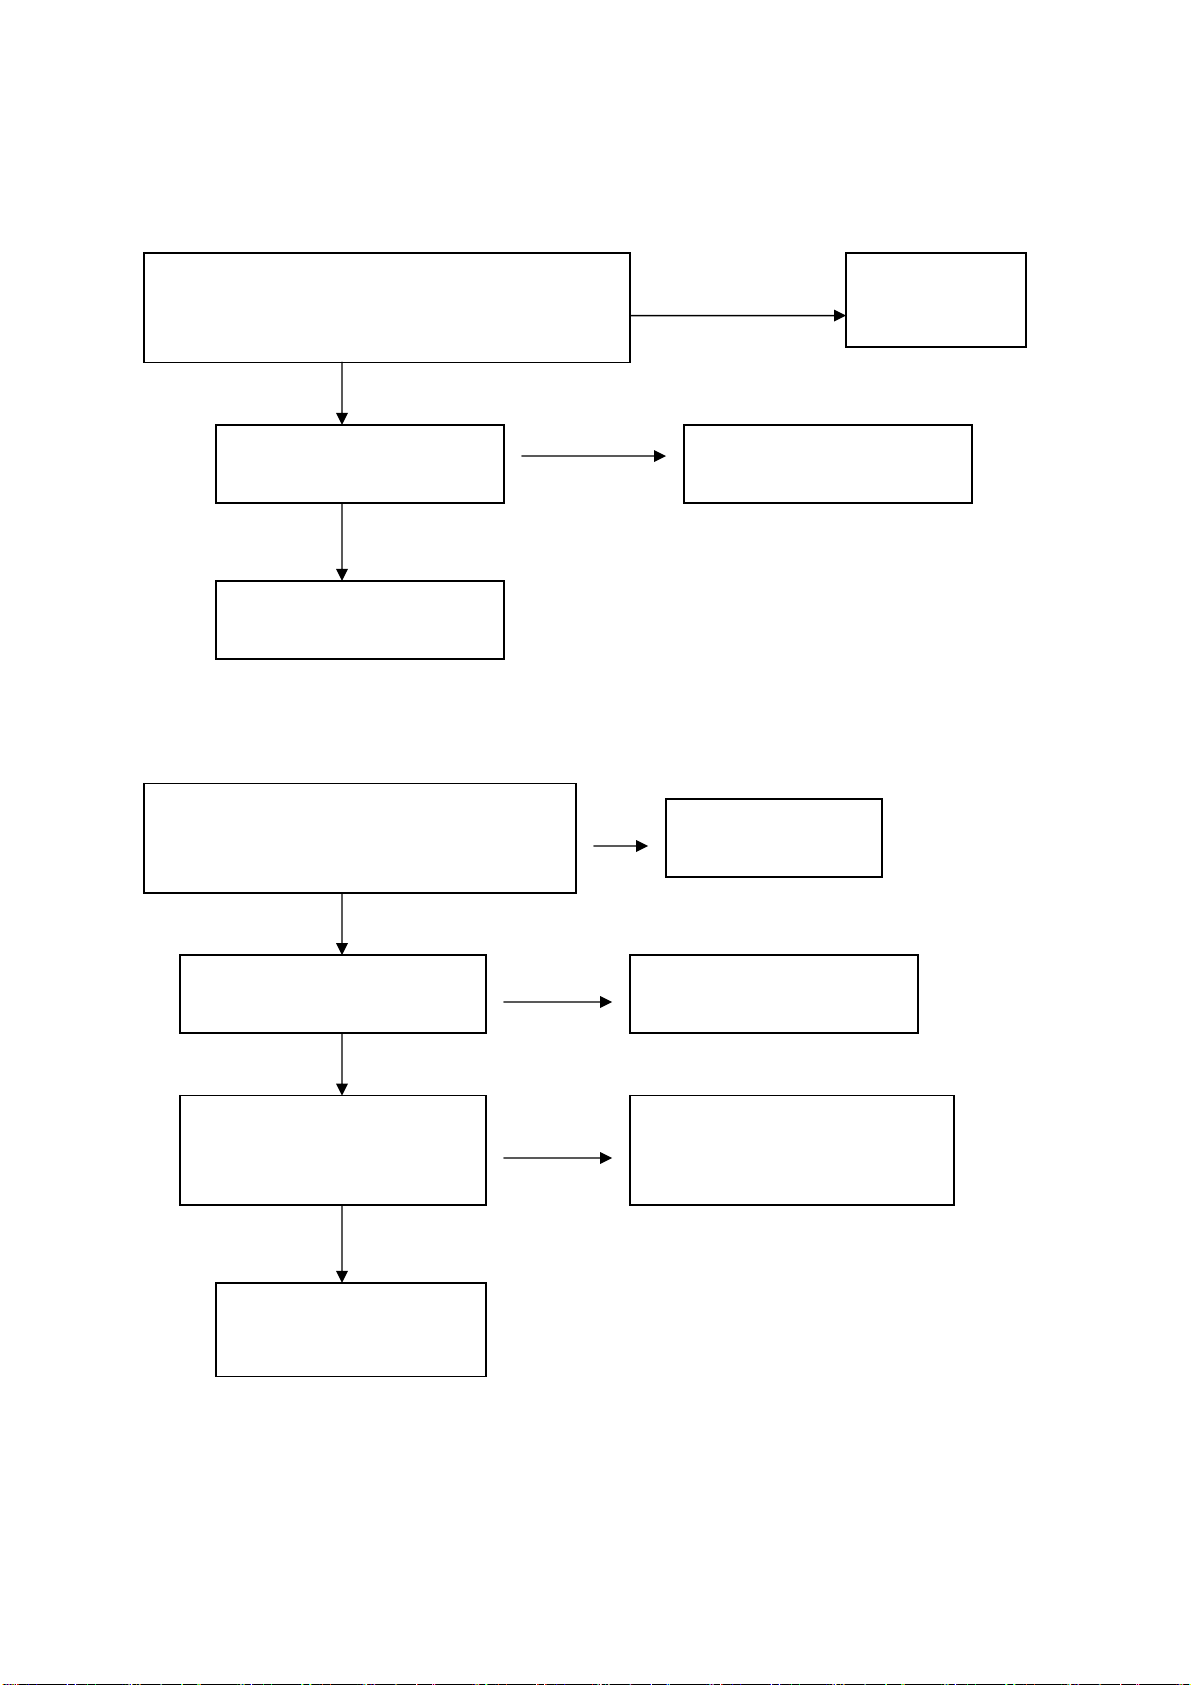
4、不揉捏/ NO KNEADING
否
5、不敲击/ NO TAPPING
更换中心板
Replace the Main PCB
检查敲击电机是否损坏
Check the tapping motor
将连接线接好
Touch well
更换机芯
Replace gear box
检查行走电机连接线是否与中心板连接好
Check the terminals of Kneading motor wire
with main PCB connected securely?
将连接线接好
Touch well
检查行走电机是否损坏
Check the Kneading motor
更换机芯
Replace gear box
宽度检测板是否损坏
Check width Inspection board
更换宽度检测板
Replace the width inspection
NG
OK
NG
OK
NG
OK
检查行走电机连接线是否与中心板连接好
Check the terminals of Tapping motor wire
with main PCB connected securely?
NG
OK
NG
OK
更换中心板
Replace the Main PCB

6、手控器上按键无反应
The all buttons of controller aren`t response
7、电动推杆(靠背/小腿)不工作
Actuator doesn’t work.(Backrest/leg rest)
检查手控器连接线是否与中心板连接好
Check the terminals of remote controller wire
and main PCB connected securely?
检查导电橡胶是否损坏
Check the conductive rubber
更换手控器
Replace the remote controller
将连接线接好
Touch well
更换导电橡胶
Replace it
检查电动推杆连接线与中心板是否连接好
The terminals of their actuator with main PCB
connected securely?
检查电动推杆是否损坏
Check the actuator
更换中心板
Replace the main PCB
将连接线接好
Touch well
更换电动推杆
Replace it
OK
NG
NG
OK
NG
OK
NG
OK
Table of contents
Other EASEPAL Massager manuals


