manuals.online logo
Brands
  1. Home
  2. •
  3. Brands
  4. •
  5. Eastwood
  6. •
  7. Power Tools
  8. •
  9. Eastwood 13650 User manual

Eastwood 13650 User manual

HOT STAPLER
PLASTIC REPAIR SYSTEM
INSTRUCTIONS
Item #13650
2Eastwood Technical Assistance: 800.544.5118 >> techelp@eastwood.com To order parts and supplies: 800.345.1178 >> eastwood.com 3
STAPLE SELECTION
• FLAT STAPLES are best for smaller cracks in rigid plastics and bridging tears in flexible
plastics or pulling together pre-stressed, difficult to close cracks.
• WAVE STAPLES are best for larger, longer cracks and complete breaks in rigid plastic.
• CORNER STAPLES are excellent for reinforcing cracks at inside corners, curved areas and
other complex shapes where a Flat or Wave Staple will not fit.
MAKING REPAIRS
• Plug the power cord into a 120V AC, 60Hz grounded
outlet.
• Switch the main Power Switch on the side of the
Power Unit to the “On” position.
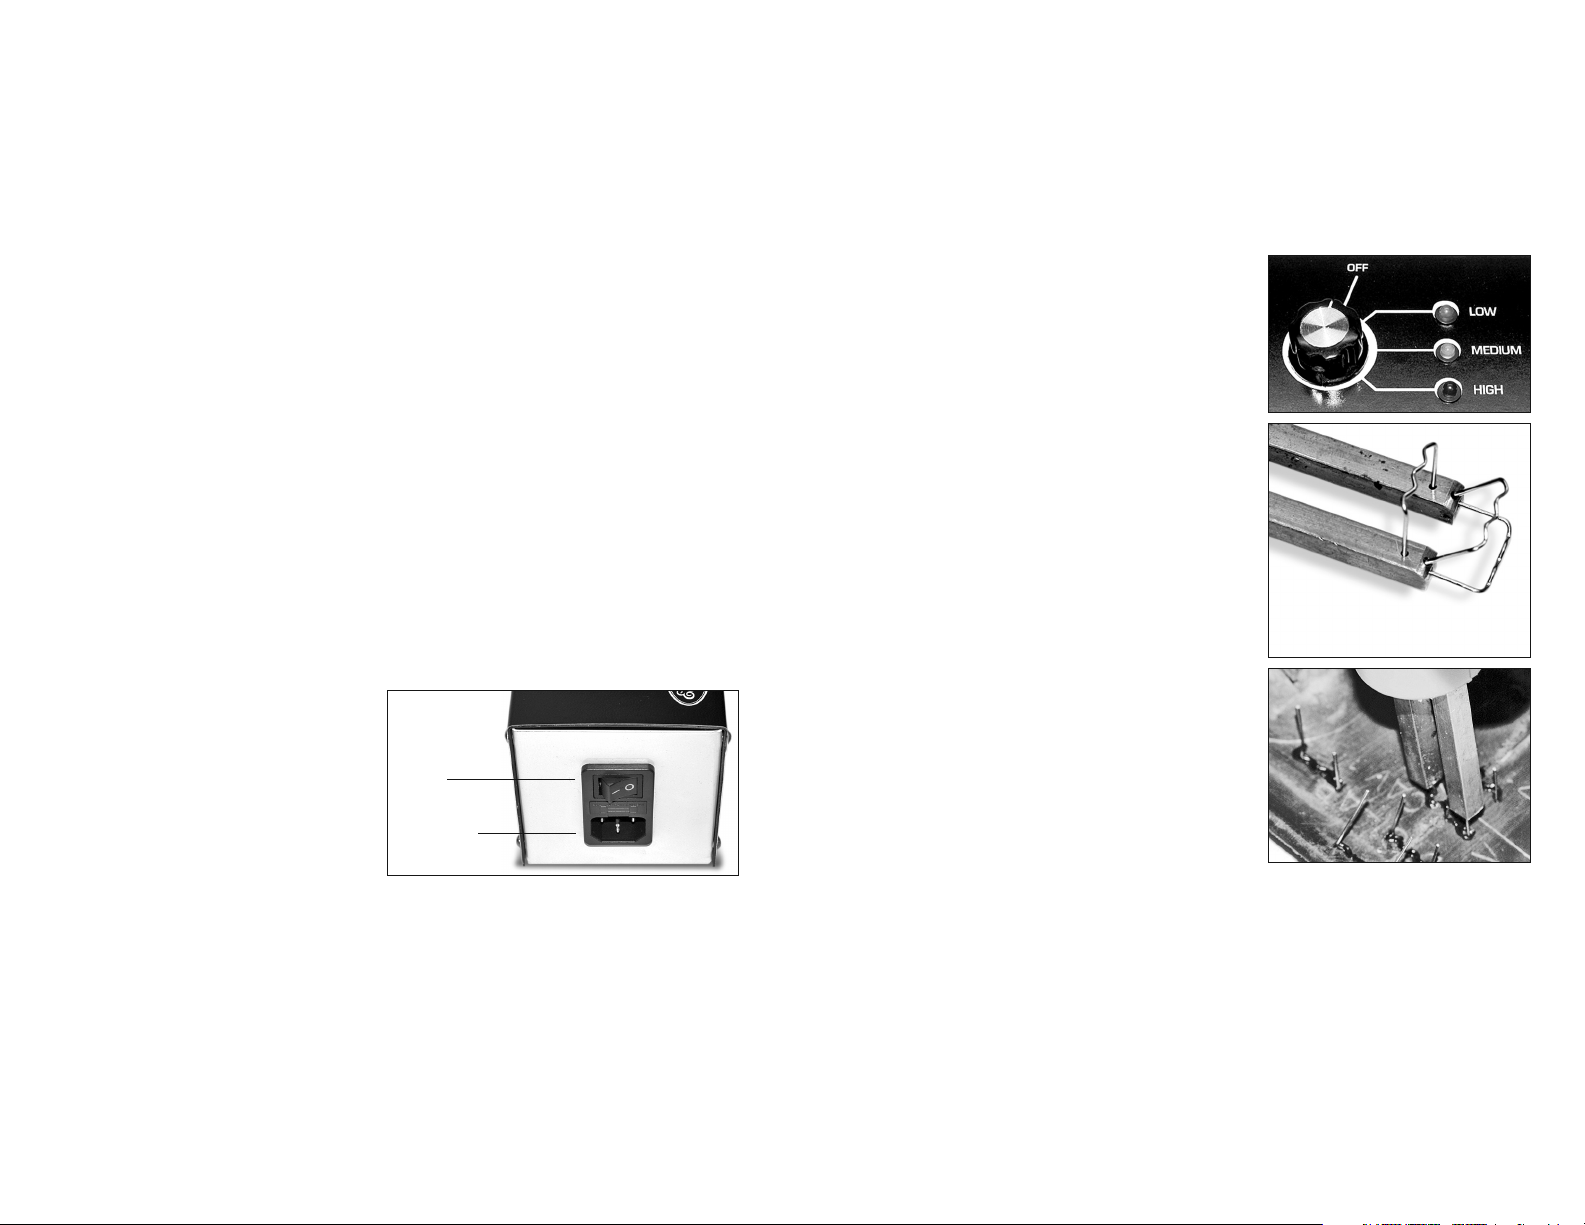
• Set the Temperature knob to suit the material being
repaired (FIG 2). NOTE: Testing on a scrap piece of
similar material is advisable to determine the correct
heat setting.
- “Low” for thinner and softer plastics.
- “Medium” for thicker and semi-rigid plastics.
- “High” for thick and hard plastics.
• Place the desired staple configuration into one of
three hole locations in the Contact Prongs, choosing
the hole location that provides the best access to the
damage (FIG 3).
• Press and hold the Heat Button on the Staple Gun for
10 seconds allowing the Staple to achieve full heat.
• Carefully press the heated staple gently into the
plastic keeping the staple parallel and square to the
surface (FIG 4) while continuing to hold the Heat
Button.
CAUTION: On thinner and softer materials, it is very easy
to burn through to the outer surface, do not use excessive
force. NOTE: On harder and thicker materials only, it may
be helpful to slightly “twist” the staple into the material.
•
When the Staple is satisfactorily burrowed into the material, release the Heat Button, wait several
seconds to allow the molten plastic to firm up then withdraw the Staple Gun from the Staple.
• NOTE: For longer cracks, it is best to start on the open end and work toward the unbroken
area. Place staples at approx. 1” apart, filling with additional staples if required. For complete
breaks, start at the ends of the break and work toward the center alternating sides as you go.
Place staples at approx. 1” apart, filling with additional staples if required.
• When done, the Staple legs can be cut off with side cutters then ground down to the repaired
surface area. CAUTION: Wear appropriate eye protection. If not grinding away remainders of
legs, exercise care when handling part to avoid scratches and cuts from sharp cut staple legs.
The EASTWOOD HOT STAPLER is a precision engineered, professional plastic repair system designed
to create solid, permanent repairs of breaks, cracks and tears in rigid and flexible plastic parts. Repair
bumper covers, door panels, consoles, plastic toolboxes, housings and more all with one convenient,
fully equipped kit. A three-level heat setting feature enables strong repairs in virtually any plastic
material, hardness or thickness. Just plug it in and go.
WARNINGS
• BURN HAZARD! This tool generates high heat in the dual prong and staple area which can
exceed 400°F. Use extreme caution when mounting staples and never touch dual prongs or
staples when switch is on. Allow sufficient time for cooling before touching repaired area.
• Wear appropriate, heat resistant work gloves and protective clothing
• Wear appropriate eye protection.
• Use in a well ventilated area and avoid breathing fumes from melted plastic.
• Do not use on or near flammable materials.
• Keep away from wet or damp areas.
INCLUDES
• (1) Hot Staple Gun.
• (1) Power Unit.
• (1) Power Cord.
• (100) #13650A, 0.8mm Heavy Duty, “Flat” Stainless Steel Staples.
• (100) #13650B, 0.8mm Heavy Duty, “Wave” Stainless Steel Staples.
• (100) #13650C, 0.8mm Heavy Duty, “Corner” Stainless Steel Staples.
• (1) Storage Case.
ASSEMBLY
• Plug the 6’ Power Cord into the
receptacle on the switch side of
the Power Unit (FIG 1).
PREPARATION
• Always clean the plastic part surface being repaired of any grease, dirt, film or other
contaminates before beginning.
• Support the part being repaired with all pieces or cracks in the original configuration. Clamping
or “blocking” parts into place may be helpful. Modeling clay or putty can be used to support
irregular shaped parts.
• Plan your work before beginning, deciding which type of staple will work best on specific
damage. If possible, test operation on a scrap piece of similar material.
Fig. 1
Power
Switch
Power Cord
Receptacle
Fig. 2
Photo to illustrate location purposes
only – only load one staple at a time
Fig. 3
Fig. 4
© Copyright 2012 Easthill Group, Inc. Instruction #13650Q Rev. 3/12
If you have any questions about the use of this product, please contact
The Eastwood Technical Assistance Service Department:
800.544.5118 >> email: techelp@eastwood.com
The Eastwood Company 263 Shoemaker Road, Pottstown, PA 19464, USA
US and Canada: 800.345.1178 outside US: 610.718.8335
Fax: 610.323.6268 eastwood.com
TOOL MAINTENANCE
• Keep Contact Prongs of Staple Gun clean and free of debris paying particular attention to the
staple insertion holes.
• Should unit fail to turn on, unplug then remove screws attaching top of case to the base. Check
fuse. If the fuse is burned, replace with an F8AL250v, 5mm x 20mm, 8 amp, 250 Volt, fast-
blow fuse.
OPTIONAL ITEMS
• Replacement Staples:
#13650A 0.8mm Heavy Duty, “Flat” Stainless Steel Staples, 100 Pieces.
#13650B 0.8mm Heavy Duty, “Wave” Stainless Steel Staples, 100 Pieces.
#13650C 0.8mm Heavy Duty, “Corner” Stainless Steel Staples, 100 Pieces.
Corner Flat Wave

Other Eastwood Power Tools manuals

Eastwood 54440 User manual

Eastwood

Eastwood 54440 User manual

Eastwood 21560 User manual

Eastwood

Eastwood 21560 User manual

Eastwood Perfect Panel Prep Tool User manual

Eastwood

Eastwood Perfect Panel Prep Tool User manual

Eastwood 33862 User manual

Eastwood

Eastwood 33862 User manual

Eastwood 11797 User manual

Eastwood

Eastwood 11797 User manual

Eastwood 30216 User manual

Eastwood

Eastwood 30216 User manual

Eastwood 11797 User manual

Eastwood

Eastwood 11797 User manual

Eastwood 20644 User manual

Eastwood

Eastwood 20644 User manual

Eastwood 11737 User manual

Eastwood

Eastwood 11737 User manual

Eastwood 13475 User manual

Eastwood

Eastwood 13475 User manual

Eastwood 54441 User manual

Eastwood

Eastwood 54441 User manual

Eastwood 13622 User manual

Eastwood

Eastwood 13622 User manual

Eastwood 21640 User manual

Eastwood

Eastwood 21640 User manual

Eastwood 31753 User manual

Eastwood

Eastwood 31753 User manual

Eastwood 14041 User manual

Eastwood

Eastwood 14041 User manual

Eastwood 32290 User manual

Eastwood

Eastwood 32290 User manual

Eastwood 31338 User manual

Eastwood

Eastwood 31338 User manual

Eastwood 51460 Manual

Eastwood

Eastwood 51460 Manual

Eastwood 21749 User manual

Eastwood

Eastwood 21749 User manual

Eastwood 32498 User manual

Eastwood

Eastwood 32498 User manual

Eastwood 21304 User manual

Eastwood

Eastwood 21304 User manual

Eastwood 13743 User manual

Eastwood

Eastwood 13743 User manual

Eastwood B60 User manual

Eastwood

Eastwood B60 User manual

Eastwood 31483 User manual

Eastwood

Eastwood 31483 User manual

Popular Power Tools manuals by other brands

Goldschmidt WT 1400 P operating manual

Goldschmidt

Goldschmidt WT 1400 P operating manual

BriskHeat BRISKAIRSP-1 instruction manual

BriskHeat

BriskHeat BRISKAIRSP-1 instruction manual

Universal Tool UT8600-1 manual

Universal Tool

Universal Tool UT8600-1 manual

AEG Atlas Copco BS2E 7.2 T Instructions for use

AEG

AEG Atlas Copco BS2E 7.2 T Instructions for use

Meec tools 060-202 operating instructions

Meec tools

Meec tools 060-202 operating instructions

BEKA Fold & Go Loom Floor Stand Assembly instructions

BEKA

BEKA Fold & Go Loom Floor Stand Assembly instructions

Ingersoll-Rand 1720B series Product information

Ingersoll-Rand

Ingersoll-Rand 1720B series Product information

Hafco Woodmaster PS-3200 Assembly and setup instructions

Hafco Woodmaster

Hafco Woodmaster PS-3200 Assembly and setup instructions

Matco Tools SK8MAT manual

Matco Tools

Matco Tools SK8MAT manual

Sioux Tools IW100HAI instructions

Sioux Tools

Sioux Tools IW100HAI instructions

Crane Electronics WrenchStar Mult Pairing guide

Crane Electronics

Crane Electronics WrenchStar Mult Pairing guide

Echo BRD-2620 Operator's manual

Echo

Echo BRD-2620 Operator's manual

Wen 23101 instruction manual

Wen

Wen 23101 instruction manual

Chicago Pneumatic CP7600xB Series Operator's manual

Chicago Pneumatic

Chicago Pneumatic CP7600xB Series Operator's manual

Rothenberger Universal ROTIGER VARIO Electronic Instructions for use

Rothenberger

Rothenberger Universal ROTIGER VARIO Electronic Instructions for use

SCANGRIP CANVIK CENTER operating instructions

SCANGRIP

SCANGRIP CANVIK CENTER operating instructions

Rotek WZWP-020MH user manual

Rotek

Rotek WZWP-020MH user manual

Clarke X-Pro CAT199 Operating & maintenance instructions

Clarke

Clarke X-Pro CAT199 Operating & maintenance instructions

manuals.online logo
manuals.online logoBrands
  • About & Mission
  • Contact us
  • Privacy Policy
  • Terms and Conditions

Copyright 2025 Manuals.Online. All Rights Reserved.