Eastwood Fairmount Tools 31805 User manual

6.5L MANUAL
FLUID EVACUATOR
INSTRUCTIONS
Item #31805

2Eastwood Technical Assistance: 800.343.9353 >> techelp@eastwood.com
The FAIRMOUNT 6.5L MANUAL FLUID EVACUATOR can be used to draw motor oil, transmission
fluid, gear oil, hydraulic fluid, coolant, fuel, and most other non-corrosive automotive fluids.
Works well for bleeding brake, clutch and other hydraulic systems.
CONTENTS
(1) 6.9 Qt. (6.5 l.) Capacity Manual Pump Evacuator
(1) 39.4” (1 m) x 0.23” (6mm) Nylon Tube
(1) 39.4” (1 m) x 0.27” (7mm) Nylon Tube
(1) Inlet Adaptor with 39.4” (1m) x .38” (10mm) Nylon Tube
(1) Tube Clog Clearing Wire
(1) 0.38” (10mm) to 0.27” (7mm) Tube Connector
(1) 0.38” (10mm) to 0.23” (6mm) Tube Connector
(1) Inlet Adaptor with 59” (1.5m) Silicone Hose with Shut-off Clip and Brake Bleeder Attachment
DANGER indicates a hazardous situation which, if not avoided, will result in death or serious injury.
WARNING indicates a hazardous situation which, if not avoided, could result in death or serious injury.
CAUTION used with the safety alert symbol, indicates a hazardous situation which, if not avoided,
could result in minor or moderate injury.
NOTICE is used to address practices not related to personal injury.
SAFETY INFORMATION
The following explanations are displayed in this manual, on the labeling, and on all other information
provided with this product:

To order parts and supplies: 800.343.9353 >> eastwood.com 3
READ INSTRUCTIONS
• Thoroughly read and understand these product instructions before using
the Manual Fluid Evacuator.
• Keep these product instructions for future reference.
IMPROPER MOTOR VEHICLE MECHANICAL
WORK CAN RESULT IN INJURY OR DEATH!
• Performing work without adequate training in motor vehicle mechanical sys-
tems can cause injury, death and vehicle damage. DO NOT attempt to use
this tool or begin motor vehicle service work without proper training in and
a thorough understanding of motor vehicle service and repair procedures.
FIRE AND EXPLOSION HAZARD!
• DO NOT use for storage of flammable liquids or fuels. Drain flammable
liquids immediately after extraction. Flammable liquids emit explosive
vapors. Keep away from sources of sparks, flames, or excessive heat.
INJURY HAZARD!
• DO NOT use for extraction of dangerous or caustic chemicals, poisons,
acids, or solvents.
EXPOSURE TO AUTOMOTIVE FLUIDS
CAN BE A HEALTH HAZARD!
• Contents can splash into eyes. Be sure to follow all precautions listed
on fluid containers before using.
• Wear ANSI Z87.1 approved eye protection while using Evacuator.
• Wear appropriate chemical resistant gloves while handling fluids.
INJURY HAZARD!
• To avoid possible personal injury and property damage, keep all hoses
free of rotating/moving underhood components such as fans, belts etc.
• Do not allow hoses to come into contact with hot underhood components.
• Used automotive fluids are hazardous materials and should be disposed of
in compliance with local regulations.

4Eastwood Technical Assistance: 800.343.9353 >> techelp@eastwood.com
SET-UP
• Select the Inlet Adapter with either the
with 39.4” (1 m) x 0.38” (9.8mm) Nylon
Tube or Inlet Adaptor with 59” (1.5 m) x
0.31” (8mm) Silicone Hose.
• Insert the selected Inlet Adapter into the
Inlet/Spout at the top of the Evacuator by
pushing in firmly until seated then turn
15° Counter-Clockwise to lock into
position (FIG 1).
FOR FLUID EXTRACTION
• Determine which Nylon Tube best fits into
the dipstick tube or other orifice being
accessed.
• Using the appropriate Tube Connector,
slip both Nylon Tubes into the Tube
Connector until seated (FIG 2).
FOR BRAKE BLEEDING
• Place the 90° Brake Bleeder Attachment
with Silicone Hose over the brake bleeder
(FIG 3).
The Nylon Tube end must
be clean and free of burrs,
nicks or other damage to
properly seal.
FIG. 1
FIG. 2
FIG. 3

To order parts and supplies: 800.343.9353 >> eastwood.com 5
OPERATION
FOR FLUID EXTRACTION
• Insert the Nylon Tube into the Dipstick
Tube or other orifice until it is determined
the end of the Tube has reached the
bottom of the oil pan or other vessel.
• Unfold the Wire Pedal from the base
of the Evacuator (FIG 4).
• Place a foot on the Wire Pedal for
stabilization. Raise the Pump Handle to
the top of it’s stroke then push downward
to the bottom of the stroke for complete
pumping action. NOTE: Each full stroke
is approx. 15” (380mm).
• Repeat pumping action until all fluid
is extracted.
FIG. 4
This is necessary in order
to remove the entire volume
of fluid.

6Eastwood Technical Assistance: 800.343.9353 >> techelp@eastwood.com
FOR BRAKE OR CLUTCH BLEEDING
FIG. 5
IMPROPER MOTOR VEHICLE BRAKE WORK OR OTHER MECHANICAL WORK
CAN RESULT IN INJURY OR DEATH!
Performing brake work without adequate training in motor vehicle brake
systems can cause injury, death and vehicle accidents. DO NOT attempt to
use this tool or begin motor vehicle brake work without proper training and
a thorough understanding of motor vehicle braking systems.
FIG. 6
• DO NOT open bleeder screw at this point!
• Before opening bleeder screw: Raise
the Pump Handle to the top of it’s stroke
then push downward to the bottom of
the stroke for complete pumping action.
NOTE: Each full stroke is approx.
15” (380mm).
• Repeat pumping action until a significant
vacuum has been built up. NOTE: 6 to 12
pumps may be required to achieve suf-
ficient vacuum.
• The bleeder screw may be opened
slightly allowing brake fluid and air to be
drawn out. NOTE: To stop flow of fluid
at any time, close the Shut-off Clip by
pressing inward on the flexible tab until
it crimps the tube and latches (FIG 5).
To open, release latch. NOTE: To relieve
any excess vacuum, press the Pressure
Release Button at the top edge of the
Evacuator lid (FIG 6).

To order parts and supplies: 800.343.9353 >> eastwood.com 7
DRAINING FLUID
• Remove the Inlet Adapter from the Inlet/Spout at the top of the Evacuator by pushing in firmly
and turning 15° Clockwise to unlock the latch.
• Grasp Knob and pull out to remove.
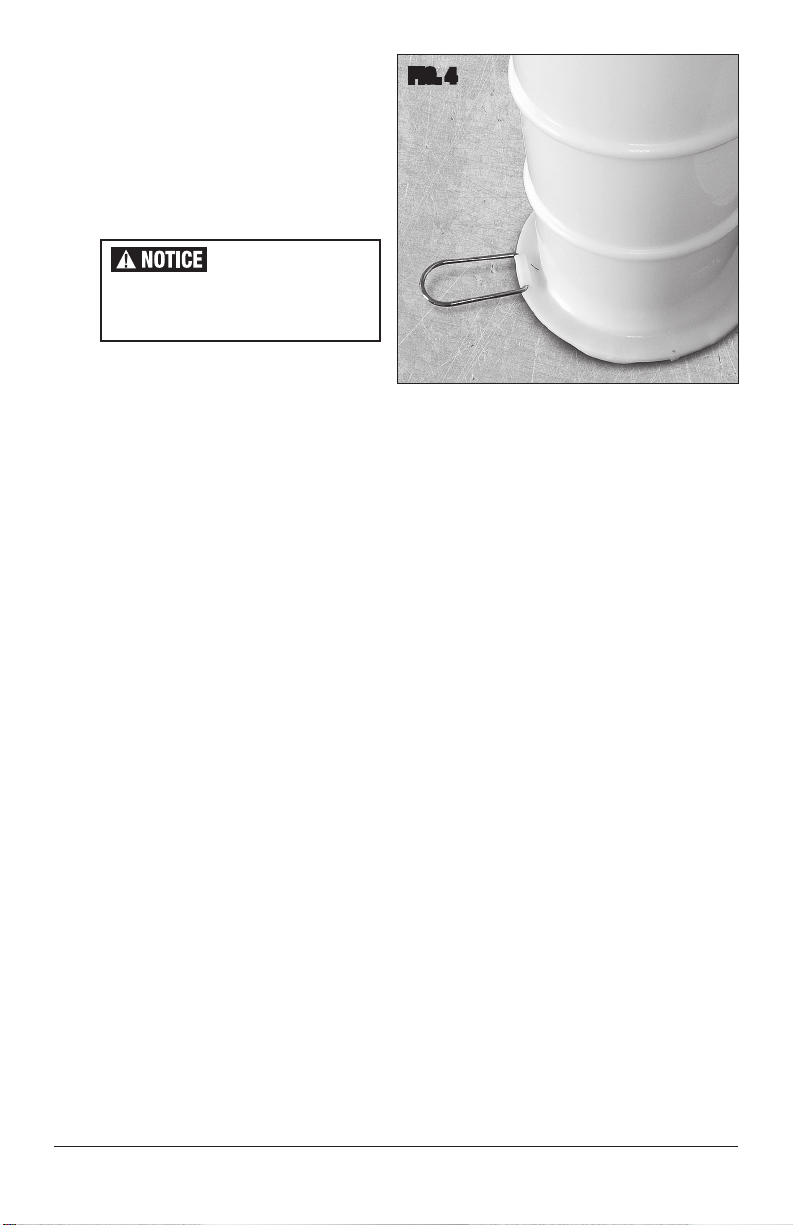
• Before proceeding to empty the Fluid
Canister, note the “Fluid Drain Limited
Line” molded into both sides of the Fluid
Canister (FIG 7). Allowing the fluid level
in the Canister to go above this line while
tilting the Canister to empty its contents
may allow fluid to escape through the
built-in Safety Valve.
• Tilt Evacuator Canister to allow accumu-
lated fluid to pour out of Spout.
MAINTENANCE
• DO NOT allow fluid to remain in Evacuator Canister.
• DO NOT use Evacuator Canister as a fluid storage vessel.
• Remove Nylon Tube or Silicone Hose when done, allow to drain fully then clean out by flushing
with a suitable solvent.
• If a clog in a Nylon Tube should occur, use the Tube Clog Clearing Wire by inserting into the end
of the tube and pushing until the material causing the clog is discharged.
EXPOSURE TO AUTOMOTIVE FLUIDS CAN BE A HEALTH HAZARD!
• Contents can splash into eyes. Be sure to follow all precautions listed
on fluid containers before using.
• Wear ANSI Z87.1 approved eye protection while using extractor.
• Wear appropriate chemical resistant gloves while handling fluids.
Used automotive fluids are hazardous materials and should be disposed of
in compliance with local regulations.
To avoid leakage from the built-in Safety Valve when draining fluid, DO NOT
allow fluid level in the Canister to exceed the “Fluid Drain Limited Line”.
FIG. 7

© Copyright 2017 Easthill Group, Inc. 8/17 Instruction item #31805Q Rev 2
If you have any questions about the use of this product, please contact
The Eastwood Technical Assistance Service Department: 800.343.9353 >> email: techelp@eastwood.com
PDF version of this manual is available online >> eastwood.com/31805manual
The Eastwood Company 263 Shoemaker Road, Pottstown, PA 19464, USA
US and Canada: 800.343.9353 Outside US: 610.718.8335
Fax: 610.323.6268 eastwood.com
ADDITIONAL ITEMS
#31591 Fairmount 8 Pc Axle Nut Socket Set
#31532 Fairmount Rear Axle Puller
#31337 3/8” Micrometer Torque wrench 10 to 80 Ft/lb
#31338 1/2” Micrometer Torque Wrench 30 to 250 Ft/lb
Table of contents
Other Eastwood Service Equipment manuals