EasyPro ECF10 Operation and maintenance manual

How does the EasyPro Pressure Filter work?
• Thepondlterisplacedin-linebetweenthepondpumpand
thewaterfall.
• Waterentersthelteratanangle,creatinga
vortexinsidetheEasyPropressurelterto
settleoutthesoliddebris.
• Waterisforceddownthroughthreelayers
ofspecialdensityfoampads.Becausethe
waterispressurizedthefoamcanllwith
manymorebenecialbacteriawithoutbecoming
blocked.Itisthislargernumberofbacteriataking
pollutantsoutofthewaterthatmakepressurelters
soeective.
• Thewaterthenpassesthroughtheplasticbiomediawhere
morebenecialbacteriacleansthepollutants.
• TheUVlightisthenusedonthepassingwatertokillfreeoatingalgaecells
whichcausegreenwater.
• Asthefoamlayersinthepressureltercollectsolids,thecleaningindicatoron
thelidwillriseup.Thissignalsthatthefoamlayersneedcleaning.
Theselterstakeindirtywaterfromthepumpandreturnsparklingclearwaterto
yourpond,minusthesolidsandgreenalgae.TheEasyPropressurelterisideal
forpondkeeperswhowantsimplicity,clearwaterandanattractive,hiddenlter
system.
ECF10 • ECF10U • ECF25 • ECF25U • ECF40 • ECF40U
Dual Filtration, High Quality
Pressurized Filters
Instructions for Operation • Safety • Warranty
1

Pressure Filter Installation
Please read all instructions carefully and keep for future reference
Safety and Electrical Connections
• Always disconnect the electrical supply before starting to handle, maintain, repair or install
any pond equipment.
• Thisproductisnotsubmersibleanditmustbesitedwhereitcannotfallintothewaterorbecome
waterlogged.However,thedesignisweatherresistant,andEasyProlterscansafelybeinstalled
outdoors.
• DirectexposuretoUltra-Violetlightcandamageeyesandskin.Donotattempttoviewthelamp
whenlit,exceptbrieythroughtheviewingwindow.
• ConnectthisproductonlytoareceptacleprotectedbyaGroundFaultCircuitInterrupter.(GFCI)
• Protectfromthefrost.Ifthepondisnotgoingtorunallwinter,drainthelterandremovefromthe
groundandstoreinawarmdryplace.
• Allelectricalworkmustbeperformedbyaqualiedtechnician.AlwaysfollowtheNationalElectrical
Code(NEC)ortheCanadianElectricalCodeaswellasalllocal,stateandprovincialcodes.Code
questionsshouldbedirectedtoyourlocalelectricalinspector.Failuretofollowelectricalcodesand
OSHAsafetystandardsmayresultinpersonalinjuryorequipmentdamage.Failuretofollowmanu-
facturer’sinstallationinstructionsmayresultinelectricalshock,rehazard,personalinjuryordeath,
damagedequipment,provideunsatisfactoryperformanceandmayvoidmanufacturer’swarranty.
Installation of the Pressure Filter
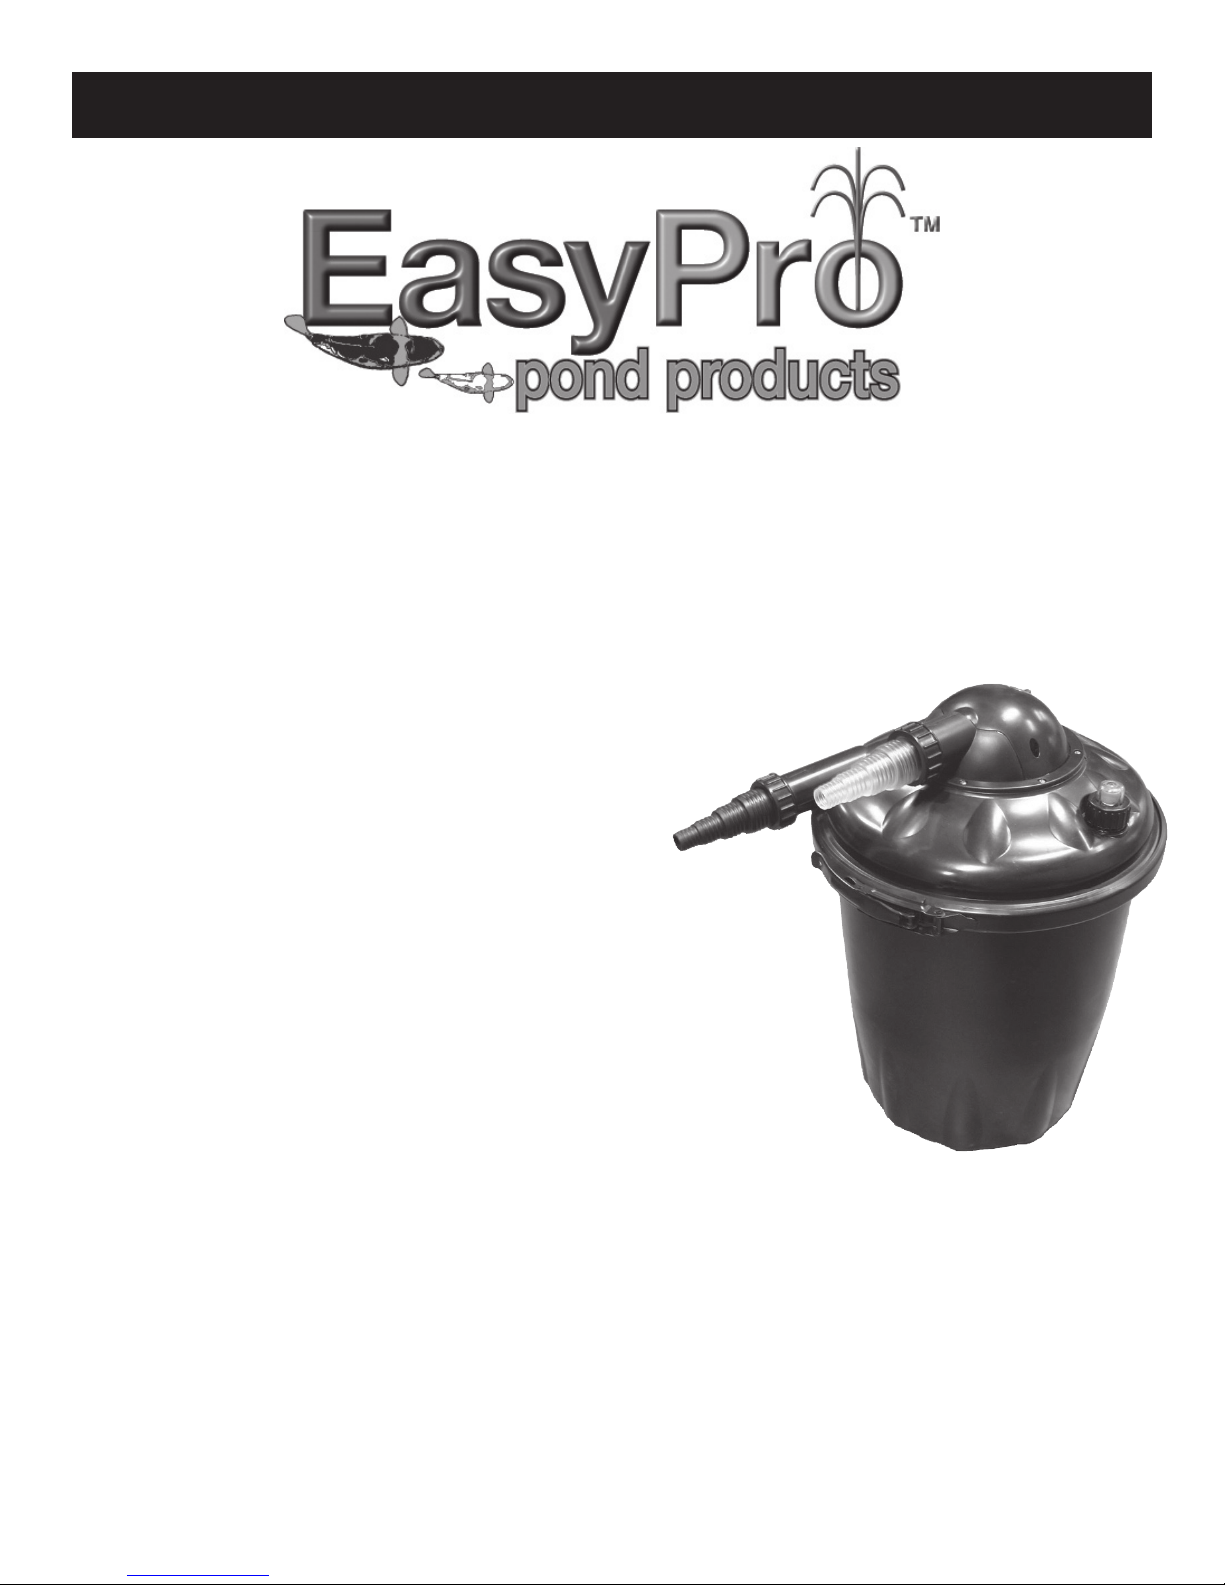
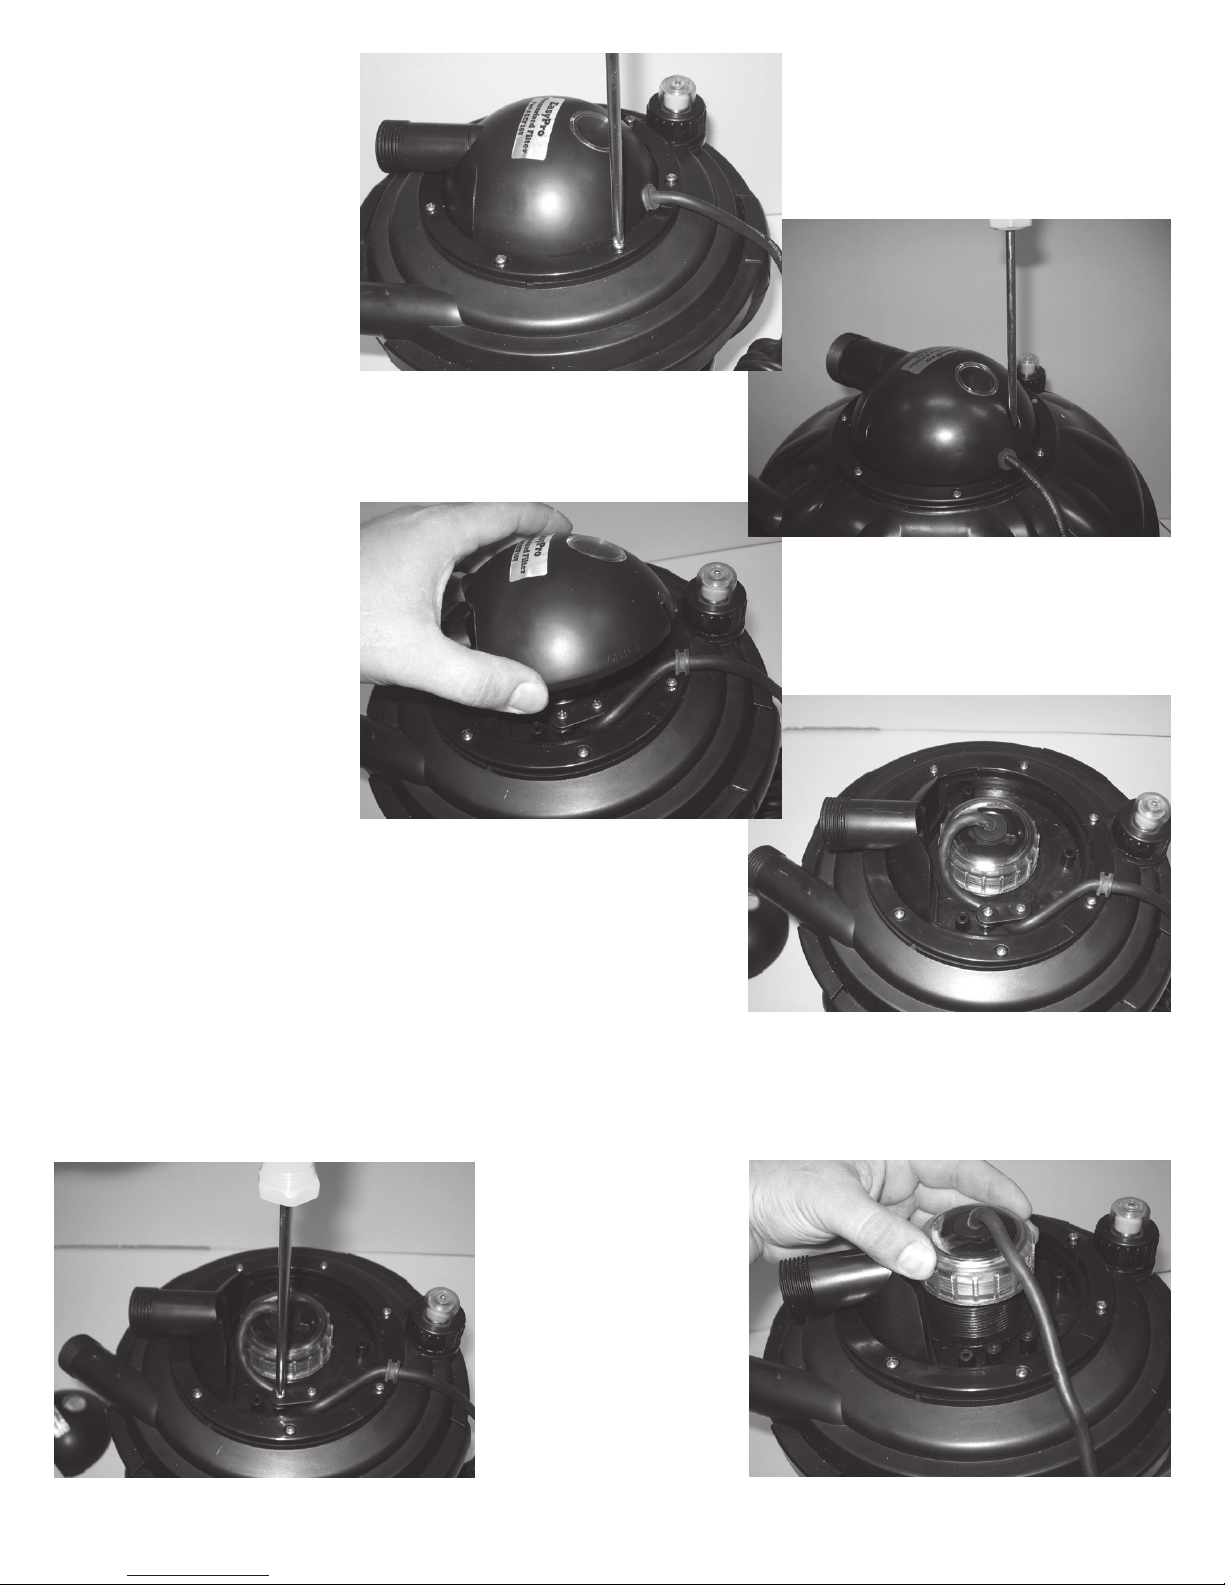
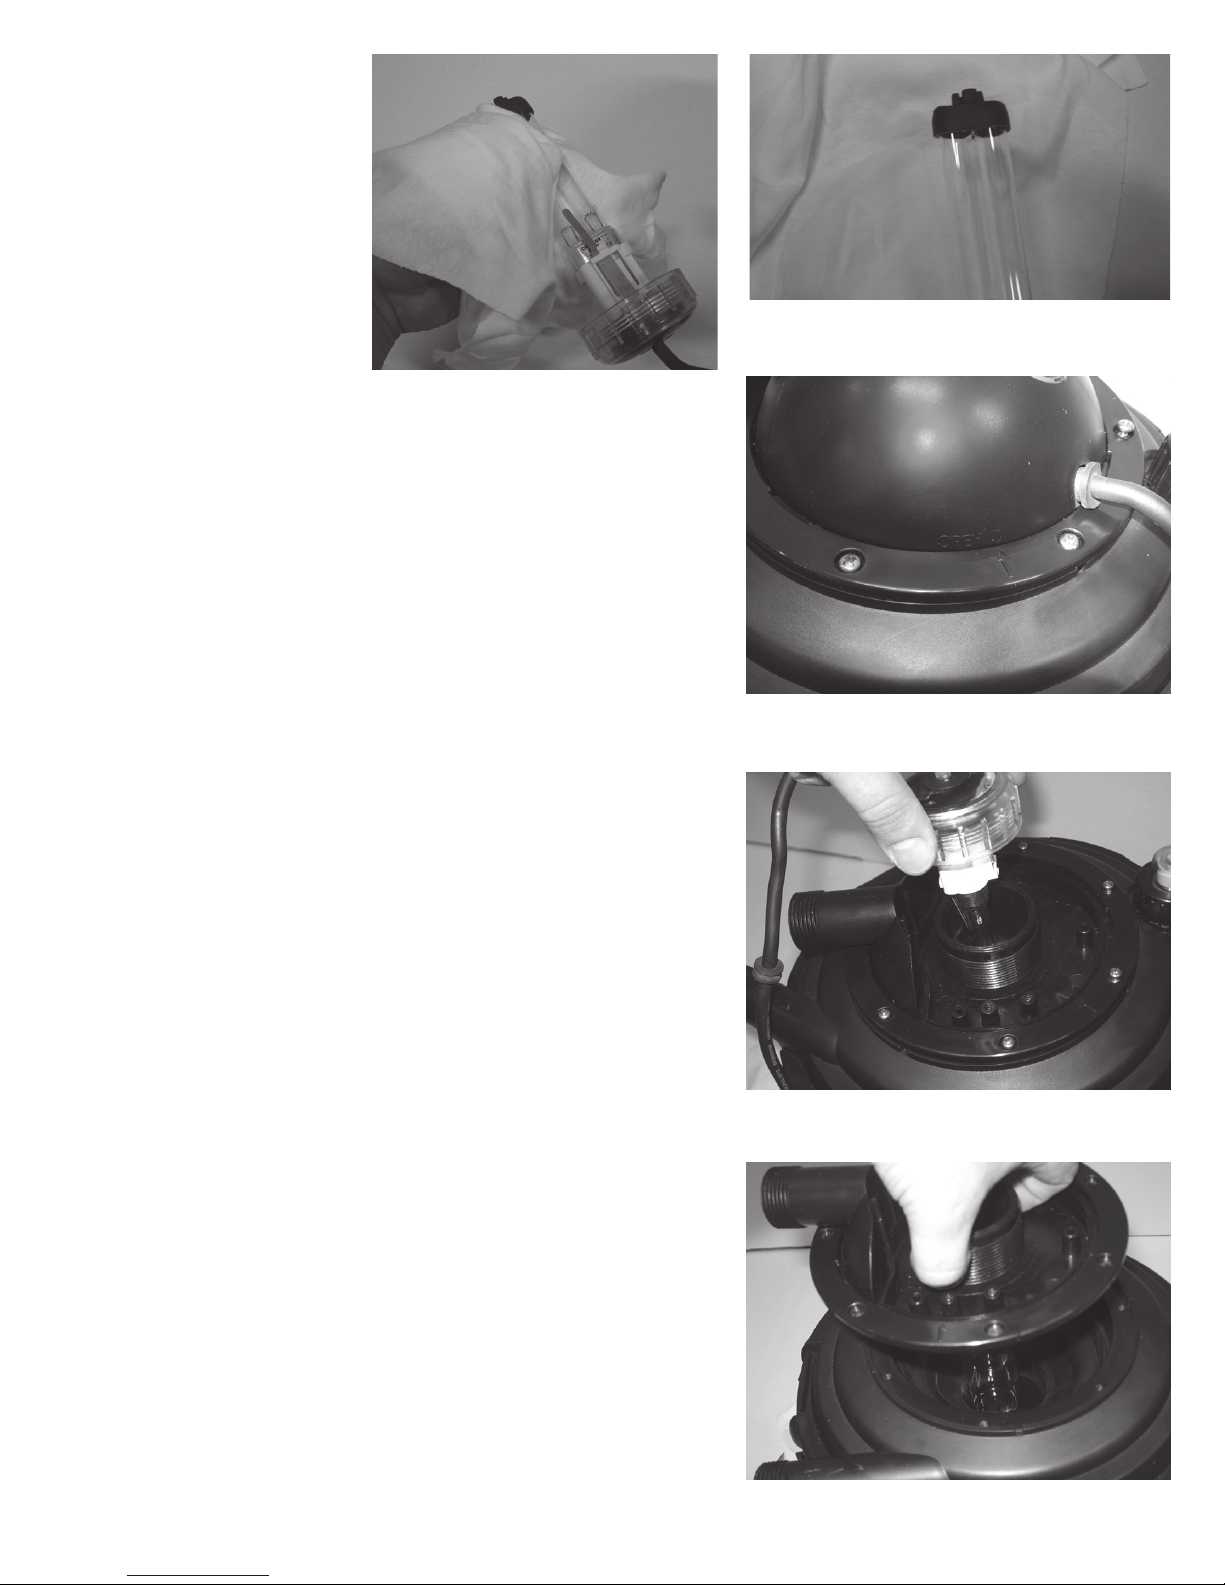
1. TheECF10U,ECF25UandtheECF40UcomewiththeUVlightalreadyinstalled.
2. Positionpumpatthefurthestpointfromthewaterfall.Runthetubingoutofthepondandburyor
concealthetubing.
3. ItisrecommendedthatthepumpbehousedinanEasyProskimmerorinanEasyProsubmersible
pumpprotector.
4. Positionthepressurelteranywherearoundthepond.Sincethedischargeisunderpressure,the
ltercanbelocateddownhillfromthewaterfall.
5. Digaholebigenoughfortheltertositin.Digtheholedeepenoughsotheretainingringisleft
exposedoutoftheground.
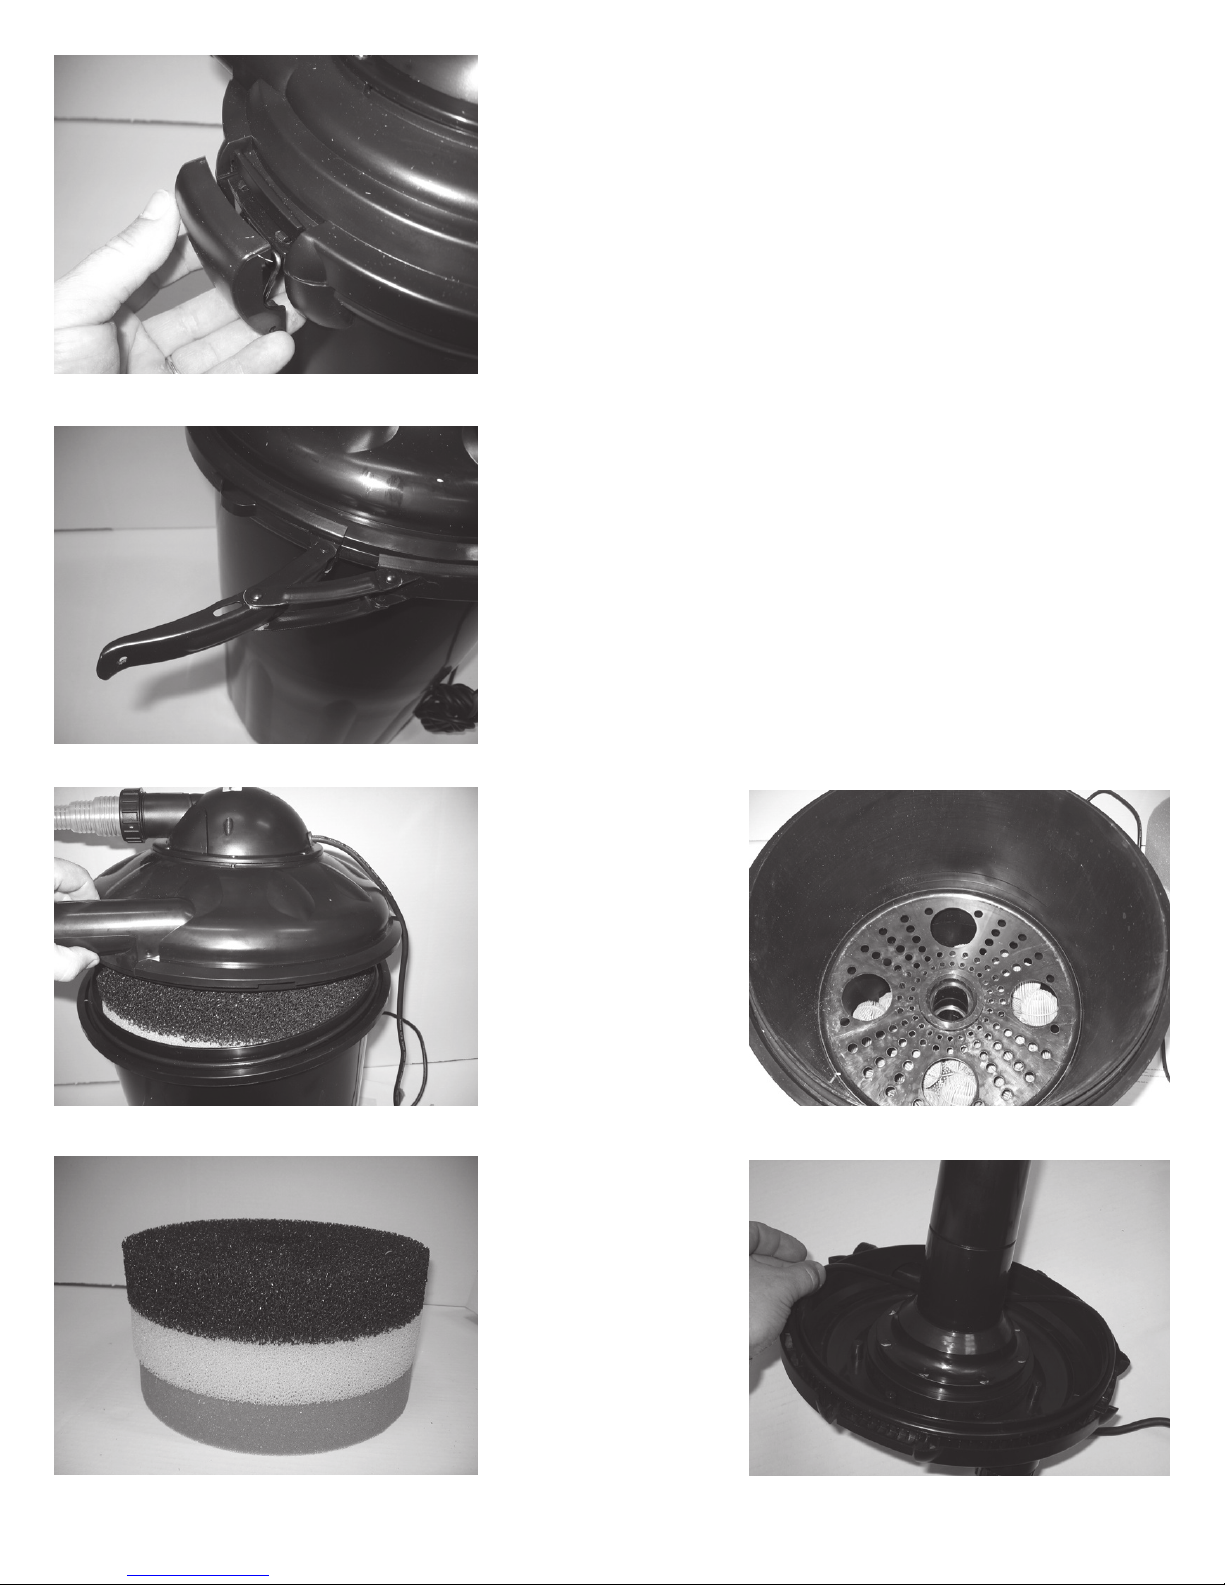
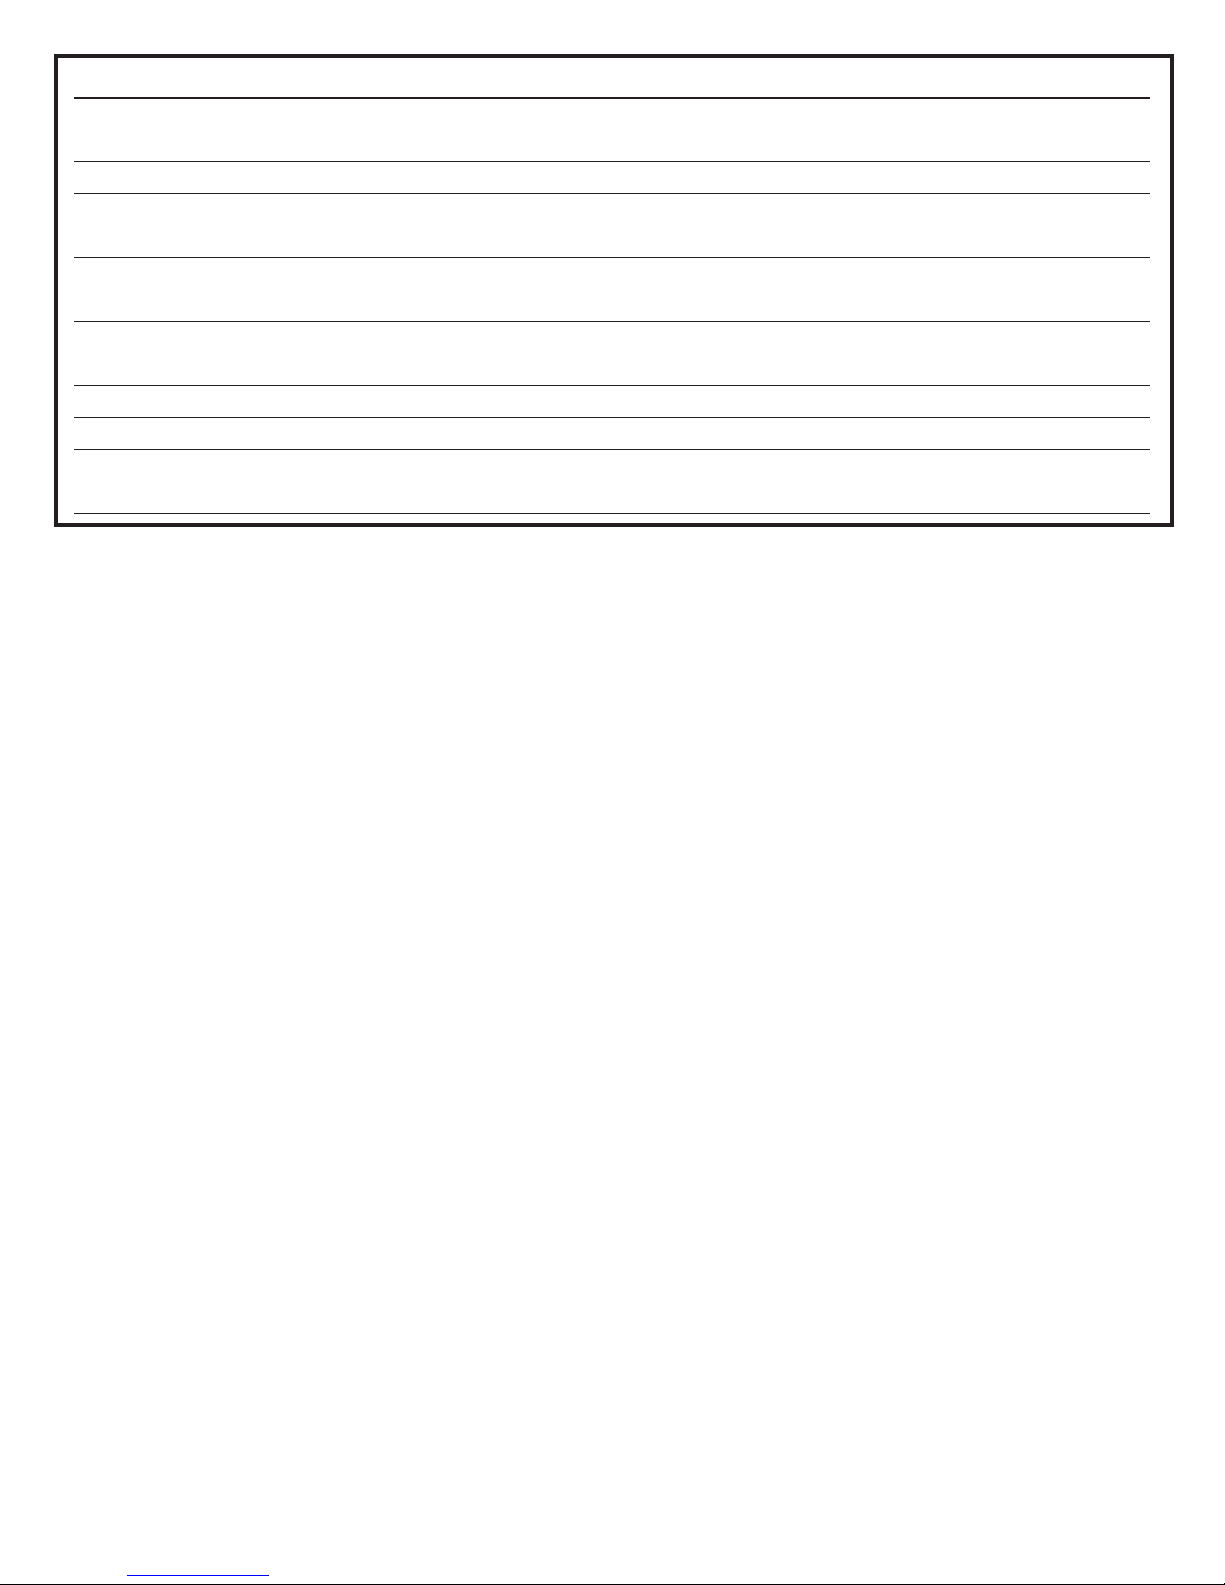
6. Ifinstallingaunitwithclips,makesuretheclipsareleftexposedoutoftheground.
7. Recessthelterintothepreviouslydughole.
8. Connectthetubingfromthepumptotheblackbarbedtting,whichattachestotheintake,whichis
markedwithanarrowpointingin.
9. Connectthetubingfromthewaterfalltotheclearbarbedttingthatisthenattachedtothedis-
charge,whichismarkedwithanarrowpointingout.
10.Runthetubingtothewaterfallandburythetubingforthebestlook.
11.IfthepressurelterunitisequippedwithaUVlightmakesureitisproperlypluggedintoaGFCI
protectedoutlet.
12.Backllaroundthepressurelter.Concealyourpressurelterandtubingwithyourchoiceofland-
scaping.
2

Figure5
Figure4
Figure3
Figure2
Lamp Replacement
1. Makesuretheunitis
disconnectedfromthe
powersource.
2. FortheECF10(U)
proceedtostepthree,
thenproceedtostep
veandcontinue.For
theECF25(U)and
ECF40(U)proceedto
stepfour,thenpro-
ceed.
3. Loosenthescrewsonthetopretainingring.Do not
remove the screws - do not remove the retaining
ring.TwisttheUV
housingandmatch
thearrowontheUV
coverwiththearrow
ontheretainingring.
Gentlypulluponthe
cordandcoverinthe
backtoloosentheUV
cover.(seegure1
and9)
4. Loosenandremove
thethreescrewson
topoftheUVcover.
(seegure2)
5. RemovetheUVcoverandsetaside.(seegures3&
4)
6. Removethetwoscrewsandtheplasticretainerclip
thatholdthecordinplaceandsetaside.(seegure5)
7. UnscrewtheUVlightandcarefullyremovefromthe
housing.(seegure6)
Figure6
3
Figure1

8. Useacleanclothto
removetheUVlightby
gentlypullinguponthe
UVbulb.(seegure7)
9. Do not touch the bulb
with your ngers.
10.Carefullyremovethe
blackprotectoronthe
endofthebulb.Install
theblackprotectoron
theendofthenewUV
lightbulb.(seegure8)
11.Carefullyinstallthenew
UVbulbinthebase,besuretouseacleanclothtoinstall
thenewbulb.Pressthebulbrmlyintothebaseuntilyou
hereaclick.(seegure7)
12.Carefullyslidethenewbulbintothesleeveandscrewthe
capintoplace.
13.Reattachthecordretainerclipwiththetwoscrews.
14.If you have an ECF25U or an ECF40UsettheUVcover
backontopofthepressurelterandtightenthethree
screws.
15.If you have an ECF10Umakesuretolineupthepower
cordinthebackwiththeslotintheUVcover.Besureto
lineupthetwoslotsinthefrontoftheUVcoverwiththe
twoprongsbehindthedischargeconnection.Pushdown
ontheUVcoverandlineupthearrowontheUVcoverwith
thearrowontheretainingring.(seegure9)
16.TwisttheUVhousingbacktodesiredpositionandtighten
thescrewsdownontheretainingring.
UV Sleeve Replacement and Cleaning
1. Makesuretheunitisdisconnectedfromthepowersource.
2. Unscrewthebarbedttingsfromtheinletandoutletonthe
lter.
3. Loosenthescrewsonthetopretainingring.Removethe
screws.Theretainingringshouldnowbeloose.(seegure
1)
4. RemovetheUVcoverandsetaside.(seegure3)
5. Removethetwoscrewsandtheplasticretainerclipthat
holdthecordinplaceandsetaside.(seegure5)
6. UnscrewtheUVlightandcarefullyremovefromthehous-
ing.(seegure10)
7. CarefullysettheUVbulbaside,beingcarefulnottotouch
theUVbulb.
Figure9
Figure10
Figure11
4
Figure7
Figure8

Figure16
Figure15
Figure14
Figure13
8. Gentlypullstraightuponthethreadedconnectioninthe
middleandremovetheUVhousing.(seegure11)
9. Besuretopullstraightup.DonotbendsidewaysastheUV
sleeveisglassandcanbreak.
10.Carefullyremovetheglasssleevebypullingstraightdown.
Glassisveryfragile,usecautionwhenremovingandhan-
dlingbrokenglass.Cleantheglasssleevewithaclean
dampcloth.(seegure12)
11. Reinstalltheblackendpieceontheendofthesleeveand
carefullyslidetheUVcoverbackintoplace.
12. TheUVsleevewillslidearoundablackringandwillonlygo
inabout
1
/
2
".
13.CarefullyplacetheUVhousingandbulbbackintothelter.
(seegures11&10)
14.Reattachthecordretainerclipwiththetwoscrews.(see
gure5)
15.Makesuretolineupthepowercordinthebackwiththeslot
intheUVcover.(seegures3&9)
16.InstalltheUVlightcoverand
screwdowntheretainingring.
(seegure1)
17.Reattachthebarbedttingsto
thepressurelter.
Pressure Filter Cleaning
1. Thereisacleaningindicatoron
thetopofthelter.Itwillbegreen
innormaloperation.Whenthel-
terneedstobecleanedtheindi-
catorwillturntored.(seegures
14&15)
2. Whenthisoccurs,ifthepressurelterisequippedwithUV,
disconnectthepumpfromthepowersource.
3. Ifthelterisapressurizedunit,thepressuremustbere-
leasedbeforeremovingthelid.This
canbedonebydisconnectingthe
inletandoutlethoses.
4. IfyourunitisanECF10orECF10U,
youwillneedtoundothefourretain-
ingclips.IfyourlterisanECF25
(U)orECF40(U),youwillneedto
releasethetensionring.(seegures
16,17&18)
5
Figure12

Figure21
Figure22
Figure19
Figure20
Figure17
Figure18
6
5. Pulluponlidassemblyandsetaside.(seegure19)
6. Removethelterpadsandrinseoutwithcleanwater.
7. Ifthelterpadsaredeteriorated,discardandreplace
withnewpads.
8. Seereplacementpartschartforthecorrectsizeand
partnumberforyourpressurelter.
9. Ifthereisexcessbuildupinthebottomofthepres-
surelter,youcanrinseitoutbutdonotclean100%.
Thisiswherethebenecialbacteriagrow.(seegure
21)
10.Replacethelterpadsandinstallthelidassemblyand
clampdownwithretainingclipsortensionring.(see
gures16&18)
11.Ifforsomereasonthelargeo-ringcomeso,itisbest
toputitbackonthelidassemblyinsteadofthelter
bucket.(seegure22)
12.Hookhosesbackup,plugintheUVlampandturnthe
pumpbackon.

Part # ECF10 ECF10U ECF25 ECF25U ECF40 ECF40U
MaximumPond
Size(gallons)* 1000 1000 2500 2500 4000 4000
UV/Watts None Yes/7 None Yes/9 None Yes/13
Inlet/Outlet
1
/
2
",
1
/
2
",
3
/
4
",1"
3
/
4
",1"
3
/
4
",1"
3
/
4
",1"
Sizes
3
/
4
",1"
3
/
4
",1" 1
1
/
4
",1
1
/
2
" 1
1
/
4
",1
1
/
2
" 1
1
/
4
",1
1
/
2
" 1
1
/
4
",1
1
/
2
"
Recommended
maximumGPH 600 600 1350 1350 2000 2000
Replacement
FilterPart# ECF10F ECF10F ECF25F ECF25F ECF25F ECF25F
UVBulbPart# None 10UB None 25UB None 40UB
UVSleevePart# None 10US None 25US None 40US
Inlet/OutletHose
BarbPart# BARB1 BARB1 BARB2 BARB2 BARB2 BARB2
*Fish load, amount of sunlight, etc. all affect actual maximum gallons ltered.
7

Warranty:
Thisproductiswarrantiedagainstanymechanicalormaterialdefectsforaperiodofoneyearfromthe
dateofpurchase.Warrantyonlycoversproperlyinstalledandmaintainedunits.
Thewarrantydoesnotcovernormalwearandtear,noranydeteriorationsueredthroughoverloading,
improperuse,negligenceoraccident.Similarly,anymodicationmadebythepurchasertotheprod-
uctwillcausethewarrantytobenullandvoid.
Allreturneditemswillbeinspectedtodeterminecauseoffailurebeforewarrantyisapproved.
Warrantydoesnotcoveranycostassociatedwiththeinstallationorremovaloftheproductsubjectto
warrantyclaim.
AnRAnumbermustbeobtainedbycallingEasyProPondProductsat800-448-3873.Itisyourre-
sponsibilitytopaythereturnshippingcharges.BesuretoincludetheRAnumber,originalreceipt(in
theformofaninvoiceorsalesreceipt),name,returnaddressandphonenumberinsideofthepack-
age.Nowarrantyclaimswillbehonoredwithouttheoriginalreceipt.
Ensuretheproductisproperlypackagedandinsuredforthereplacementvalue.Damageduetoim-
properpackagingistheresponsibilityofthesender.
Themanufacturerorsuppliershallnotbeheldliableforanydamagescausedbydefectivecompo-
nentsormaterialsofthisproduct;orforlossincurredbecauseoftheinterruptionofservice;orany
consequential/incidentaldamagesandexpensesarisingfromtheproduction,sale,useormisuseof
thisproduct.
Themanufacturerorsuppliershallnotbeheldliableforanylossofsh,plantsoranyotherlivestock
asaresultofanyfailureordefectofthisproduct.
800-448-3873•Grant,Michigan
www.easypropondproducts.com•[email protected]
1-14
This manual suits for next models
5
Table of contents
Other EasyPro Water Filtration System manuals
Popular Water Filtration System manuals by other brands

Beko
Beko CLEARPOINT S040 Instructions for installation and operation

M2SYNTH
M2SYNTH Compact LP VCF 116 Assembly instructions

Grunbeck
Grunbeck MXA DN 100 Operation manual

NOVO
NOVO NVO665FAIO75 Installation and operation manual

Wave
Wave Flostream Installation & operating instructions

RAISE 3D
RAISE 3D PRO2 Series Installation instruction