NETWORK CONNECTIVITY
©Copyright 2014 Eaton, Raleigh NC, USA. All rights reserved. No part of this document may be reproduced in any way without the express written approval of Eaton. • P-164000314_2 • July 2014 • www.eaton.com/powerquality
The network connection automatically receives an IP address through the Dynamic Host
Configuration Protocol (DHCP) if available on the network. If a DHCP is enabled but a DHCP
server is not available, the eNMC will fall back to the last-used IP address setting. Alternately, it is
possible to set a static IP address by using either the LCD menu or a serial connection command
line interface (CLI).
You can also connect up to four ePDUs together using the Daisy Chain port and an RJ-45 split-
ter (provided). This enables multiple ePDUs to communicate over one Ethernet port. Refer to the
Eaton ePDU G3 Operation Manual for detailed instructions. View the operation manual online at:
http://www.eaton.com/ePDU
NETWORK COMMUNICATION CONFIGURATION
NETWORK COMMUNICATION CONFIGURATION
ETUP USING THE LCD — STATIC IP ADDRESS
ETUP USING THE LCD — STATIC IP ADDRESS
ETUP USING A SERIAL CONNECTION — STATIC IP ADDRESS
ETUP USING A SERIAL CONNECTION — STATIC IP ADDRESS
1. The ePDU defaults to DHCP enabled when deliv-
ered.
2. Connect to a network that has a DHCP server and
wait 20 seconds.
3. Obtain the IP address from the LCD home
screen.
COMMUNICATION MANAGEMENT
Some Eaton ePDU G3 power distribution products have an internal ePDU Network
Management and Control (eNMC) module that manages the ePDU communication
interfaces. Basic network communication configuration must be performed before the
Web or Command Line Interface (CLI) user interfaces can be accessed and used. This
sheet describes how to set eNMC parameters and enable the module.
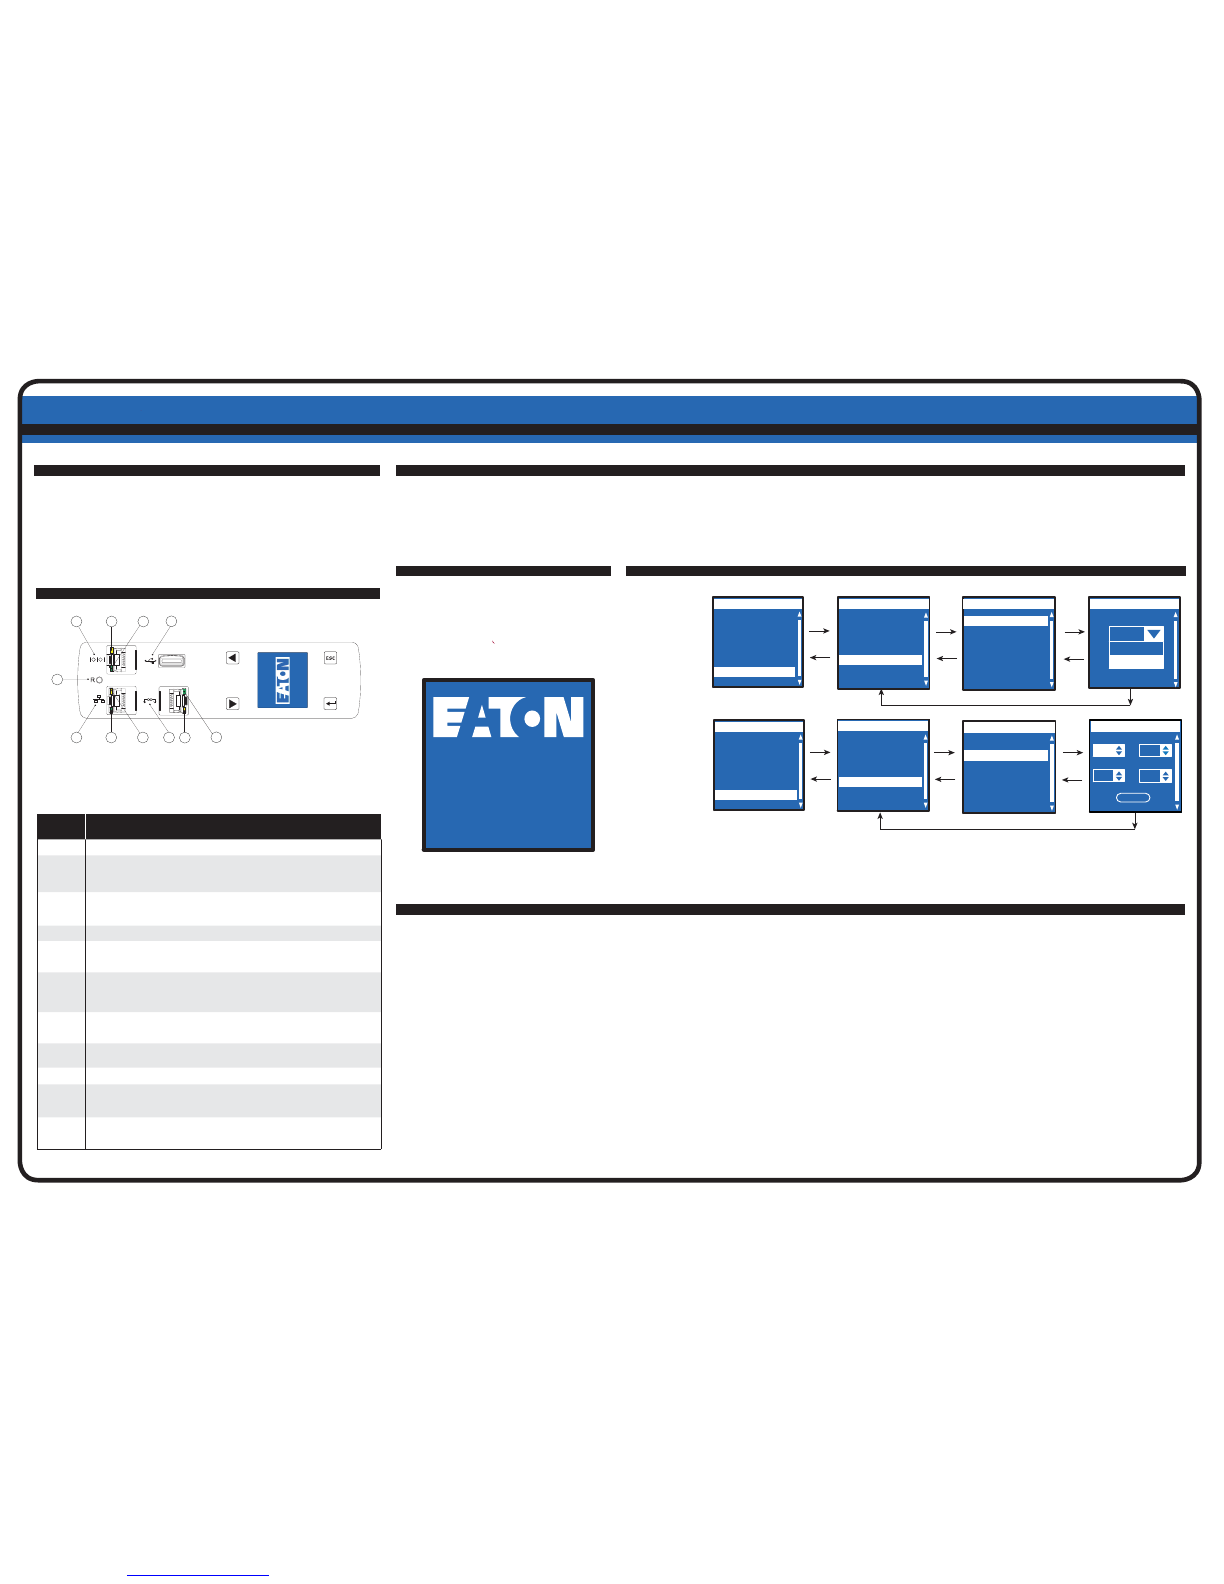
Diagram
Reference Description
1Serial or Environmental Monitoring Probe (EMP) Port
2
Yellow Serial/EMP Port LED: RS-232 Operation and Activity Status
OFF: No EMP connected
FLASHING: EMP connected
3
Green Serial/EMP Port LED: ePDU Communication Status
OFF: ePDU start-up in progress
FLASHING: eNMC module operational
4Ethernet 10/100 Base-T Port
5
Green Ethernet Port LED: Operation Transfer Rate Status
OFF: Port operating at 10 Mbits/s
ON: Port operating at 100 Mbits/s
6
Yellow Ethernet Port LED: Connection and Transmission Activity Status
OFF: ePDU not connected to the network
ON: ePDU connected to the network, but no activity
FLASHING: Port is sending or receiving (transmission active)
7
Reset Button
Note: To restart the eNMC, insert a probe and press the button for 3 seconds (or until the LCD
goes blank). This does not reset power to the outlets.
8USB Port: Used for Firmware Upgrade
Note: Refer to the Eaton ePDU G3 Operation Manual for more information.
9Daisy Chain Port
10
Yellow Daisy Chain Port LED: Transmission Activity Status
FLASHING: ePDU is transmitting data
11
Green Daisy Chain Port LED: Role Assignment in Communication Protocol
ON: Device
FLASHING: Host
8
7
10
9
11
2
3
5
46
1
OMMUNICATION STATUS LEDS
The ePDU front panel includes communication and monitoring ports, LED status indica-
tors, and operation buttons. The ports and the associated LED indicators are described
in the following table.
After establishing a serial connection, perform the following steps:
1. In the terminal emulator session window, enter the default user name (admin) at the login
prompt. For example:
Enter Login: admin
Enter Password:
2. Type admin (default) at the password prompt. Press Enter.
3. The CLI uses a “get” command to return the value of a setting and a “set” command to
change the value of a setting. For example:
PDU#0>set System.Network.DHCP 0
PDU#0>get System.Network.DHCP
0
4. Type set System.Network.DHCP 0 and press Enter to modify the value (0 = disabled and
1= enabled). For example:
PDU#0>set System.Network.DHCP 0
0
5. Set the IP address to a value provided by your system administrator.
PDU#0>set System.Network.IPAddress xxx.xxx.xxx.xxx
xxx.xxx.xxx.xxx
6. If necessary, set the network Subnet Mask to the value required by your system administrator.
PDU#0>set System.Network.IPMask 255.255.yyy.yyy
255.255.yyy.yyy
7. Set the network Gateway to the value required by your system administrator.
PDU#0>set System.Network.IPGateway zzz.zzz.zzz.zzz
zzz.zzz.zzz.zzz
8. Wait 10 seconds. Use the reset button to restart the eNMC and apply the new settings.
ote:NFor alternate instructions to access the CLI using Telnet, refer to the Eaton ePDU G3 Operation Manual. View the operation manual online at: http://www.eaton.com/ePDU.
ETUP USING THE LCD — DHCP
ETUP USING THE LCD — DHCP
Enter
Enter
ESC
ESC
Enter
ESC
IPv4 Settings
DHCP
Subnet Mask
Gateway
IP address
Enter
ESC
Main Menu
Active Alarms
Alarms History
Meter
Control
Settings
IP address
192 168
123
123
OK
Settings
Display
Daisy Chain
Language
IPv4
Clear History
Use the RJ45-to-DB9 serial cable that is provided. If your computer does not have a DB9 (RS-232) connector, a USB-to-RS-232 adapter can be purchased separately. Access the CLI using a terminal
emulation program such as HyperTerminal®, PuTTY, or TeraTerm. To set up the serial port using your selected terminal emulation program, use the following settings:
Bits per second: 9600 Data bits: 8 Parity: None Stop bits: 1Flow Control: None
Enter
ESC
Enter
ESC
Enter
ESC
DHCP
Disable
Enable
Disable
Enter
ESC
Main Menu
Active Alarms
Alarms History
Meter
Control
Settings
IPv4 Settings
IP Address
Subnet Mask
Gateway
DHCP
Settings
Display
Daisy Chain
Language
IPv4
Clear History
Wait 10 seconds. Use the reset button to restart the eNMC and apply the new settings.
14/06/2013
15:55:26
192.168.123.123
EMA305-10
The default settings are: DHCP: Enabled IP Address: 192.168.123.123 Subnet Mask: 255.255.255.0 Gateway: 192.168.123.1 Username: admin Password: admin
Groups of Eaton ePDU G3 models can be configured or updated with new firmware at
the same time using Eaton Intelligent Power Manager (IPM). The IPM software is avail-
able separately at no cost for up to 10 devices.
Disable DHCP
Reset and Apply
Set the
Static IP Address
1
2
3


