Ecco 320A User manual

Spare parts list for
Automatic High-Pressure Spray Gun
ESL 12/03-08
9836 0524 01
2014–09
65135 F57
Part numbers in bold type designate consumption parts.
Service set 6103 1078 00 Consisting of parts with ref. Nos. 2, 5, 6,
7 (Qty 2), 8 (Qty 2), 9, 11, 13, 19 (Qty 2), 27.
Ecco 320A
Ecco 320A.........Prod. No. 8611 4114 17
Max. working fluid pressure....... 360 bar
Min./Max. control air pressure.....4/8 bar
Ref.
No. Part number Qty Description
1 6103 1146 30 1 Gun body
2 6103 0812 00a1 Gasket
36103 1054 01 1 Fluid nozzle
4 6003 9957 00 1 Sealing element
5 6103 1069 00a1 – Washer
6 6103 1070 00a1 – Guide
7 6103 1071 00a2 – Packing (PTFE)
8 0663 7110 00a2 – O-ring (3.1 x 1.6 FPM)
9 6103 1072 00a1 – Sleeve
10 6103 1068 00 1 – Packing screw
11 6103 1073 00a1 – Guide bushing
12 6103 1056 00 1 Fluid needle
13 0653 9211 00a1 Gasket (42/50 x 1 Al)
14 6003 9958 00 1 Servo part
15 6103 1060 00 1 – Back head
16 6103 1064 00 1 – Spring
17 6103 1061 00 1 – Piston
18 6103 1062 00 1 – Lock screw
19 0190 1242 00a2 – Set screw (P6SS 6 x 8 A4 S.S.)
Ref.
No. Part number Qty Description
20 6803 1065 00 1 – Cup seal
21 6803 1066 00 1 – Cup seal
22 6103 1063 00 1 – Guide
23 0653 1059 00 2 Gasket (13/17 x 1 Kpr)
24 0686 4202 03 1 Plug (G 1/4)
25 6002 0233 00 1 Nipple (G 1/4 x 1/4" 18 NPSM)
26 6003 9827 41 1 Elbow coupling (G 1/8 – 8)
27 6101 5670 00a1 Gasket
28 – 1 Standard spray tip (see spare parts
list No. 9836 3060, ESL 12/04-16)
29 6101 6254 00 1 Retaining ring (M18 x 1)
Delivered with the spray gun:
– 6103 1074 00 1 Tool set
– 0902 0111 00 1 – Hexagon wrench (3 mm)
– 0101 1293 00 1 – Pin (ø 5 mm)
– 6000 8004 00 1 – Cleaning brush (ø 10 mm)
Optional equipment (See also page 2)
– 6003 8001 00 1 Cleaning needle set (see above)
19
22 21 20 17 16 15 18 19
14
(15–22)
Fluid inlet
1/4" 18NPSM
Air inlet ø 8 mm
8
24 23 1
23 25 13
29 28 27 3 2 26
4
(5 –11)
7 9 10 11
12 5 6 7
KJELL JOHANSSON
a Including in service set 6103 1078 00.
ECCO
ECCO FINISHING
ECCO FINISHING AB, Box 93, S-532 22 SKARA, Sweden
Tel: +46 (0)511-134 45, Fax: +46 (0)511-180 13
E-mail: [email protected] • www.eccofinishing.com
II 2 G
Optional equipment
Cleaning needle set
Part number 6003 8001 00
Spray tip cleaning broaches to clean-
ing blocked spray tips, 12 pieces in-
cluded, length 21 mm dia. 0.10 mm
with spiral handles.

2
Operator’s Instructions
Use Ecco genuine parts and accessories only for best
function and safety.
Before starting, read through all instructions carefully.
The high velocity flow of material through hoses and nozzles
may develop static electricity. Be sure that the equipment,
object being sprayed, spraybooth, paint and waste container
are properly grounded to prevent static discharge orsparks.
Check the electrical resistance of the high pressure paint
hose regulary. The operator is normally connected to earth
through the spray gun.
WARNING
As the equipment works under very high pressure the utmost
care must be observed during the work. Bearing this in mind,
never aim the spray gun at a person or towards any part of the
body In the event of personal injury caused by the spraying
pressure, immediate medical attention is essential. Before
carrying out any adjustment or repair, the equipment must be
witched off and the paint pressure relieved.
WARNING
If the gun does not work satisfactorily it must on no account
be used. Repair or replace it immediately.
Important
Do not use halogenated hydrocarbons in coating application
equipment where aluminium or galvanized parts come
in contact with the solvent or coating material.
Halogenated hydrocarbons e.g. 1,1,1-thrichloroethane and
methylene chloride react, violently with such parts, causing
corrosion and danger for explosion.
WARNING
65135 F56
Ecco 320A
Dimension in mm.
100
88
28
ø13
22
26
ø8
38
85
ø60
20
7
1/4" 18 NPSM
M18 x 1
G 1/4
3
22
3
30
31
Optional equipment
65130 F308
Ref.
No. Part number Qty Description
30 6003 6565 00 1 Nipple
31 6803 3077 00 1 Edge filter, slot width 0.127 mm (0.005”)
Suitable for tips with equivaent oriffice
diameteter = 0.279 – 0.457 mm
(0.011” – 0.018”)
31 6803 3078 00 1 Edge filter, slot width 0.229 mm (0.009”)
Suitable for tips with equivaent oriffice
diameteter = 0.483 mm
(0.019”) and larger

3
Cleaning the spray tip
1. If the spray tip clogs while spraying shut off pump and relief paint
pressure.
2. Loosen the retaining nut, for the spray tip, and release pressure
slowly before removing completely.
3. Then remove spray tip and put it in solvent.
4. Blow obstruction out with air from front of spray tip, or let it soak
long enough to dissolve the particle.
5. If it won’t dissolve, clean it with a Ecco cleaning broach from front
of spray tip.
Always remove spray tip from gun to clean it.
Be very careful when removing spray tip or hose from gun.
The pump must be switched off and paint pressure relieved.
A plugged high pressure hose contains fluid under high pres-
sure. Loosen tip retaining nut or hose coupling slightly and
WARNING
Trouble shooting
Introduction
Always commence troubleshooting by checking the general condition
of the spray gun. This can most easily be determined by test spraying,
which provides an opportunity for checking the spray pattern and ca-
pacity and gasket leakage.
The following external factors can cause malfunctioning and should be
thoroughly checked:
1. The quality of the paint, i.e. its viscosity, purity. etc.
2. The paint pressure in relation to viscosity of the paint and
spray tip used.
3. The size of paint hoses.
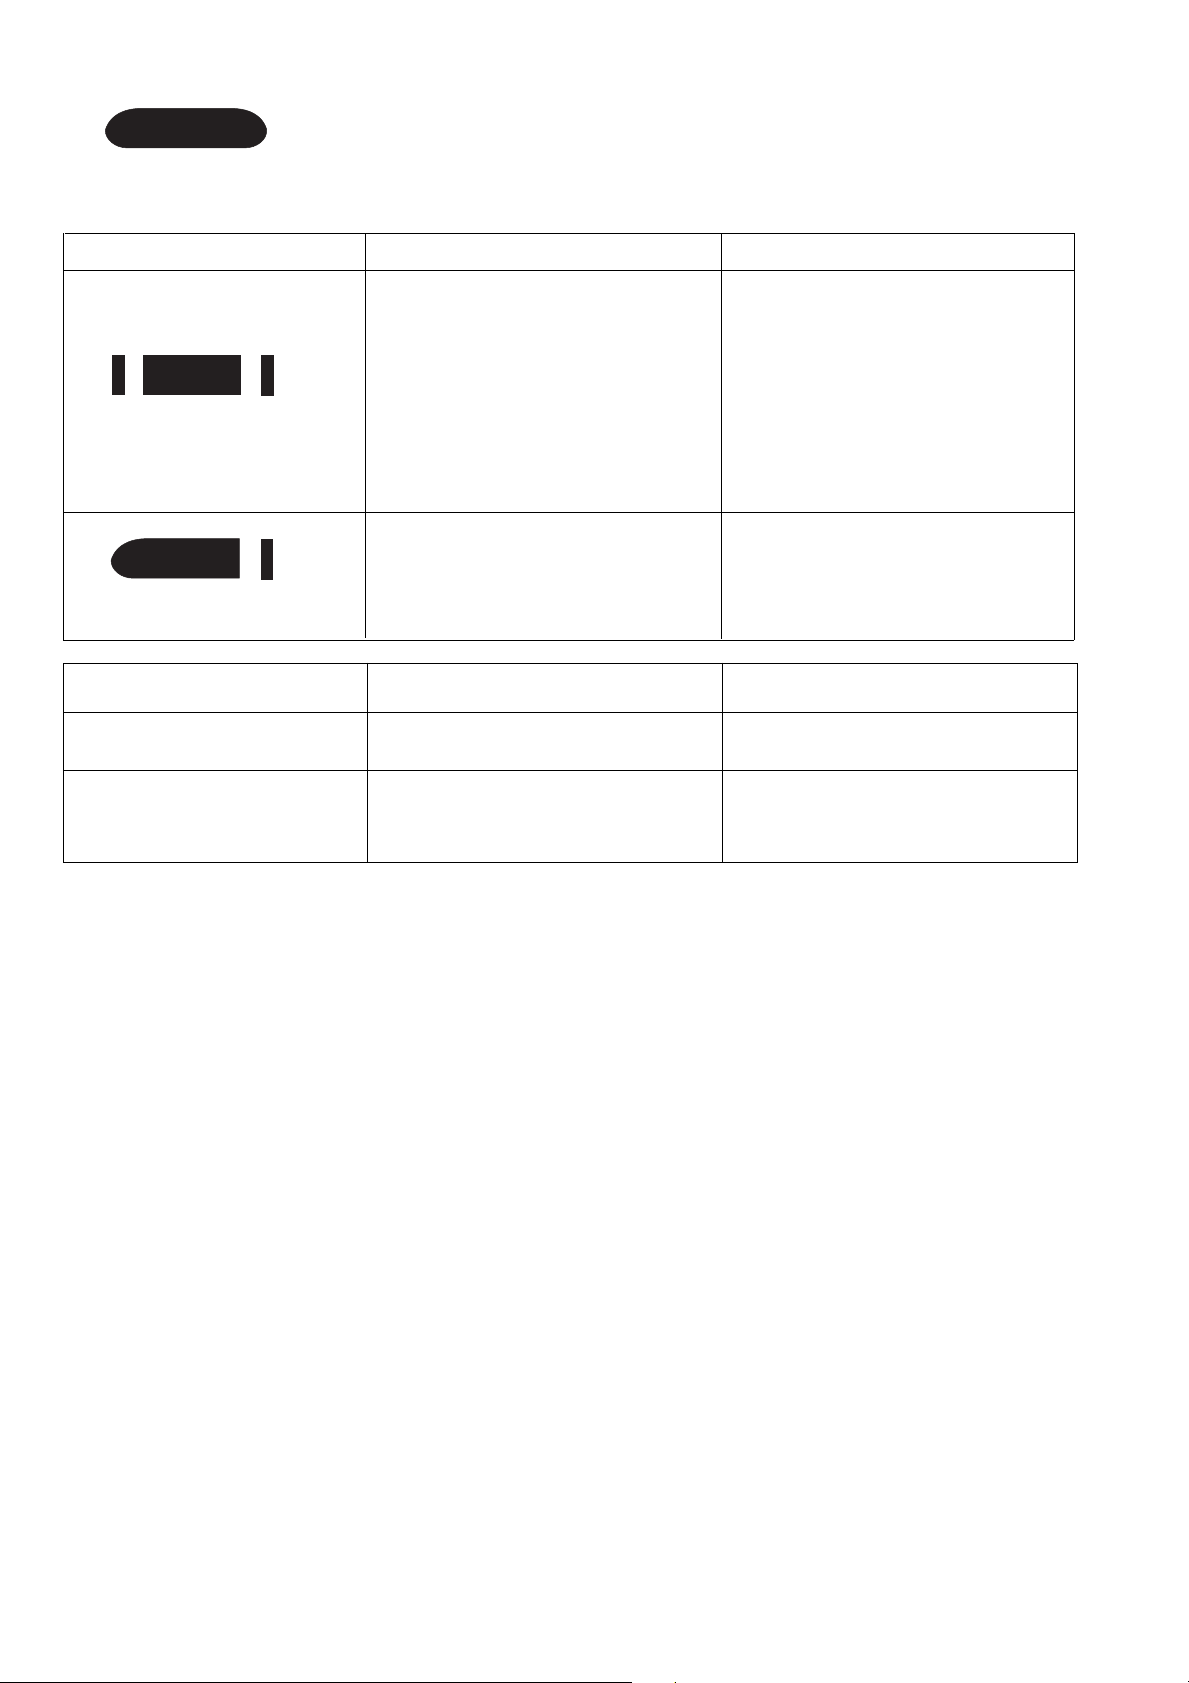
Trouble shoouting chart (see the last page)
Types of problems
Collection of information which makes it possible to identify the error
symptoms applicable to the spray gun in the event of malfunctioning
is a matter of vital importance. Identification of symptoms makes it pos-
sible to decide whether the spray gun itself is the direct cause of the
malfunctioning or if this may have been caused by an external factor.
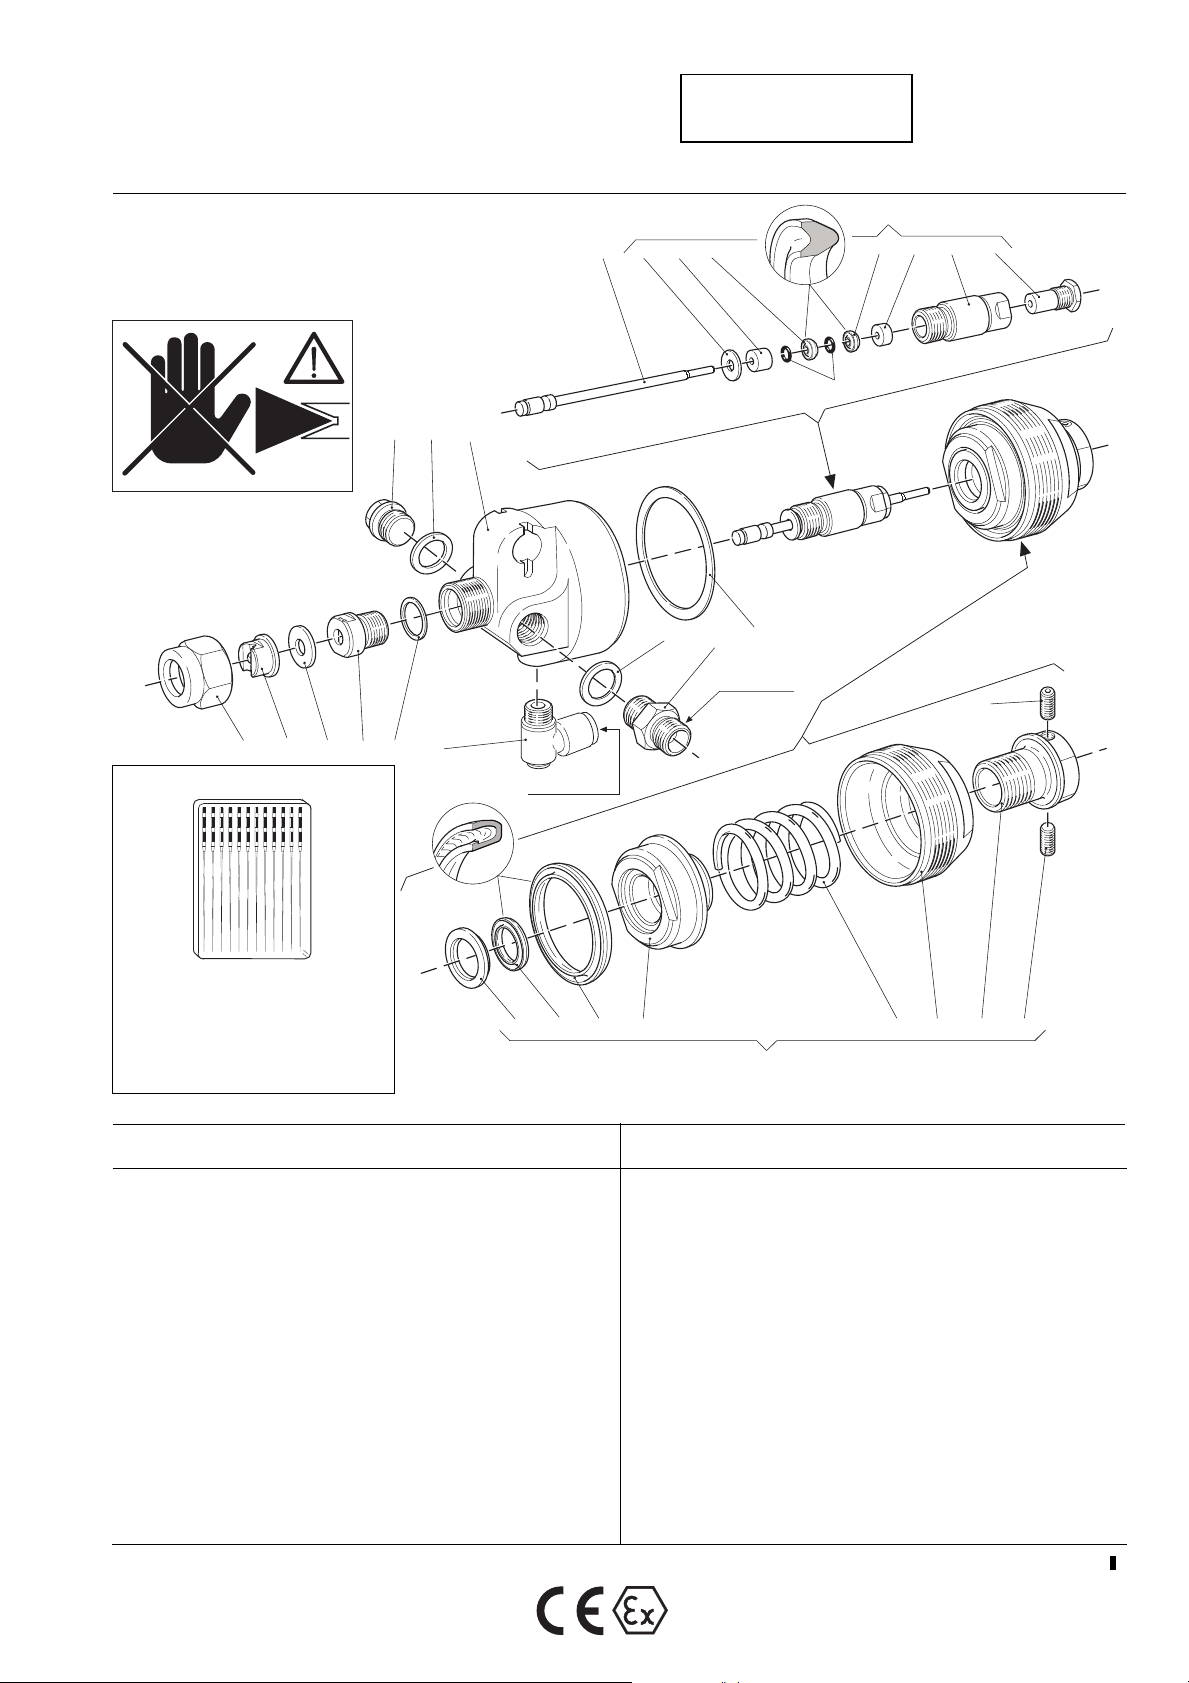
Replacement of fluid needle and fluid needle
gaskets
Removal
1. Shut off pump and relief paint pressure.
2. Undo the two screws (19).
3. Remove the servo part (14) by screwing out the back head (15).
4. Unscrew the sealing element (4).
5. Withdraw fluid needle (12) and take away the washer (5).
6. Unscrew the guide bushing (11).
7. Press the packing set out with the aid of the 5-mm pinprovided in
the tool set. Note! Take care to avoid damaging the outside diameter
of the packing screw (10) which is a sealing surface. Use the flats
of the packing screw when clamping between the jaws of a vice.
8. Clean and inspect all parts.
Assembly
All moving parts must be lubricated
1. Mount the packing set on the fluid needle (12) in the following order:
The washer (5), the guide (6), the packings (7) with the o-rings (8)
and finally the sleeve (9). Note! The packings (7) are to be fitted
with the tip of the Vee facing away from the valve cone in the fluid
needle.
2. Screw the assembled sealing element (4) into the gun body.
3. Drip a little oil onto the sealing surface of the packing screw and
mount the servo part (14).
4. Secured the fluid needle with the two lock screws (19).
Replacement of fluid needle only
1. Unscrew the retaining ring (29) and remove the spray tip (28) together
with its gasket (27)
2. Uns crew the fluid nozzle (3) with its gasket (2).
3. Undo the lock screws (19) and pull the fluid needle (12) out from the
front.
4. Insert a new fluid needle and tighten the lock screws (19).
5. Fit the fluid nozzle (3) and spray tip (28). Don’t forget to refit the
gaskets (2 and 27).
•Max. fluid pressure 360 bar.
•Fluid hose connection 1/4-18 NPSM.
•Min./Max. control air pressure 4/8 bar.
•Control air tube connection is elbow coupling for 6/8 mm nylon
tubing.
•Blow the fluid and air tube clean before connecting them.
•When assessing the reaction time of the connected spray gun
(the time from the start impulse until spraying commences) the
reaction time of the control valve must be taken into consideration.
•Recommended sizes for control valve and air hoses:
– Control valve, 3-way, G1/4. Min. flow area 28 mm2. Mechanically,
pneumatically or electrically actuated.
– Air hose, nylon, dia. 6/8 mm, max. Iength 7.5 m for control air.
•To prevent the fluid hose from getting stuck on account of dried
paint, it is recommended that the connection threads be greased
with vasseline or a similar lubricant.
•Take great care to keep the spray gun clean and to lubricate all
moving parts at regular intervals.
•Lubricants for paint spraying equipment must not contain
silicones.
•Check that all connections are tight.
•If the gun does not work satisfactorily it must on no account be
used. Repair or replace it immediately.
Paint spraying
Advice on high-pressure spraying
1. Consult your paint supplier for information to choose the correct
spray tip for the actual paint.
2. As rule the best spraying distance is 30-40 cm.
3. The spray passes do not need to overlap as much as in spray
painting with air atomization.
4. The capacity of high pressure spraying is very large. To avoid runs,
the spray gun should usually be movedfaster than in spray
painting with air atomization.
Maintenance
The entire spray gun gun should be cleaned at the end of each work-
ing day. The spray tip should be cleaned more frequently.
Wipe the spray gun thoroughly clean on outside and clean it inter-
nally by flushing a suitable solvent through it.
More extensive cleaning and overhauling should be carried out at
least once a month, depending on the material being sprayed.

Trouble shoouting chart
Correct Spray Pattern
The paint is uniformly dipersed over the entire spray angle.
a) Increase the paint pressure. Not that too
high a paint pressure causes excessive
spray mist.
b) Thin the paint cautiously or change to a
different spray tip size or spray angle.
c) Choose the correct size of spray tip.
d) Clean the spray tip with solvent. Use a
brush and, if necessary, a sliver of wood.
e) Change the spray tip.
Symmetrical edge stripes
a) Paint pressure too low.
b) Paint viscosity too high.
c) Wrong choice of spray tip.
c) Spray tip orifies partly clogged.
d) Spray tip damaged.
Asymmetrical edge stripes
a) Spray tip damaged. a) Change the spray tip.
Spray Pattern Cause Remedy
Paint leaking
Paint leaking Worn needle packings and/or needle. Replace damaged parts with new ones.
Paint leaking through the spray tip
when the gun is closed.
Pollution between the needle and the fluid
nozzle (3) or fluid needle (12) and nozzle worn
or damaged.
Clean carefully and check for any sign of dam-
ages or wear.
Cause Remedy
Paint leaking
This manual suits for next models
1
Other Ecco Paint Sprayer manuals
Popular Paint Sprayer manuals by other brands

Parkside
Parkside PFS 400 A1 Translation of the original instructions

Scheppach
Scheppach 7906100721 Translation of original operating manual

C.A. Technologies
C.A. Technologies Panther 200H Product information

WAGNER
WAGNER W 350 operating instructions

Norac
Norac UC5 Topcon X30 installation manual

Hozelock
Hozelock 4124 instructions