Ecco 40S User manual

9836 0155 14
2009–05
Spare parts list for
Low Pressure Spray Guns
ESL 12/01-04
Ecco 40S, -401S,
-402S
Spray gun type: S = Stainless steel version.
Ecco 40S
Pressure feed
Ecco 40S
Suction feed
Ecco 401S
Suction feed
with suction cup
Ecco 402S
Gravity feed
65130 F225
65130 F226
65130 F234
65130 F228
Ecco 40
ECCOFINISHING AB
NACKA- SWEDEN
Madein Sweden
Ecco 40
ECCOFINISHING AB
NACKA- SWEDEN
Madein Sweden
Ecco 40
ECCOFINISHING AB
NACKA- SWEDEN
Madein Sweden
Ecco 40
ECCOFINISHING AB
NACKA- SWEDEN
Madein Sweden
Suction feed guns
Paint nozzle Prod. No.
Orifice diam., With paint needle
Type of gun mm Air cap of nylon
Ecco 40 1,3 273 8611 4000 13
Ecco 40 1.5 273 8611 4000 15
Ecco 40 1.8 271 8611 4000 18
Ecco 40S 1,3 273 8611 4005 13
Ecco 40S 1.5 273 8611 4005 15
Ecco 40S 1.8 271 8611 4005 18
For further combinations, consult Ecco Finishing AB
Suction feed guns
Paint nozzle Prod. No.
Orifice diam., With paint needle
Type of gun mm Air cap of nylon
Ecco 401 1,2 170 8611 4010 12
Ecco 401 1.5 273 8611 4010 15
Ecco 401 1.8 271 8611 4010 18
Ecco 401 1.8 275 8611 4010 38
Ecco 401 1.8 375 8611 4010 21
For further combinations, consult Ecco Finishing AB
Gravity feed guns with gravity cup 0.5 lit.
Paint nozzle Prod. No.
Orifice diam., With paint needle
Type of gun mm Air cap of nylon
Ecco 402S 1,2 170 8611 4020 12
Ecco 402S 1.3 273 8611 4020 13
Ecco 402S 1.5 275 8611 4020 35
Ecco 402S 1.8 271 8611 4020 18
Ecco 402S 1.8 275 8611 4020 38
Ecco 402S 2.1 375 8611 4020 21
For further combinations, consult Ecco Finishing AB
II 2 G
Pressure feed guns
Paint nozzle Prod. No. Prod. No. With
Orifice diam., With paint needle paint needle tip
Type of gun mm Air cap of nylon of tungsten-carbide
Ecco 40S 1,1 T274 8611 6013 60
Ecco 40S 1,1 T278 8611 4040 11
Ecco 40S 1.3 T272 8611 4040 13
Ecco 40S 1.3 T274 8611 6013 63
Ecco 40S 1.5 T274 8611 6013 62
Ecco 40S 1.8aT272 8611 6023 59
Ecco 40S 1.8 T272 8611 4040 18
Ecco 40S 2.1aT374 8611 6013 61
Ecco 40S 2.7 T474 8611 4040 27
a Tungsten-carbide design
For further combinations, consult Ecco Finishing AB
ECCO FINISHING AB, Box 93, S-532 22 SKARA, Sweden
Tel: +46 (0)511-134 45, Fax: +46 (0)511-180 13
E-mail: [email protected] • www.eccofinishing.com
ECCO
ECCO FINISHING

40
KJELL JOHANSSON
47
39
38 37
36 35
16 15 14
20 19 20
1 2 3
6 7 8 9 10 11
17 43 34
45
46
50
4
(5-11)
5
3 2
33 32 30 31 29
27 26 25 42
28 2
21
(22-27)
24 23 22
41
44
49
48
18
13
12
Ecco 40S, -401S, -402S
65130 F245
2
22 Nm

3
aLocktite 225. b Locktite 243. c Not for plastic paint nozzle. d Set of 10. e
Sold singly. f Set of 5. g Including in service set.
Part numbers in bold type designate consumption parts.
Service set 6003 9095 00 for Ecco 40S, -401S, -402S
Consists of parts with ref. Nos. 2, 3 (Qty 1), 7, 10, 11, 19, 20, 22, 23,
25, 27, 29 and 31.
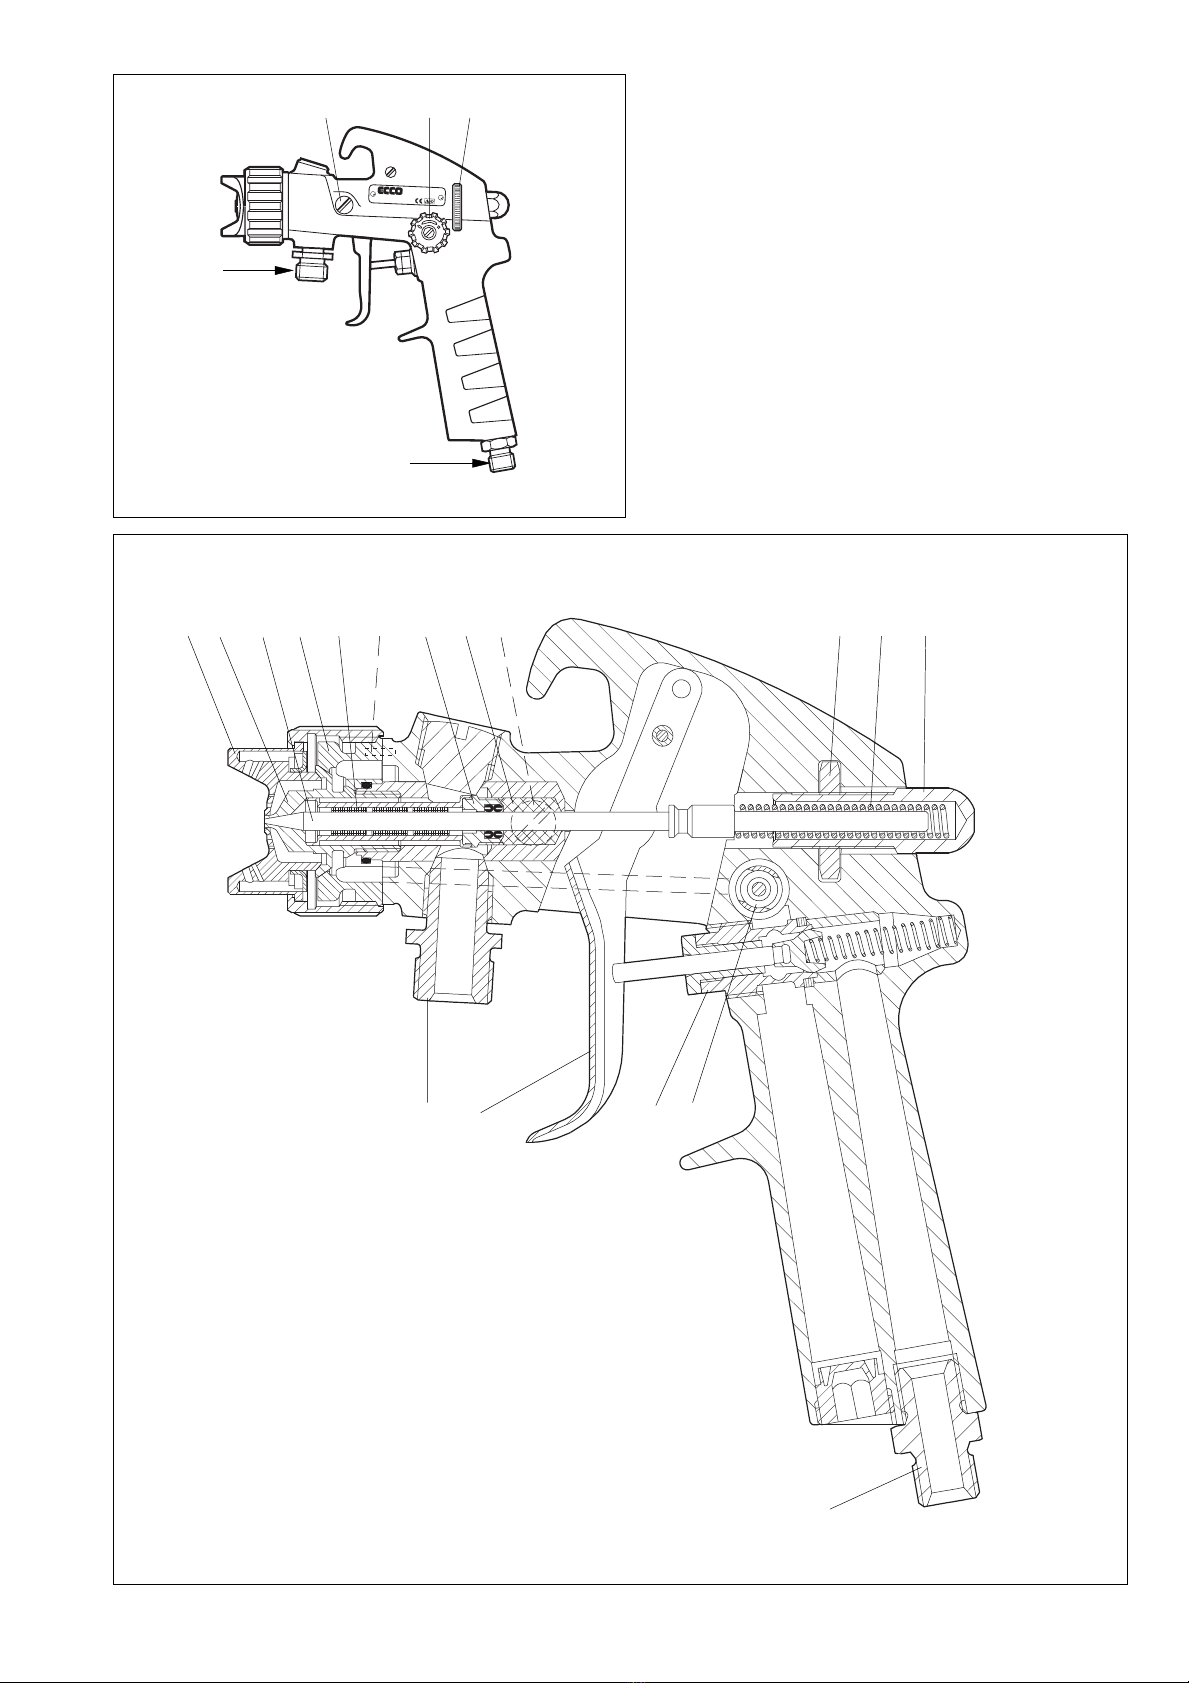
1 6003 9229 00 1 1 1 Gun body
2 6102 2401 00g1 1 1 Packing set
3 6000 8369 00g2 2 2 Packing screw (stainless steel)
4 6101 5100 00 1 1 1 Fan width control, compl.
5 6101 3788 00 1 1 1 – Valve screw
6 6101 3790 00 1 1 1 – Valve pin
7 6101 3796 00g1 1 1 – O-ring
8 6101 3789 00 1 1 1 – Valve housing
9 6101 3648 00 1 1 1 – Wheel
10 0333 5109 00g1 1 1 – Lock washer (V 3.2)
11 0164 5013 00g1 1 1 – Screw (MKFS 3 x 6 SS A2)
12 (see page 4) 1 1 1 Paint needle
13 6000 9191 80 1 1 1 Back head, compl.
14 6000 9191 00 1 1 1 – Back head
15 6101 2582 00 1 1 1 – Spring (3.4 kg)
16 6000 7764 00 1 1 1 – Wheel
17 6101 2796 00 1 1 1 Trigger (stainless steel)
18 6101 2990 80 1 1 1 Shaft, compl.
19 6101 2990 00g1 1 1 – Shaft (stainless steel)
20 0164 5013 91g2 2 2 – Screw (MSCS A4-70 3 x 6
stainless steel.)
21 6101 5730 00 1 1 1 Air valve, compl.
22 6101 2111 00g1 1 1 – Spring
23 6101 5008 00g1 1 1 – Air valve
24 6101 3631 00 1 1 1 – Valve pin
25 6001 1008 00g1 1 1 – Packing
26 6003 2167 00 1 1 1 – Valve housing
27 6101 5716 00g1 1 1 – Bushing
28 0101 4131 00b1 1 1 Pin (CP 4h6 x 10 S )
29 6103 3112 00g1 1 1 Packing screw (stainless steel)
30 6102 1214 00 1 1 1 Distribution ring with O-ing
31 6101 1724 00g1 1 1 – O-ring
32 (see page 4) 1 1 1 Paint nozzle
33 (see page 4) 1 1 1 Air cap
34 6001 2619 00a1 1 1 Nipple (G 1/4)
35 6101 5560 00 – – 1 Paint cup Ecco G 5, compl.
36 6101 5561 00 – – 1 – Paint cup, volume 0.5 l (G3/8)
37 6101 5559 00 – – 1 – Cover, compl.
38 6003 9094 00 – – 1 – – Cover
39 6003 9068 00 – – 1 – – Plug (Drip guard)
40 6003 9974 00 1 1 – Plug (G 3/8)
41 6101 3742 00 – – 1 Plug (M14 x1)
42 6101 5021 00 1 1 – Nipple (G 3/8 stainless steel)
43 6101 5626 00 1 1 1 Plug (G 3/8 )
44 6003 9714 00 – 1 – Suction cup Ecco SD 15,
volume 1 l (see spare parts list
No. 9836 3175, ESL 12/04-20)
45 6000 8004 00 1 1 1 Cleaning brush (ø10 mm)
46 6000 8001 00 1 1 1 Cleaning brush (ø17 mm)
47 (see optional 3 3 – Strainer 100 mesh
equipment)
48 (see optional – – 1 Strainer 100 mesh
equipment)
Qty
Ref.
No. Part number Description
-40S
-401S
-402S
-40S
-402S
Optional Equipment
– 6101 6065 00 1 1 1 Retaining ring, acetal plastic
(for air cap)
4 6101 9230 00 1 1 1 Fan width control for left
handed
4 6003 9602 00 1 1 1 Quick fan width control
15 6101 2582 65 1 1 1 Spring, soft (2.7 kg)
15 6001 2036 00 1 – – Spring, stiff (6.4 kg)
30 6102 1215 00 1 1 1 Distribution ring, compl.
(stainless steel threads)
34 6000 1877 00 1 1 1 Air inlet nipple (9/16" 20G)
34 6002 0233 00 1 1 1 Air inlet nipple (1/4" 18 NPSM)
35 6101 5560 95 – – 1 Paint cup Ecco G 1.25,
volume 0.125 l
42 6102 9314 46 1 – – Paint inlet nipple (G 1/4 stain-
less steel)
42 6003 7393 00 1 – – Paint inlet nipple (9/16" 20G
stainless steel)
44 6003 9676 00 – 1 – Suction cup Ecco SD 15T,
volume 1 l (inside coated with
teflon)
47 6103 3200 00c1 1 1 Strainer setd60 mesh (white)
47 6103 3201 00c1 1 1 Strainer setd 100 mesh (yellow)
47 6103 3202 00c1 1 1 Strainer setd200 mesh (black)
47 6103 1088 00c1 1 1 Strainere300 mesh (red)
48 6003 9754 05 – – 1 Strainer setf60 mesh (white)
48 6003 9752 05 – – 1 Strainer setf100 mesh (yellow)
49 6003 7886 00 – 1 – Strainer setd 80 mesh
50 6003 8002 00 1 1 1 Throttle valve (G1/4)
51 6101 5247 80 1 1 1 Plug set, for gun is not fitted
with fan width control
52 6102 1203 80 1 1 1 Back head, lockable fluid
volyme control
65130 F285 65130 F286
51
52
-401S
Qty
Ref.
No. Part number Description

Orifice diam. Designation Part number Designation Part number Designation Part number Air consumption
mm l/min at 4 bar
0.8 0–7 6001 0241 00 170 6101 2588 00 215
270 6101 2589 00 285
271 6101 5249 00 380
007 6001 0548 00 273 6103 3159 00 370
P007 6101 5747 00 275 6101 2590 00 380
T272 6101 2599 00 480
T278 6101 5614 00 480
T272 6101 2599 00 480
T272f6102 3992 00 480
T278 6101 5614 00 480
T278f6102 3991 00 480
1.2 170 6101 2588 00 215
271 6101 5249 00 380
273 6103 3159 00 370
T272 6101 2599 00 480
T272f6102 3992 00 480
T274 6101 2602 00 480
PT274 6101 5785 00 480
T278 6101 5614 00 480
T278f6102 3991 00 480
270 6101 2589 00 285
271 6101 5249 00 380
273 6103 3159 00 370
T272 6101 2599 00 480
M270 6101 3293 00 155
270 6101 2589 00 285
2–7 6000 9140 00 271 6101 5249 00 380
1.8 P2–7 6001 1478 00 P1807e6101 3844 00 273 6103 3159 00 370
H2–7 6001 0768 00 275 6101 2590 00 380
T274 6101 2602 00 480
PT274 6101 5785 00 480
3–7 6000 9141 00 M370 6101 3294 00 265
2.1 P3–7 6001 1479 00 P2107e6003 9366 00 375 6101 2591 00 385
H3–7 6000 9876 00 T374 6101 2603 00 510
M470 6101 3295 00 305
2.7 475 6101 2592 00 385
T474 6101 2604 00 510
57 6000 9289 00 M570 6101 3296 00 500
P57 6101 6056 00 T576 6101 2607 00 540
6.5 6–7 6001 0451 00 67 6001 0453 00 T676 6101 2608 00 585
1.1 09–7 6001 1068 00 P1107e6101 5616
0.8 B0–7 6001 0966 00
1–7 6001 0276 00
P1–7 6001 1476 00
Nozzle sets
Consists of air cap, paint nozzle of stainless steel and paint needle of nylon.
Pressure feed Suction and Gravity feed
Paint nozzle Paint needle Air cap Nozzle set Paint nozzle Paint needle Air cap Nozzle set
Orifice diam. Orifice diam.
mm Type Type Part number mm Type Type Type Part number
1.1 09–7 P007 T278 6003 9772 11 1.1 09–7 P007 271 6003 9771 11
1.3 1.5–7 P07 T272 6003 9772 13 1.3 1.5–7 P07 273 6003 9771 13
1.5 1.5 P07 T272 6003 9772 15 1.5 1.5 P07 273 6003 9771 15
1.8 2–7 P07 T272 6003 9772 18 1.8 2–7 P07 271 6003 9771 18
2.1 3–7 P07 T374 6003 9772 21 2.1 3–7 P07 375 6003 9771 21
2.7 4–7 P07 T474 6003 9772 27 2.7 4–7 P07 475 6003 9771 27
a The letter “H“ before the designation denotes tungsten-carbide design.
b The letter “P“ before the designation denotes nylon design. The rear part of the nylon needle is made of steel.
c Air caps for round spray with “M“ in the designation should be used together with stop ring 6101 3298.
d Air caps with a “T“ in the designation are designed for pressure feed only. The other air caps are designed for suction feed but can also be used for pressure feed.
e Fluid needle with cylindrical point.
f Acetal plastic retaining ring.
3.7 5–7 6000 9287 00
1.5–7 6001 0999 00
1.3 P1.5–7 6001 1477 00 P1307e6101 5982 00
H1.5–7 6001 1092 00
Nozzle combinations
Paint nozzle Paint needle Air cap
(a) (b) (a) (b) (b) (c) (d)
07 6000 9275 00
1.5 1.5 6103 1303 00 P07 6001 1471 00
H07 6000 9881 00
4–7 6000 9142 00
H4–7 6000 9877 00
4

5
The high velocity flow of air and liquids through hoses and
nozzles may develop static electricity. Be sure that the
equipment, object being sprayed, spraybooth, paint and
waste container are properly grounded to prevent static
discharge or sparks.
WARNING
As the equipment works under pressure the utmost care must
be observed during the work. Bearing this in mind, never aim
the spray gun at a person or towards any part of the body In
the event of personal injury caused by the spraying pressure,
immediate medical attention is essential. Before carrying out
any adjustment or repair, the equipment must be switched
off and the paint pressure relieved.
WARNING
Operator’s Instructions
Important
Principal data
Type Max. working Paint cup
pressure volume
Ecco bar l
40S 7 -
401S 7 1
402S 7 0.5
Use Ecco genuine parts and accessories only for best
function and safety.
Before starting, read through all instructions carefully.
Do not use halogenated hydrocarbons in coating application
equipment where aluminium or galvanized parts come
in contact with the solvent or coating material.
Halogenated hydrocarbons e.g. 1,1,1-thrichloroethane and
methylene chloride react, violently with such parts, causing
corrosion and danger for explosion.
WARNING

6
Operation
• Install and operate the spray gun according to Fig. 1.
• Blow the paint and air hoses clean before connection.
• Check that all connections are tight (pay particular attention to
the connection between paint cup and spray gun).
• Keep the spray gun clean and lubricate moving parts at regular
intervals.
• Lubricants for surface-treatment equipment must not contain
silicon.
• In the event of leakage around the paint needle, tightening the
packing screws (3) from both sides. After tightening, check that
fluid needle is pushed forward by the spring force.
• For short standstill periods, for instance over a night, it will
suffice to clean the air and paint nozzles on the outside. If a
two-componentpaintisused, however, the gun must be flushed
through immediately with solvent. This must also be done if the
gun is to remain unused for a longer period of time.
• When cleaning the air cap and the paint nozzle, use a soft brush
or rag dipped in solvent. Do not place the entire gun in solvent,
as the oil on the lubricated parts would be dissolved. Blow the air
cap dry with compressed air from both sides.
• Never use iron or steel wire to clean air holes and ducts in
the nozzles.
Connections and controls (see Fig. 1)
3Paint needle packing adjusting screws.
4Fan width adjusting. If the knob is screwed all the way in a round
fan will be obtained other positions give broad fans.
16 Paint flow adjusting. Clockwise turning result in a smaller paint
flow and counter-clockwise turning increases the flow. The fluid
flow is regulated in the first instance by the choice of paint nozzle
and paint pressure.
34 Atomizing air hose connection G 1/4.
Hose:Inside dia. 6.3 mm (1/4").
42 Paint hose connection G 3/8.
Hose: Inside dia. 6.3 mm (1/4") or 9.5 mm (3/8").
Needle packing and needle
1. Remove the air cap (33), and the paint nozzle (32).
2. Unscrew the back head (14) by screwing the wheel (16) counter-
clockwise.
3. Remove the spring (15) and the paint needle (12).
4. Dismantle the front packing screw (29).
5. Dismantle the packing screws (3).
6. Pry out the the packing set (2). Clear out any remains of the
packings .
7. Clean everything well with cleaning agent and then blow out with air.
8. Assembly the packing (2 ) whith holes and the packing screw (29) on
the paint needle (12), tightening with a screwdriver.
9. Assembly the side packings (2) in the gun body. Advance the packing
screws (3) with a screwdriver from both sides until good friction is ob-
tained between the paint needle (12) and the packings (2).
10. Re-fit the paint nozzle (32) (screwing torque 22 Nm), squeeze the
trigger (17) to avoid damaging the tip of the paint needle, and refit the
air cap (33) by hand.
Distributor ring
1. Dismantle the distributor ring (30) by screving on the air cap (33) a few
turns. Withdraw the distributor ring axially from the gun body.
2. Assembly the distributor ring (30) by mating it with a pin (28) in the gun
body.
Fan width control
Check when fitting the valve housing (8) that the marking on the body
agrees with fig. below.
Paint spraying
Inhalation of paint, paint dust and solvent is not healthy. Make
sure an approved spraybooth is used. The operator must use
personal protection-breathing mask or fresh air hood.
CAUTION
Disassembly-Reassembly (see Fig. page 1)
(see also Fig. 2)
How to operate
Recommended paint viscosity differs according to paint properties and
painting conditions. 15 to 23 sec./Ford cup 4 is recommendable.
The gun is operate at low air pressure, high transfer efficiency will not
be obtained if the spray distance is to far.
Set the spray distance from the gun to the work piece as near as pos-
sible within the range of 150-300 mm.
Air caps
The air caps are tested and certified according to the SEAVA method.
This gives a ”finger print” of the spray pattern on each air cap.
For further information please contact your supplier.
The retaining ring for the air cap shall only be tightened with hand
force. No tools are required. Especially important when a capcleaner
is used.
Air caps can be sent back for checking and comparity the perform-
ance. For further interesting please contact your supplier.
Before reassembling the different components:
• Clean the parts with the appropriate cleaning agent by means
of brush.
• Install new seals after having lubricated them with PTFE grease.
• Install new parts if necessary.
Before any intervention on the spray gun, shot off and relieved
the compressed air supply and paint pressure to the gun.
VARNING
65130 F302
Position of valve housing (8)
after fitting in the gun body

7
65130 F301
Ecco 40S
Fig. 2
2. Packing set
3. Packing screws
4. Fan with control
12. Paint needle
14. Back head
15. Spring
16. Wheel (Paint flow adjusting)
17. Trigger
21. Air valve
28. Guide pin
29. Packing screw
30. Distributor ring (Air distrubutor)
32. Paint nozzle
33. Air cap
34. Paint hose connection nipple (G 3/8)
42. Air hose connection nipple (G1/4)
47. Strainer (optional equipment)
33 32 12 30 47 28 29 2 3
65130 F225
Fig. 1
Ecco 40
ECCO FINISHING AB
NACKA - SWEDEN
Made in Sweden
16
4
3
34G 1/4
2-6 bar
42G 3/8
0.8-2 bar
16 15 14
42 17 21 4
34

Troubleshooting
Introduction
Always commence troubleshooting by checking the general condition
of the spray gun. This can most easily be determined by test spraying,
which provides an opportunity for checking the spray pattern and ca-
pacity, air leakage and gasket leakage.
Thefollowing external factorscan cause malfunctioning and shouldbe
thoroughly checked:
1. The quality of the air, i.e. content of moisture, dirt particles and oil.
2. The quality of the paint, i.e. its viscosity, purity. etc.
3 The air and paint pressure in relation to viscosity of the paint and
nozzle combination used.
4. The size of the air/paint hoses.
Troubleshoouting chart
Correct Spray Pattern
Types of problems
Collection of information which makes it possible to identify the error
symptoms applicable to the spray gun in the event of malfunctioning
is a matter of vital importance. Identification of symptoms makes it pos-
sible to decide whether the spray gun itself is the direct cause of the
malfunctioning or if this may have been caused by an external factor.
Paint leaking Worn needle packings and/or needle. Replace damaged parts with new ones.
Paint leaking through the paint nozzle
when the gun is closed. Pollution between the needle and the nozzle
or needle and nozzle worn or damaged. Unscrew air cap (33) and nozzle (32). Clean
carefully and check for any sign of damages
or wear.
Paint leaking - Air leaking Cause Remedy
a) Dried paint on holes for atomizing air.
Clean the air holes, use appropriate clean-
ing agent and a soft brush.
b) Damage to holes for atomizing air.
Replace the air cap with a new one.
c) Air cap not sufficiently tightened.
Tighten the air cap properly by hand.
Asymmetrical to the left or
to the right
a) Dried paint on holes for atomizing air.
b) Damage to holes for atomizing air.
c) Air cap not sufficiently tightened.
Distorted in the middle
a) Damage to the tip of the paint nozzle.
b) The pressure of the atomizing air in relation
to the viscosity of the paint.
a) Fit a new paint nozzle.
b) Adjust the air pressure of the atomizing air.
Spray Pattern Cause Remedy
Narrowing off in the middle
a) Wrong nozzle combination.
b) Fan air pressurer too high.
c) Paint viscosity unsuitable.
d) Incorrect spray angle.
a) Select a new nozzle combination suitable
for the viscosity of paint.
b) Reduce the pressure of the fan air.
c) Adjust the viscosity of the paint.
d) Adjust the angle with the fan width control.
Irregular spray (spitting)
a) Paint needle gasket leaky.
b) Damaged O-ring in distributor ring.
c) Paint nozzle not tightened.
d) Dirt on sealing surfaces of paint nozzle and
distributor ring.
e) Paint hose connection not tightened.
f) Paint hose defective.
a) Adjust the packing screws. If this does not
suffice, change the paint needle gaskets.
b) Change the O-ring in the distributor ring.
c) Tighten the paint nozzle.
d) Clean the sealing surfaces of the paint
nozzle and distributor ring with solvent and
blow clean.
e) Tighten the paint hose connection.
f) Change the paint hose.
This manual suits for next models
2
Table of contents
Other Ecco Paint Sprayer manuals