EcoLet 25e User manual
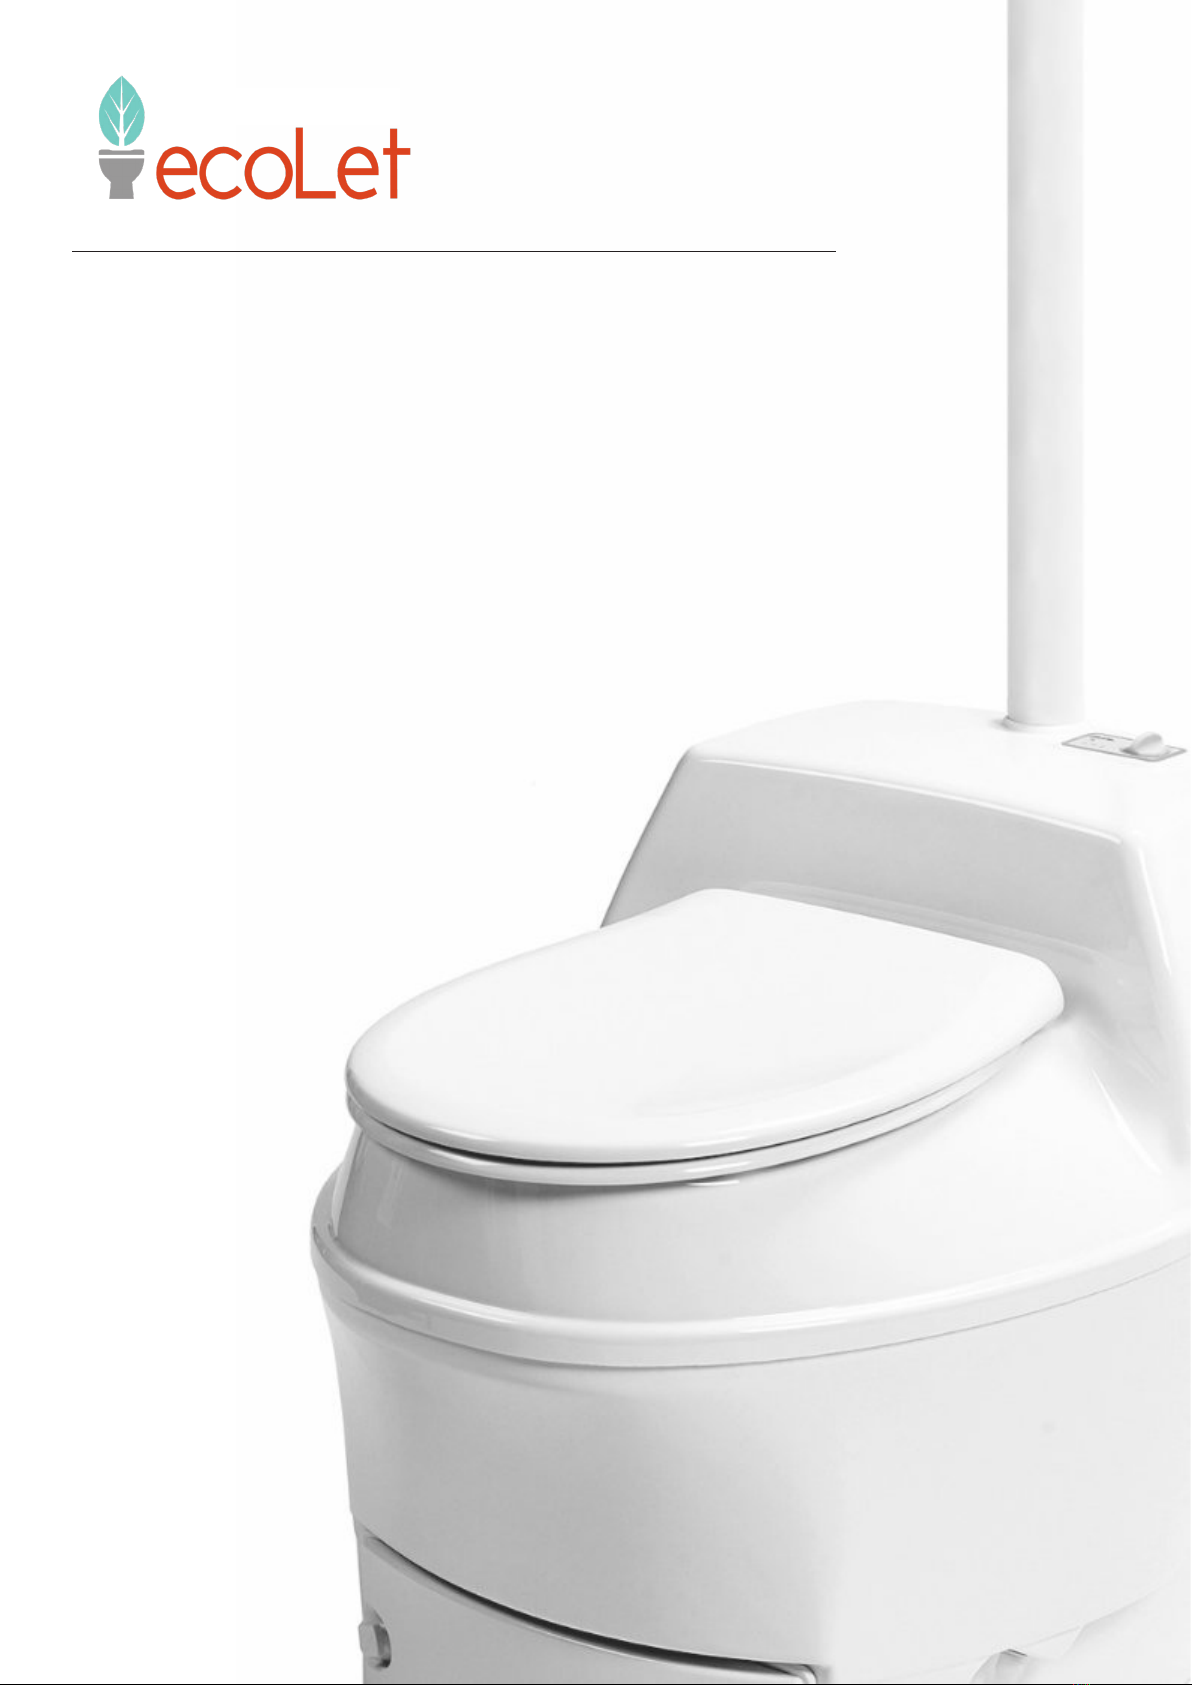
EcoLet 25e & 65e
Owner’s Manual
May 2022

2
Table of Contents
Contact Details 2
How the EcoLet works 3
What’s in the box? 4
EcoLet cross section 5
Settings 5
Installation 6
Operation 7
Caution 10
Maintenance 10
Troubleshooting 11
Contact Details
We are available to chat from 8am to 5pm, Monday to Friday (excluding public holidays).
PHONE: 1300-138-182
EMAIL: info@ecoo.com.au
WEBSITE: www.ecoo.com.au
www.ecolet.com.au

3
Congratulations on the purchase of your new EcoLet compost toilet system!
These EcoLet models are continuous process units (as opposed to batch systems), which
meansthewasteisprocessedinsidetheunitproducingnishedcompostwhichfallsintoatray
at the bottom of the unit. The tray is emptied every 6 to 12 weeks depending on use.
The systems are designed and built in Sweden and are completely odourless. The fan
driven ventilation system, automated mixing mechanism and heating elements combine
toencourageanefcientaerobiccompostingprocessandevaporateuids.Thenished
compost can then be buried in your garden.
Unit dimensions
25e: 710mm L x 550mm W x 650mm H
65e: 810mm L x 650mm W x 660mm H
Foot print (including compost drawer): 1100mm L x 650mm W (minimum)
THREE IMPORTANT THINGS TO REMEMBER
1. When the toilet is used, room temperature should be at least 18°C.
2. If you are away for more than two days, always turn the power off and put the cover in the
seat opening, otherwise the compost will become dry.
3. The heating element in the room can also be switched off, the composting toilet will not be
damaged by freezing.
How the EcoLet works
EcoLet is a self-continued biological toilet that composts waste and toilet paper, and
evaporates liquid. The composting process takes place using nature’s own microorganisms,
without the need of any chemicals. Controlled air supply and heat, as well as regular mixing of
the compost accelerates the composting process and converts toilet waste into eco-friendly
humus. This makes a nutrient rich supplement for your garden.
4
What’s in the box?
The box contains:
• The toilet
• The manual
• Bulking agents (peat moss and wood
shavings/hemp)
• Nature Flush enzymes
• Nature Quick microbes
• Toilet Paper
• Spray with trigger
• Warranty Sheet
• Bowl cover
• A rake
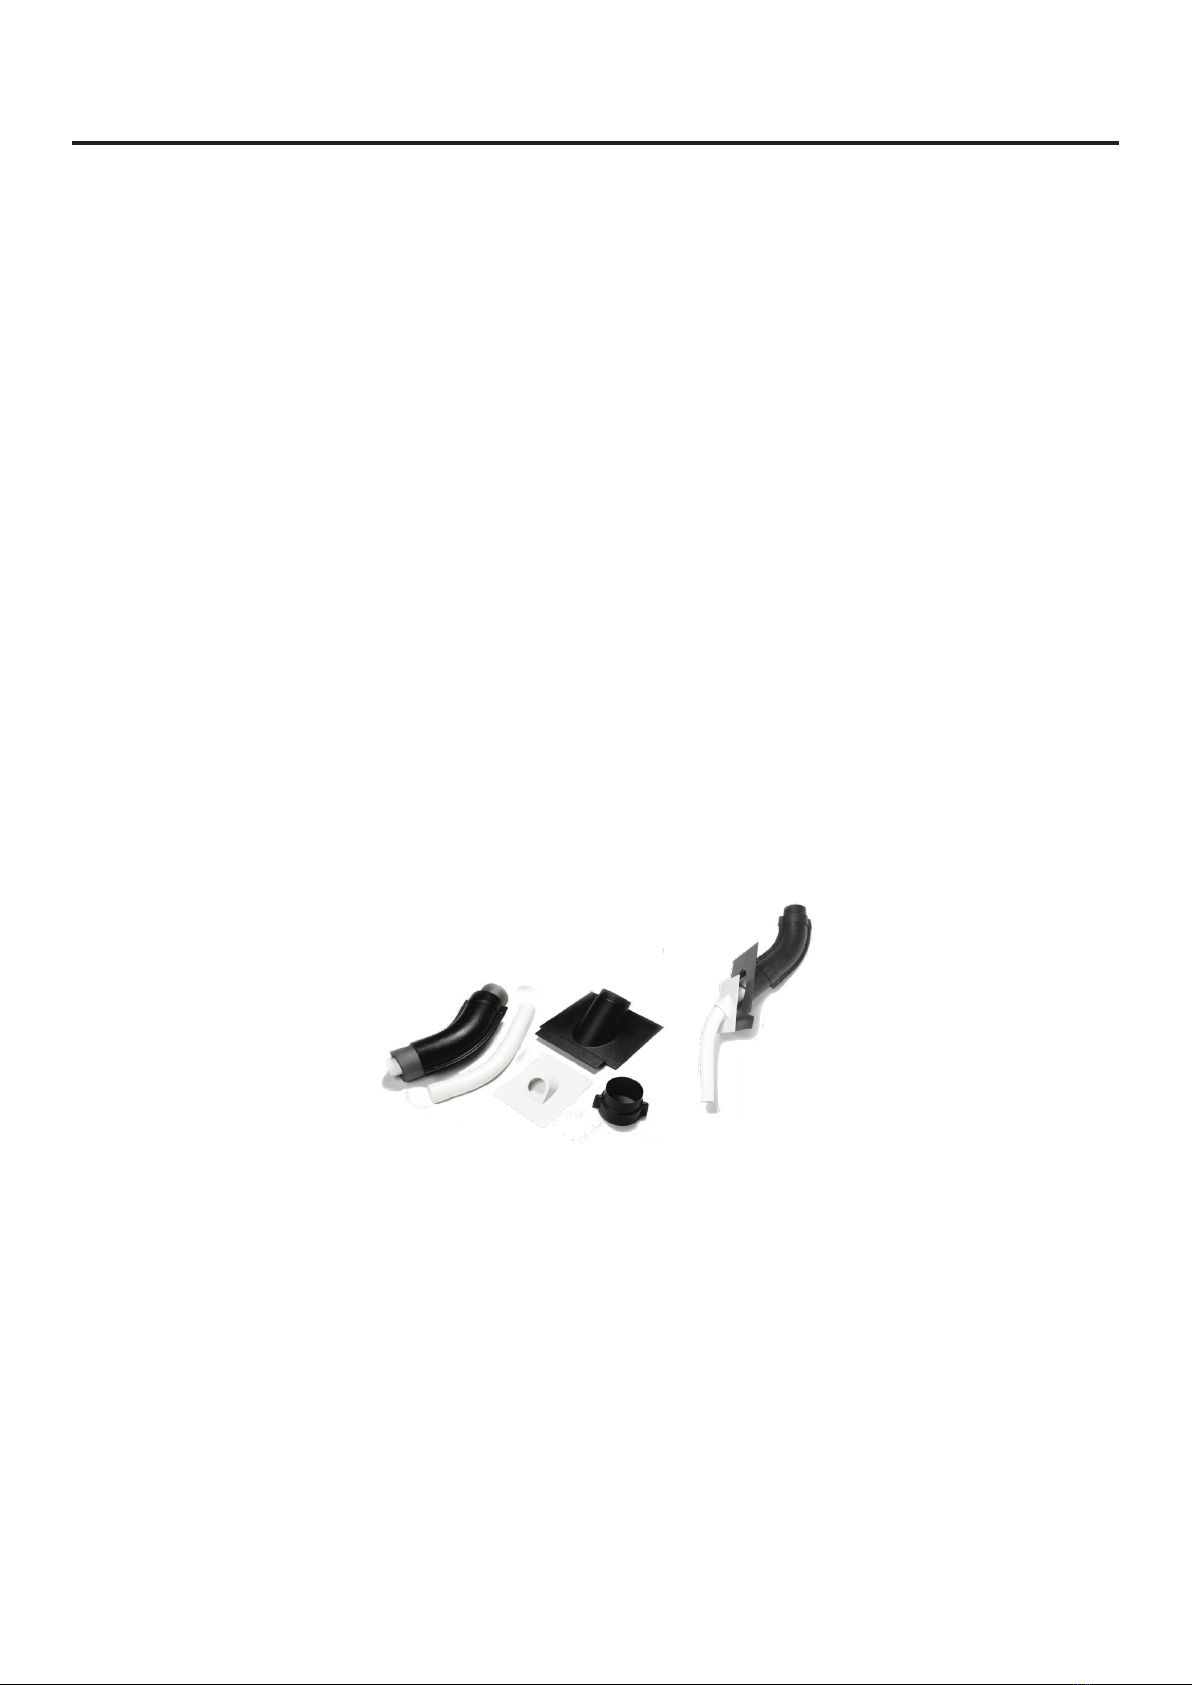
The vent kit contains:
• Ventilation pipes, white pipes, 6pcs x 675mm
• Outside pipe, black 2pcs x 675mm
• Insulation, 2pcs x 675mm
• Reduction coupling, 55/110mm
• Roofashing
• Insect netting
Optional wall installation kit (not included):
Extra accessories (not included):
• 30˚and45˚Pipebends
• Insulation
• Additional vent piping
• Bulking agent (peat moss, hemp/wood-shavings)
• Compost starter
• Enzymes cleaning
5
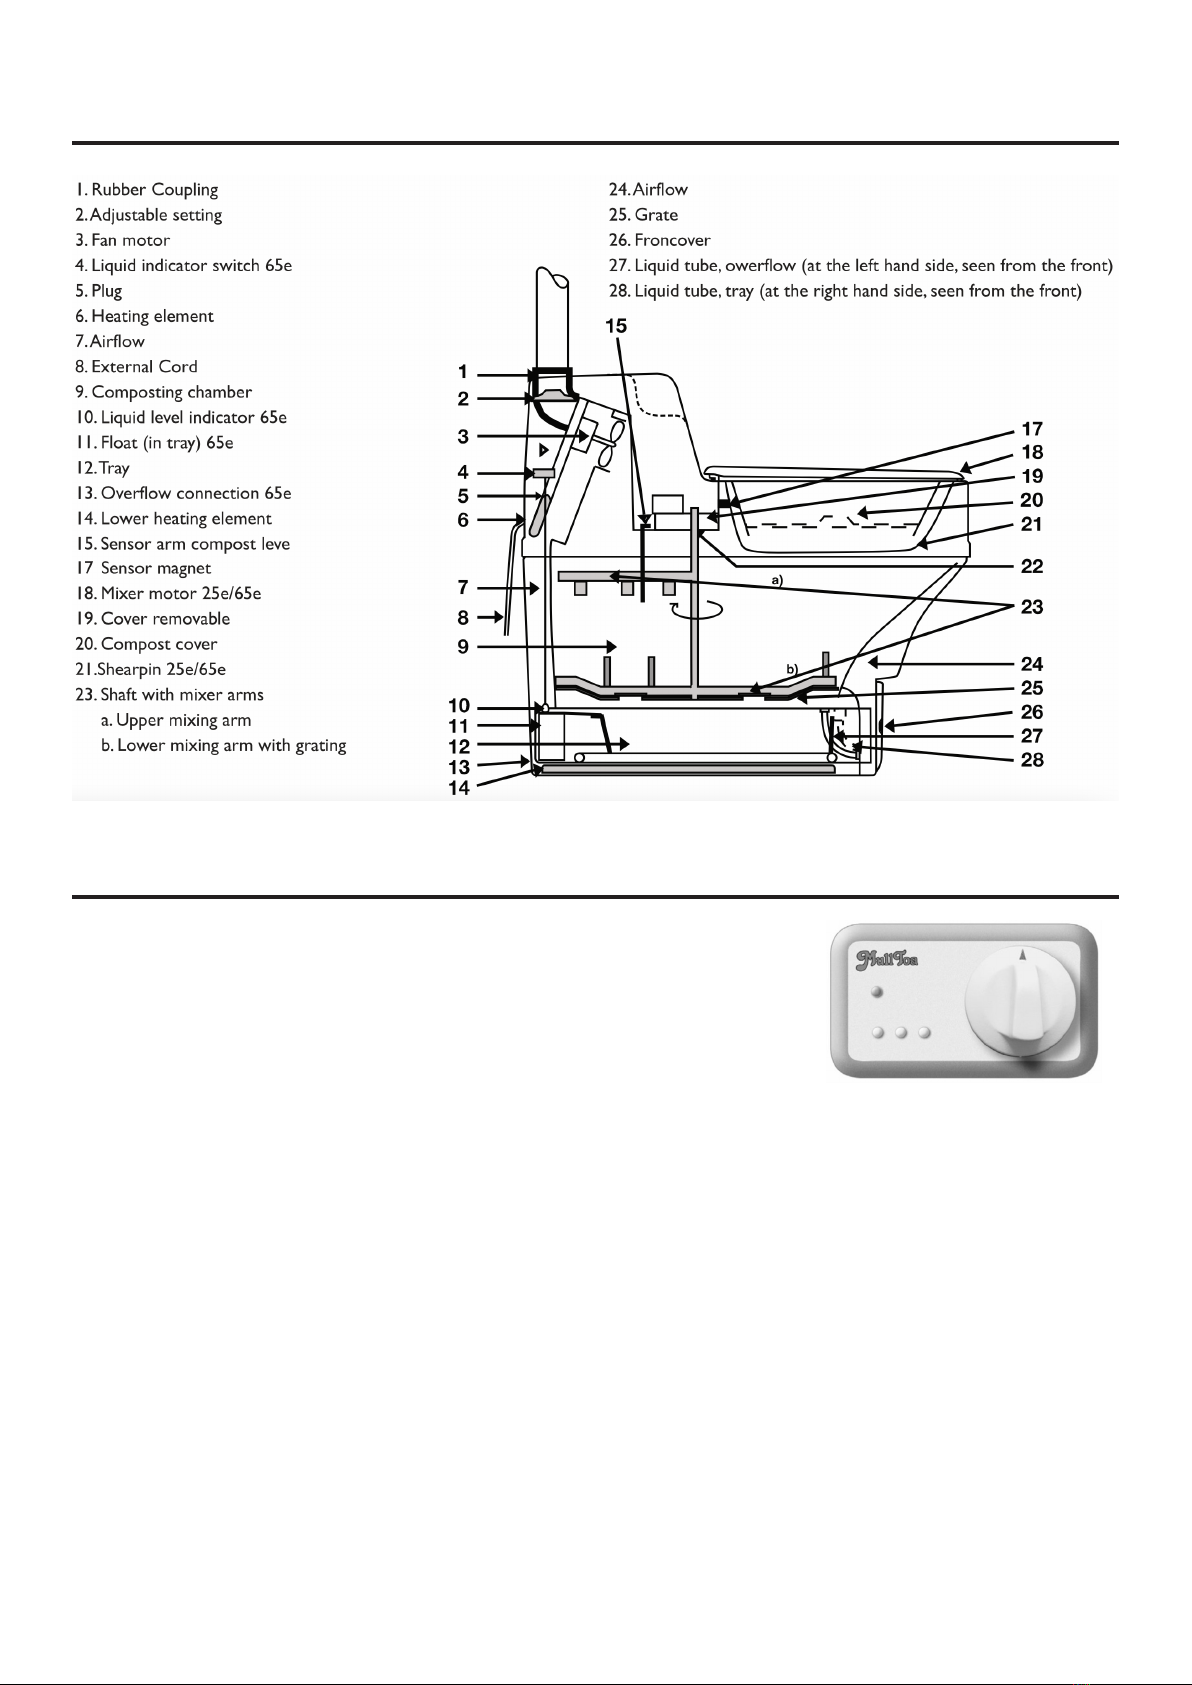
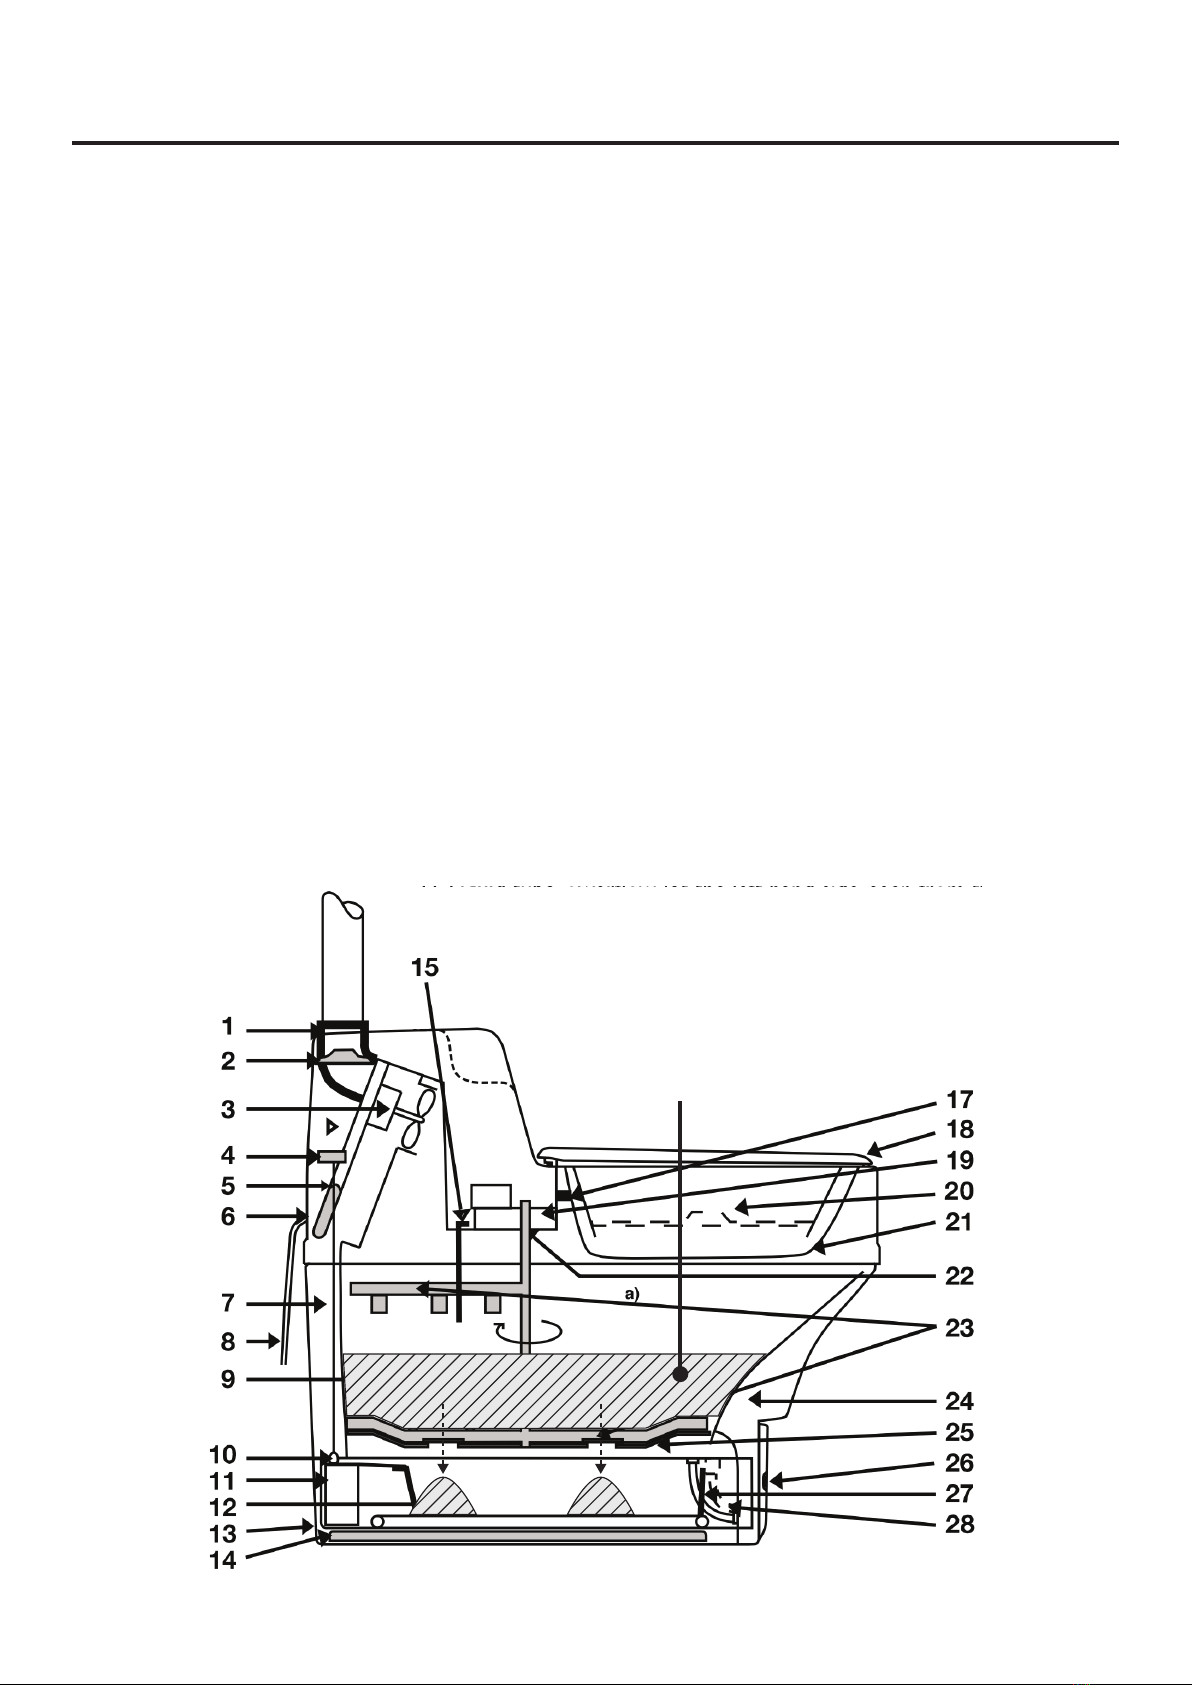
EcoLet cross section
Settings
Capacity settings
Adjust capacity by turning the dial.
The recommended start setting for 2 people:
Green light: Only fan is operating (see Heater settings, Step 1 below).
After 1 week in operation, you might have to adjust the setting depending on usage and the
liquid level in the tube (#28).
Heater settings
Set the heat according to load, read the level tube (#28) on the right side (seen from the front).
• Step 1 Green light: Only fan is operating
• Step 2 One amber light: Fan + 50% top heater
• Step 3 Two amber lights: Fan + 50% top heater + 100% bottom heater
• Step 4 Three amber lights: Fan + 100% top heater + 100% bottom heater
1
2 3 4
6
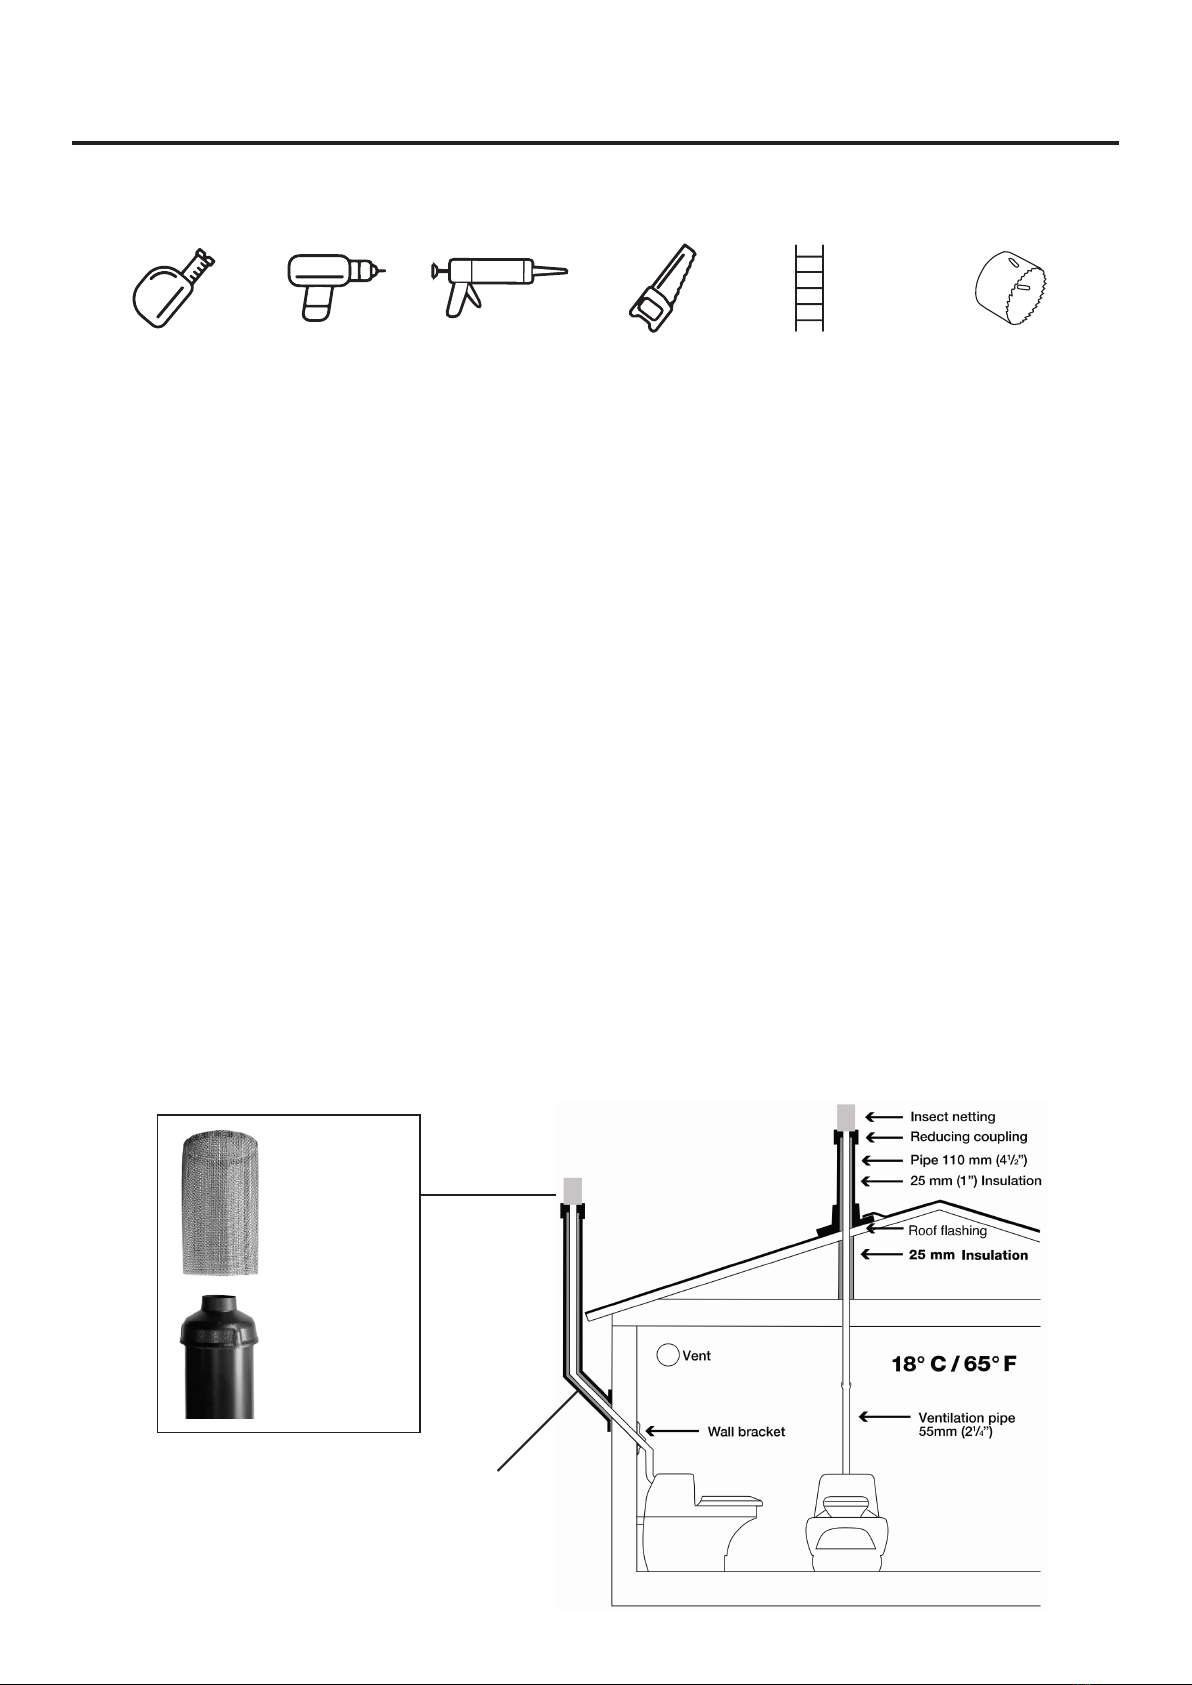
Instructions
1. Position the unit on a level surface leaving enough space in front of the unit to remove the
compost tray.
– Minimum distance from the back wall to the front of the tray is 1100mm.
– Keep in mind you will need a 240V power point available somewhere near the unit.
– Be mindful of how the vent is to be installed as this may impact windows, etc.
2. Install the vent pipe either straight up through the ceiling or out through the wall and up
the exterior of the building.
– An optional vent wall kit is available.
– Donotusebendsover45˚.
3. Installtheroofashingandsealasrequired.
4. Insulate all parts of the vent pipe in roof cavities or outside the building using the insulation
provided and shield with 100mm pipe provided. Note: You may need to source extra
insulation.
5. Fit the insect netting cap to the top of the vent.
Installation
Tools required
SILICONE
DrillMeasuring
tape Sealant/
adhesives Saw Ladder 55mm Hole saw
or Jigsaw
Fit insect netting
onto reducing
coupling
Must be insulated
7
Operation
Starting with empty toilet
1. Mix the bulking agents (40% peat moss, 60% hemp/wood-shavings) provided with your
toilet, this creates a very absorbent bulking agent.
2. Add a 150mm layer of bulking agent mix into the main chamber of the toilet through the
toilet seat. Some of the mix will fall down into the collection tray, add this back to the main
chamber.
3. Connect the mains plug into a grounded wall socket, switch the system on and turn the dial
totherstpositionsothatonlythegreenlightison(justthefan,nottheheater)
4. Make sure that when the fan is running you don’t have the bowl cover in place, this acts like
a plug and seals the composting chamber only when the system is not in use.
The mixer arm
• The mixer arm will turn a full revolution when switched on.
• If you lift the seat and place it down the mixer arm will turn a full revolution.
• If you sit on the toilet the mixer arm will turn a full revolution when you get up.
Add a 150mm layer
of bulking agent.
Bulking agent will fall
into the tray.
Example of bulking agent volume estimation

8
In the rst week
• Monitor the main composting chamber every day
– The bulking agent should be porous and have a moderately moist texture; the ideal
moisture content for compost is 60%.
– The mixing arm should automatically activate after every use because of the micro
switches.
• The collection tray will be full of the dry bulking agent that you used in setting the system
up for use. Empty this back into the main composting chamber (it’s the equivalent of
“turning” a compost pile by making more room at the base for the compost to fall)
• Once you have some solid waste in your composting chamber you can start to introduce
your microbes (refer to microbes instructions). This is a crucial step as it is a closed system
so there is no guarantee these microbes will occur naturally to compost your waste; without
them you’re just collecting waste.
• Add a handful of bulking agent for every solid deposit you do – or approximately 1L once a
week, based on full time usage.
• Checktheuidlevelindicatortubeonthesideoftheunit(#28)
– If the liquid in the tube is increasing, turn the thermostat up one click to aid
evaporation.
– The thermostat setting may vary depending on the usage patterns and climate.
– Adjust the dial according to use.
Level in the liquid tube
The liquid tube (on the right hand side, viewed from the front. #28) shows how much liquid
there is in the tray. The tube should never be full; this means the tray is full of liquid. Half full of
liquid in the tube is alright, but should be monitored. You can use a permanent marker to mark
the liquid tube at your ideal level.
Correct setting
At the correct setting, the compost has a porous and moderately moist consistency. If liquid
stays on top of the compost and seeps into the tray slowly, then the compost is too wet and
can no longer absorb the liquid as intended. Increase the setting and add a few litres of
humus starter. On the other hand, if hard lumps form or toilet paper remains on top, so that it
doesn’t get soaked and mixed in properly during mixing, the compost is too dry. If so, turn the
setting down and sprinkle about half a litre of water over the compost.

9
How to and how often to empty the tray
This depends on use, but the system is designed to be emptied every 6 to 12 weeks when
used to its maximum capacity. As a general rule, once you are collecting completed compost
from your collection drawer you can empty it once the compost pile reaches the top mixing
arm (see example below).
Becarefulnottoopenthecollectiontrayifyouroverowliquidtube(LHS,#27)isshowing
that there is liquid pooled in the base of your unit, outside of your collection drawer. If there is
too much liquid remove the hose and plug it up immediately. It is recommended that prior to
emptying the compost tray to turn the dial up to the highest setting for a couple of hours in
ordertoevaporatealluids.
When the tray slides out the liquid hose (RHS, #28) needs to be unplugged to remove it fully,
so make sure you have reduced the leachate level as low as possible.
The compost process takes at least three to four months so you may not see compost in the
rstfewmonths.Ifyourcollectiontraycontainsonlybulkingagent,thenadditbackintothe
composting chamber through the toilet seat.
If you’re at the stage of seeing completed compost, you can use this in your garden. We
recommend burying it like a fertiliser in a non edible garden. Burying it will reduce the
likelihood of contact with animals or people, even though fully composted waste will be
pathogen free, it’s better to be safe than sorry. You’ll want to contact your local council for any
restrictions or requirements about using composting toilet waste around your property. Every
local council may have slightly different requirements about waste disposal.
Compost pile

10
Caution
• Do NOT use any anti-bacterial cleaning agents or products inside the composting system.
• DoNOTusesugarcanemulchorotherstringybrousmaterial.
• Do NOT use bowl cover when system in use.
• Avoidbulkingagentswithveryneparticlesthatcanbecome“cakey“whenabsorbing
moisture, which will block the drainage of excess moisture.
• Only use peat moss, wood-shavings and hemp in your EcoLet.
Maintenance
• Checktheuidlevelindicatortuberegularlyandadjustthermostataccordingly.
– Fluid level increasing and above halfway = turn thermostat up
• Add bulking agent regularly (refer to Correct Setting on page 8).
• Empty the compost tray BEFORE it is full.
– Mostpeopleemptyitonceamonthtoavoidoverlling.
When to reintroduce the microbes
You will know when the pile is not composting as the matter will not be breaking down (which
reduces volume). This is most evident by monitoring the toilet paper, as it tends to break down
rst.
As you use the system, the microbes that you introduce will spread through your composting
chamber which is aided by the mixing mechanism. If they are able to thrive in the composting
chamber environment you may never need to reintroduce them. An optimal composting
environment for these microbes is moist and warm. You will therefore want to consider
reintroducing microbes if your system has:
• Completely dried out. In dry conditions microbes will start to hibernate and eventually die
• Gone septic. If your system is full of liquid the microbes will drown
• Becomes too cold. Microbes will slow down start to hibernate in cold temperatures
It can also be “refreshing” for your compost pile to have some new microbes added into the
top layers. This can be helpful if you have been using the system for a long time or if you have
left the system unattended and turned off.
Thankfully, there’s two really easy ways to add microbes into the composting chamber:
• Add Nature Quick Microbes
• Add fully composted material (it will still contain a population of microbes)

11
When to turn the system off
If you’re going to leave your system unattended for longer than two weeks, you can switch it
off and place the bowl cover into the seat. This seals the chamber and will prevent any smells
from entering your bathroom. Then you can comfortably turn the system off at the wall socket
without worrying about emptying the contents. The microbes will move around and compost
while you’re gone, assuming ideal conditions.
Troubleshooting
Odours detected
• Urine/damp odour
– Turn thermostat up one click and monitor
– Ensure vent pipe is well insulated (to prevent condensation issues)
• Strange burnt odour
– Turn thermostat down one click and monitor
– Check moisture level of the pile. If it appears dry, sprinkle 500ml of water on bulking
agent.
Liquid leaking onto oor
• Identify where liquid is coming from - why is it not evaporating or being absorbed.
• Checkuidlevelindicatortubeonsideofunit(#28).
• If liquid is visible in the tube, turn the thermostat up one click and monitor (make sure
bottom heater is working).
• Ensure the vent pipe is well insulated (to prevent condensation in the vent pipe).
Mixing arms are not turning
• The mixing arms moves very slowly and the micro switch will stop them from moving when
you lift the toilet seat lid. To check if the mixing arms are moving:
1. Lift the toilet seat up to activate the seat sensor (this is the magnet in the lid making a
connection). Refer to page 7.
2. Now release move the toilet seat lid away from the unit to release the seat sensor.
• You should see the mixing arms start its rotation. If you don’t, you’ll want to start
troubleshooting:
– Turn on and off. Motor should turn a full revolution.
– Make sure the shear pin hasn’t broken.
– Can you hear the mixer motor?

12
Other manuals for 25e
2
This manual suits for next models
1
Table of contents
Other EcoLet Toilet manuals


Popular Toilet manuals by other brands


Invacare
Invacare H450LA Omega manual

American Standard
American Standard 721AA INSTALLATION INSTRUCTIONS CARE AND MAINTENANCE

Mirabelle
Mirabelle ALLEDONIA MIRAL241WH installation instructions

DURAVIT
DURAVIT SensoWash Slim operating instructions

Rubi
Rubi RKN345BL Installation

Schell
Schell 01 028 28 99 Assembly instructions

Kohler
Kohler K-3323 Homeowner's guide

LAFEME
LAFEME SESTO ST22 instruction manual

BEMIS
BEMIS bioBidet Discovery DLS Replacement instructions

DURAVIT
DURAVIT DuraStyle Dry 2808300000 Mounting instructions

Helvex
Helvex WC MURANO 2P installation guide

Raritan
Raritan Marine Elegance Toilet Installation and maintenance instructions