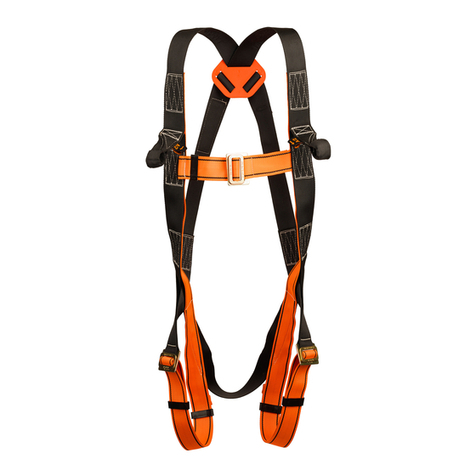
EDELRID Notch Sentinel User manual


A-Side D ring
B-Bridge adjustment strap
C-Bridge strap buckle
D-Rope bridge
E-Bridge ring
F-Bridge anchor plate
G-Elastic waist strap
H-Waist belt strap
I-Waist belt connect buckle
J-Leg strap with connect buckle
K-Leg pad keeper straps
L-Accessory loops (8)
M-Accessory rings (2)
N-Accessory pouch straps (not pictured)
O-Leg Pads
P-Suspender Loop
Q-Chainsaw Snap (not pictured)
P
M
AHGI
D
F
C
B
J
L
N
K
O
EB
J
Q
K

EN Notch™ Sentinel Arborist Harness
FIELD OF APPLICATION:
This product can be part of personal protective equipment for
protection (PPE) for position at the work station, or to prevent
the operator from entering a zone where a fall is possible. The
product should be allocated to one individual.
Attention! Sit harnesses are not suitable for fall arrest
purposes!
Personal protection equipment products may only be used to
belay persons. Do not use the personal protective equipment
for work load.
Work at height is inherently dangerous activity. Understand and
accept the risks involved before participating.
These instructions for use contain important notes, a control
card, and proof of inspection. Before using this product, all
documents must have been read and their content understood.
This document must be provided to the user by the retailer in
the respective country’s language and must be kept with the
equipment while it is in use.
WEARING INSTRUCTIONS:
Thoroughly inspect harness and all components before each
use. Your safety is related to the integrity of your equipment.
•Release and open the elastic waist strap
•Open the waist belt connect buckle
•Open the leg strap connect buckles (if necessary)
•Hold the harness facing forward and step into the harness
•Raise harness into position just above your hip bones
•Secure the elastic waist strap
Note: Elastic waist strap is for support and comfort only.
Caution, do not over tension.
• Ensure the work positioning side D rings are slightly forward
of the hip then close the waist belt connect buckle (using
thumb press in the center of buckle to open/close)
• Pull on the waist belt strap until strap feels snug (Fig 1), fold
excess strap into the waist strap keeper
• Wrap the leg straps around the leg so that the padded
portions of the leg straps are behind the leg and the buckles
are on the side of the leg
•Connect the leg strap buckles (if not connected)
• Adjust the leg strap as necessary so they are snug, but
comfortable
•Fold the excess strap into the elastic leg strap keeper E
Fig. 1

ADJUSTMENT INSTRUCTIONS:
Adjust the fit of your harness so that your body is supported
with weight evenly distributed between the belt and leg straps,
balanced to hang upright and relaxed, without uncomfortable
pinching or pressure. Fit the harness before your first climb
where you can hang.
Choose the correct size:
hipbelt min.
(elastic, not stretched)
hipbelt min.
(webbing)
172 cm 28,35 in 75 cm 29,53 in
292 cm 36,22 in 95 cm 37,40 in
hipbelt max. legloops min.
1100 cm 39,37 in 50 cm 19,69 in
2130 cm 51,18 in 65 cm 25,59 in
BRIDGE STRAP ADJUSTMENT:
• Locate the Bridge strap buckle positioned between the Bridge
anchor plate and the Side D ring
• Using thumb pull back on the tension buckle releasing the
webbing to extend distance (Fig 2), to shorten simply loosen
webbing and work it back through the tension buckle
• Fold the excess strap into the elastic leg strap keeper
Fig 2
• Tightening the adjustment straps will bring the bridge closer
to your body while loosening them will move the bridge away
from your body.

REPLACEMENT OF ROPE BRIDGE:
Replacement rope bridges are supplied separately and include
detailed replacement instructions to be used when replacing
worn bridge. Use only replacement Notch™ bridge
(manufactured from approved arborist climbing rope) supplied
by Notch Equipment. Replace suspension bridge if protective
cover of stitching (shrink tube) is damaged, missing or torn.
TYING THE ROPE BRIDGE STOPPER KNOT:
This stopper knot is recommended by the rope manufacturer
to secure the replacement Notch™ rope bridge. It stops the
rope from passing thought the hole in the bridge anchor plate.
The knots should be hand-tightened to prevent any possibility
of movement/slippage.
Pass the free rope end from the outside to the inside of one
anchor plate, placing the knotted on the outside of the rigging
plate, using the center hole, pass it through the ring, then
through the center hole of the opposite anchor plate, from
inside to outside.
Finish by tying the Double Fisherman's knot on the outside of
the anchor plate with a tail, with minimum of 3 inches in length.
Construct the knot as shown on the right side.
After attaching the replacement rope bridge to the harness,
varify knot stability in a hanging test (user weight) in a non-fall
environment.
80 mm ≈ 3 in
Double Fishermen‘s
knot
Rigging
Plate
Ring
Label
transparent Shrinking
Tube
black Shrinked Label
Stopp Bartack

TRIPLE-LOCK BUCKLE OPERATION:
The Triple-Lock Buckles offer a very high safety standard by providing a three-way closure. To open the buckle, press the top
button releasing the frame and pull back as shown below.
To close the buckle, push frame into the main buckle body and pull back, audible click will be heard confirming secure closure.
Strap length can be adjusting by pulling on the tail end of the webbing. Strap end can be retrieved by pulling up on the end as
shown below.

LEG PAD BUCKLE ADJUSTMENT:
• Open the Leg strap connect buckle by pressing in the center
of the buckle and release the single slot frame from main
buckle
• Adjust the length of the webbing by pulling on webbing in
either direction to move the main buckle frame
• Close buckle and test fit, continue adjustment until leg pads
are snug
•Repeat for opposite side of leg strap
•Fold the excess strap into the elastic leg strap loop keeper
• Proper adjustment of the leg pad straps will ensure the leg
pads will be in the most comfortable position on your legs
REAR LEG STRAP ADJUSTMENT:
• Adjust the length of the elastic webbing by pulling in either
direction through the plastic friction buckle, retain excess
webbing in the strap loop keeper
• Proper adjustment of the rear leg strap will ensure the pads
are in the correct distance below the waist
USING BRIDGE ANCHOR PLATES:
Bridge anchor plates are designed for maximum strength along
their major axis. Anchor plates should be loaded ONLY between
the single slot shaped connector holes and any combination of
the other three round holes. Only use the bridge anchor plates
for tie-in the rope bridge and only use both plates together.
Inspection:
Prior to each use, carefully inspect this equipment for
indications of wear or deterioration. The inspection should
include but not be limited to inspection for:
•tearing, cuts, severe abrasion of the webbing or rope
•burnt, singed, or melted webbing or rope
• faded, discolored from exposure to ultraviolet light, chemical
exposure of webbing or rope
•torn or pulled threads (broken fibers)
• nicks, cracks, distortion or corrosion of hardware (buckle,
rigging plate, D-ring, etc.)
•nonfunctional buckles
•evidence of involvement in dynamic fall
•readability of the marking
•if there are any indications for impact loading
Note: All load bearing bartacks are constructed of contrast
color stitching for easy identification. Replace suspension
bridge if protective cover of stitching (shrink tube) is damaged,
missing or torn.
If any evidence of wear or deterioration as outlined is observed,
immediately cease use, destroy the product and replace with
new equipment. Should any unusual condition conditions not
outlined above be observed, or you have reasonable doubt
about a particular condition, remove the equipment from
service. Failure to carefully and completely inspect your
equipment could result in serious injury or death. Notch
Equipment recommends a detailed inspection by competent
person at least once every 12 months (depending on current
regulations in your country, and your conditions of use). Record
the results on your PPE inspection form: type, model,
manufacturer contact info, serial number or individual number,
dates: manufacture, purchase, first use, next periodic
inspection, problems, comments, Inspector’s name and
signature.

WORK POSITIONING HARNESS EN 358:1999
These attachment points are designed to either hold the user
in position at the work station, or to prevent the operator from
entering a zone where a fall is possible.
Attachment points according EN 358 must only be used to
attach a restraint or work positioning system, maximum fall
height 0.5 m. The connection device for work positioning
harnesses must be kept tight, the tie-in point must
be above or at hip height.
These attachment points are not designed for fall arrest usage.
It may be necessary to supplement work positioning or travel
restraint system with collective or personal fall arrest systems.
A – Side D rings
The two side D rings must always be used together.
EN 358: 1999
SEAT HARNESS EN 813:2008
Nominal maximum load = 140 kg (308 lbs). Designed for pro-
gression on rope and work positioning. Use the attachment
bridge to attach a descender, positioning lanyards, or progres-
sion lanyards.This attachment point is not suitable for fall
arrest.
EN 813: 2008
and
EN 358:1999

LIFESPAN AND REPLACEMENT:
The lifespan of the product will depend on frequency of use and
external conditions. This product is made from synthetic fibre
(polyamide, polyester, aluminium alloy, steel). Part of these
components degrade over time. Seven years is considered the
safe life of nylon climbing equipment when it is stored properly
and never used.
WHEN TO RETIRE THE EQUIPMENT:
A product must be retired when:
•It’s over 10 years old and made of plastic or textiles
•It has been subjected to a major fall (or load)
• It fails to pass inspection. You have any doubt as to its
reliability
•You do not know its full usage history
• When it becomes obsolete due to changes in legislation,
standards, technique, or incompatibility with other equipment
STORAGE:
Store in a clean, cool, dark, place free of acids, alkalis, exhaust
emissions, rust and strong chemicals. Store without
mechanical stress caused by jamming, pressure or tension.
TRANSPORT:
The product must be transported to avoid direct sunlight,
moisture, chemicals, dirt, extreme temperatures and
mechanical damage.
CLEANING:
Clean soiled products in luke warm water (if necessary, use pH
neutral soap). Rinse well. Hang dry at room temperature in well
ventilated area out of direct sunlight, never use a tumble dryer.
If required, halogen-free commercial disinfectants may be
used.
Metal hardware parts (anchor plates, buckles, etc.) should be
cleaned and dried. If necessary, minor sharp edges may be
polished using a fine abrasive cloth before cleaning.
Periodic lubrication of metal hardware using a lightweight
lubricant will maintain smooth operation, wipe off any excess
lubricant with a clean dry cloth.
WARNINGS FOR ROPE BRIDGE:
Rope bridge attached to this harness is designed to be replaced
by the user at regular intervals. Interval will be dictated by the
frequency of use and external working conditions rather than
set time.
Manufacturer does not place a time limit on the replacement
of the rope bridge. Due to the rigorous strain the rope bridge
endures, it should be replaced at the earliest signs of wear.
Bridge should be carefully inspected prior to each use. This
inspection should include but not be limited to: rope cuts, nicks,
tears, kinks, abrasions, burns, excessive swelling, excessive
jacket wear, discoloration, broken, fraying, or unraveling fibers,
loose stitching, chemical or physical exposure. Failure to
regularly inspect and replace the rope bridge could result in
injury or death.
Only use Notch rope bridges where one end is still equiped with
a manufacturer-supplied Double Fisherman's knot and tie the
other end in the same way.
WARNINGS:
• Manufacturer’s instructions shall be provided by the user of
this product. If additional copy is needed, contact Notch
Equipment.
• Completely read, understand, and follow all instructions,
warnings, and cautions pertaining to this particular harness
and all associated equipment before use. Failure to do so
could result in serious injury or death.
•Make sure the markings on the product are legible
• Service (repairs) may only be carried out by the manufacturer
or a center authorized by the manufacturer.

• Notch™ harnesses are manufactured in accordance with EN
358:1999, EN 813:2008, ASTM F887 and are intended for use
as personal protective equipment only comply with the
requirements of ANSI Z133-12.
• This product is designed to be used by a person with a
maximum weight of 308 lbs when fully equipped.
• This harness is not designed to be used with a retro fit Fall
Arrest Harness.
• Notch™ harness is to be used for work positioning and
suspension only, NOT FOR FALL ARREST.
• In any case of fall arrest use a fall arrest system according EN
363. If you use a fall arrest system, it must be ensured that
the necessary free space in the work area beneath the user
(clear height) of 7 m is guaranteed.
• Retire and destroy the harness and all other personal
protective equipment if involved in a fall.
• Retire harness if it’s been seven or more years past the
manufacturing date.
• Only trained and experienced people under guidance and
supervision are allowed to make use of it.
• Users must be aware that poor physical and/or mental health
can jeopardise safety under normal conditions and in
emergencies.
• Prior to first use, the user should carry out a suspension test
in a safe place that the equipment is of the correct size, has
sufficient adjustment and is of an acceptable comfort level
• Before using the equipment, the user must ensure that, in the
event of falling into the personal protection equipment
system, the person caught can be rescued immediately,
safely and effectively. A rescue plan for all work operations is
recommended.
• In case of an emergency, an accident or loss of consciousness
prevent the victim from suspension trauma. Suspension
trauma can cause serious harm to health and death.
• Keep equipment from contacting with sharp edges, abrasive
surfaces, extreme temperatures, excessive ultra violet rays,
chemical agents, moving machinery, and electrical hazards.
Exposure to these elements may compromise the integrity of
the equipment.
• Always visually check that all buckles are properly closed.
• The large loop centered at the rear of the back pad is intended
for connection of harness suspenders only (Fig 4). Harness
suspenders are not safety products. Suspenders are
designed to support only the weight of the saddle and the
equipment it contains, NOT the individual.
Fig 4
10 kg max

• Accessory loops (8), carabiner slots, accessory rings (2) are
attachment points (Fig 4) for equipment ONLY. Do not use for
any life safety attachment, gear loops are not suitable for
anchoring or belaying.
• During use all fastening and adjusting elements must be
regularly checked to ensure proper adjustment and closure.
• Attach only connecting devices meeting standard/
regulations for intended use for positioning and suspension
to belt D rings and bridge anchor plate.
• Only positioning equipment, such as lanyards, should be
attached to D rings, as D rings are not intended for fall arrest
• The equipment should not be modified in any way or altered
to allow attachment of additional parts without the
manufacturer’s written recommendation.
• Make sure the anchor point is correctly positioned in order to
limit the risk and the height of the fall.
• The anchor points for fall arrest forces must be rated for at
least 12 kN, see also EN 795.
• For Connecting to the anchor points only use ppe partial
systems (e. g. connecting elements (karabiners) to EN 362).
• When combining this product with other components, the
safety aspects of the products may interfere with each other.
• If this product is used in combination with other components
of a rescue/fall arrest system, users must acquaint
themselves with the enclosed recommendations, notes and
instructions for these components prior to use and comply
with them.
WARRANTY:
Every Notch™ harness carries a limited lifetime warranty
against defects in materials and workmanship. Notch
Equipment will replace the defective product at no charge and
return it back to the customer.
Coverage terminates if the product is sold or transferred.
RETURNS:
You may return your Notch™ product for any reason. Please call
Notch Equipment at 866-345-2468 to request a Return
Merchandise Authorization (RMA). Mark the package with the
RMA number and follow the instructions on the enclosed return
slip.
Returned products will be inspected within three working days
of receipt and you will be contacted with the results of the
inspection. Depending on our findings, Notch Equipment will
replace your product or refund your purchase price, at our sole
discretion.
No returns will be accepted on items returned after 30 days.
Only authorized replacement parts from Notch Equipment
should be used on this product. The use of unauthorized
replacement parts will void manufacturer’s warranty.
PRODUCT INFORMATION:
Manufacturer: EDELRID
Model: Name of the product
Size: 1 – small, 2 – large;
Product description: Work positioning harness according to
EN 358:1999, sit harness according to EN 813:2008.
Standards indicated in some cases with year of issue;
Users weight: max. 140 kg/ 308 lbs;
Lot number: GV XXX MM YYYY NNN
Nomenclature of the lot number:
XXX – Lot Number
MM – Month of Production
YYYY - Year of production
NNN – Serial Number
MM YYYY: Month and year of manufacturing
Identification: To be entered by the user if appropriate
i-Symbol: Warning notices and instructions must be read and
observed
CE 0123: the authority supervising production of PPE
(TÜV SÜD Product Service GmbH, 80339 Munich, Germany)

A- Anillo Lateral D
B- Correa de Ajuste del Puente
C- Hebilla de Correa de Puente
D- Puente de Cuerda
E- Anillo del Puente
F- Placa de Anclaje del Puente
G- Correa de Cintura Elástica
H- Correa del Cinturón
I- Hebilla de Cinturón de Conexión de la cintura
J- Correa para la Pierna con Hebilla de Conexión
K- Tirantes del Tirador
L- Lazos de Accesorios (8)
M- Anillos Accesorios (2)
N- Correas de la Bolsa de Accesorios (no fotograado)
O- Almohadillas de Pierna
P- Lazos de Suspendedor
Q- Snap de Motosierra (no fotograado)
P
M
AHGI
D
F
C
B
J
L
N
K
O
EB
J
Q
K

ES Notch™ Sentinel Arnes Arborista
CAMPO DE APLICACIÓN:
Este producto puede ser parte del equipo de protección perso-
nal para protección (PPE) para la posición en la estación de
trabajo, o para prevenir el operador entra a una zona donde es
posible una caída. El producto debe ser asignado a un individuo
solamente.
¡Atención! ¡Los arneses de asiento no son adecuados para el
arresto de caídas!
Los productos de equipos de protección personal solo se
pueden usar para aseguramiento de personas. No use el
equipo de protección personal para la carga de trabajo.
Trabajar en altura es una actividad peligrosa. Comprenda y
acepte los riesgos involucrados antes de participar.
Estas instrucciones de uso contienen notas importantes, una
tarjeta de control y prueba de inspección. Antes de usar este
producto, todos los documentos deben haber sido leídos y
entendido su contenido. Este documento debe ser entregado
al usuario por el minorista en el idioma del país respectivo y
debe mantenerse con el equipo mientras está en uso.
INSTRUCCIONES DE USO:
Inspeccione minuciosamente el arnés y todos los componen-
tes antes de utilizar. Su seguridad está relacionada con la inte-
gridad de su equipo.
• Suelta y abre la correa de cintura elástica.
• Abra la hebilla de conexión del cinturón de la cintura.
• Abra la correa de la pierna conecte las hebillas (si es nece-
sario).
• Sostenga el arnés mirando hacia adelante y pise en arnés.
• Levante el arnés en posición justo arriba de su cadera.
• Asegure la correa elástica de la cintura.
Nota: La correa de cintura elástica es solo para soporte y co-
modidad. Precaución, no sobre tensión.
• Asegúrese de que los anillos D del lado de posición de traba-
jo estén un poco hacia adelante de la cadera, luego cierre la
hebilla de conexión del cinturón (usando pulgar presione en
el centro de la hebilla para abrir/cerrar).
• Tire de la correa del cinturón hasta que la correa se sienta
ajustada (Fig 1), pliegue exceso de correa en el tirador de la
correa de la cintura.
• Envuelva las correas de las piernas alrededor de la pierna
para que el acolchado porciones de las tiras de las piernas
están detrás de la pierna y las hebillas están en el lado de la
pierna.
• Conecte las hebillas de la correa de la pierna (si no está co-
nectado).
• Ajuste la correa de la pierna según sea necesario para que
quede ajustada, pero cómodo.
• Dobla la correa sobrante en el sujetador E la correa elástica.
Fig. 1

INSTRUCCIONES DE AJUSTE:
Ajuste el ajuste de su arnés para que su cuerpo sea compatible
con un peso distribuido uniformemente entre la correa y las
correas para las piernas, equilibrado para colgar en posición
vertical y relajado, sin incómodo pellizcos o presión. Ajuste el
arnés antes de su primer ascenso donde puedes colgar.
hipbelt min.
(elastic, not stretched)
hipbelt min.
(webbing)
172 cm 28,35 in 75 cm 29,53 in
292 cm 36,22 in 95 cm 37,40 in
hipbelt max. legloops min.
1100 cm 39,37 in 50 cm 19,69 in
2130 cm 51,18 in 65 cm 25,59 in
AJUSTE DE LA CORREA DEL PUENTE:
• Ubique la hebilla de la correa del puente ubicada entre el
puente placa de anclaje y el anillo lateral D
• Usando el pulgar, tire hacia atrás la hebilla de tensión libe-
rando las correas para extender la distancia (Fig 2), para
acortar simplemente aflojar las correas y trabajar de nuevo
a través de la hebilla de tensión
• Doble la correa sobrante en el sujetador elástico de la correa
Fig 2
• Apretar las correas de ajuste acercará el puente a su cuerpo
mientras los afloja alejará el puente de tu cuerpo.

REEMPLAZO DEL PUENTE DE CUERDA:
Los puentes de cable de repuesto se suministran por separado
e incluyen instrucciones detalladas de reemplazo para ser
usadas cuando se reemplaza puente desgastado. Utilice solo
el puente de reemplazo Notch (fabricado a partir de una cuerda
de escalada de arborista aprobada) suministrado por Notch
Equipment. Reemplace el puente colgante si es protector la
cubierta de la costura (tubo de contracción) está dañada, falta
o está rasgado.
CÓMO ATAR EL NUDO DEL TOPE DEL PUENTE DE LA
CUERDA:
Este nudo de retención es recomendado por el fabricante de la
cuerda para asegurar el puente de cuerda Notch de reemplazo.
Para la cuerda deje pasar prensar el agujero en la placa de
anclaje del puente. Los nudos se deben apretar a mano para
evitar cualquier posibilidad de movimiento/deslizamiento.
Pase la cuerda desde el exterior a el interior de la placa de
anclaje, usando el orificio central, páselo por el anillo, luego a
través del agujero central de lo opuesto placa de anclaje, forma
de adentro hacia afuera. Termina atando a otro nudo en el ex-
terior con la longitud deseada del puente entre las dos placas
después de apretar. Solo use doble nudos de pescador en
ambos lados. Construya el nudo como se muestra abajo:
80 mm ≈ 3 in
Double Fishermen‘s
knot
Rigging
Plate
Ring
Label
transparent Shrinking
Tube
black Shrinked Label
Stopp Bartack
Anillo Placa de Rigging
Nudo Doble de los
Pescadores
Stopp Bartack
Tube de Tranparente
de Encogimiento
Etiqueta Negra
Encogida
Etiqueta

FUNCIONAMIENTO DE LA HEBILLA DE BLOQUEO TRIPLE:
Las hebillas de triple bloqueo ofrecen un estándar de seguridad muy alto al proporcionar un cierre de tres vías. Para abrir la he-
billa, presione la parte superior suelte el marco y tire hacia atrás como se muestra a continuación.
Para cerrar la hebilla, empujar el marco hacia el cuerpo de la hebilla principal y tirar hacia atrás, se escuchará un clic audible que
confirmará el cierre seguro.
La longitud de la correa se puede ajustar tirando del extremo posterior de la correa. El final de la correa se puede recuperar ti-
rando hacia arriba en el extremo como mostrado a continuación.

AJUSTE DE LA HEBILLA DE LA PIERNA DE LA PIERNA:
• Abra la hebilla de conexión de la correa para la pierna pre-
sionando en el centro de la hebilla y suelte el marco de
ranura única de la hebilla.
• Ajuste la longitud de la correa tirando de la correa en cual-
quier dirección para mover el marco de la hebilla principal.
• Cierre la hebilla y ajuste de prueba, continúe el ajuste hasta
que las almohadillas de las piernas
• estén cómodas.
• Repita para el lado opuesto de la correa de la pierna.
• El ajuste adecuado de las correas de la almohadilla de la
pierna asegurará la pierna las almohadillas estarán en la
posición más cómoda en sus piernas.
AJUSTE DE LA CORREA DE PIERNA TRASERA:
• Ajuste la longitud de la cinta elástica tirando de cualquiera
dirección a través de la hebilla de fricción de plástico, retener
el exceso correas en el tirador de correa.
• El ajuste apropiado de la correa trasera para la pierna asegu-
rará que las almohadillas están en la distancia correcta
debajo de la cintura.
USANDO PLACAS DE ANCLA DE PUENTE:
Las placas de anclaje del puente están diseñadas para una
resistencia máxima junto con su axis principal. Las placas de
anclaje deben cargarse SÓLO entre los agujeros del conector
en forma de ranura única y cualquier combinación de los otros
tres agujeros redondos. Solo use las placas de anclaje del
puente para atar el puente de cuerda y solo usar ambas placas
juntas.
Inspección:
Antes de cada uso, inspeccione cuidadosamente este equipo
para indicaciones de desgaste o deterioro. La inspección de-
bería incluir, pero no se limitan a la inspección de:
• rasgado, cortes, abrasión severa de la correa o cuerda
• cinta o cuerda quemada, chamuscada o fundida
• desteñido, decolorado por la exposición a la luz ultravioleta,
sustancia química exposición de cinta o cuerda
• hilos rotos o tirados (fibras rotas)
• mellas, grietas, distorsión o corrosión del hardware (hebilla,
placa de montaje, anillo en D, etc.)
• hebillas no funcionales
• evidencia de participación en caída dinámica
• legibilidad del marcado
• sí hay indicaciones de carga de impacto
Nota: Todos los brazaletes de carga están construidos de con-
traste puntadas de color para una fácil identificación. Reempla-
zar la suspensión del puente si la cubierta protectora de la
costura (tubo de contracción) está dañada, perdido o roto.
Si se observa alguna evidencia de desgaste o deterioro como
se describe, deje de usar inmediatamente, destruya el produc-
to y reemplácelo por nuevo equipo.
Alguna condición inusual no descrita anteriormente, o si tiene
dudas razonables sobre la condición particular, retire el equipo
de servicio. Fallo en inspeccionar cuidadosa y completamente
su equipo podría provocar lesiones graves o la muerte. Equipo
NOTCH recomienda una inspección detallada por parte de una
persona competente al menos una vez cada 12 meses (depen-
diendo de las regulaciones en su país y sus condiciones de
uso). Grabar los resultados en su formulario de inspección de
PPE: tipo, modelo, información de contacto del fabricante,
número de serie o número individual, fechas: fabricación,
compra, primer uso, siguiente periódico inspección, proble-
mas, comentarios, nombre del inspector y firma.

ARNÉS DE POSICIONAMIENTO DEL TRABAJO EN 358:1999
Estos puntos de conexión están diseñados para mantener al
usuario en posición en la estación de trabajo, o para evitar que
el operador sea ingresando a una zona donde es posible una
caída.
Los puntos de fijación según EN 358 solo se deben usar para
coloque un sistema de sujeción o de posicionamiento de tra-
bajo, caída máxima altura 0.5 m. El punto de conexión para el
posicionamiento de trabajo los arneses deben mantenerse
apretados, el punto de anclaje debe estar arriba o a la altura de
la cadera.
Estos puntos de fijación no están diseñados para el uso de
detención de caídas. Puede ser necesario complementar el
posicionamiento laboral o viajar sistema de retención con sis-
temas colectivos o personales de detención de caídas.
A - Anillos laterales D
Los dos anillos D laterales siempre deben ser usados juntos.
EN 358: 1999
ASIENTO ARNÉS EN 813: 2008
Carga máxima nominal = 140 kg (308 lbs). Diseñado para la
progresión en cuerda y posicionamiento de trabajo. Usa el
puente de cuerda para unir un descensor, colocar cordones o
cordones progresión. Este punto de fijación no es adecuado
para arresto fallido.
EN 813: 2008
and
EN 358:1999
VIDA ÚTIL Y REEMPLAZO:
La vida útil del producto dependerá de la frecuencia de uso y
condiciones externas. Este producto está hecho de fibra sinté-
tica (poliamida, poliéster, aleación de aluminio, acero). Parte de
estos componentes se degradan con el tiempo. Siete años se
considera la vida segura del equipo de escalada de nylon
cuando se almacena adecuadamente y nunca usado.
CUANDO RETIRAR EL EQUIPO:
Un producto debe ser retirado cuando:
• Tiene más de 10 años y está hecho de plástico o textiles
• Ha sido sometido a una caída importante (o carga)

• No pasa la inspección. Usted tiene alguna duda sobre su
confiabilidad
• No sabes su historial de uso completo
• Cuando se vuelve obsoleto debido a cambios en la legisla-
ción, estándares, técnica o incompatibilidad con otros equi-
pos
ALMACENAMIENTO:
Almacenar en un lugar limpio, fresco, oscuro, libre de ácidos,
álcalis, gases de escape emisiones, óxido y productos químicos
fuertes. Almacenar sin estrés mecánico causado por atasco,
presión o tensión.
TRANSPORTE:
El producto debe ser transportado para evitar la luz solar direc-
ta, humedad, productos químicos, suciedad, temperaturas ex-
tremas y daños mecánicos.
LIMPIEZA:
Limpie los productos sucios en agua templada (si es necesario,
use pH jabón neutro). Enjuague bien. Cuelgue seco a tempera-
tura ambiente en un área ventilada fuera de la luz solar directa,
nunca use una secadora. Si es necesario, los desinfectantes
comerciales sin halógeno pueden ser usado.
Las partes de hardware de metal (placas de anclaje, hebillas,
etc.) deben limpiado y secado si es necesario, bordes cortan-
tes menores pueden ser pulido con un paño abrasivo fino antes
de limpiar.
Lubricación periódica de hardware de metal con un ligero lubri-
cante mantendrá una operación suave, limpie cualquier exceso
lubricante con un paño limpio y seco.
ADVERTENCIAS PARA EL PUENTE DE CUERDA:
El puente de cuerda unido a este arnés está diseñado para ser
reemplazado por el usuario a intervalos regulares. El intervalo
será dictado por la frecuencia de uso y condiciones de trabajo
externas en lugar de fijar tiempo.
El fabricante no establece un límite de tiempo para el reempla-
zo del puente de cuerda. Debido a la rigurosa tensión del
puente de cuerda perdura, debe reemplazarse en los primeros
signos de desgaste.
El puente debe inspeccionarse cuidadosamente antes de cada
uso. Esta la inspección debe incluir, pero no limitarse a: cortes
de cuerda, desgarros, torceduras, abrasiones, quemaduras,
hinchazón excesiva, excesivo desgaste de la chaqueta, decolo-
ración, fibras rotas, deshilachadas, puntadas sueltas, exposi-
ción química o física. Falta de inspeccionar regularmente y
reemplazar el puente de cuerda podría resultar en lesión o
muerte.
ADVERTENCIAS:
• Las instrucciones del fabricante deben ser provistas por el
usuario de este producto. Si se necesita una copia adicional,
póngase en contacto con Equipo Notch.
• Lea completamente, comprenda y siga todas las instruccio-
nes, advertencias y precauciones relacionadas con este arnés
particular y todo el equipo asociado antes del uso. De no ha-
cerlo podría ocasionar lesiones graves o la muerte.
• Asegúrese de que las marcas en el producto sean legibles
• El servicio (reparaciones) solo puede ser llevado a cabo por
el fabricante o un centro autorizado por el fabricante.
• Los arneses Notch se fabrican de acuerdo con EN 358: 1999,
EN 813: 2008, ASTM F887 y están destinados para su uso como
equipo de protección personal solo cumplen con los requisitos
de ANSI Z133-12.
• Este producto está diseñado para ser utilizado por una persona
con peso máximo de 308 libras cuando está completamente
equipado.
• Este arnés no está diseñado para usarse con un ajuste de Retro
Arrest Arnes.
• El arnés Notch debe usarse para posicionar el trabajo y suspen-
sión solamente, NO PARA DETENCIÓN DE CAÍDA.

• En cualquier caso, de detención de caídas use un sistema de
detención de caídas según EN363. Si usa un sistema de deten-
ción de caídas, se debe garantizar que el espacio libre necesario
en el área de trabajo debajo del usuario (altura libre) de 7 m está
garantizado.
• Retírate y destruye el arnés y todos los demás objetos persona-
les equipo de protección si está involucrado en una caída.
• Retirar el arnés si han pasado siete o más años fecha de fabri-
cación.
• Solo personas capacitadas y con experiencia bajo orientación
y supervisión se les permite hacer uso de él.
• Los usuarios deben ser conscientes de que la salud física y/o
mental es deficiente puede poner en peligro la seguridad en
condiciones normales y en emergencias.
• Antes del primer uso, el usuario debe llevar a cabo una prueba
de suspensión en un lugar seguro que el equipo es del tamaño
correcto, tiene suficiente ajuste y es de un nivel de comodidad
aceptable.
• Antes de usar el equipo, el usuario debe asegurarse de que, en
el evento de caer en el equipo de protección personal sistema,
la persona atrapada puede ser rescatada de inmediato, de
forma segura y efectiva. Un plan de rescate para todas las ope-
raciones de trabajo es recomendado.
• En caso de una emergencia, un accidente o pérdida de conoci-
miento evitar que la víctima sufra trauma por suspensión. Sus-
pensión el trauma puede causar daños graves a la salud y la
muerte.
• Evite que el equipo entre en contacto con bordes filosos, abra-
sivos superficies, temperaturas extremas, excesivos rayos ultra-
violeta, agentes químicos, maquinaria en movimiento y riesgos
eléctricos. La exposición a estos elementos puede comprome-
ter la integridad del equipamiento.
• Siempre verifique visualmente que todas las hebillas estén ce-
rradas correctamente.
• El gran lazo centrado en la parte trasera de la almohadilla trase-
ra está destinado para la conexión de los tirantes del arnés
solamente (Fig 4). Aprovechar tirantes no son productos de
seguridad. Tirantes son diseñado para soportar solo el peso del
sillín y el equipo que contiene, NO el individuo.
Fig 4
10 kg max
• Lazos de accesorios (8), ranuras para mosquetones, anillos
accesorios (2) son Puntos de fijación (Fig. 4) ÚNICAMENTE
para equipos. No usar para cualquier accesorio de seguridad
de vida, los bucles de engranaje no son adecuados para an-
claje o aseguramiento.
• Durante el uso, todos los elementos de sujeción y ajuste
deben ser revisado regularmente para asegurar el ajuste y el
cierre adecuados.
Table of contents
Languages:
Other EDELRID Security Sensor manuals
Popular Security Sensor manuals by other brands

Innotech
Innotech AIO-GLEIT-12 instruction manual
Siemens
Siemens SIRIUS 3RK3 System manual
Heitronic
Heitronic 37356 Installation and operating instructions
LEGRAND
LEGRAND CP Electronics MWS3A-AT-AD installation guide
ATS
ATS BULLSEYE user manual
Powerfix Profi
Powerfix Profi IAN 40111 Operation and safety notes
