EG 750FX FAT User manual

1
ELECTRIC BICYCLE OWNER’S MANUAL
For Owners of EG Venice 750FX FAT Folding Electric Bicycle
Table of Contents
Descriptions: Page
Installation Instructions 2
How to Install/Unfold the bicycle out of the box 2
How to Fold the Bicycle 3
Operation Instructions 4
How to operate the Electric Bicycle 4
About the Brake Safety Feature on all EG Electric Bikes 5
How to operate the Display Unit 5
How to read the Battery Meters and about the Li-on Battery 6
Care Instructions 7
Battery 7
Storage, Maintenance and Transport 7
Battery 7
Charger 8
Charger 8
Accessories 8
Electric Motor and Battery Features 9
Charging the Battery 9
Repair and Service 9
Inspection of the Bearings and Maintenance 10
Serial Numbers to your EG Electric Bike 10
How to detach the rear wheel of the Electric bike 10

2
INSTALLATION INSTRUCTIONS
How to Install/Unfold the bicycle out of the box
! WARNING: DO NOT ride this bicycle without first installing the Battery. The Battery for
this bicycle is a structural component of the EG Venice 750FX. Riding without the battery
can cause the frame to collapse and cause loss of control and injury to the rider.
! WARNING: DO NOT use this bicycle off-road or Off Pavement. This bicycle is
structurally designed only for on Pavement use. Off-road use can cause structural
integrity issues to the bicycle’s frame and can cause injury to the rider.
! WARNING: Always wear a helmet when riding this bicycle.
Your folding bicycle is 95% installed. All you need to do is unfold, align the handlebar
stem of the bike and Unfold the pedals. ALL of which are secured using quick releases.
To begin, unpack the bicycle from the box and cut all the ties that held the bicycle
together during shipping.
Unfold the Handlebar stem (where the handlebar fits into) section of the bike. Then, bring
the quick release over to the top portion of the bike and secure the lever.
! WARNING: the seat post tube must be firmly secured before riding the bike.
Install the saddle and the handle bar for the bicycle. Both the saddle and the handle bar
can be installed by tightening and locking in their respective quick releases.
Unfold the pedals by gently lifting them horizontally and they will lock into place.

3
To install the Main Li-on battery on your bike, insert the
battery key at the side of the frame and place it into the
Unlock position. (Picture) While holding the key in unlock
position, insert the bottom portion of the battery onto the
frame and then gently place the battery into it’s place in the
frame. Push the battery all the way in and the lock the
battery in place with the key. Ensure your battery is locked in
place before removing the key.
To turn on the electrical system on your Venice 750FX,
simply press on the power button on the handlebar controller
once you have inserted the battery
A front and rear LED lamp is installed on your EG Vienna folding bicycle. To run this
lamp, simply click hold the “+” button for 2 seconds on the handlebar controller to turn it
on. The main battery must be installed to run the LED Lamps on this bike.
How to Fold the Bicycle
First make sure your saddle and the handle bars are lowered.
To fold the handlebar stem, slide the safety switch UP and then Pull on the quick release
lever downward to release the stem. (Pictured below)
! WARNING: if your pedals don’t fold easily do not force them to do so, or you will risk
breaking the pedals.
Next fold, the pedals, by gently squeeze the pedal’s spring loaded lock in the pedals and
they will effortlessly fold into their natural folded position. (Pictured below)
To fold the frame of the bike, Slide the safety switch forward then pull the lever outward to
release the frame. Next, bend the frame to fold it. (Pictured below)
Handlebar Folding Frame Folding Lever
Stem Lever Pedals

4
OPERATION INSTRUCTIONS
How to operate the Electric Bicycle
The Electric bicycle can be operated in 3 different modes: Manual, Pedal Assist and Throttle
Modes
Manual Mode –
1. To use your bike in full Manual mode, simply make sure the Display on the bike is “OFF”
and then, pedal the bicycle normally as you would any bicycle. Your motor is geared such
that forward motion is never hampered by the motor
2. Pedal Assist (PAS) Level 1 – 5
•To use your bike in Pedal assist levels 1 thru 5, simply turn on the battery power to the
electric bike by turning the key clockwise to the “ON” position.
•Press “Power/M” button on the pad located to the left of the handlebar to turn “ON” the
system. Pedal the bicycle normally as you would any bicycle.
•The motor will stop if the brake lever is depressed even if you are still peddling the
bicycle.
•The motor will stop when you stop peddling in this mode.
•When the system is first switched “ON” it will default to start in the “PAS Level 1”.
•You can adjust the desired speed and power usage by pressing “+” or “-” buttons to the
desired PAS level and operate your E-Bike as you normally would any bicycle.
•In “PAS Level 1”, the system will provide you with the most “miles per charge” of battery
power use among the PAS modes and the slowest speed among the PAS levels.
•In “PAS Level 5”, the system will provide you the lowest “miles per charge” of battery
power use among the PAS modes and the highest speed available among the PAS
levels.
2b.Pedal Assist (PAS) and Throttle on demand (PAS Level 0)–
•To put your bike in NO Pedal assist and “Throttle on demand” mode only, switch “ON” the
bike’s electrical system by pressing the “Power/M” button on the Pad located to the left of
the handlebar and then press “-” button on the pad until “0” appears on the LCD screen.
Pedal the bicycle normally as you would any bicycle.
•In this mode, the motor will only function with the use of the throttle.
•In this mode level, the PAS function has been turned off.
•! CAUTION: This mode can still achieve a speed of 20 MPH. User discretion is advised
•The motor will stop if the brake lever is depressed even if you are have the throttle
depressed/engaged.
•This mode will give you a Moderate to low “miles per charge” of battery power use among
the pedal assist modes, depending on your throttle use.
•Holding down the throttle in this mode is essentially the same as placing your bike in PAS
Level 5 and running the motor.
•To switch back to pedal assist modes, press the “+” button until you reach the desired
PAS level.
3. Throttle Mode –
•To ride the bike fully on “Electric Mode”, switch “ON” the bike by pressing the “Power/M”

5
button on the Pad located to the left of the handlebar.
•Place the PAS on any level you desire, because while the thumb throttle is engaged, the
PAS mode is not active and has no effect on the speed or power of the electric motor.
•Depress the thumb throttle in any increments of power you desire to power the motor of
the bicycle and it will take off as demanded.
•This mode can be used in conjunction with any of the above modes as the amount of
motor power supplied while twisting the thumb throttle overrides all PAS modes the
system is set to.
•You can engage this mode whenever you want as long as the system is turned “ON”.
•While peddling will lighten the motor load and assist lower the demand on the electric
motor, you do not need to pedal in this mode of operation.
•! CAUTION: This mode is designed to achieve a speed of 20 MPH. User discretion is
advised
•The motor will NOT stop when you stop peddling while the thumb throttle is engaged.
•The motor will stop if the brake lever is depressed even if the thumb throttle is engaged.
•! CAUTION: Remember to let go of the thumb throttle when getting on or off the bike
weather or not the brake levers are engaged.
•In this mode, the electric bike will use the most amount of battery power it will use the
most amount of battery power compared to any PAS modes on this bike.
•This mode will give you the least “miles per charge” compared to any of the above modes
of operation
•To assist the motor from a dead stop in this mode, it is suggested to gear down to lower
gears before stopping your bike.
About the Brake Safety Feature on all EG Electric Bikes
•ALL our electric bikes make use of a wired brake lever kill switch for safety purposes.
When the brake lever is engaged, it sends a kill signal to the controller to disable the
motor under all circumstances and condition. This will ensure the motor does not
continue to spin when you need the bicycle to stop.
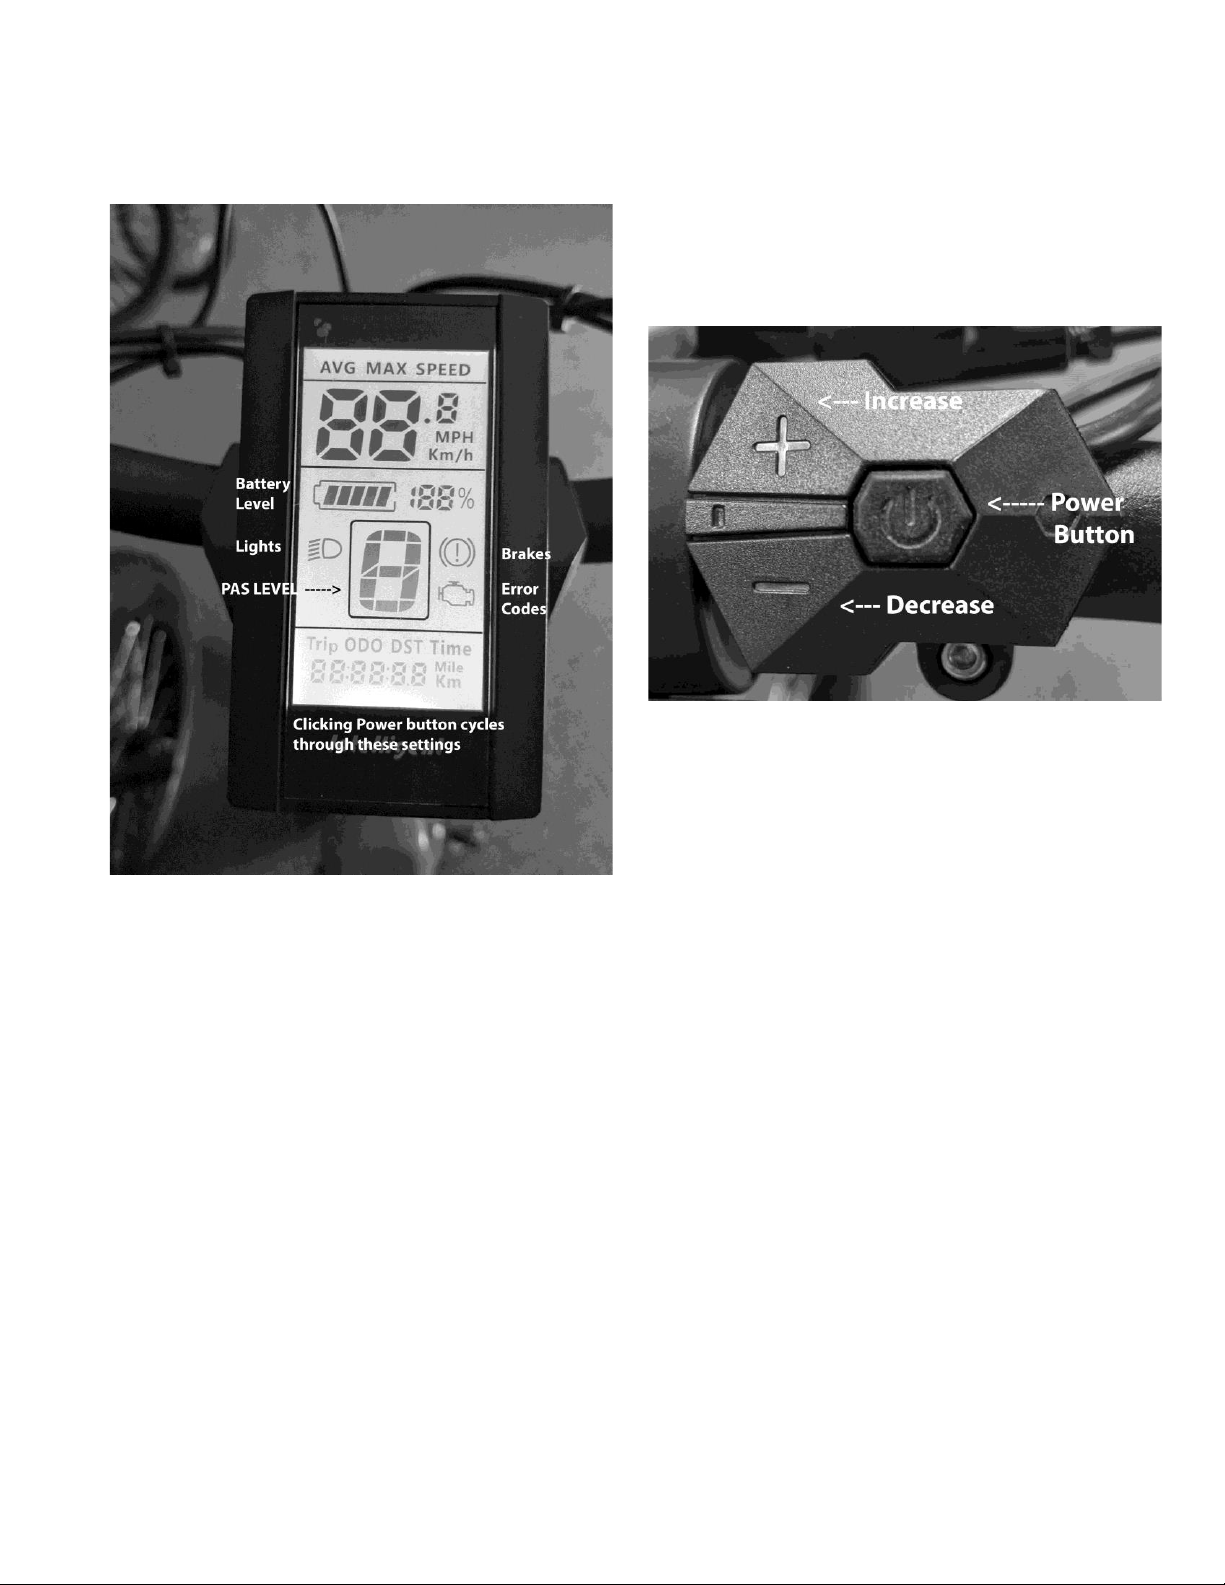
How to Operate the Display Unit
•Pressing “Power” button turns ON the electrical system to your bike.
•Pressing and releasing (clicking) “Power” button once the system is ON toggle between
Odo = Odometer, Trip = Tripmeter, Max = Max speed, AVG = Average Speed and Time =
Total time
•Pressing and holding “Power” button for 3 seconds will turn OFF the system
•Pressing “+” or “-” adjusts the PAS mode to the desired levels as indicated to the right of
the display.
•Pressing and holding “+” button for 3 seconds Turns the LED Lamp On/Off
•Pressing and holding “-” button will engage the walk assist. The motor will keep turning
as long as the button is held down.
•Depressing the brake levers on your bike will engage brake lights. This bike features a
dual stage rear LED lamp that allows the brake light to come on brighter when the LED
lamps are turned on as you engage the Brake levers.
•To reset the Trip meter, Max & Average Speed, Press and hold “+” and “-“ simultaneously

6
for 3 seconds, choose “y” by using either “+” or “-“ button and then exit the system by
clicking the “Power” button to exit back to regular menu.
Handlebar Controller
Display Unit
How to read the Battery Meters and about the Li-on battery
There are 2 Battery meters on your bike. The 1st meter is located conveniently on the LCD
screen on the handle bar. The 5 battery segments on the display represents the state of
discharge of your battery. The 2nd meter is located on top of your battery visible only when the
battery is off the bike. The 4 LEDs shows the current capacity of the battery in various states of
discharge when it is away from the bike.
As with any Lithium-ion batteries, there are a limited number of times a battery can be charged.
While priming Lithium-ion batteries are not necessary (which means it may be charged
whenever you want without affecting its charge capacity), the number of times it is charged and
how long it’s kept charging will affect the overall longevity and life of your battery.
To conserve battery power, switch off the electrical system by pressing the “Power” button on
the meter on the left of the handlebar, when the electric power is not needed.
! NOTE: You can remove the keys from the bike after locking the battery onto the Frame. You
will NOT need the key to operate the electrical system of this bicycle.

7
! WARNING: Please keep your keys to your electric bicycle in a safe place. Each set of keys are
unique to your particular electric bicycle and unfortunately we do not keep a copy of your keys
on file. Nor do we reproduce them at EG Bike.
CARE INSTRUCTIONS
Battery
!WARNING:
•Never short circuit the charge or discharge battery terminals.
•Never charge the battery by the discharge terminals or discharge the battery by the
charge terminals.
•Keep the battery away from excessive heat and or open flames.
•Never pour on or submerge the battery in water.
•To avoid damage to the battery, never subject the battery to intense physical impact,
shock or severe vibration.
•Protect the battery from water or moisture at all times.
•Protect the discharge and charge terminals of the battery from rain or water logging.
•Keep the battery away from children.
•When the battery is not in use for an extended period of time, remove the battery from
the battery holder for storage.
•Never disassemble the battery. The battery does not contain serviceable parts.
•Do not sit on or place any object on or over the battery.
•Use only the supplied charger to charge the battery.
•Do not keep the battery charging for more than 24hrs each time it is charged, as this will
damage battery chemistry and shorten your battery life.
Battery capacity: 14Ah
Battery and Motor Voltage: 48v
Charge temperature range 0~45℃
Discharge temperature range –20~55℃
Total Charge time from total discharge: 6-8 hours
- Please make sure you fully charge your battery (Charger LED turns green) the first 3x you
charge your battery.
If you have any questions about this battery or its usage, please do not hesitate to contact us
Storage, Maintenance and transport
Battery
•If the battery needs to be stored for an extended period of time, it should be kept at
around >50% charge capacity (or charge the battery for at least 2-3hours from empty)
and should be placed in a dry and well ventilated place.
•To maintain battery life expectancy, the battery needs to be charged at least once for 2-3
hours every two months, even if you have not used the battery during that time.

8
•The battery and charger should be kept in storage in a clean, dry and well ventilated
place. Avoid contact with corrosive substances and keep the battery away from excessive
heat and or open flames.
•Should the battery need to be transported, pack it in a box, and ensure that it is always
protected from intense physical impact, shock, severe vibrations, direct sunlight, or water
logging or Short circuits. The battery may be transported in a vehicle such as an
automobile, train, ship, airplane and etc. Please check your local rules and regulations
regarding such transportation.
Battery Storage conditions: Room temperature -20~35℃,
Battery Storage relative humidity: 5~65%RH
Charger
•The charger should be disconnected from the battery when it is kept in storage.
•Should the charger need to be transported, pack it into a box and ensure that it is always
protected from intense physical shock, severe vibrations, impact, direct sunlight, or water
logging. The battery may be transported in a vehicle such as an automobile, train, ship,
airplane and etc. Please check your local rules and regulations regarding such
transportation.
Charger Storage conditions: Room temperature -20 ~ 35℃,
Charger relative humidity: 5~65%RH
Charger
!WARNING:
•Never place any object on the charger.
•Never pour any liquid on or insert any metal into the charger.
•Never disassemble or modify the charger in anyway.
•Never plug or un-plug the charger with a wet hand
•Do not use the charger during a lightning storm.
•Use only the supplied charger to re-charge the battery.
•Do not operate the charger in an unstable, dusty or an excessively damp environment.
•Avoid using the charger under direct sunlight.
•Operate the charger in a well ventilation environment.
•Unplug the charger from the wall outlet when not in use.
Accessories
!WARNING :
•Ensure that your assembled accessory does not interfere with the steering, braking or the
natural movement of the bicycle.

9
Electric Motor and Battery Features
High efficiency and power saving Electric Motor–
•A Brushless Motor with gears
•High efficiency of up to 85%.
•Efficiency>80%. 48v battery for a continuous run range of more than 40 miles on a single
charge in pedal assist mode.
•Produces a continuous and sustained power of 750 Watt power with a peak of up to 1500
Watts.
High power and high torque –
•Fast pick up even under heavy load. Easily climb and ascend steep inclines.
•Low power consumption, Long-battery life and a Compact design.
•The 48 volt Battery pack weighs 12 Lbs.
Trouble-free, Low maintenance, Long life span and Easy to maintain electric motor –
•High Quality Brushless Electric Disc motor with an advance cadence sensor and gears.
•Closed system motor requires only surface cleaning and dry storage.
Charging the Battery
•Connect the Charger to the wall outlet first before connecting the Charger to the Battery.
•Ensure the Charger is firmly plugged into the Wall outlet.
•Ensure the Charger output terminal and the Battery input terminal are firmly mated to
each other.
•When the charger is plugged into a wall outlet, the charger LED indicator will turn solid
RED to indicate that the battery is charging.
•The Charger LED indicator will turn GREEN when the battery is fully charged.
•Disconnect the charger from the wall outlet before disconnecting the charger from the
battery.
•To ensure long battery life, fully charge the battery for at least twelve (12) hours during
the first initial three charges and fully charge the battery at least once every 2 months
•! NOTE: Only charge the battery pack using the supplied charger.
•! NOTE: Always plug the charger onto the Battery pack before plugging the charger to the
wall socket.
•! WARNING: Do NOT leave the charger plugged into the wall out let charging the battery
for more than 24hrs at a time for risk of damaging the battery.
Repair and Service
!WARNING:
•Inspect the bicycle frequently. Failure to inspect the bicycle and to make repairs or
adjustments, as necessary, can result in injury to the rider or to others. Make sure all
parts are correctly assembled and adjusted as written in the owner’s manual.
•Immediately replace any damaged, missing, or worn parts.
•Make sure all fasteners are correctly tightened as written in the owner’s manual
•Parts that are not properly tightened can be lost or operate poorly.
•Do not over tighten parts, as over-tightening may damage the part.

10
•Make sure any replacement fasteners are of the correct type and size.
•Your bike uses an Aluminum Alloy frame. Ensure that the bicycle frame is carefully and
frequently inspected; as Aluminum frames can develop micro fractures from stress,
severe impact and shocks. If you see these micro fractures or cracks, stop riding the
bicycle immediately.
•In case of micro fractures, have the bicycle frame repaired and inspected by a qualified
professional before riding the bicycle again.
NOTE: Have a bicycle service shop make any repairs or adjustments for which you do not have
the correct tools to or if you do not sufficiently understand the instructions set forth in this electric
bicycle’s manual supplement or the bicycle owner’s manual.
Inspection of the Bearings Maintenance
1. Frequently check the bearings of the bicycle. Have a bicycle service shop lubricate the
bearing once a year or any time they do not pass the tests as noted in the Bicycle
owner’s manual.
Serial Numbers to your EG Electric Bike
There are 3 serial numbers that are of importance on your EG Electric Bike. They are the
Frame serial number, the Motor serial number and the Battery pack serial number. All the
serial numbers except for the battery's can be found on the outside of the box the bicycle
was shipped in.
The Bike Frame Serial number to your EG Electric Bike is located on bottom bracket tube
of the bike (where the pedal crank attaches to the bike) on the frame of the bike.
The Motor serial number is located on the side of the motor.
The Battery serial number is located near the output posts of the Battery pack.
How to detach the rear wheel of the Electric bike
1. ! WARNING: We do not condone modifying the EG Electric Bicycle in any way shape or
form. Modifying the bike in any way, will void your Warranty. The instructions below are
written only for the maintenance or repair of the bike.
2. To detach the rear wheel, first unhook the connector near the rear wheel.
3. Unscrew the nuts on both sides of the rear axle and the wheel should come right off.
4. Unhook the chains from the rear freewheel (cogs)
5. To install it back on, please note and reverse all the detachment instructions.
Table of contents
Other EG Bicycle manuals